background image

4


3.4 Running-In   

19


3.5 Altitude 


19

4. ENGINE FLUIDS .......................................................................................... 20
 

4.1 Fuel Specification 


2

0


4.1.1 Low Temperature Fuels


20


4.2 Lubricating Oil Specification 


2

1


4.3 Coolant Specification   

2

2

5. ROUTINE MAINTENANCE .......................................................................... 23
 

5.1 Maintenance Schedule  

23


5.2 Draining the Cooling System 


24


5.3 Checking the Drive Belts 


25


5.3.1 Adjusting the Belt Tension 


25


5.4 Cleaning the Fuel Lift Pump 


26


5.5 Checking the Fuel Pre-Filter 


27


5.6 Renewing the Fuel Filter Element 


2

7


5.6.1 Renewing a Separate Type Fuel Filter Element


27


5.6.2 Renewing a Canister Type Fuel Filter Element


28


5.6.3 Renewing a Quick Release 


         Canister Type Fuel Filter Element 


28


5.7 Renewing a Fuel Injector 


3

0


5.8 Eliminating Air from the Fuel System 


31


5.8.1 Standard Method 


31


5.8.2 Method Using In-Line PB Type Injection Pump   

33


5.9 Changing the Lubricating Oil 


34


5.10 Replacing the Oil Filter Canister 


34


5.11 Cleaning the Breather system   

35


5.12 Servicing the Air Cleaner 


36


5.12.1 Air Filter   


37


5.12.2 Restriction Indicator  

38

Содержание GW3

Страница 1: ...GW3 GWT3 GW4 GWT4 GWT6 1A GWT6 2A GWTA6 ENGINEs Operators Handbook ORIGINAL INSTRUCTIONS P027 08199 GAMMA SERIES ...

Страница 2: ... the assistance of users and is based upon results obtained from tests carried out at the place of manufacture This Company does not guarantee that the same results will be obtained elsewhere under different conditions Parts that have not been approved by the Lister Petter Power Systems organisation cannot be relied upon for correct material dimensions or finish The Company cannot therefore be hel...

Страница 3: ...th Batteries 12 Battery Charge Alternator 12 1 7 Care with Electrical Systems 13 Wiring Cables 13 1 8 Lifting Precautions 13 1 9 Care with Filters and Elements 14 1 10 Waste Disposal 14 2 Engine Parts and Technical Data 15 2 1 Front and Left Side 15 2 2 Rear and Right Side 15 3 Operating instructions 17 3 1 Starting the Engine 17 3 1 1 Starting a Warm Engine 17 3 1 2 Starting a Cold Engine without...

Страница 4: ...uel Pre Filter 27 5 6 Renewing the Fuel Filter Element 27 5 6 1 Renewing a Separate Type Fuel Filter Element 27 5 6 2 Renewing a Canister Type Fuel Filter Element 28 5 6 3 Renewing a Quick Release Canister Type Fuel Filter Element 28 5 7 Renewing a Fuel Injector 30 5 8 Eliminating Air from the Fuel System 31 5 8 1 Standard Method 31 5 8 2 Method Using In Line PB Type Injection Pump 33 5 9 Changing...

Страница 5: ... 1 Preparing the Engine for Storage 43 7 2 Returning the Engine to Service 43 8 Maintenance Record 44 8 1 Routine Maintenance 44 8 2 Non Routine Maintenance 48 9 Warranty 52 9 1 Standard Warranty Cover 52 9 2 Conditions of Warranty 52 9 3 Limitations of Warranty 53 9 4 Repairs under Warranty 53 9 4 1 Contact Details 53 Appendix Fuel Pumps and Governors 54 PB Pump 54 Adjustment and Use of the PB Pu...

Страница 6: ...er Petter Power Systems distributor can assist in this matter and will also supply the genuine Lister Petter Power Systems parts needed for your engine To ensure that you use the correct information for your specific engine type refer to the section below Engine Identification In this handbook the different engine types are indicated by code letters The meanings of these codes are as indicated bel...

Страница 7: ... Before lifting the engine read 1 8 Lifting Precautions Care of Your Engine Your engine must receive the correct routine maintenance as described in section 5 If faults do occur they can usually be diagnosed and corrected using the information in section 6 In case of queries about your engine or its installation contact your Lister Petter Power Systems distributor Your distributor can undertake re...

Страница 8: ...CAN CAUSE SEVERE BURNS ENTANGLEMENT WITH ROTATING EQUIPMENT CAN CAUSE SERIOUS INJURY OR DEATH Tie long hair back securely Wear close fitting clothing Do not wear a necktie scarf loose clothing or necklace when working close to a running engine Where possible remove rings and other jewellery to prevent entanglement in moving parts These items could also cause a short circuit if any part of the elect...

Страница 9: ...running Tie long hair close to your head Do not wear loose clothing or jewellery WARNING KEEP CLEAR OF ALL ROTATING PARTS DO NOT WEAR A NECKTIE A SCARF LOOSE CLOTHING OR A NECKLACE WHEN WORKING CLOSE TO A RUNNING ENGINE ENTANGLEMENT WITH ROTATING PARTS COULD CAUSE SERIOUS INJURY OR DEATH Remove rings and other jewellery if working on any part of the electrical system to avoid causing a short circu...

Страница 10: ... guards in position Never attempt to change the specification of the engine as this could affect its safe operation and put the operator at risk Never work under any plant that is only held by overhead lifting equipment Check that the brakes are in good condition before moving mobile equipment While the engine is running never attempt to clean it add fuel or lubricating oil or adjust it in any way...

Страница 11: ...ys switch off the engine before adding fuel Never smoke when you are filling the tank with fuel Do not handle fuel near to heaters or other sources of ignition Do not overfill the fuel tank Clean up any spillages WARNING Material that has been contaminated by diesel must be kept away from all sources of ignition and safely disposed of Never attempt to adjust the fuel system while the engine is run...

Страница 12: ...trical system Keep the top of the battery well ventilated during charging Do not attempt to charge a frozen battery it may explode Instead warm the battery to 16 C 60 F Switch off the battery charger before connecting or disconnecting the charger leads The negative earth battery lead must be disconnected first and reconnected last Never use a damaged battery Battery Charge Alternator The following...

Страница 13: ...ufficient size to carry the currents required Check that the engine mounted alternator is of sufficient output to cope with the total electrical load required by the machine to which it is fitted Wiring Cables Ensure that wiring cables are Bound together in a loom and adequately supported Routed to avoid any hot surfaces particularly the exhaust system Not in contact with any rough surfaces or sha...

Страница 14: ...NT 1 9 Care with Filters and Elements The combustion material of some components of the engine for example certain seals can become extremely dangerous if burned Never allow burnt material to come into contact with the skin or eyes WARNING The materials used in the manufacture and treatment of some filters and elements may cause irritation or discomfort If they come into contact with the eyes or m...

Страница 15: ...icating oil cooler 4 Fuel injection pump 5 Lubricating oil dipstick 6 Lubricating oil filter 7 Drain plug for lubricating oil 8 Crankshaft pulley 9 Drive belt 10 Water pump 11 Fan 12 Water outlet 13 Front lift bracket 14 Injector 2 2 Rear and Right Side 15 Turbocharger 16 Exhaust manifold 17 Radiator 18 Alternator 19 Bracket 20 Lubricating oil sump 21 Starter motor 22 Flywheel housing 23 Flywheel ...

Страница 16: ...on System Bore nominal 100 mm 3 94 in Stroke 127 mm 5 in Compression Ratio GW3 GW4 16 5 1 GWT3 GWT4 GWT6 GWTA6 17 5 1 Cubic Capacity 3 cylinder engines 2 99 litres 183 in3 4 cylinder engines 3 99 litres 243 in3 6 cylinder engines 5 99 litres 365 in3 Firing Order 3 cylinder 1 2 3 4 cylinder 1 3 4 2 6 cylinder 1 5 3 6 2 4 Valve Clearance Inlet 0 20 mm 0 008 in Exhaust 0 45 mm 0 018 in Lubricating Oi...

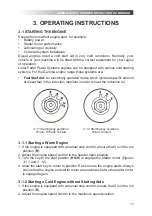
Страница 17: ...ifold in order to heat the induction air 3 Operating instructions 3 1 1 Starting key positions R run H heat S start 3 1 2 Starting key positions R run S start 3 1 1 Starting a Warm Engine 1 If the engine is equipped with a manual stop control ensure that it is in the run position R 2 Adjust the engine speed control to the quarter open position 3 Turn the key to the start position HS S to engage th...

Страница 18: ...o get an even idle speed 5 lf the engine does not start in 15 seconds turn the start key to the H position and hold it there for 10 seconds then engage the starting motor again CAUTION A short circuit or reversal of polarity will ruin diodes and transistors 3 2 Stopping the Engine According to the equipment fitted either turn the start key to position 0 or operate the manual stop control If a manu...

Страница 19: ...is put into service CAUTION Do not operate the engine at high speeds without load CAUTION Do not overload the engine 3 5 Altitude If the naturally aspirated engine is to run at an altitude above 600 m 2000 ft the fuel delivery can be changed to reduce fuel consumption and smoke Lister Petter Power Systems can give the percentage of fuel reduction necessary if details of engine application and ambi...

Страница 20: ...iven limits Density A low density fuel reduces engine power A high density fuel increases engine power and exhaust emissions Sulphur A high sulphur content not normally found in Europe North America or Australasia can cause engine wear Where only high sulphur fuels are available it is necessary to use highly alkaline lubricating oil or to renew the lubricating oil more frequently see sections 5 1 ...

Страница 21: ...d Note 1 Engines in Heavy Duty Applications Earthmoving Equipment Turbocharged Note 1 Not recommended during the first 40 hours of operation nor for light load applications Always ensure that the correct viscosity grade of lubricating oil is used for the ambient temperature range in which the engine will run as shown in Figure 4 2 For advice on adjustments to an engine setting or to the lubricatin...

Страница 22: ...Power Systems antifreeze exceeds the requirements of this standard The quality of antifreeze coolant must be checked at least once a year for example at the beginning of the cold period The coolant must be renewed every two years The antifreeze mixture must contain equal quantities of antifreeze and water Concentrations of more than 50 antifreeze must not be used as this can affect the performance...

Страница 23: ...ck for water in the fuel pre filter 1 Check the idle speed and adjust if necessary 2 Clean the sediment chamber and the strainer of the fuel lift pump Renew the fuel filter element s Check the atomisers 2 Check the amount of lubricating oil in the sump Check the lubricating oil pressure at thegauge 1 Renew the engine lubricating oil 3 4 Renew the canister s of the lubricating oil filter 3 Clean the a...

Страница 24: ...he cooling system drain plug GAMMA SERIES ENGINES OPERATORS HANDBOOK whichever limit is reached first The intervals apply only to engines operating under normal conditions and using fuel and lubricating oil that conform to the specifications given in this handbook If the engine is running in dusty or otherwise adverse conditions the maintenance intervals must be more frequent Check also the maintena...

Страница 25: ...nsion is below 220N 50 Ibf or 22 kgf adj st to 355N as indicated below 5 3 Using the belt tensioner gauge If a gauge is not available press down the belt with a thumb at the centre of the longest free length and check the deflection Figure 5 3 With moderate thumb pressure 45N 10 Ibf or 4 5 kgf the correct deflection is 10mm 3 8in If twin belts are fitted check and if necessary adjust the tension on t...

Страница 26: ... Check the belt tension again to ensure that it is st ill correct If a new belt is fitted the belt tension must be checked again 5 4 Cleaning the Fuel Lift Pump Refer to Figure 5 4 1 Remove t he fuel lift pump and place into clean fuel 21 renew a belt if it is worn or ed belts are fitted they must be d together ure maximum belt life it is mended that a belt tensioner is used to check the belt Fit t...

Страница 27: ...This will normally be fitted between the fuel tank and the engine and is connected to the main filter but before the fuel lift pump Both elements must be removed at the same time Check the fuel bowl for water at regular intervals and drain as necessary 5 6 RENEWING THE FUEL FILTER ELEMENT There are three fuel filter element types in use see Figure 5 6 1 Separate Type The filter element is held between...

Страница 28: ...crew which is fitted through the filter head above the centre of each element 3 Lower the bottom cover of the filter 4 Remove the element and discard it 5 Clean the inside surfaces of the fitter head and cover 6 Renew the seals and lightly lubricate them with clean fuel 7 Put the bottom cover under the new element and hold the element square to the fitter head Ensure the element is fitted in the c...

Страница 29: ...e fuel assembly If a drain tap is fitted e bottom of the filter bowl drain uel from the filter the bottom cover of the filter ent and release the setscrew h is fitted through the filter head e the centre of each element r the bottom cover of the filter ove the element and discard it n the inside surfaces of the fitter and cover w the seals and lightly lubricate with clean fuel he bottom cover under the ne...

Страница 30: ...nge se and remove the flange the and the seat washer Figu numbers 1 2 and 3 Rem dust seal and spacer 4 and fit the spacer and a new dus the injector 4 Put the new injector in posit its spacer a new dust sea new seat washer Ensure leak off connection is not tow engine Fit the flange and eng flange setscrews Ensure the is not tilted and tighten the setscrews evenly and grad 12Nm 9 lbt ft or 1 2 kgfm CAU...

Страница 31: ...A part of the low pressure fuel system leaks during engine operation To eliminate air from the fuel system use one of the following procedures depending on the fuel system vent set up on your engine 5 8 1 Standard Method Refer to Figure 5 8 1 1 Loosen the vent plug on top of the twin element fuel filter or if there is only one fuel filter element the banjo bolt which is fitted on the top of the fi...

Страница 32: ...e disconnected or damaged broken Apart of the low pressure fuel system whichisfittedonthetopofthefitter 1 2 Operate the priming lever on the fuel lift pump until air free fuel flows from the filter venting point 2 Tighten the vent plug of the banjo connection bolt If the drive cam of the fuel lift pump is 1 2 3 4 1 The banjo bolt on top of the fuel filter 2 Operating the priming lever on the fuel lift ...

Страница 33: ...hten the nuts of the high pressure pipes more than the recommended torque If there Is a leakage from the union nut ensure that the pipe is correctly aligned with the injector inlet Do not tighten the union nut more as this can cause a restriction at the end of the pipe which in turn will affect the fuel delivery to the engine 8 The engine is now ready to start If the engine runs correctly tor a sh...

Страница 34: ...ngine speed If after a short d of normal running the engine s or runs roughly it may be use there is a leak in the low ure section of the fuel system k this and rectify if necessary AUTION aste fuel must be collected sposed of in a responsible r and in accordance with local ty guidelines HANGING THE CATING OIL o Figure 5 9 ate the engine until it is warm the engine remove the sump the sump and tig...

Страница 35: ... the new canister Allow the oil enough time to pass through the filter element 5 Lubricate the top of the canister seal with clean lubricating oil 6 Fit the new canister and tighten it by hand only Do NOT use a strap wrench 7 Ensure that there is lubricating oil in the sump On turbocharged engines ensure that the engine will not start and operate the starter motor until oil pressure is obtained To...

Страница 36: ...s 5 12 SERVICING THE AIR CLEANER A typical wet type air cleaner is shown in Figure 5 12 The wet type air cleaner must be drained regularly 1 The container and element 1 must be cleaned with kerosene or with another suitable fluid Do NOT use gasoline 2 Check that the seal 2 is not damaged Renew it if necessary 3 Fill to the indicated level 3 with clean engine lubricating oil Figure 5 11 Cleaning the...

Страница 37: ...s of operation Certain air filters have automatic dust valves through which dust is expelled from the filter Figure 5 12 2 The rubber dust valve 1 must be kept clean Ensure that the sides of the valves close completely together and that they can separate freely GAMMA SERIES ENGINES OPERATORS HANDBOOK 12 A typical wet type air cleaner ir Filter nmental conditions have an nt effect on the frequency ...

Страница 38: ...valve positions are shown i 5 13 2 Figure 5 13 2 The valve posit GW4 GWT4 Figure 5 12 3 Restriction indicator 1 warning light 2 clear panel 3 rubber base 4 button 5 13 Checking Valve Clearances The valve clearances are checked between the top of the valve stem and the rocker lever Figure 5 13 with the engine hot or cold 30 GAMMA SERIES ENGINES OPERATORS HANDBOOK removed for service After a clean e...

Страница 39: ...lves following the firing order 3 cylinder engines have firing order 1 2 3 5 Replace the rocker cover ensuring that the rocker cover gasket is in good condition and is correctly positioned 5 13 2 Four Cylinder Engines The sequence of valves from number 1 cylinder is shown in the table below Number 1 cylinder is at the front of the engine fan and gear end VALVE POSITIONS Cylinder and Valve Number 1 2...

Страница 40: ...ck the clearances of the valves 1 and 2 of number 1 cylinder and adjust them if necessary 2 Set the valves 4 and 3 of number 2 cylinder as indicated above for number 6 cylinder Then check and adjust the clearances of the valves 9 and 10 of number 5 cylinder 3 Set the valves 8 and 7 of number 4 cylinder Then check and adjust the clearances of the valves 5 and 6 of number 3 cylinder 4 Set the valves...

Страница 41: ... 10 11 12 13 16 17 18 19 20 21 31 33 35 36 37 38 41 42 43 60 62 63 Misfires 8 9 10 12 13 15 20 22 33 35 36 37 38 39 40 42 High fuel consumption 11 13 15 17 18 19 21 22 33 35 36 37 38 39 41 42 43 62 Black exhaust smoke 11 13 15 17 19 21 22 33 35 36 37 38 39 41 42 43 60 62 Blue or white exhaust smoke 4 15 21 23 31 35 36 37 38 41 43 44 51 52 61 Low lubricating oil pressure 4 24 25 26 45 46 47 49 50 5...

Страница 42: ...water passages of radiator 31 Restriction in breather pipe 32 Insufficient coolant in system Checks by Workshop Personnel 33 Fault in fuel injection pump 34 Broken drive on fuel injection pump 35 Timing of fuel injection pump is incorrect 36 Valve timing is incorrect 37 Bad compression 38 Cylinder head gasket leaks 39 Valve stem sticking 40 Wrong high pressure pipes 41 Worn cylinder bores 42 Leaka...

Страница 43: ...e engine for a short period in order to circulate the lubricating oil and coolant in the engine 8 Clean the engine breather pipe 9 Remove the air fitter If necessary remove the pipe s installed between the air filter and induction manifold or turbocharger Seal the manifold with waterproof tape 10 Seal the exhaust manifold and air pipe of the fuel tank with waterproof tape 11 Disconnect the battery...

Страница 44: ... Maintenance Schedule Details of the maintenance work carried out on the engine during the warranty period the first 5000 hours or first two years whichever is sooner except the daily checks must be recorded in the spaces allocated in this section pages 35 39 for routine maintenance and pages 40 44 for non routine maintenance see 9 3 Conditions of Warranty If you purchase an extended warranty you ...

Страница 45: ...45 GAMMA SERIES ENGINES operators handbook Hours run Work done by Details of service Distributor Dealer Stamp Date ...

Страница 46: ...46 GAMMA SERIES ENGINES operators handbook Hours run Work done by Details of service Distributor Dealer Stamp Date ...

Страница 47: ...47 GAMMA SERIES ENGINES operators handbook Hours run Work done by Details of service Distributor Dealer Stamp Date ...

Страница 48: ...48 GAMMA SERIES ENGINES operators handbook 8 2 Non Routine Maintenance Hours run Work done by Details of service Distributor Dealer Stamp Date ...

Страница 49: ...49 GAMMA SERIES ENGINES operators handbook Hours run Work done by Details of service Distributor Dealer Stamp Date ...

Страница 50: ...50 GAMMA SERIES ENGINES operators handbook Hours run Work done by Details of service Distributor Dealer Stamp Date ...

Страница 51: ...51 GAMMA SERIES ENGINES operators handbook Hours run Work done by Details of service Distributor Dealer Stamp Date ...

Страница 52: ... parts are purchased from a dealer this must be noted with the dealer s stamp in 8 Maintenance Record and receipts for the parts must be retained The dealer is authorised to stamp the maintenance record only following the sale of genuine parts to a competent engineer intended to be used on the warrantable Lister Petter Power Systems engine Evidence will be required of engine hours run and should b...

Страница 53: ...t starting stopping or operating procedures the use of non approved parts fair wear and tear and serviceable items see note 1 9 4 Repairs under Warranty Lister Petter Power Systems must be contacted and authorisation given before any warrantable work is commenced 9 4 1 Contact Details Head Office Lister Petter Power Systems Limited Unit 14 Estuary Court Broadmeadow Industrial Estate Teignmouth TQ1...

Страница 54: ...NES OPERATORS HANDBOOK APPENDIX FUEL PUMPS AND GOVERNORS PB fuel pumps RSV governors and electronically controlled governors are applied on certain of the diesel engines manufactured for the Gamma engine series PB Pump Structure PB PUMP Characteristics of PB fuel pumps are 1 Plunger and barrel assembly pumping element for each cylinder 2 Camshaft is integrated into the aluminium pump housing 3 Fue...

Страница 55: ...nt stop turning the crankshaft and check for a difference between the angle on the timing case cover and the pulley thus the fuel supply advanced angle can be determined At this moment if the mark on the pulley is ahead of that on the timing case cover it indicates that the fuel supply is in advance and vice versa 4 If the fuel supply advance angle fails to meet the requirement loosen the nut on t...

Страница 56: ...e adjusting screw on the spring lever is used to change the speed governing rate within a certain range 48 GAMMA SERIES ENGINES OPERATORS HANDBOOK RSV GOVERNOR PB PUMP The RSV governor see figure is of the mechanically eccentric type The governor drawbar device can be simplified into a crank block device and the break device can be simplified into a rolling guide road device The load of the spring ca...

Страница 57: ...Built in automatic advance system 2 Electric shut off system 3 Mechanical governing to 3 regulation 4 Peak injection pressure to 800 bar 11600 lbf in2 GAMMA SERIES ENGINES OPERATORS HANDBOOK RY TYPE FUEL PUMPS yne rotary pumps DB2 and DB4 ed on certain engine models he Gamma range These have nical governing except GWTA6 and incorporate an electrical solenoid eristics of the DB2 DB4 pump n automati...

Страница 58: ... a rapid and accurate response to the instantaneous load variation 50 GAMMA SERIES ENGINES OPERATORS HANDBOOK ELECTRONIC GOVERNOR The figure below gives a basic illustration on the principle of electronic speed governing The solenoid actuator is an actuator of the electronic governor which can control the output displacement of the actuator through controlling a coil current in the solenoid actuato...

Страница 59: ...59 ...

Страница 60: ...r Power Systems Limited Units 13 15 Quadrant Distribution Centre Hardwicke Gloucester GL2 2RN sales listerpetter com www listerpetter com 1 Optional items standard on most builds Note This engine does not comply with Harmonised International Regulated Emissions Limits operators hand book English OPTIONAL ITEMS A range of options are available that allows you to select a specification that matches ...

Отзывы: