background image

5. Turn the Unit On

Press and hold the Power Button for 1 second to turn the receiver on, the unit display will show the 
unit ID, battery status and the current channel. Each item will be displayed for three seconds and 
then the display will turn off.  

To view the unit ID, battery status or channel while the unit is powered, momentarily press the power 
button. To turn the receiver off, press and hold the power button for 3 seconds. 

6. Programmable Channel Select (Listen Button)

The main advantage of the LR-5200 Receiver is the functionality of the programmable Listen Button.  
The Listen Button can be programmed for Channel Select Mode, Seek Mode or be Disabled. These 
modes can only be change via the IDSP Software Suite.  

Note: In order for the LR-5200 to receive audio it must be on the same channel as a transmitter in 
the facility. 72 MHz receivers operate on 17 wide band channels and 40 narrow band channels. 
Channels represented by letters on the display (i.e. A) are wideband channels; channels represented 
by numbers are narrowband channels. Listen recommends the use of wide band channels for a 
much higher quality listening experience.

PAGE 9    

l

        L R - 5 2 0 0 - 7 2   R E C E I V E R   M A N U A L

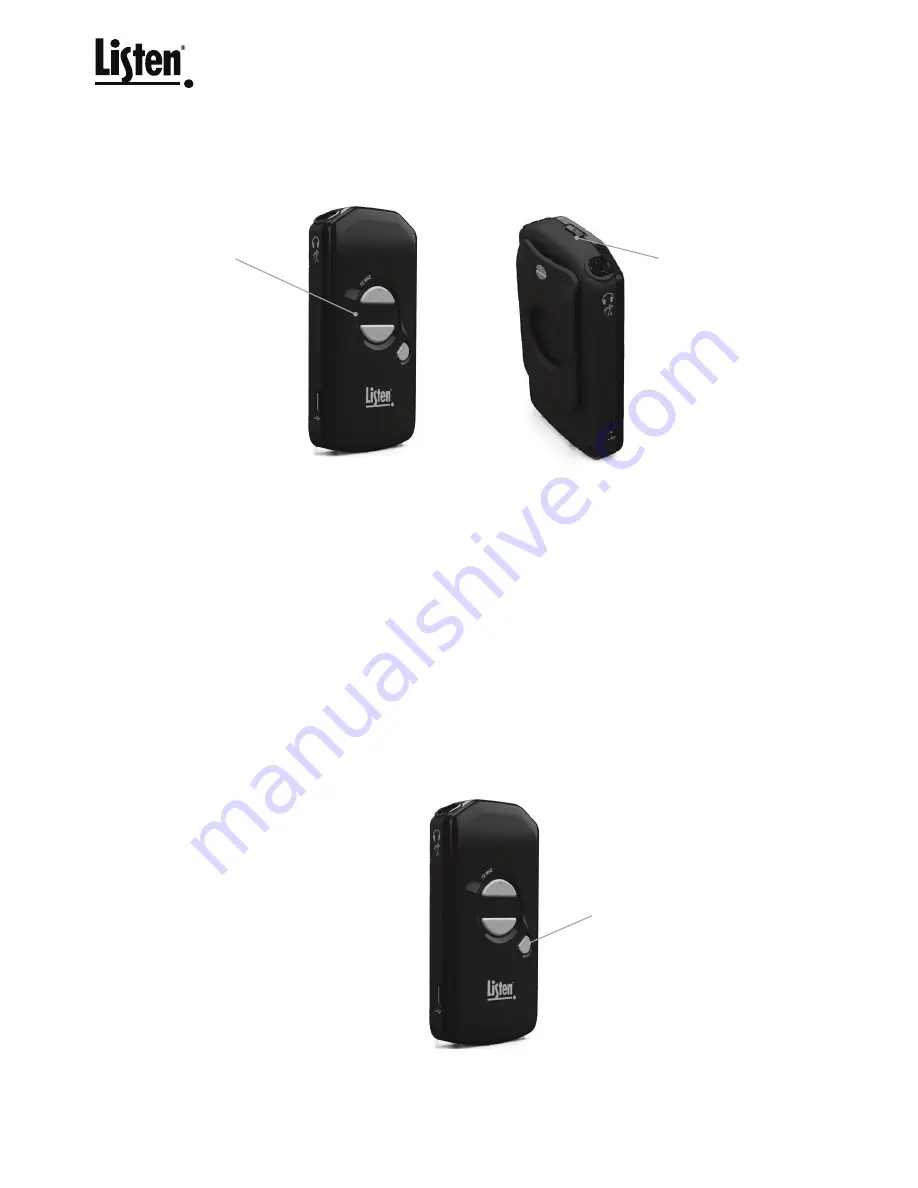
OLED Display:
Indicates Unit #,
Charge % 
and Channel
Assignment 
when power
button is pressed

Power Button:
Press and hold for 
1 second to turn 
on, press and hold 
for 3 seconds to 
turn off

1. Channel Select:
    (Listen Button)
 

CH E

#123

It is important to choose channels 
that are free from interference to 
achieve proper operation of your Listen 
equipment. This process is trial and error. 
Before turning on the transmitter, listen for 
interference on the available channels. 
Choose channels with the least amount 
of interference. If you are using multiple 
channels follow this process:

Same Space If you are using transmitters 
in the same space, the most number of 
channels that will work simultaneously 
is six wide band channels or 8 narrow 
band channels at 72 MHz.  With all of the 

Содержание LR-5200

Страница 1: ...n All Rights Reserved For further details regarding use adjustment or programming of your Listen products visit our website at www listentech com support manuals or contact Listen at 1 801 233 8992 or...

Страница 2: ...e any comments or suggestions we re here to listen Here s how to reach us 1 801 233 8992 1 800 330 0891 North America 1 801 233 8995 fax support listentech com www listentech com Thank you and enjoy y...

Страница 3: ...ct Mode 10 Automatic Channel Selection 11 Manual Channel Selection 11 Seek Mode 12 Disabled 13 Listen Button Block 13 Adjust Volume 14 Battery Belt Clip 15 Low Battery Indication 15 Belt Clip Installa...

Страница 4: ...Earphone Neck Loop Lanyard can be used as the induction loop for those users who have T coil enabled hearing aids or cochlear implants inducing the received audio directly into these T coil enabled d...

Страница 5: ...rnal battery connections 11 Battery Door Can be removed to access battery and product labeling information 1 OLED Display Area Displays battery status unit ID channel status volume status and charge a...

Страница 6: ...75 950 MHz Number of Channels 17 wide band 40 narrow band Sensitivity 6uV typical 1 uV maximum for 12 dB sinad Frequency Accuracy 005 stability 32 to 122 F 0 to 50 C Antenna Type Uses ear phone neck l...

Страница 7: ...other medical device consult your physician or manufacturer of your implantable or other medical device Always make sure you are using this prod uct in accordance with the safety guidelines establishe...

Страница 8: ...380 Intelligent 12 Unit Charging Carrying Case b LA 381 Intelligent 12 Unit Charging Tray c LA 421 1 Port USB Charger comes with cable d LA 423 4 Port USB Charger comes with 4 cables e LA 422 USB to...

Страница 9: ...t jack on the lanyard The lanyard neck loop is placed over the head and worn as a necklace Using The 3 5mm Earphone Extension Cable If the receiver is to be clipped to a belt waistband or inside a poc...

Страница 10: ...ls and 40 narrow band channels Channels represented by letters on the display i e A are wideband channels channels represented by numbers are narrowband channels Listen recommends the use of wide band...

Страница 11: ...t away Channel Select Mode The Listen Button on your receiver has been programmed from the factory for Channel Select Mode This mode is especially useful for applications where users are required to s...

Страница 12: ...he display Press the UP DOWN button for the number of desired channels Momentarily press the POW ER button to save the setting or after 5 seconds of no activity the setting is saved and the unit retur...

Страница 13: ...ed channel is located momentarily press the power button to save and exit the channel select mode or if no button is pressed for 5 seconds then the selected channel will be saved and the unit will exi...

Страница 14: ...seconds When the unit enters locked mode the unit will show the locked symbol on the display for 3 second When locked each time the Listen Button is pressed the unit will show the locked symbol on th...

Страница 15: ...e user to gauge and adjust the audio level to a comfortable listening level The volume level will be displayed for 3 seconds and then the display will turn off Note To protect the users hearing at pow...

Страница 16: ...e before the unit will turn off Press and release the power button and the battery charge will be displayed on the OLED screen temporarily Belt Clip Installation Removal To remove belt clip remove scr...

Страница 17: ...by following steps 1 Turn the unit off 2 Press and hold down the volume down button while pressing and holding the power button for 1 second to turn the unit on 3 Continue to hold down the volume dow...

Страница 18: ...udio quality Listen offers a noise reduction technology called Listen SQ Only Listen transmitters and receivers have SQ available both the transmitter and receiver must have SQ activated to achieve th...

Страница 19: ...ds the range but could allow interference from other transmitters when operating far distances from the primary transmitter Basic Channels and Expanded Channels Modes Your Listen receiver has been shi...

Страница 20: ...peration except for the power on sequence or when the power button is momentarily pressed to check status The receiver is shipped with the Auto Brightness Control Mode enabled Jack Sense The jack sens...

Страница 21: ...0 6 3 72 1750 4 4 4 A4 15 7 72 2000 K K K K K 8 4 B 72 2 72 2250 5 5 5 K5 16 9 72 2500 10 5 72 2750 6 6 6 K6 17 11 72 3000 B B B B B 18 12 6 C 72 3 72 3250 7 7 7 B7 19 13 72 3500 14 7 72 3750 8 8 8 B8...

Страница 22: ...ick up the signal on the receiver Check to make sure the receiver and the transmitter are on the same exact channel frequency Also verify the receiver is in broadcast range of the transmitter Move the...

Страница 23: ...ar installation If this equipment does cause harmful interference to radio or television reception which can be determined by turning the equipment off and on the user is encouraged to try to correct...

Страница 24: ...days of purchase This warranty is void if damage occurred because of misuse or if the product has been repaired or modified by anyone other than a factory authorized service technician Warranty does n...

Страница 25: ...aged in shipment please contact the carrier then contact Listen for replacement or repair requirements payable by the carrier Listen s corporate headquarters are located in Bluffdale Utah U S A and ar...

Отзывы: