44
DO915TDK
EN
DEFROSTING THE FRIDGE
The refrigerator defrosts fully automatically. While the cooling is running, beads of
condensation or hoarfrost form at the back of the refrigerator. This is normal. It is not
necessary to wipe off the condensation or frost. The rear panel defrosts automatically. The
condensation runs into the condensation channel and is conveyed to the cooling from where
it evaporates.
Note: Keep the condensation channel and drainage hole clean, so that the condensation can
run out.
DEFROSTING THE FREEZER
A layer of frost in the freezer will impair refrigeration of the frozen food and increases power
consumption. Remove the layer of frost regularly. Do not scrape off frost or ice with a knife or
pointed object. Doing this may damage the refrigerant tubes.
1. Remove the frozen food and place temporarily in a cool location.
2. Disconnect the appliance from the mains socket.
3. To accelerate the defrosting process, place a pan of hot water on a stand in the freezer.
4. Wipe up condensation with a cloth or sponge.
5. Wipe dry the freezer compartment.
6. Plug in the appliance and adjust the temperature control knob as desired.
7. Put the frozen food back in the freezer.
BULB REPLACEMENT
1. Set the temperature to ‘0’. Unplug the appliance from the power supply before replacing
the light bulb.
2. Remove the bulb cover.
3. Unscrew the old bulb and then screw a new bulb.
4. Replace the bulb cover. Now close the appliance.
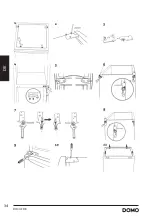
DOOR CONVERSION
If you need to hinge your door on the opposite side it is recommended that you call your local
authorised service agent to make this conversion or ask a technician. Before you reverse the
door, you should ensure the appliance is unplugged and empty. It is recommended to use a
crosshead screwdriver and a spanner (both not supplied).
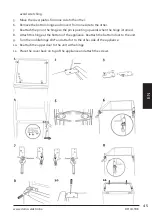
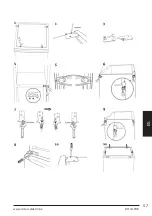
1. Remove the four screws in the cover and lift it up.
2. Remove the upper hinge, then remove the upper door and place it on a soft surface to
avoid scratches.
3. Remove the hinge plate with a screwdriver and turn it 180° to attach the door at the
other side of the unit.
4. Remove the middle hinge. Remove the bottom door and place it on a soft surface to
Содержание DOMO DO915TDK
Страница 10: ...10 DO915TDK NL...
Страница 22: ...22 DO915TDK FR...
Страница 34: ...34 DO915TDK DE...
Страница 57: ...57 DO915TDK www domo elektro be ES...

