background image

DO8132

27

HOW TO USE

To adjust the speed, move the speed control to the required position :

0 : to stop

1 : slow

2 : medium

3 : fast

To make the fan head oscillate, push in the knob on the motor housing. To stop the fan

from oscillation, pull up on the knob.

To adjust vertical angle, tilt fan head up or down as desired.

ASSEMBLY

MONTEER THE ROUND FOOT TO THE TELESCOPIC TUBE:

•  At the bottom side of the tube is a “L” shaped screw. Losen this screw.

•  Place the tube in the foot and attache the tub with the “L” shaped screw.

•  Place the motor unit on the telescopic tube. Remove the large black screw from 

the tube and the black screw from the motor unit.

•  Place the motor on the tube, make sure the small groove, fits in the little hole on 

the tube. Now use the large black srew of the tube, to fix the motor unit to the 

tube. Now use the other black screw, to fully fix the motor unit. This last screw 

can also be used to tilt the fan.

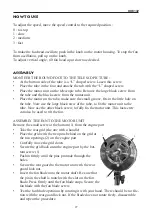
ASSEMBLY THE FAN TO THE MOTOR UNIT

Remove the small screw at the bottom (1) from the engine part

•  Take the rear grid (the one with a handle)

•  Place the grid with the two pins behind on the grid at 

the two openings (2) on the engine part

•  Carefully move the grid down

•  Secure the grid back onto the engine part by the bot-

tom screw (1) 

•  Push in firmly until the pins protrude through the 

holes.

•  Secure the rear guard to the motor unit with the rear 

guard lock nut.

•  Insert the fan blade onto the motor shaft. Be sure that 

the pin in the shaft is match with the slot on the fan 

blade. Press firmly until the fan blade stops. Secure the 

fan blade with the fan blade screw.

•  Test the fan blade operation by rotating it with your hand. There should be no fric-

tion with the rear guard lock nut. If the blade does not rotate freely, disassemble 

and repeat the procedure.

1

2

2

Содержание DOMO DO8132

Страница 1: ...HANDLEIDING MODE D EMPLOI GEBRAUCHSANLEITUNG INSTRUCTION BOOKLET N VOD K POU IT PRODUCT OF VENTILATOR VENTILATEUR VENTILATOR VENTIL TOR VENTILADOR DO8132...

Страница 2: ...garantie devient caduque si des r parations ont t effectu es par des personnes non agr es La garantie ne sera valable que si la date d achat ainsi que le cachet et la signature du magasin figurent su...

Страница 3: ...3 z ruka se nevztahuje a na mechanick po kozen b nespr vn pou v n v rozporu s n vodem k pou it 1 z ruka zanik p i pou it spot ebi e jinak ne v dom cnosti p i prov d n opravy nebo zm ny na spot ebi i...

Страница 4: ...no Adres Adresse Address Adresa Aankoopdatum Date d achat Kaufdatum Date of purchase Datum n kupu podpis a raz tko Tel Jm no kupuj c ho adresu a tel spojen je nutno vyplnit pokud si z kazn k p eje zas...

Страница 5: ...znamy servisu 1 reklamace datum p ijet odesl n slo reklama n ho dokladu 2 reklamace datum p ijet odesl n slo reklama n ho dokladu 3 reklamace datum p ijet odesl n slo reklama n ho dokladu Jm no kupuj...

Страница 6: ...produit est limin correctement vous favorisez la pr vention des cons quences n gatives pour l environnement et la sant humaine qui sinon seraient le r sulat d un traitement inappropri des d chets de c...

Страница 7: ...elektrick ch a elektronick ch za zen Dodr en m tohoto doporu en chr n te ivotn prost ed a zdrav spoluob an V ce informac o mo nostech likvidace nebezpe n ho odpadu obdr te na obecn ch nebo m stsk ch...

Страница 8: ...gt ist muss es vom Hersteller dessen Kundendienst oder einer gleichartig geschulten Person ersetzt werden um Ungl cke zu verhindern If the supply cord is damaged it must be replaced by the manufacture...

Страница 9: ...n niet met het toestel spelen Onderhoud en reiniging van het toestel mogen niet gebeuren door kinderen tenzij ze ouder zijn dan 8 jaar en toezicht krijgen Hou het toestel en het snoer buiten het berei...

Страница 10: ...g ervoor dat het elektrisch snoer niet te dicht bij het warme toestel ligt Trek niet aan het elektrisch snoer of aan het toestel om de stekker uit het stopcontact te verwijderen Stel het toestel niet...

Страница 11: ...tot ongelukken met mensen dieren of schade aan dingen De fabrikant kan hiervoor niet verantwoordelijk gesteld worden Het toestel moet altijd rechtstaand gebruikt worden Zorg ervoor dat de netspanning...

Страница 12: ...ats het motorgeelte op de buis zorg er voor dat het kleine groefje past in het gaatje op de buis Gebruik nu de grote zwarte schroef van de uitschuifbare buis om het motorgeedeelte te bevestigen aan de...

Страница 13: ...e grillen een schroef bevestigen zodat de twee helften extra met elkaar verbonden zijn REINIGING Gebruik een zachte doek om de ventilator schoon te maken Wanneer het vuil niet gemakkelijk kan verwijde...

Страница 14: ...tretien et le nettoyage de l appareil ne peuvent pas s effectuer par des enfants moins qu ils aient plus de 8 ans et qu ils soient sous surveillance Gardez l appareil et le cordon lectrique hors de la...

Страница 15: ...personne ne puisse buter sur le cordon Veillez ce que le cordon lectrique ne se trouve pas trop pr s du chauffage chaud Ne tirez pas au cordon lectrique ou au ventilateur afin de retirer la fiche de l...

Страница 16: ...rer des risques pour les hommes et les animaux ou bien causer des d g ts mat riels Le fabricant ne sera pas responsable L appareil doit toujours se trouver debout lors de l utilisation Veillez ce que...

Страница 17: ...ouverture ronde du tube Utilisez maintenant la grande vis noire du tube t lescopique pour attacher le bloc moteur au tube Utilisez l autre grande vis noire pour bloquer le moteur Si n cessaire vous p...

Страница 18: ...la la grille c t arri re l aide des fermetures Pour plus de s curit vous pouvez fixer une vis travers des deux grilles pour encore plus les s curiser NETTOYAGE Corps Utilisez un tissue ou chiffon pou...

Страница 19: ...ie Pflege und Wartung des Ger tes darf nicht von Kindern ausgef hrt werden es sei denn dass dies unter Aufsicht passiert und es sich um Kinder handelt die lter als 8 Jahre sind und im Voraus ausreiche...

Страница 20: ...gedeckt wird stellen Sie keine Gegenst nde auf das Kabel sorgen Sie daf r dass niemand ber das Kabel stolpern kann Sorgen Sie daf r dass das Ger t nicht zu dicht beim Heizk rper liegt Der Speisekabel...

Страница 21: ...die gef hrlichen Teile des Ger tes harmlos zu machen meistens f r die Kinder die das unbrauchbare Ger t als Spielzeug benutzen k nnen Die Installation soll nach den Anweisungen des Herstellers durchge...

Страница 22: ...wird der Ventilaotren kopf entsprechend nach oben oder unten gekippt MONTAGE DEN RUNDEN FUSS AM TELESKOPISCHEN ROHR MONTIEREN An der Unterseite des Rohrs befindet sich eine rechtwinklige Schraube Die...

Страница 23: ...rschraube in der Aussparung auf der zentra len Achse verwenden Die Ventilatorschraube ber die Aussparung auf der zentralen Achse schieben und danach die Ventilatorschraube mit der Stellschraube die si...

Страница 24: ...ldren cannot be allowed to play with the appliance Maintenance and cleaning of the appliance may not be done by children unless they are older than 8 years old and are under supervision Keep the appli...

Страница 25: ...ll the power cord or the appliance to remove the plug from the socket Don t expose the appliance to rain sun etc Don t let children or unauthorised persons use the appliance without supervision Don t...

Страница 26: ...ntioned on the rating label When in doubt let it be checked by an electrician Don t let the appliance operate when it is not necessary Remove the plug from the socket when you don t need the appliance...

Страница 27: ...or unit to the tube Now use the other black screw to fully fix the motor unit This last screw can also be used to tilt the fan ASSEMBLY THE FAN TO THE MOTOR UNIT Remove the small screw at the bottom 1...

Страница 28: ...tioning the hook Join the front rear guards by pressing firmly Secure the two guards by the fixing screw CLEANING Use a soft tissue or cloth to clean In case dirt or grime does not come off easily use...

Страница 29: ...strojem hr t nebo jej samostatn obsluhovat dr bu a i t n p stroje nesm prov d t d ti mlad 8 let P stroj nesm b t pou v n po extr mn dlouhou dobu jako profesion ln p stroje Je ur en zvl t do kuchyn k p...

Страница 30: ...y 4 a ut hn te 3 Nasa te vrtuli 3 na h del motoru p ilo te p edn m ku 2 a ut hn te roubem 1 p ed dota en m zkontrolujte zda se vrtule nikde nedot k zadn nebo p edn m ky MONT Z KLADNY A PRODLU OVAC HO...

Страница 31: ...ur it ho bodu motor se automaticky vypne P ed dal m pou it m je nutno vym nit tepelnou pojistku za novou I T N Nejd ve odpojte p stroj od elektrick s t V echny d ly m ete ot t vlhk m hadrem s trochou...

Страница 32: ...pueda enredar con el cable Aseg rese de que el cable de alimentaci n no est demasiado cerca de la unidad Para desconectar el enchufe de la toma de corriente no tire del cable ni del ventilador El vent...

Страница 33: ...nde al de la placa de identificaci n del ventilador En caso de duda consulte a un electricista No deje el ventilador encendido cuando no lo necesita Retire el enchufe de la toma de corriente cuando no...

Страница 34: ...ervisi n Mantenga el ventilador y el cable fuera del alcance de los ni os menores de 8 a os Este ventilador es adecuado para su uso en el mbito dom stico y entornos similares como Zona de cocina para...

Страница 35: ...tilador hacia arriba o hacia abajo MONTE AHORA EL VENTILADOR EN LA PARTE DEL MOTOR DEL MODO SIGUIENTE Retire los tornillo 1 que se encuentran en la parte delantera del compartimento del motor Coloque...

Страница 36: ...ires en onderdelen online via of scan hier COMMANDEZ d authentiques accessoires et pi ces Domo en ligne sur ou scannez ici BESTELLEN SIE die Domo Original Zubeh r und Ersatzteile online ber oder hier...

Отзывы: