background image


3. 

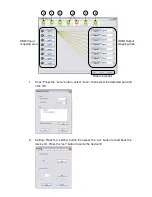
Linkage: Press the “linkage” button to read back all the status ID’s 

 
4. 

Open/Close: Press either the “open” or “close” button to open or close the COM 
port 


5. 

Mapping:  


Select All Output: Click on “Select All Output” then  
select the source on the main menu. This quickly 
sets all the outputs to the same source. 


Unselect All Output: This releases all the outputs 


Select Input 1~8 Output: Select the input source,  
then select the output port icon.  
Example: click on “Select Input 1 – Output”, then  
select output port 1 & 2. The video and audio will  
be sent to port 1 & 2. 


6. 

Fast Select:  


Input Num – Output Num: This will set all input  
Ports to its corresponding output port  
ie. 1 to 2, 2 to 2 
 
Input 1-8 – All Output: Quickly send the same  
source to all outputs 


7.  Command Set 


RS-232 Transmission format: 


Baud rate:       

9600 bps 


Data length: 

8 bits 


Parity check: 

None 


Stop bit:        

1 bit 

 
Full details of the RS-232 protocols can be found on the CD provided:  
 
D:\02 Documentation\01.Serial Command Set\8x8 Matrix_Command Set 

Or 

D:\02 Documentation\02.RS-232 Protocol Terminal\8x8 Matrix_ProtocolTerminal 


Содержание HDMI 8x8 Matrix Switch 1.3c

Страница 1: ...LINDY ELECTRONICS LIMITED LINDY ELEKTRONIK GMBH Second Edition November 2010 HDMI 8x8 Matrix Switch 1 3c Manual English LINDY No 38047 www lindy com...

Страница 2: ...to multiple levels 2 Features HDMI 1 3c HDCP 1 1 and DVI 1 0 compliant HDMI input is compensated clock phase adjusted and jitter eliminated so the output is a new standard HDMI signal Supports high r...

Страница 3: ...res on multiple screens The channel switching takes approximately 2 seconds Fn Source Sel 1 Escape system lock Fn Source Sel 2 System lock The remote control becomes inactive except for the above comm...

Страница 4: ...ble to the RS 232 port and serial port of your PC b Execute the firmware update program on your PC via the COM 1 port c Set Pin 1 to the on position for firmware update mode d Set Pins 2 3 to the resp...

Страница 5: ...elect the detected port and click OK 2 Setting Press the setting button then press the get button to read back the device ID Press the set button to write the device ID HDMI Input mapping area HDMI Ou...

Страница 6: ...t icon Example click on Select Input 1 Output then select output port 1 2 The video and audio will be sent to port 1 2 6 Fast Select Input Num Output Num This will set all input Ports to its correspon...

Страница 7: ...pean Union introduced regulations WEEE for the collection and recycling of all waste electrical and electronic equipment It is no longer allowable to simply throw away electrical and electronic equipm...

Отзывы: