


1.
If your HDTV displays video but no audio, set the audio mode to stereo
2.
The factory default setting is both pins to off, this sets 1080p for video and
surround sound audio
3.
For any other video/audio problems, turn Pin1 to “off” and Pin2 to “on”. This will
force the video signal to 720p and the audio signal to stereo
4.
Bypass mode will maintain the original output format of video and audio. Setting
this mode may give you compatibility issues with the many different kinds of
sources and screens. If either the video or audio fail to work then try the different
dip switch settings above
Main dip switches
Dip Switch Position
Pin #1
Pin#2
Pin#3
Pin#4
Operation mode via RS-232 Port
1
OFF (
↑
) OFF (
↑
) OFF (
↑
) OFF (
↑
)
Operation mode via USB Port
2
OFF (
↑
) OFF (
↑
) OFF (
↑
)
On (
↓
)
Block A
On (
↓
)
OFF (
↑
) OFF (
↑
) OFF (
↑
)
Block B
On (
↓
)
OFF (
↑
)
On (
↓
)
OFF (
↑
)
Firmware update
mode
3
Block C
On (
↓
)
On (
↓
)
OFF (
↑
) OFF (
↑
)
1.
Factory default setting, all pins set to “off”. This is the default mode for RS-232
control
2.
For USB control, set Pins 1, 2 & 3 to “off” and Pin 4 to “on”
3.
Firmware update mode can only be used via RS-232 with the PC set to COM1.
a. Power off your LINDY 8x8 HDMI Matrix and connect your serial cable to the
RS-232 port and serial port of your PC.
b. Execute the firmware update program on your PC via the COM 1 port
c. Set Pin 1 to the “on” position for firmware update mode
d. Set Pins 2 & 3 to the respective positions to assign which block is to be
updated
e. Power on your Matrix and the firmware update program should begin the
update sequence automatically. (If the program does not start, check the cable
connections)
f. Once the firmware update sequence has completed, the screen will display
“OK”, at this point turn off the Matrix
g. When all updates are complete, set the dip switches to normal operation mode
h. Power on the LINDY 8x8 HDMI Matrix
6. Software installation & control
Note: before inserting either the USB or serial cable, make sure that the main dip
switches are set to the correct position. Incorrect dip switch settings will result in the
HDMI Matrix not being picked up on the PC com port.
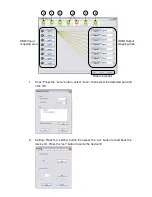
1.
Plug either a USB A male to female cable or serial cable in to the back of the
Matrix and your computer.
2.
For USB the computer will show that new hardware has been found. Click next
to continue and finish at the end.
3.
When the hardware has fully installed, insert the CD provided.
4.
Open the folder “01 control program\control program 8x8 HDMI matrix\8x8 HDMI
matrix setup” This will install the Matrix control software.


