


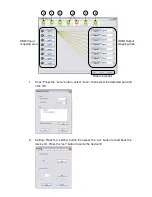


Rear Panel
1.
AC power input: 100-240V
2.
RS-232 Communication port
3.
USB control port
4.
Main dip switches
5.
HDMI dip switches
6.
HDMI input ports
7.
HDMI output ports
4. Remote Control
1.
Power:
Turn the unit on/off
2.
Source select:
Only buttons 1 & 2 are used in
this area. These are used in
conjunction with the “Fn” button
3.
Input:
Press 1-8 to select the desired
input
4.
Output:
Press 1-8 to select the desired
output
To use the remote control to switch channels, first select the input you require and
then select the output/outputs you would like it to display on. Repeat this for multiple
pictures on multiple screens. The channel switching takes approximately 2 seconds.
Fn + Source Sel 1 = Escape system lock
Fn + Source Sel 2 = System lock. The remote control becomes inactive except for the
above command.
5. Dip Switch Configuration
HDMI dip switches
2
1
4
3
5
6
7
6
5
1
2
3
4
Dip Switch Position
Pin #1
Pin #2
Video
Audio
Description
OFF (
↑
)
OFF (
↑
)
Up to
1080p
Surround
1
Default mode
2
– Up to 1080p video
& surround sound audio output up to
7.1ch (DTS-HD & Dolby TrueHD)
OFF (
↑
)
On (
↓
)
Up to
720p /
1080i
Stereo
Safe Mode
3
– Force the system to
output at 720p/1080i video & stereo
audio for basic HDTV compatibility
On (
↓
)
OFF (
↑
)
Bypass
4
Bypass
4
EDID Learning Mode
– for display
EDID Learning with the received
HDMI audio format
On (
↓
)
On (
↓
)
Bypass
Stereo
EDID Learning & Stereo Audio
Mode
– for display EDID Learning
with stereo audio


