Lilin PIH-816III Скачать руководство пользователя страница 12

1st Sequence Table

(1~8)

1st Sequence Table

(9~16)

1st Sequence Table

(17~24)

1st Sequence Table

(25~32)

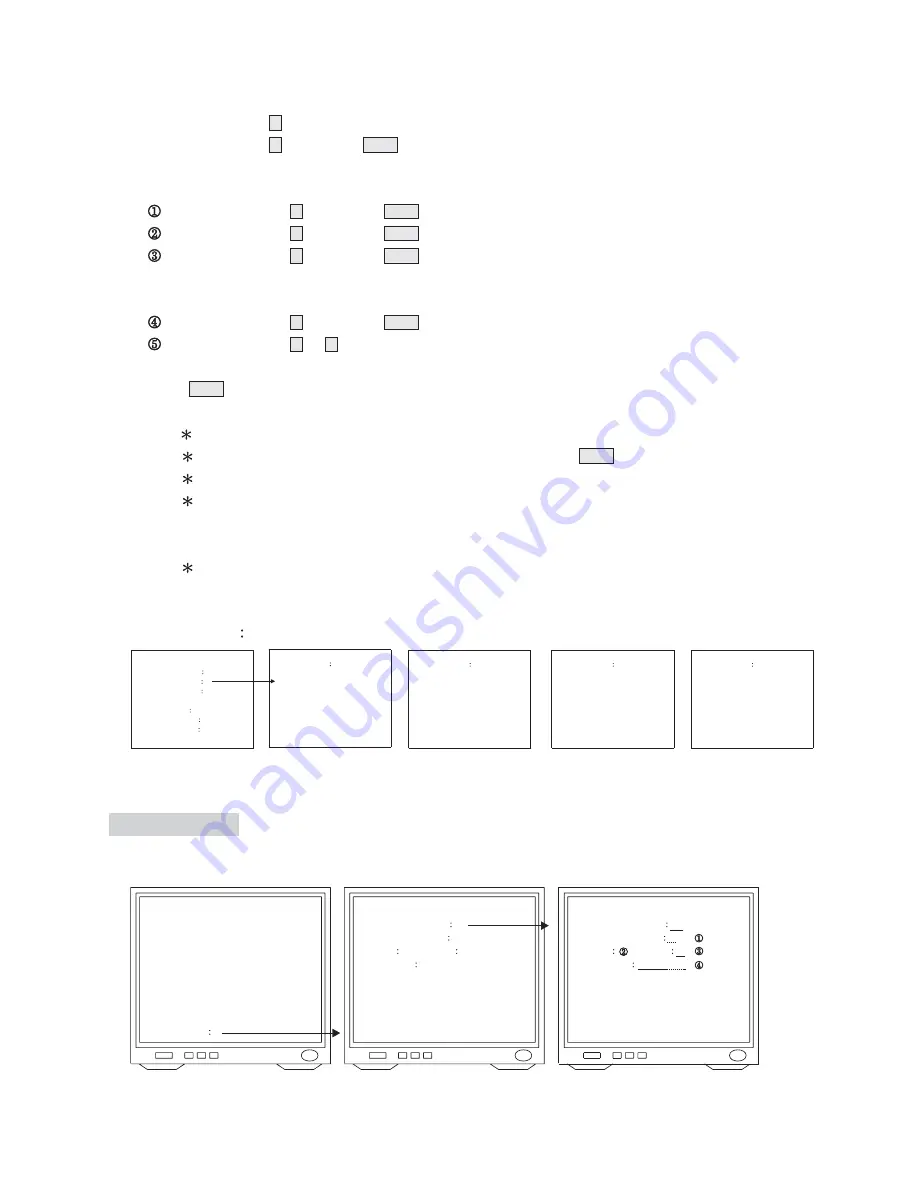
1. Press numeric key 3 to enter MONITOR SETUP from SETUP MENU.
2. Press numeric key 2 followed by ENT key. The 2nd monitor is selected as shown above.

(1~16 monitors can be selected depending on the model purchased)

3. Use blinking cursor to set up after monitor is selected.

Press numeric key 1 followed by ENT key to set 1st sequence table.
Press numeric key 3 followed by ENT key to set 3rd sequence table.
Press numeric key 2 followed by ENT key to set dwell time as 2 seconds.
(If GLOBAL DWELL TIME is set to 0 secretary, camera dwell time will match sequence table's initial
setting)
Press numeric key 0 followed by ENT key to set Monitor as 0 priority.
Press numeric key 0 or 1 (NO or YES) selecting to display or not to display Video Loss and Alarm
signals.

Press ESC key to escape.

NOTE:

Use the Joystick to move blinking cursor.

Move blinking cursor to the position to clear data and press CLR key to clear.
Set up in sequence table 1 and 2 decide the monitor auto sequence order.
Monitor's Priority should be set as 0. There are 3 priority rankings:
0,1 and 2 where 0 has the highest priority. Camera with lower priority than monitor will not be
displayed by monitor.
When warning Display is set to YES, monitor will switch automatically to alarm position when
received alarm signal.

Sequence Table

MONITOR SETUP

ENTER MONITOR No

2

SEQUENCE TABLE 1

01

SEQUENCE TABLE 2

03

GLOBAL DWELL TIME
<0 TO 255 SEC.>

02

PRIORITY <0 TO 2 >

0

WARNING DISPLAY

YES

<VIDEO LOSS ALARM>

SEQUENCE TABLE

ENTER TABLE No

01

ENTRY CAMERA TIME

01

01

03

02

02

03

03

03

03

04

04

03

05

05

04

06

06

05

07

07

10

08

10

03

SEQUENCE TABLE

ENTER TABLE No

01

ENTRY CAMERA TIME

09

11

05

10

12

03

11

13

03

12

14

03

13

15

03

14

20

05

15

21

05

16

22

06

SEQUENCE TABLE

ENTER TABLE No

01

ENTRY CAMERA TIME

17

24

05

18

25

03

19
20
21
22
23
24

SEQUENCE TABLE

ENTER TABLE No

01

ENTRY CAMERA TIME

25
26
27
28
29
30
31
32

ID & Receiver Setup

Camera ID and Receiver can be set under ID & Receiver Setup.

ID & RECEIVER SETUP

ENTER CAMERA No

1

PRIORITY <0 TO 2>
CTRL1

CTRL2

CAMERA Id
<MAXIMUM 8 WORDS>

ENTER CAMERA No

01

PRIORITY <0 TO 2>

0

CTRL1

CTRL2

M

CAMERA ID

CAMERA01

A B C D E F G H I J
K L M N O P Q R S T
U V W X Y Z : . ,

ID & RECEIVER SETUP

SETUP MENU

1. SYSTEM SETUP
2. SEQUENCE TABLE
3. MONITOR SETUP
4. ID & RECEIVER SETUP
5. ALARM SETUP
6. ALARM TIME SETUP
7. DOME SETUP

ENTER ITEM

4

10

Содержание PIH-816III

Страница 1: ...Video Matrix Switch Series PIH 816III 832III 864III INSTRUCTION MANUAL CSE...

Страница 2: ...Receiver Setup Alarm Setup Alarm and Corresponding Camera Alarm Time Setup Dome Setup Fast Dome Recalling Monitor or Camera Controlling PTZ or Fast Dome Camera PAN TILT Focus Auto Focus Iris Auto Iri...

Страница 3: ...speed to control movement of Fast Domes Ability to control lens movement such as zoom focus and iris Horizontal 180 flip button for easy tracking purpose Each Fast Dome can set up to 128 preset point...

Страница 4: ...ection cable and change the cable if there is damage on cable 10 Make sure ground is well connected to avoid damage caused by lightning 11 Do not put any foreign objects inside the equipment and do no...

Страница 5: ...C control Power input 110Vac or 220Vac Audio and Alarm warning will also be canceled when VIDEO LOST is released Audio and Alarm warning will also be canceled when ALARM is released Connection to keyb...

Страница 6: ...MON 6 CTRL1 CTRL1 1 2 5 4 ESC ESC AUX AUX CAM CAM 9 ENT ENT 8 7 0 CLR CLR SETUP SETUP PRESET PRESET CTRL2 CTRL2 F1 F1 F2 F2 F4 F4 F3 F3 PRESET1 PRESET1 PRESET2 PRESET2 POWER POWER FAST FAST PRESET3 PR...

Страница 7: ...first keyboard should be connected to TXD on KEYBOARD connector located at the back of matrix system TXDI on IN connector located at the back of first keyboard should be connected to TXD on KEYBOARD c...

Страница 8: ...on for 5 minutes Setting Mode Press SETUP key under control sign the SETUP MENU will appear as shown below No initial password was set 1 SYSTEM SETUP Set up Date Time Password and to clear all Setting...

Страница 9: ...UP 5 ALARM SETUP 6 ALARM TIME SETUP 7 DOME SETUP ENTER ITEM SYSTEM SETUP VER 1 0 ENTER SYSTEM PASSWORD AND PRESS ENT TO CONFIRM MERIT LI LIN CO LTD SW1 RESET PIH 832A Deleting Password Deleting passwo...

Страница 10: ...red as password Eg Enter numeric keys 5 6 7 8 followed by ENT key Password will be memorized and Menu will switch back to SYSTEM SETUP To leave press ESC key Deleting Password To delete Password 1 Pre...

Страница 11: ...ve cursor To clear set up move cursor to position and press CLR Each screen will display only 8 sets of information the system will roll over to the next 8 sets of data automatically Setting Sequence...

Страница 12: ...as 0 There are 3 priority rankings 0 1 and 2 where 0 has the highest priority Camera with lower priority than monitor will not be displayed by monitor When warning Display is set to YES monitor will s...

Страница 13: ...off relay M Relay is on when CTRL2 is to pressed and hold Once CTRL2 is released relay is turned off ALARM SETUP Alarm and corresponding Camera Matrix contains 64 Alarm inputs camera with correspondin...

Страница 14: ...ress numeric key 2 followed by ENT key to set time as 2 second Time can be set from 1sec 20sec Press numeric key 2 0 followed by ENT key to set DURATION time as 20sec Time can be set from 1sec 255sec...

Страница 15: ...FOCUS FAR FOCUS NEAR or AUTO FOCUS It is recommended using manual focus mode when setting up presets to maintain optimal focus level Adjust IRIS O IRIS C or AUTO IRIS for optimum picture Set dwell tim...

Страница 16: ...oard to save Press ESC key returning to step1 Step1 to step2 can be repeated Or press ESC key again to escape 4 Preset point data DOME SETUP DOME SETUP DOME NO 1 RESET Y N N PRESET NO 1 TO 128 DWELL S...

Страница 17: ...d by MON key Control sign will appear on 3rd monitor 3 From the keyboard press numeric key camera ID 1 followed by CAM key 1 1st camera number will appear on the monitor Eg Press 1 CAM to select camer...

Страница 18: ...tick can be used to move scanner or to control Fast Dome Camera up down left and right Scanner s moving range depends on your setting Fast Dome Camera s PAN is 360 degree continuously TILT is 100 degr...

Страница 19: ...t position Ex 1 PRESET keys for 1st preset 2 3 PRESET keys for 23th preset 1 2 8 PRESET keys for 128th preset Follow keys can be used for speed recalled PRESET 1 key for 1st preset PRESET 2 key for 2n...

Страница 20: ...gn press AUTO PAN key to activate auto tour LED will lit Under sign press AUTO PAN key to stop auto tour LED will be off Then you can start control manually MON 01 H CAM 01 CAMERA01 10 13 98 17 28 01...

Страница 21: ...control mode Adjusting Monitor Display MONITOR ADJUST MON 01 H CAM 01 CAMERA01 10 13 98 17 28 01 1 Under sign press F3 key monitor shown as above 2 Joystick can be used to move monitor display s posit...

Страница 22: ...COMMON 17 18 19 20 21 22 23 ALARM POINT 24 25 26 27 28 29 30 31 32 COM OUTPUT COMMON JACK 1 2 3 4 5 6 7 8 9 10 11 12 13 JACK 14 15 16 17 18 19 20 21 22 23 24 25 26 JACK 27 28 29 30 31 32 33 34 35 36...

Страница 23: ...3 4 5 ON 8 6 7 5 4 3 2 7 6 8 ON 1 2 3 4 5 8 6 7 ON ON 1 5 4 3 2 7 6 8 1 1 2 3 4 5 ON 8 6 7 2 3 4 5 8 6 7 ON 1 1 ON 5 4 3 2 ON 7 6 8 2 3 4 5 8 6 7 ON 1 1 1 5 4 3 2 7 6 8 5 4 3 2 7 6 8 ON 2 3 4 5 ON 8...

Страница 24: ...ESET4 LENSZOOMINGIN LENSZOOMINGOUT OBJECTBECOMESFURTHER OBJECTBECOMESNEARER AUTOFOCUSING IRISOPEN IRISCLOSE AUTOIRISING TOACTIVATEAUTOTOURING SPECIFICATION TABLE MODEL NO Camera Input Video Output Ala...

Страница 25: ...3 4 5 6 7 8 9 X RXD Received Data TXD Transmitted Data DTR Data Terminal Ready GND Signal Ground DSR Data Set Ready DTR Data Terminal Ready X X PIN Asignment RS 232 9PIN D SUB CONNECTION 1 5 9 6 23 6...

Страница 26: ...MERIT LILIN ENT CO LTD http www meritlilin com 66 816IIICSE...

Отзывы: