background image

20

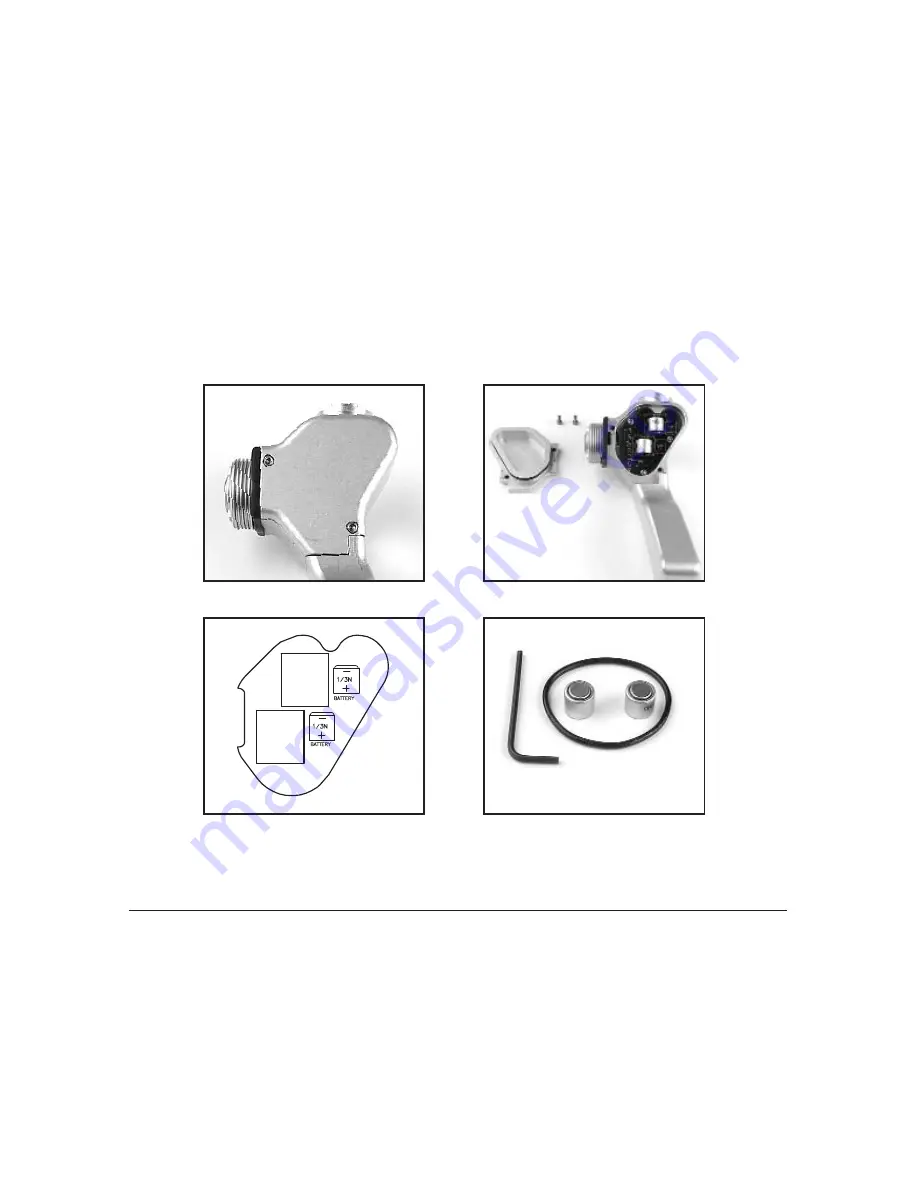
(Fig. 25)

(Fig. 26)

(Fig. 27)

(Fig. 28)

1)

Using an allen key, remove the two screws on the back of the handle.
(Refer fig. 25)

2)

Remove the Handle Cap from the handle assembly. (Refer fig. 26)

3)

Remove old batteries from handle board.

4)

Install new 1/3 N batteries into the handle board. (Refer. fig. 27)

The +/- position of the batteries is critical. If batteries are
installed backwards, they will damage the handle board.

5)

Inspect the Handle Cap O-ring or replace with a new O-ring.

6)

Press the Handle Cap into the handle assembly so O-ring seals evenly.

7)

Replace both screws in Handle Cap and tighten using allen key.

Smart Grip O-ring and Battery Kit (part # 802-0117) (Refer fig. 28)
Kit contains one O-ring and battery set for one Smart Grip.

Pre-Dive Checklist

1)

Make sure you have a Mini DV tape in the camcorder.

2)

Make sure you have a completely charged battery in the camera.

3)

Verify operation of all housing controls.

4)

Check that the lens lock is securely engaged and that the latch pin is in the locked
position. Clean lens if necessary.

5)

Check that the rear plate O-rings are seated correctly and that the rear latches are
in the closed and locked position.

Содержание Bluefin HC3

Страница 1: ...Bluefin HC3 Owner s Manual www uwimaging com For the Sony HDR HC3 camcorder ...

Страница 2: ...travel Failure to do so may result in inadvertent ignition of lighting system and possible heat or fire damage Check the operation of all your equipment several weeks prior to your trip If maintenance or repair is necessary then time is available for both shipping and repair scheduling Never transport or ship the housing with the camcorder inside This may damage your camcorder Never leave your hou...

Страница 3: ... Monitor Operation 14 Remote Monitor Operation 15 Charging the Remote Monitor 16 Diving Without a Monitor Attached 16 Display Icons on Monitors 16 Bluefin Light Systems Getting Started 17 Charging Batteries 18 Installing Batteries 18 Removing Batteries 18 Mounting Battery Pods 19 Connecting Lights to Battery Pods 19 Light Operation 19 Replacing Handle Batteries 19 Pre Dive Checklist 20 First Time ...

Страница 4: ...Bluefin s features and functions Take time to familiarize yourself with the housing Monitor Base Light Arm Base Lens Lock ON MODE Button Monitor Bulkhead P Menu Selector Easy Button Flip Filter Lever Manual Button Camera Control Knob Self Locking Rotary Latch ...

Страница 5: ...so the LCD screen is facing away from the camcorder Close the LCD screen against the camcorder body so the screen is facing outward 5 Enter the camera s MENU and confirm or change the following settings Scroll to the STANDARD SET sub menu and select it A Change the Remote Control to the ON position Refer Fig 1 B Change the REC LED to the OFF position Refer Fig 2 C Change the DISPLAY to the V OUT P...

Страница 6: ...MENU SET UP button 4 Press the RESET button Refer fig 5 This resets the camera s P Menu to the factory defaults Press YES when prompted and YES again to complete the reset 5 Press the P MENU SET UP button again Refer fig 6 and 7 6 Press the SORT button Refer fig 5 This button allows you to change the position of most of the P Menu buttons 7 Select the SMOOTH SLWREC button on the first P Menu page ...

Страница 7: ...7 Fig 5 Fig 6 Fig 7 Fig 8 ...

Страница 8: ...d guide the wall to the right of the battery over the small post on the camera tray 6 Open the front right connector cover on the camera and plug the end of the long cable into the blue LANC jack Refer fig 11 7 Insert the short video cable into the A V OUT connector on the rear of the camera Refer fig 11 8 On the housing pull the CAM CTRL knob out and rotate it slightly until it catches in the out...

Страница 9: ... Tele Zooms camcorder to telephoto Wide Zooms camcorder to wide angle Rec Toggles camcorder between record standby Mom Af Press and hold this button to put the camcorder into momentary AF Camcorder remains in AF as long as the button is pressed Once released the camcorder switches to manual focus This is useful in stopping the camcorder from seeking when filming in a low contrast environment To re...

Страница 10: ... until the menu of options appears on the display Camera Control Knob Adjusts the function activated with the Manual button Easy Press once to put most of the camera s settings in automatic adjustment mode Press again to allow use of manual features P Menu Selector Allows partial access to the camera s P Menu Rotate the knob to position the internal selector over a button on the camera s screen Pr...

Страница 11: ...Menu Selector to push the ON screen button Use the P Menu Selector to push the OK button You may also hit the REC button on the right handle to both complete setup of the Tele Macro function and begin recording To exit the Tele Macro function use the WIDE button on the right handle to change the camera s zoom setting One Push White Balance Set up the P Menu as described in this manual under P Menu...

Страница 12: ...l the camcorder enters VTR Mode as listed and illustrated below the Bluefin s Smart Grip Controls allow you to controls the camcorder s VTR functions while the camcorder is still inside the Bluefin Commands Left Smart Grip Controls Refer fig 18 Far Frame Back while paused and reverse direction during playback Near Frame Advance while paused Photo Dis Rewind Lights Not used Photo Captures still ima...

Страница 13: ... Press either FAR and NEAR or TELE and WIDE buttons simultaneously and hold for three seconds Button functions are now swapped Button functions will mirror opposite handle i e REC and PHOTO AF OFF and PHOTO DIS This is a handle by handle procedure Performing this function on one handle will not switch both Revert to original button configuration 1 Perform the same swap procedure Press either FAR a...

Страница 14: ... Bulkhead connector on the inside of the Rear Plate circuit board Refer Fig 19 8 Replace circuit board and secure it to the Rear Plate using the four button head cap screws Fig 16 Fig 17 Button head cap screws Fig 18 Fig 19 Attaching the Remote or Compact Monitor 1 Attach clamp assembly to back of monitor 2 Attach monitor clamp assembly to quick connect post by pressing down and rotating until bla...

Страница 15: ...lose Moves focus point closer to camcorder Right Side Refer Fig 19 Af Off AF Press once to return camcorder to auto focus from manual focus OFF Turns camcorder off Press and hold for three seconds then release Rec Toggles between record and stand by modes Mom Af Pressing and holding this button puts the camcorder into Momentary AF Camcorder remains in AF as long as the button is pressed Once relea...

Страница 16: ... the Monitor Diving Without a Monitor Attached If you do not use the monitor you MUST de activate power to the bulkhead before entering the water To de activate BlueFin bulkhead 1 Remove the Rear Plate 2 Locate the power switch on the inside of the Rear Plate 3 Move the switch to the OFF position Display Icons on Monitors Monitor Screen In order to see the camera display information in the monitor...

Страница 17: ...ng system Take a moment to familiarize yourself with each part for later identification and use Battery Pods Light heads Charger and electrical cord Pod Locker Light Arms HID light heads Li ion Batteries Sunray Mini Pro Light System Sunray Mini Elite Light System Battery Pods Pod Locker Charger and electrical cord Li ion Batteries ...

Страница 18: ...rger time is approximately 2 5 hours Installing Batteries 1 Slide the battery back into the pod with the contact end inserted first so that the connector will align with the socket inside the pod Refer Fig 23 2 Inspect the O ring on the pod cap See O ring maintenance 3 Replace the front cap onto the pod Insure that the removal strap attached to the battery does not interfere with the seal when the...

Страница 19: ...Pro Lights or E for Mini Elite Lights Refer Fig 24 Operation from Smart Grips 1 Activate initial power up by pressing the Pod Power Button Refer Fig 24 After initial power up lights may be controlled using LIGHT button on the left Smart Grip 2 Turn off lights by pressing and holding the LIGHT button Operation from Battery Pods 1 Turn on light by pressing the Power Button on the rear cap 2 Turn off...

Страница 20: ...he Handle Cap into the handle assembly so O ring seals evenly 7 Replace both screws in Handle Cap and tighten using allen key Smart Grip O ring and Battery Kit part 802 0117 Refer fig 28 Kit contains one O ring and battery set for one Smart Grip Pre Dive Checklist 1 Make sure you have a Mini DV tape in the camcorder 2 Make sure you have a completely charged battery in the camera 3 Verify operation...

Страница 21: ...to allow for air circulation Similarly leaveTravel Case Lid about two inches open Allow any residual water to evaporate from the Travel Case prior to storing the housing O ring Care Maintenance O rings are the critical component that keeps water out of the housing Routinely inspect O rings and replace at least once a year If your O rings are damaged contact the Light Motion service department for ...

Страница 22: ...ring Replacement Kit part 802 0096 includes Two O rings for the Rear Plate and two O rings for front optic Smart Grip O ring and Battery Kit part 802 0117 includes O ring and battery for one Smart Grip O rings used for the Rear Plate and all optics are different sizes Be sure to replace the appropriate O ring in its respective groove Other Maintenance CLEAN THE CONNECTORS Pay special attention to ...

Страница 23: ...Housing O ring Kit 802 0096 Smart Grip Battery and O ring Replacement Kit 802 0117 Bluefin Handle Thread Ring Replacement Kit 802 0147 Light Motion Lanyard 802 0167 Replacement Monitor Shade 661 0336 Sunray S 7 2v NiMH battery 800 0086 Sunray S 11 1v Li ion battery 800 0113 Sunray 110 220v Multi Chem Charger 800 0124 20w Halogen Lamp Mini Elite Light System 824 0026 Mini Elite Light System O ring ...

Страница 24: ...Light Motion 300 Cannery Row Monterey CA 93940 831 645 1525 Fax 831 375 2517 www uwimaging com 905 0266 A ...

Отзывы: