Page
|
6
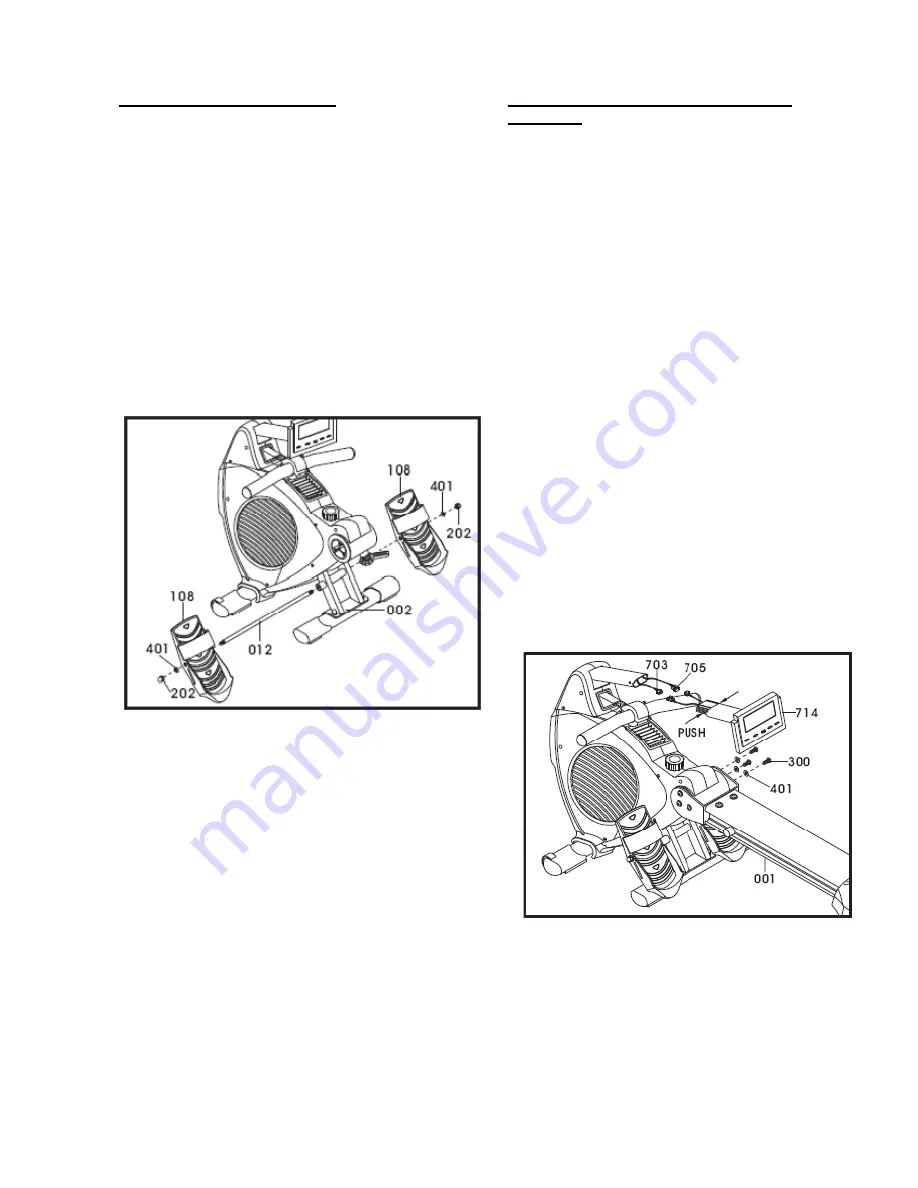
Step 10: Aluminum Beam & Computer
Assembly
Tools Needed:
5mm Allen wrench
Note: Additional assistance may be needed. Make
sure the wires are connected together properly.
Push and store excess wires back into main frame.
Be careful not to pinch the wires while assembling
the console
A. Using the provided 5mm Allen wrench, remove
the preassembled Qty. six bolts (300) and Qty.
six washers (401) from the die cast pivot (004).
B. Slide the aluminum beam (001) onto the die
cast pivot (004)
Note: Additional assistance me
be needed to help align the holes.
Firmly
secure the Qty. six bolts (300) and Qty. six
washers (401) in place with the provided 5mm
Allen wrench.
C. Locate the computer console (714) and make
sure that wires (703 & 705) are connected
together properly with the computer cables
.
D. Gently press in the pop pins on the sides of the
computer arm (150) and slide the arm into main
assembly.
E. Discard and recycle the packaging material
and read the manual thoroughly before using
the rower.
Congratulations!
Assembly for the R99 rower is complete.
Step 9: Foot Pedal Assembly
Tools Needed:
13mm wrenches
A. Locate the foot pedal bar (012) and remove the
preassembled Qty. two nuts (202) and Qty. two
washers (401). Slide the foot pedal bar through
the main frame (002) as shown in the diagram
below.
B. Locate the left and right foot pedals (108) and
slide them onto the foot pedal bar (012). With
the previously removed Qty. two nuts (202) and
Qty. two washers (401) secure them to the foot
pedal bar. Using the provided 13mm wrenches,
firmly tighten the nuts (202).
Содержание LC-R99
Страница 1: ...User s Product Manual LifeCore LC R99 Rower...
Страница 26: ...Page 25...
Страница 27: ...Page 26...


