background image

Channel Menu Satellite Source

For ATV/DTV see 

Channel Menu ATV/DTV

 on page 15.

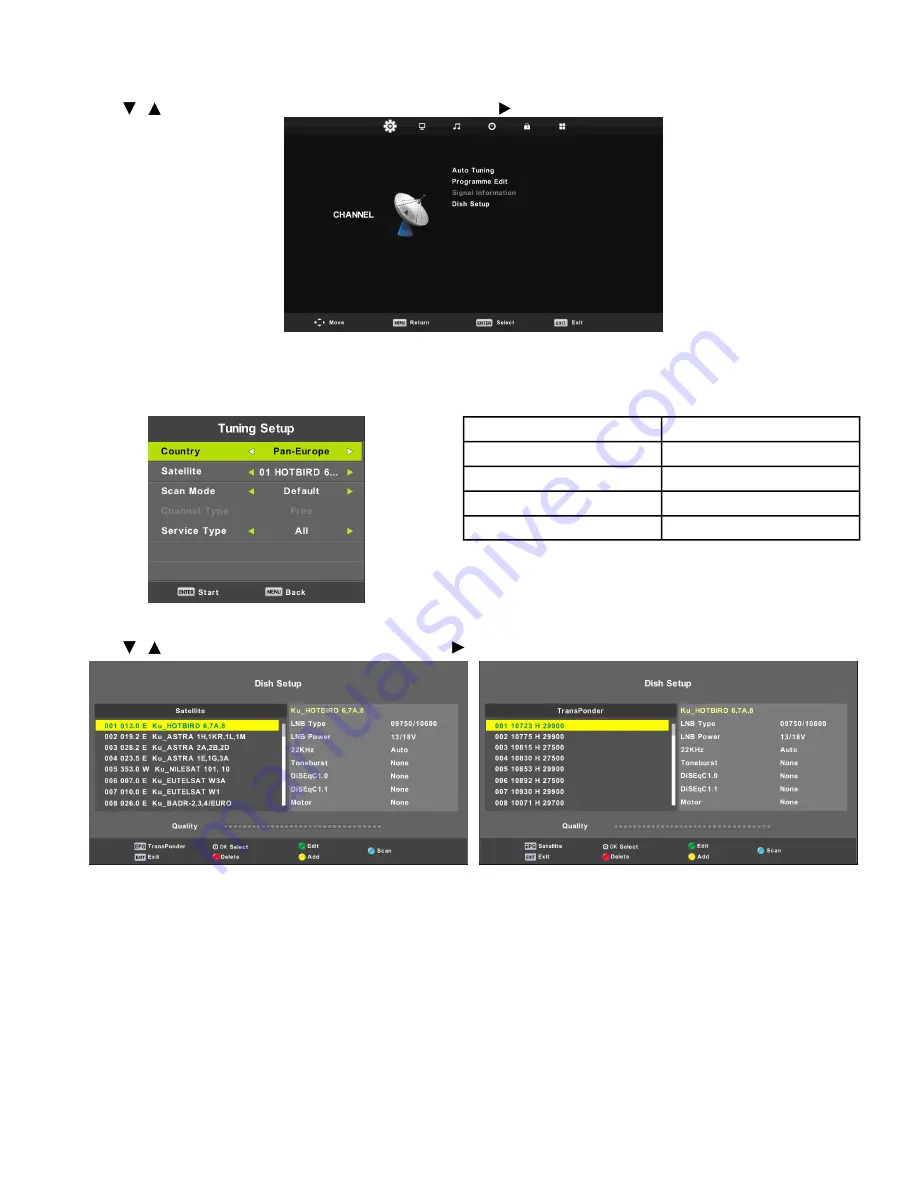
Auto Tuning
1.

Press   /   button to select Auto Tuning, then press Enter /   button to enter.

2.

Press MENU button to call out the main menu.

3.

Highlight Channel using navigation buttons and press OK to enter.

4.

Highlight Auto Tuning and press OK to enter.

Select your country.

Country:

Select an available satellite.

Satellite:

Select your scan mode.

Scan Mode:

Select a channel type.

Channel Type:

Select a service type.

Service Type:

Dish Setup
1.

Press   /   button to select Dish Setup. Press Enter /   button to enter.

2.

Press MENU button to call out the main menu.

3.

Highlight Channel using navigation buttons and press OK to enter it.

4.

Highlight Dish Setup and press OK to enter it.

5.

Press LEFT/RIGHT navigation button to highlight LeftMiddle, or Right column.

6.

Press EXIT button to return.

Page 18 of 39

Содержание ATV15-***D-02

Страница 1: ...15 ATTACHABLE TV PAL DVB T2 DVB C Owner s Manual ATV15 XXXD 02 1009362 0001 REV AA ...

Страница 2: ......

Страница 3: ...porte lifefitness com br Sales Marketing Email lifefitness lifefitness com br ASIA PACIFIC AP Japan Life Fitness Japan Japan Nippon Brunswick Bldg 8F 5 27 7 Sendagaya Shibuya Ku Tokyo Japan 151 0051 Telephone 81 3 3359 4309 Service Email service lifefitnessjapan com Sales Marketing Email sales lifefitnessjapan com Austria Life Fitness Austria Vertriebs G m b H Dückegasse 7 9 3 36 1220 Vienna AUSTR...

Страница 4: ...Approved and Compatible Cleaners 35 Troubleshooting 35 Advanced Troubleshooting 36 Replace headphone jack on the wired remote control 37 Service 37 Returning Equipment to Life Fitness 37 Warranty What is Covered 38 Who is Covered 38 How long it is covered 38 Who Pays Transportation and Insurance For Service 38 What We Will Do To Correct Covered Defects 38 What is Not Covered 38 What You Must Do 38...

Страница 5: ...e power cord from the outlet and carefully retrieve it If the item cannot be reached contact Customer Support Services Do not use this product outdoors near swimming pools or in areas of high humidity Do not expose this product to dripping or splashing liquids If the product should be exposed to liquid contact Life Fitness Customer Support Services Never operate the product with the air openings b...

Страница 6: ...or Type Description Power Jack 12 Volt DC Power In Power In 1 USB Type A USB Input USB 2 HDMI High Definition Audio Video Connection High Def1 3 HDMI High Definition Audio Video Connection High Def2 4 S Video S Video Signal In S Video In 5 RF F Type Male Antenna Cable connection DVB S2 6 RF F Type PAL Female Antenna Cable Connection RF Coaxial 7 Remote Control Wired Remote Control Connection Wired...

Страница 7: ... C DVB S2 MPEG 2 MPEG 4 HEVC NICAM A2 MPEG 1 AC3 Audio UHF VHF CATV Channel Coverage 75 ohm RF Input 12dBmV 25dB Antenna RF 20W Nominal Power Requirements 12Vdc 5A External Power Supply AC Power Input 100 240V 50 60 Hz 1 5A Power Rating DC Supply Input 12V 5A 3 5mm Stereo 300 milliwatt Headphone Jack 13 5 34 4 cm LCD Screen Length 7 6 19 4 cm LCD Screen Height 75mm H x 75mm W 100mm H x 100mm W VES...

Страница 8: ...button to enter the input source 4 Press EXIT button to quit First Time Installation Connect an RF cable from the RF IN to your TV aerial socket Select Language Press button to select the language to be used for menus and message Select Country 1 Press button to highlight country menu 2 Press button to select the country you want to Page 8 of 39 ...

Страница 9: ...Auto Tuning 1 First tuning ATV press Menu and left arrow button to skip ATV tuning 2 Second tuning DTV press Menu and left arrow button to skip DTV tuning Page 9 of 39 ...

Страница 10: ...ctions of TV Remote Basic Functions Turn the power on by pressing the ON OFF key 1 on the remote control A blue LED appears on the lower right corner of the TV when the power is on The LED blinks during SLEEP mode the back light will be off Press the POWER key 1 and hold for 5 seconds to access the Setup Menu Use the RIGHT VOLUME key 2 and LEFT VOLUME key 3 to adjust volume The RIGHT VOLUME key 2 ...

Страница 11: ...hable TV includes the TV Remote The Attachable TV System for new or previously purchased silver gray commercial cardio machines includes the TV Remote ON OFF key 1 RIGHT VOLUME key 2 LEFT VOLUME key 3 NUMERIC KEYPAD 4 UP and DOWN channel arrow keys 5 CC key 6 MUTE key 7 PREVIOUS key 8 Page 11 of 39 ...

Страница 12: ...nnel buttons 4 Volume Press to increase or decrease sound level Channel Press to scan through channels To scan quickly press and hold down either buttons Audio Press to view audio languages Auto Press to do auto configuration directly Display Press to display the source and channel information Volume Channel Configuration 5 Thumbstick buttons Allows navigation of the OSD menus and adjustment of se...

Страница 13: ...io Press to select TV or Radio mode EPG Press to view the Electronic Program Guide Index only available in teletext mode Go to first page Size only available in teletext mode Zoom in out Reveal only available in teletext mode Hide or reveal concealed contents on current page Subpage only available in teletext mode Enter exit subpage 11 Color Buttons Use as shortcuts to edit channel settings 12 Ins...

Страница 14: ...ccess Console Controls Discover SI TV Controls Discover SI TV controls include TV Off Channel Up Down Numeric Keypad Previous Channel Aspect Ratio Input Integrity X TV Controls Integrity X TV controls include Power Mute Last Numeric Keys Channel Up Down Left Right arrow keys to adjust volume Page 14 of 39 ...

Страница 15: ...ain menu 2 Press button to select CHANNEL in the main menu 3 Press button to select the option that you want to adjust in the CHANNEL menu 4 Press Enter button to adjust 5 After finishing your adjustment Press Enter button to save and return to the previous menu Auto Tuning Press button to select Auto Tuning then press Enter button to enter Page 15 of 39 ...

Страница 16: ...nter button to search program Program Edit Press button to select Program Edit then press Enter button to enter sub menu The three colored key is the shortcut key for programming the channel First press to highlight the channel you want to select then 1 Press the Red button to delete the program in the list 2 Press the Yellow button to move the channel in favorite list 3 Press the Blue button to s...

Страница 17: ...Signal Information 1 Press button to select Signal Information 2 Press the Enter button to see the detail information about the signal Only available when there is signal in DTV Page 17 of 39 ...

Страница 18: ...t your country Country Select an available satellite Satellite Select your scan mode Scan Mode Select a channel type Channel Type Select a service type Service Type Dish Setup 1 Press button to select Dish Setup Press Enter button to enter 2 Press MENU button to call out the main menu 3 Highlight Channel using navigation buttons and press OK to enter it 4 Highlight Dish Setup and press OK to enter...

Страница 19: ...er buttons on remote Longitude Angle control to input desired value Press LEFT RIGHT navigation button to select desired option Band 2 Press Green button on remote control to enter Edit menu The operations of Edit menu are the same as Add menu 3 Press Blue button on remote control to enter Scan menu a Press UP DOWN navigation button to highlighted desired item b Press RIGHT navigation button to se...

Страница 20: ...input desired value Symbol ks s Press LEFT RIGHT navigation button to select desired option Polarity 2 Press Green button on remote control to enter Edit menu The operations of Edit menu are the same as Add menu 3 Press Blue button on remote control to enter Scan menu a Press UP DOWN navigation button to highlighted desired item b Press LEFT RIGHT navigation button to select desired Scan Mode Chan...

Страница 21: ...select desired option LNB Power Press LEFT RIGHT navigation button to select desired option 22 kHz Press LEFT RIGHT navigation button to select desired option Toneburst Press LEFT RIGHT navigation button to select desired option DisEqc1 0 Digital Satellite Equipment Control Press LEFT RIGHT navigation button to select desired option DisEqc1 1 Press LEFT RIGHT navigation button to select desired op...

Страница 22: ...olor sharpness and tint when the picture is in Personal mode Tip You can press PMODE button to change the Picture Mode directly Contrast Brightness Color Tint Sharpness Press button to select option then press button to adjust Adjust the highlight intensity of the picture but the shadow of the picture is invariable Contrast Adjust the optical fiber output of the entire picture it will effect the d...

Страница 23: ...Default color temperature Normal Increase the red color for the white Warm Noise Reduction To filter out and reduces the image noise and improve picture quality 1 Press button to select Noise Reduction 2 Press OK button to enter sub menu Select to turn off video noise detection Off Detect and reduce low video noise Low Detect and reduce moderate video noise Middle Detect and reduce enhanced video ...

Страница 24: ...rograms Music Enhances treble and bass for a rich sound experience Movie Enhances vocals for sports Sports Select to customize picture settings Personal Note The treble and bass are only available in User mode you can adjust them as you like Press button to select option Press button to adjust Note This item can adjust the speaker s output it enables you to listen to best at your position Balance ...

Страница 25: ...finishing your adjustment Press Enter button to save and return to the previous menu Time Zone 1 Press button to select Time Zone then press Enter button to enter sub menu 2 Press button to select time zone Sleep Timer 1 Press button to select Sleep Timer then press Enter button to enter sub menu 2 Press button to select Available options are Off 10 min 20 min 30 min 60 min 90 min 120 min 180 min ...

Страница 26: ...ss button to select Tip The remote control does not make any operation in the hypothesis time it will close down automatically If you do any operation it will reset the time OSD Timer 1 Press button to select OSD Timer then press Enter button to enter sub menu 2 Press button to select Page 26 of 39 ...

Страница 27: ... adjust 5 After finishing your adjustment Press MENU button to return back to the previous menu Lock System 1 Press button to select Lock System 2 Press Enter button to make the following 3 options valid Default password is 0000 and if forget what you set please call the service center Set Password 1 Press button to select Set Password 2 Press Enter button to enter sub menu to set new password Pag...

Страница 28: ... unlock the channel Parental Guidance 1 Press button to select Parental Guidance 2 Press Enter button to enter sub menu to select the number of age which is suitable for your children Key Lock 1 Press button to select Off or On 2 Press button to select When Key Lock s statue is on you can t use the Key panel button Page 28 of 39 ...

Страница 29: ...press Enter button to enter sub menu to select Default Source Press button to select Default Prog then press button to adjust It is available when the default source is TV Default Prog Press button to select Max Volume then press button to adjust Max Volume We can import parameter of Audio Channel Lock Setup from USB disk Insert USB disk choose Import Database and press Enter to import Import Data...

Страница 30: ... button to adjust 5 After finishing your adjustment Press Enter button to save and return to the previous menu OSD Language 1 Select an OSD menu language can be displayed Default English is selected as menu language 2 Press button to select Menu Language TT Language 1 Press button to select TT Language then press Enter button to enter sub menu 2 Press button to select TT language Page 30 of 39 ...

Страница 31: ...e Language then press Enter button to enter sub menu 2 Press button to select the primary of Subtitle Language 3 Press button to select the Subtitle Language Hearing Impaired Press button to select Hearing Impaired then press Enter button to select On or Off Aspect Ratio 1 Press button to select Aspect Ratio then press Enter button to enter sub menu 2 Press button to select aspect ratio Available ...

Страница 32: ...s button to select First time Installation then press Enter button to enter Reset Press button to select Reset then press Enter button to enter sub menu Software Update USB 1 Press button to select Software Update USB 2 Plug your USB device in the USB slot 3 Press Enter button to update the right software Page 32 of 39 ...

Страница 33: ...ton to record program Press Green button repeatedly to set a reminder Press Yellow button to display program guide of previous day Press Blue button to display program guide of next day Favorite List When viewing an available channel press FAV button on remote control to enter Favorite List menu page 1 Press UP or DOWN navigation buttons to select preferred channel 2 Press OK button to confirm the...

Страница 34: ...ess OK button on remote control to enter Channel List menu page 1 Press UP or DOWN navigation buttons to select preferred channel 2 Press LEFT RIGHT navigation buttons to select a channel group 3 Press OK button to confirm the selection Page 34 of 39 ...

Страница 35: ...800 351 3737 or email customersupport lifefitness com Mild soap and water or a mild non abrasive household cleaner can also be used to clean the display and all exterior surfaces Use a soft microfiber cloth only Apply the cleaner to the microfiber cloth before cleaning DO NOT use ammonia or acid based cleaners DO NOT use abrasive cleaners DO NOT use paper towels DO NOT apply cleaners directly to t...

Страница 36: ...n Advanced Troubleshooting If the picture regularly breaks up then the signal received may be too weak or too strong to allow the digital TV receiver to generate a stable picture Have your service provider confirm that the signal level at the machine is 72 dBuV 25 dB This is equivalent to 12 dBmV and includes the range of 13 dBmV to 37dBmV These levels are acceptable for both analog and digital TV...

Страница 37: ...3 Slide the stereo plug on the audio cable in the new headphone jack 4 Replace the headphone jack Important Do not stretch crimp or damage the cable Cables damaged by improper installation will not be covered by the warranty Service Any service other than cleaning or user maintenance must be performed by an authorized service representative For information about product service or operation please...

Страница 38: ...itness representative What You Must Do Retain proof of purchase Use operate and maintain the as specified in the Manual notify the place of purchase of any defect within 10 days after discovery of the defect if instructed return any defective part for replacement or if necessary the entire Product for repair reserves the right to decide whether or not a product is to be returned for repair How to ...

Страница 39: ... legal rights and you may have other rights which vary from state to state and country by country Our Pledge To You Our Products are designed and manufactured to the highest standards We want you to be completely satisfied with our Products and will do everything possible under the terms of this warranty to keep you secure in knowing you have bought the best Page 39 of 39 ...

Отзывы: