Deployment and installation
9.3.2. On-surface node installation
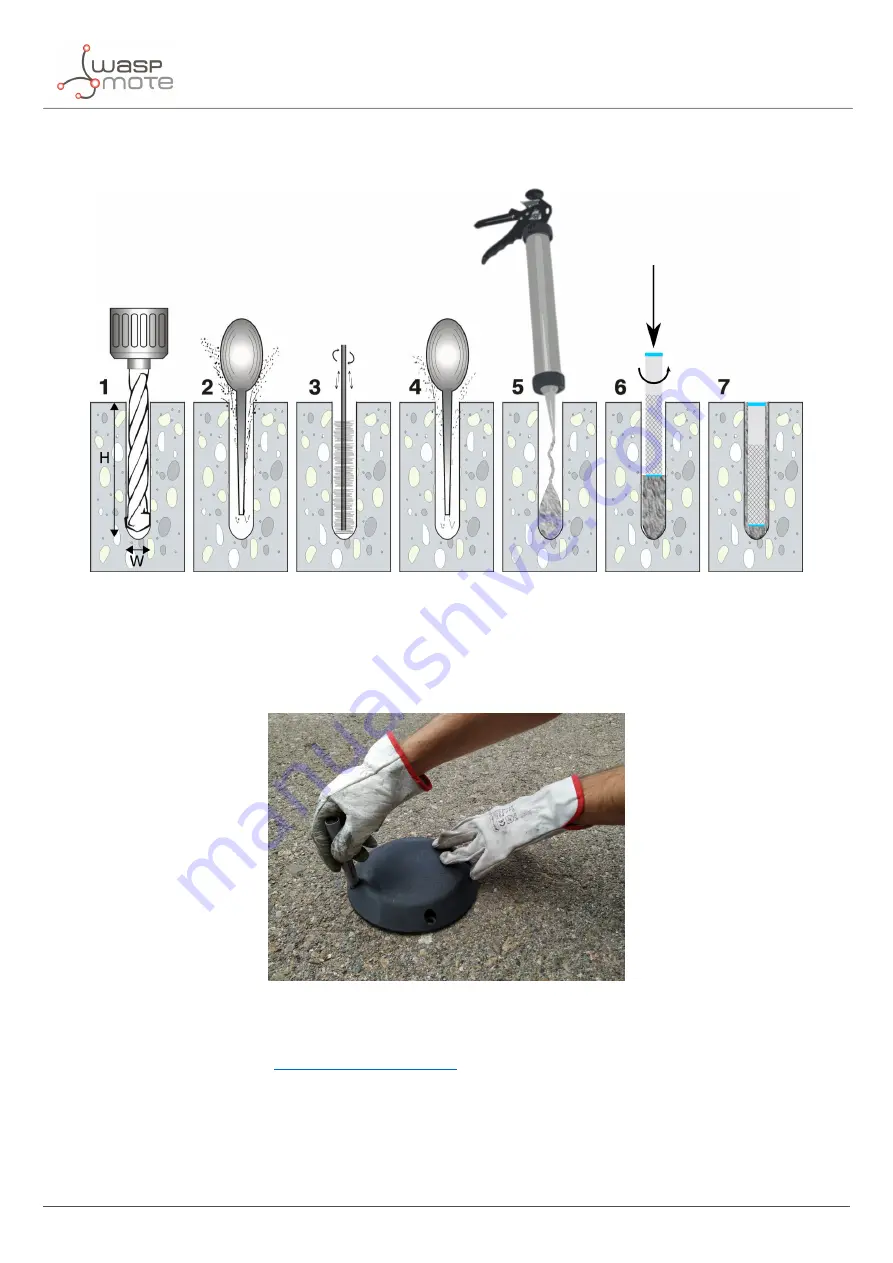
Figure : Step by step chemical
fi
xing and anchor installation
Firstly, mark 4 holes in the asphalt. Select an area as
fl
at and regular as possible, avoid irregularities on the terrain.
You should place the enclosure in the
fi
nal location and use the 4 holes as a reference to drill 4 little marks on the
ground. You can also draw 4 dots with ink.
Figure : Marking the holes for the node
Then continue with the chemical
fi
xing installation step by step as described above. Also, in the next video you can
see how the installation is done
Step 1
: Drill the holes.
The drill diameter must be W=14 mm minimum. Try to drill as vertical as possible to enable the best enclosure
installation. The length of the hole must be about H=85 mm.
- 130 -
v7.5
Содержание Waspmote Smart Parking v2
Страница 1: ......
Страница 23: ...Smart Parking node 3 6 4 Node program flowchart Figure Smart Parking node program flowchart 22 v7 5 ...
Страница 92: ...LoRaWAN Network Server setup Figure Check In to DeviceHQ 91 v7 5 ...
Страница 135: ...Deployment and installation Figure Final section of the anchor and screw 134 v7 5 ...
Страница 143: ...Safety Guides 11 Safety Guides 11 1 Smart Parking Chemical Fixing Cartridge 142 v7 5 ...
Страница 144: ...Safety Guides 143 v7 5 ...
Страница 145: ...Safety Guides 144 v7 5 ...
Страница 146: ...Safety Guides 145 v7 5 ...
Страница 147: ...Safety Guides 146 v7 5 ...
Страница 148: ...Safety Guides 147 v7 5 ...
Страница 149: ...Safety Guides 148 v7 5 ...
Страница 150: ...Safety Guides 149 v7 5 ...
Страница 151: ...Safety Guides 150 v7 5 ...
Страница 152: ...Safety Guides 151 v7 5 ...
Страница 153: ...Safety Guides 152 v7 5 ...
Страница 154: ...Safety Guides 153 v7 5 ...


