background image

Saf

et

y Inf

ormation

3

Safety Information

  1

CAUTION concerning the Power Cord

Most appliances recommend they be placed upon a 
dedicated circuit; 

That is, a single outlet circuit which powers only 
that appliance and has no additional outlets or 
branch circuits. Check the specifi cation page of this 
owner’s manual to be certain. Do not overload wall 
outlets. Overloaded wall outlets, loose or damaged 
wall outlets, extension cords, frayed power cords, or 
damaged or cracked wire insulation are dangerous. 
Any of these conditions could result in electric 
shock or fi re. Periodically examine the cord of your 
appliance, and if its appearance indicates damage 
or deterioration, unplug it, discontinue use of the 
appliance, and have the cord replaced with an exact 
replacement part by an authorized service centre. 
Protect the power cord from physical or mechanical 
abuse, such as being twisted, kinked, pinched, closed 
in a door, or walked upon. Pay particular attention 
to plugs, wall outlets, and the point where the cord 
exits the appliance. To disconnect power from the 
mains, pull out the mains cord plug. When installing 
the product, ensure that the plug is easily accessible.

The appliance is not intended for use by young 
children or infi rm persons without supervision.

Young Children should be supervised to ensure 
that they do not play with appliance.

If the appliance is supplied from a cord 
extension set or an electrical portable outlet 
device, the cord extension set on electrical 
portable outlet device must be positioned so 
that it is not subject to splashing or ingress of 
moisture.

This device is equipped with a portable battery or 
accumulator. 

Safety way to remove the battery or the battery 
from the equipment: 

Remove the old battery 

or battery pack, follow the steps in reverse order 
than the assembly. To prevent contamination of 
the environment and bring on possible threat 
to human and animal health, the old battery or 
the battery put it in the appropriate container at 
designated collection points. Do not dispose of 
batteries or battery together with other waste. 
It is recommended that you use local, free 
reimbursement systems batteries and accumulators. 
The battery shall not be exposed to excessive heat 
such as sunshine, fi re or the like.

HB905TAW-FH.BNZLLLK_ENG_0854.ind3   3

HB905TAW-FH.BNZLLLK_ENG_0854.ind3   3

2010.5.28   3:47:37 PM

2010.5.28   3:47:37 PM

Содержание W95

Страница 1: ... MODEL HB905TAW HB905TAW SB95TA F S C W W95 P NO MFL65220854 Please read this manual carefully before operating your set and retain it for future reference HB905TAW FH BNZLLLK_ENG_0854 ind1 1 HB905TAW FH BNZLLLK_ENG_0854 ind1 1 2010 5 28 3 47 32 PM 2010 5 28 3 47 32 PM ...

Страница 2: ...ny ventilation openings Install in accordance with the manufacturer s instructions Slots and openings in the cabinet are provided for ventilation and to ensure reliable operation of the product and to protect it from over heating The openings shall be never be blocked by placing the product on a bed sofa rug or other similar surface This product shall not be placed in a built in installation such ...

Страница 3: ... cord plug When installing the product ensure that the plug is easily accessible The appliance is not intended for use by young children or infirm persons without supervision Young Children should be supervised to ensure that they do not play with appliance If the appliance is supplied from a cord extension set or an electrical portable outlet device the cord extension set on electrical portable o...

Страница 4: ...depending on your time of purchase as those restrictions may be adopted and or changed by AACS after the production of this product Furthermore BD ROM Mark and BD are additionally used as content protection systems for BD format which imposes certain restrictions including playback restrictions for BD ROM Mark and or BD protected contents To obtain additional information on AACS BD ROM Mark BD or ...

Страница 5: ...e a PAL colour system TV you will see just distorted images when using discs or video contents recorded in NTSC The multi system colour TV changes the colour system automatically according to input signals In case that the colour system is not changed automatically turn it off and then on to see normal images on screen Even if the disc recorded in NTSC colour system are well displayed on your TV t...

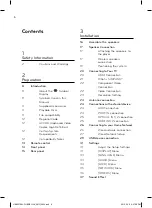
Страница 6: ...nection 19 Positioning the system 20 Connecting to Your TV 20 HDMI Connection 21 What is SIMPLINK 22 Component Video Connection 22 Video Connection 23 Resolution Setting 23 Antenna connection 24 Connections with external device 24 AUX Connection 24 PORT IN connection 25 OPTICAL IN 1 2 connection 25 HDMI IN 1 2 connection 26 Connecting to your Home Network 26 Wired network connection 27 Wired Netwo...

Страница 7: ...intenance 73 Notes on Discs 73 Handling the Unit 6 Troubleshooting 74 General 75 Picture 75 Sound 76 Network 7 Appendix 77 Controlling a TV with the Supplied Remote Control 78 Area Code List 79 Language code List 80 Network Software Update 80 Network update notification 80 Software Update 82 Video output resolution 85 Specifications 87 Important Information Relating to Network Services 88 Open sourc...

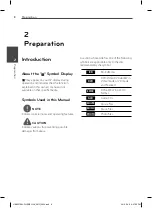
Страница 8: ...d operating features CAUTION Indicate cautions for preventing possible damages from abuse A section whose title has one of the following symbols are applicable only to the disc represented by the symbol BD BD ROM disc DVD DVD Video DVD R RW in Video mode or VR mode and finalized AVCHD DVD R RW in AVCHD format ACD Audio CDs MOVIE Movie files MUSIC Music files PHOTO Photo files HB905TAW FH BNZLLLK_E...

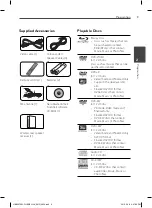
Страница 9: ...disc Video mode and finalized only Supports the dual layer disc also Finalized AVCHD format DVD R discs that contain Movie Music or Photo files DVD RW 8 12 cm disc VR mode Video mode and finalized only Finalized AVCHD format DVD RW discs that contain Movie Music or Photo files DVD RW 8 12 cm disc Video mode and finalized only AVCHD format Finalized AVCHD format DVD RW discs that contain Movie Musi...

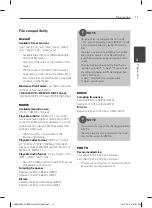
Страница 10: ...This player requires discs and recordings to meet certain technical standards in order to achieve optimal playback quality Pre recorded DVDs are automatically set to these standards There are many different types of recordable disc formats including CD R containing MP3 or WMA files and these require certain pre existing conditions to ensure compatible playback Customers should note that permission...

Страница 11: ... formats are compatible with this unit Sampling frequency between 32 kHz to 48 kHz WMA between 16 kHz to 48 kHz MP3 Bit rate between 20 kbps to 320 kbps WMA between 32 kbps to 320 kbps MP3 NOTE HD movie files contained on the CD or USB 1 0 1 1 may not played properly BD DVD or USB 2 0 are recommended to play back HD movie files This player supports H 264 MPEG 4 AVC profile Main High at Level 4 1 F...

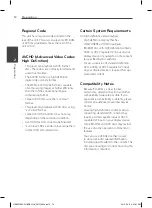
Страница 12: ...n display that has COMPONENT or HDMI input jacks BD ROM disc with high definition content HDMI or HDCP capable DVI input on your display device is required for some content as specified by disc authors For up conversion of standard definition DVD a HDMI or HDCP capable DVI input on your display device is required for copy protected content Compatibility Notes Because BD ROM is a new format certain...

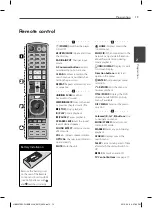
Страница 13: ...onnected to the network can provide information about the current song during movie playback INFO DISPLAY Displays or exits On Screen Display Direction buttons Selects an option in the menu ENTER Acknowledges menu selection O RETURN Exits the menu or resumes playback TITLE POPUP Displays the DVD title menu or BD ROM s pop up menu if available DISC MENU Accesses the menu on a disc d Coloured R G Y ...

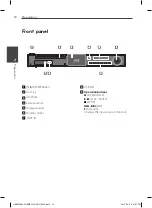
Страница 14: ...c iPod Dock d Remote sensor e Display window f Volume control g PORT IN h USB Port i Operation buttons Z OPEN CLOSE B X PLAY PAUSE x STOP SKIP F Function Changes the input source or function HB905TAW FH BNZLLLK_ENG_0854 ind14 14 HB905TAW FH BNZLLLK_ENG_0854 ind14 14 2010 5 28 3 47 47 PM 2010 5 28 3 47 47 PM ...

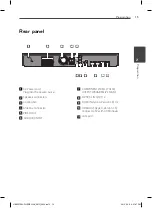
Страница 15: ... OUTPUT PROGRESSIVE SCAN h OPTICAL IN 1 TV 2 i HDMI IN type A Version 1 3 1 2 j HDMI OUT type A Version 1 3 Connect to TV with HDMI inputs k LAN port Rear panel 1 2 3 4 5 1 1 8 9 2 3 4 5 7 6 11 10 2 3 4 5 6 7 8 9 10 11 12 6 7 8 9 10 10 11 11 1 2 3 4 5 6 7 8 9 10 11 HB905TAW FH BNZLLLK_ENG_0854 ind15 15 HB905TAW FH BNZLLLK_ENG_0854 ind15 15 2010 5 28 3 47 47 PM 2010 5 28 3 47 47 PM ...

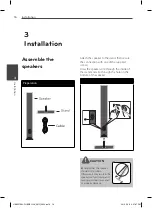
Страница 16: ...e through the inside of the stand and also through the hole on the bottom of the speaker CAUTION Be careful that the speaker should not fall down Otherwise it may result in the speaker malfunctioning and causing personal injury and or property damage 3 Installation HB905TAW FH BNZLLLK_ENG_0854 ind16 16 HB905TAW FH BNZLLLK_ENG_0854 ind16 16 2010 5 28 3 47 47 PM 2010 5 28 3 47 47 PM ...

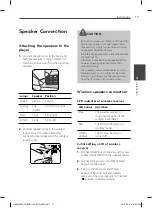
Страница 17: ...falling down and causing personal injury and or property damage The speakers contain magnet parts so colour irregularity may occur on the TV screen or PC monitor screen Please use the speakers away from the TV screen or PC monitor screen Wireless speakers connection LED indicator of wireless receiver LED Colour Operation Blue The wireless receiver is receiving the signal of the wireless transmitte...

Страница 18: ... m 32 ft Optimum performance can be implemented only when the Wireless Transmitter and the Wireless Receiver within distance of 2 m 6 ft to 10 m 32 ft is used since communication failure may occur if longer distance is used Be sure to match the speaker cable to the appropriate terminal on the components to and to If the cables are reversed the sound will be distorted and will lack bass It takes a ...

Страница 19: ...o the sides of the monitor or screen and as flush with the screen surface as possible C Centre speaker Place the centre speaker above or below the monitor or screen D Surround left speaker L E Surround right speaker R Place these speakers behind your listening position facing slightly inwards F Subwoofer The position of the subwoofer is not so critical because low bass sounds are not highly direct...

Страница 20: ...es as necessary to make the best connections Make sure the player is connected directly to the TV Tune the TV to the correct video input channel Do not connect your player via your VCR The image could be distorted by the copy protection system HDMI Connection If you have a HDMI TV or monitor you can connect it to this player using a HDMI cable Type A Version 1 3 Connect the HDMI OUT jack on the pl...

Страница 21: ...s player Next switch on the HDMI DVI device and leave it for around 30 seconds then switch on this player The connected device s video input is set correctly for this unit The connected device is compatible with 720x576p 1280x720p 1920x1080i or 1920x1080p video input Not all HDCP compatible HDMI or DVI devices will work with this player The picture will not be displayed properly with non HDCP devi...

Страница 22: ...ayer Green Blue Red NOTE When you use COMPONENT VIDEO OUT connection you can change the resolution for the output Refer to Resolution setting on page 23 Video Connection Connect the VIDEO OUT jack on the player to the video in jack on the TV using a video cable You can hear the sound through the system s speakers Video Connection TV Yellow Player Player TV Yellow HB905TAW FH BNZLLLK_ENG_0854 ind22...

Страница 23: ...ution then press ENTER to confirm your selection NOTE If your TV does not accept the resolution you have set on the player you can set resolution to 576p as follows 1 Press Z to open the disc tray 2 Press x for more than 5 seconds Since several factors affect the resolution of video output see Video Output Resolution on page 82 Antenna connection Connect the supplied antenna for listening to the r...

Страница 24: ... output jacks of your component TV VCR etc Red White Red White Player To the audio output jacks of your component TV VCR etc PORT IN connection You can enjoy the sound from your portable audio player through the speakers of this system Connect the headphones or line out jack of the portable audio player into the PORT IN socket of this unit And then select the PORTABLE option by pressing RADIO INPU...

Страница 25: ...select the HDMI IN 1 2 option by pressing RADIO INPUT and ENTER You can also use the F Function button on the front panel to select the input mode HDMI 1 2 Connection To the HDMI OUT jack of your component set top box digital satellite receiver video game machine etc To the HDMI OUT jack of your component set top box digital satellite receiver video game machine etc NOTE You cannot change the vide...

Страница 26: ...rnet cable CAT5 or better with RJ45 connector In the example configuration for wired connection below this player would be able to access content from either of the PCs Wired Network Connection Broadband Service Router WAN LAN 1 LAN 2 LAN 3 Player PC PC Router Broadband Service Player NOTE When plugging or unplugging the LAN cable hold the plug portion of the cable When unplugging do not pull on t...

Страница 27: ...ynamic to allocate an IP address automatically NOTE If there is no DHCP server on the network and you want to set the IP address manually select Static then set the IP Address Subnet Mask Gateway and DNS Server using U u I i and numerical buttons If you make a mistake while entering a number press CLEAR to clear the highlighted part 3 Select OK and press ENTER to apply network settings 4 The playe...

Страница 28: ...tents may not operate properly because of internet congestion the quality or bandwidth of your internet service or problems at the provider of the content Some internet connection operations may not be possible due to certain restrictions set by the Internet service provider ISP supplying your broadband Internet connection Any fees charged by an ISP including without limitation connection charges ...

Страница 29: ...s of files a menu for the file type selection will appear File loading may takes few minutes depending on the number of content stored in the USB storage device Press ENTER while Cancel is selected to stop loading 2 Select Movie Photo or Music using I i and press ENTER 3 Select a file using U u I i and press PLAY or ENTER to play the file You can check the space of the USB device on the screen 4 S...

Страница 30: ...SB device during operation play etc An USB device which requires additional programme installation when you have connected it to a computer is not supported USB device USB device that support USB 1 1 and USB 2 0 Movie music and photo files can be played For details of operations on each file refer to relevant pages Regular back up is recommended to prevent data loss If you use a USB extension cabl...

Страница 31: ...ding to your TV type 4 3 Letter Box Select when a standard 4 3 TV is connected Displays theatrical images with masking bars above and below the picture 4 3 Pan Scan Select when a standard 4 3 TV is connected Displays pictures cropped to fill your TV screen Both sides of the picture are cut off 16 9 Original Select when a 16 9 wide TV is connected The 4 3 picture is displayed with an original 4 3 a...

Страница 32: ... 576i Outputs 576 lines of interlaced video 1080p Display Mode When the resolution is set to 1080p select 24 Hz for smooth presentation of film material 1080p 24 Hz with a HDMI equipped display compatible with 1080p 24 Hz input NOTE When you select 24 Hz you may experience some picture disturbance when the video switches video and film material In this case select 50 Hz Even when 1080p Display Mod...

Страница 33: ...e NOTE Depending on the disc your language setting may not work AUDIO Menu Speaker Setup To obtain the best possible sound use the speaker setup display to specify the volume of the speakers you have connected and their distance from your listening position Use the test to adjust the volume of the speakers to the same level Speaker Select a speaker that you want to adjust Volume Adjust the output ...

Страница 34: ...ting can be changed only when a disc is not inserted or the unit is in complete stop mode LOCK Menu To access any features in the LOCK settings you must enter the 4 digit security code you have created If you have not entered a password yet you are prompted to do so Enter a 4 digit password twice and press ENTER to create a new password Password You can create or change the password None Enter a 4...

Страница 35: ...date feature BD Live Home Link and NetCast features Connection Setting If your home network environment is ready to connect to the player the player needs to be set up for network communication See Connecting to your Home Network on page 26 Connection Status If you want to check the network status on this player select the Connection Status option and press ENTER to check whether a connection to t...

Страница 36: ...on this unit Auto Power Off The screen saver appears when you leave the player in Stop mode for about five minutes If you set this option to On the unit automatically turns itself off after the Screen Saver is displayed for 25 minutes Set this option to Off to leave the screen saver until the unit is operated by the user Initialize Factory Set You can reset the player to its original factory setti...

Страница 37: ...vailable only to 2 channel sources PL ll Music Performs Pro Logic ll music mode decoding to the input signal and produces five full bandwidth output channels from 2 channel sources This setting is ideal for normal stereo sources such as CD This mode is available only to 2 channel sources Clear Voice This mode makes voice sound clear improving the quality of voice sound Virtual You can enjoy more d...

Страница 38: ...ng I i and press ENTER When you connect up to two devices it appears as above 6 Select a file using U u I i and press B PLAY or ENTER to play the file NOTE Playback functions described in this manual are not always available in every files and medium Some functions can be restricted depending on many factors Depending on the BD ROM titles a USB device connection may be needed for proper playback 4...

Страница 39: ...s chapter track file During playback press or to go to the next chapter track file or to return to the beginning of the current chapter track file Press twice briefly to step back to the previous chapter track file Using the disc menu BD DVD AVCHD To display the disc menu The menu screen may be displayed first after loading a disc which contains a menu If you want to display the disc menu during pl...

Страница 40: ...EPEAT repeatedly to select a desired repeat mode BDs DVDs A Selected portion will be repeated continually Chapter The current chapter will be played back repeatedly Title The current title will be played back repeatedly To return to normal playback press REPEAT repeatedly to select Off Audio CDs Music files The current track or file will be played back repeatedly All the tracks or files will be pl...

Страница 41: ...ly 2 Repeat step 1 to add up to nine markers To recall a marked scene 1 Press SEARCH and the search menu appears on the screen 2 Press a number button to select a marker number that you want to recall Playback starts from the marked scene To delete a Marker 1 Press SEARCH and the search menu appears on the screen 2 Press u to highlight a marker number Use I i to select a marked scene that you want...

Страница 42: ...rs on the screen 2 Press u to highlight a marker number Use I i to select a marked scene that you want to playback from 3 Press ENTER to start playback from the marked scene NOTE This function may not work depending on discs titles server ability This function may not work on some Home Link contents depending on the file type and ability of the DLNA server Changing content list view MOVIE MUSIC PH...

Страница 43: ... The information displayed on the screen may not be correct compared to the actual content information Last Scene Memory BD DVD This unit memorizes the last scene from the last disc that is viewed The last scene remains in memory even if you remove the disc from the unit or switch off the unit If you load a disc that has the scene memorized the scene is automatically recalled NOTE Last Scene Memor...

Страница 44: ... using U u 3 Use I i to adjust the selected option value 4 Press RETURN O to exit the On Screen display NOTE If no button is pressed for a few seconds the on screen display disappears A title number cannot be selected on some discs Available items may differ depending on discs or titles If BD interactive title is playing back some setting information is displayed on the screen but prohibited to be...

Страница 45: ...track or audio channel NOTE Some discs allow you to change audio selections only via the disc menu If this is the case press TITLE POPUP or DISC MENU button and choose the appropriate audio from the selections on the disc menu Immediately after you have switched sound there may be a temporary discrepancy between the display and actual sound On BD ROM disc the multi audio format 5 1CH or 7 1CH is d...

Страница 46: ... the TV Aspect Ratio option in On Screen display the TV Aspect Ratio option in the Setup menu is not changed Changing the Picture Mode BD DVD AVCHD MOVIE You can change the Picture mode option during playback 1 During playback press INFO DISPLAY to display the on screen display 2 Use U u to select the Picture Mode option 3 Use I i to select desired option 4 Press RETURN O to exit the On Screen dis...

Страница 47: ...nt USB Connection 3 Press Home and set the BD LIVE connection option on the Setup menu page 35 Depending on the disc the BD LIVE function may not operate if BD LIVE connection option is set to Partially Permitted 4 Insert a BD ROM with BD LIVE The operations may differ depending on the disc Refer to the manual supplied with the disc NOTE Do not extract the connected USB device while content is bei...

Страница 48: ...lay the file NOTE The file requirements are described on page 11 You can use various playback functions Refer to pages 38 46 Unfinalized DVD VR format discs may not be played in this player Some DVD VR disc are made with CPRM data by DVD recorder This unit cannot support these kinds of discs What is CPRM CPRM is a copy protection system with scramble system only allowing the recording of copy once...

Страница 49: ...le Selected subtitle file will be displayed when you play the movie file NOTE If you press x STOP during playback the subtitle selection is cancelled This function may not work in the Home Link feature Changing subtitle code page MOVIE If the subtitle is not displayed properly You can change the subtitle code page to view the subtitle file properly 1 During playback press INFO DISPLAY to display t...

Страница 50: ...ress B PLAY to start slide show To stop a slide show Press x STOP during slide show To pause a slide show Press X PAUSE during slide show Press B PLAY to re start the slide show To skip to the next previous photo While viewing a photo in full screen press I or i to go to the previous or next photo NOTE The file requirements are described on page 11 You can use various playback functions Refer to p...

Страница 51: ...ffect Use I i to select a transition effect between photos in a slide show h Speed Use I i to select a delaying speed between photos in a slide show 3 Press RETURN O to exit the option menu Listening to music during a slide show You can display photo files while listening to music files 1 Press HOME 2 Select Photo or Home Link using I i and press ENTER 3 Select the Disc or USB option using I i and...

Страница 52: ...ic from Home Link folder selection is not available Only file selection is available on the Home link 9 Use i to select OK and press ENTER to complete music selection Listening to music The player can play Audio CDs and music files 1 Press HOME 2 Select Music using I i and press ENTER 3 Select the device using I i and press ENTER When you connect up to two devices it appears as above 4 Select a mu...

Страница 53: ...s step to select tracks as many as you want Select all the tracks on an Audio CD Selects an encoding option from the pop up menu 128 kbps 192 kbps 320 kbps or Lossless Cancels the recording and returns to the previous screen 6 Use U u I i to select Start and press ENTER 7 Use U u I i to select the destination folder to be copied If you want to create a new folder use U u I i to select New Folder a...

Страница 54: ...be an infringement of copyrights and constitute a criminal offense This equipment should not be used for such purposes Be responsible Respect copyrights Viewing information from Gracenote Media Database The player can access to the Gracenote Media Database and loads the music information so that Track name Artist Name Genre and other text information can be displayed on the list Audio CD When you ...

Страница 55: ...ort Depending on the cases it will takes a few minutes to load music information from the Gracenote media database Information may be displayed in broken letters if the language you selected is not available on the Gracenote Media Database This function is not available for NetCast on line content and content in DLNA servers LG is a licence of Gracenote technology and is not responsible or reliabl...

Страница 56: ...a photo on a TV For details about a slide show refer to the iPod User Guide Before connecting the iPod turn this unit off and reduce the volume of this unit to its minimum 1 Connect the iPod firmly To open the iPod Dock pull iPod dock Connect the iPod When you connect the iPod on the HOME menu the player plays a music automatically Or a menu for the file type selection will appear 2 Select a file ...

Страница 57: ...appears when the communication between this unit and your iPod is failed t Undock re dock your iPod in this unit your iPod is not connected firmly this unit recognises your iPod as unknown device your iPod is exceptionally low on power t The battery needs to be charged t If you charge the battery while iPod is extremely low in power it may take longer to charge You may use the dock adapter which s...

Страница 58: ...you have turned down the volume 1 Press RADIO INPUT until the TUNER FM appears in the display window 2 Select the desired frequency by using TUNING 3 Press ENTER a preset number will flash in the display window 4 Press PRESET to select the preset number you want 5 Press ENTER The station is stored 6 Repeat the steps 2 to 5 to store other stations Deleting all the saved stations Press and hold CLEA...

Страница 59: ...roperability Guidelines This unit complies with DLNA Interoperability Guidelines v1 5 When a PC running DLNA server software or other DLNA compatible device is connected to this player some setting changes of software or other devices may be required Please refer to the operating instructions for the software or device for more information Accessing a DLNA media server 1 Check the network connecti...

Страница 60: ...o MediaHome 4 Essentials Nero MediaHome 4 Essentials is a software for sharing movie music and photo files stored on your computer with this player as a DLNA compatiable digital media server NOTE The Nero MediaHome 4 Essentials CD ROM is designed for PCs and should not be inserted in this player or in any product other than a PC The supplied Nero MediaHome 4 Essentials CD ROM is a customized softw...

Страница 61: ...lick Next The installation process is started 7 If you want to take part in the anonymous collection of data select the check box and click the Next button 8 Click the Exit button to complete the installation Sharing files and folders On your computer you must share the folder that contains the movie music and or photo content to play them using Home Link features This part explains the procedure f...

Страница 62: ...an be displayed in the Home Link menu but those cannot be played on this player If there is an unplayable music file in the Home Link menu the player skips the file and play next file The subtitle file name and movie file name have to be the same and located at the same folder The playback and operating quality of the Home Link function may be affected by your home network condition The files on a...

Страница 63: ...e I i to select D or Ď and then press ENTER Clear Clear all entered characters Space Inserts a space at the cursor position Deletes the previous character at the cursor position ABC abc Change the keyboard menu settings to capital letters small letters or symbols 3 When you finish entering the network user ID and password select OK using U u I i and press ENTER to access the folder The network use...

Страница 64: ...cates the weather of your favorite city in the AccuWeather feature YouTube You can browse search and watch YouTubeTM videos over the internet on your TV via your LG Blu ray disc player Watch YouTubeTM videos on your TV 1 On the player select the YouTubeTM option in the NetCast menu using I i and press ENTER 2 Press U to select the option menu bar 3 Use I i to select an option and press ENTER to se...

Страница 65: ...ign in with your YouTubeTM account on page 67 for more details Local site Choose which country s videos you would like to view The countries listed on the Local Site menu may be different from those listed on the YouTubeTM web site NOTE The YouTubeTM menu can display 5 videos in the videos list Press green G or yellow Y buttons to display previous next 5 videos If you select the Most Viewed or Top...

Страница 66: ... i on the virtual key board 2 Press INFO DISPLAY to display the extended character set 3 Use I i to select a character then press ENTER Available languages to enter on the keyboard mode are as follows English Spanish Italian French German Dutch Portuguese Swedish Polish and Czech Keypad Mode This mode allows you to enter letters by pressing the buttons on the remote control Press the buttons with ...

Страница 67: ...press ENTER to display the virtual keyboard 2 Use U u I i to select a character then press ENTER to confirm your selection on the virtual keyboard Refer to Using the virtual keyboard on page 66 for using the virtual keyboard 3 When you finish entering the user name and the password select OK and press ENTER to sign in 4 If you want to sign out select the Sign Out from the YouTubeTM menu and press ...

Страница 68: ...oto Options while viewing a photo You can use various options during viewing a photo in full screen 1 While viewing a photo in full screen press INFO DISPLAY to display the option menu 2 Select an option using U u a g f e d c b a Current photo Total number of photos Use I i to view previous next photo b Slide Show Press ENTER to start or pause slide show c Add to NetCast Friends List Add the curre...

Страница 69: ...sign in or returns to the sign out status page 70 NOTE Photos displayed in My Photos and Favorites may differ from the photos from a web browser on PC Adding friends If you add your friends on the NetCast Friends menu you can see the photos of your friend s public photos directly 1 Select the NetCast Friends on the PicasaTM Web Albums menu using U u I i and press ENTER 2 Press ENTER to display the...

Страница 70: ... Enter your user name using the virtual keyboard and press ENTER while OK is selected Refer to Using the virtual keyboard on page 66 for using the virtual keyboard 3 Enter the password using the virtual keyboard and press ENTER while OK is selected Your web album is displayed on the screen 4 If you want to sign out select the Sign Out from the PicasaTM Web Albums menu and press ENTER This unit can...

Страница 71: ...u I i and press ENTER 6 Use U u I i to select Home and press ENTER to display weather information of the selected city Press red R coloured button to toggle display between Fahrenheit or Celsius thermometre 7 Use I i to select previous or next city and press ENTER to display the weather information This step works only when you add more than 1 city to the Favorite city List NOTE The weather inform...

Страница 72: ...elect a region country and city using U u I i and ENTER 4 Repeats step 2 3 to add up to 5 cities Select the X symbol and press ENTER to delete the stored favorite city 5 Use U u to select a city from the Favorite City List and press ENTER to display the weather information HB905TAW FH BNZLLLK_ENG_0854 ind72 72 HB905TAW FH BNZLLLK_ENG_0854 ind72 72 2010 5 28 3 48 21 PM 2010 5 28 3 48 21 PM ...

Страница 73: ...terior surfaces clean Do not use volatile liquids such as insecticide spray near the unit Wiping with strong pressure may damage the surface Do not leave rubber or plastic products in contact with the unit for a long period of time Cleaning the unit To clean the player use a soft dry cloth If the surfaces are extremely dirty use a soft cloth lightly moistened with a mild detergent solution Do not ...

Страница 74: ...he DVD Video being played The subtitle language cannot be changed or turned off Subtitles are not recorded on the DVD Video being played Cannot play MP3 WMA JPEG DivX files The files are not recorded in a format that the unit can play The unit does not support the codec of the movie file The remote control does not work properly The remote control is not pointed at the remote sensor of the unit Th...

Страница 75: ...layer Change the resolution to one that your TV accepts The player s HDMI OUT jack is connected to a DVI device that does not support copyright protection Picture noise appears You are playing a disc recorded in a colour system that is different from your TV Set the resolution to one that your TV accepts Sound There is no sound or the sound is distorted The unit is in scan slow motion or pause mod...

Страница 76: ...eam video services Contact your Internet Service Provider ISP and increase the broadband speed is recommended Shared folder or files from your PC or a media server are not displayed on the Home Link menu The firewall or anti virus software on your media server is running Turn off the firewall or anti virus software running on your PC or media server The player is not connected to the local area ne...

Страница 77: ...d channels NOTE Depending on the unit being connected you may not be able to control your TV using some of the buttons Setting up the remote to control your TV You can operate your LG GoldStar TV with the supplied remote control While holding down TV POWER button and press PR CH U u Release the TV POWER button to complete setting When you replace the batteries in the remote you may have reset the ...

Страница 78: ...IT Jamaica JM Japan JP Kenya KE Kuwait KW Libya LY Luxembourg LU Malaysia MY Maldives MV Mexico MX Monaco MC Mongolia MN Morocco MA Nepal NP Netherlands NL Netherlands Antilles AN New Zealand NZ Nigeria NG Norway NO Oman OM Pakistan PK Panama PA Paraguay PY Philippines PH Poland PL Portugal PT Romania RO Russian Federation RU Saudi Arabia SA Senegal SN Singapore SG Slovak Republic SK Slovenia SI S...

Страница 79: ...sh 7165 Italian 7384 Japanese 7465 Kannada 7578 Kashmiri 7583 Kazakh 7575 Kirghiz 7589 Korean 7579 Kurdish 7585 Laothian 7679 Latin 7665 Latvian Lettish 7686 Lingala 7678 Lithuanian 7684 Macedonian 7775 Malagasy 7771 Malay 7783 Malayalam 7776 Maori 7773 Marathi 7782 Moldavian 7779 Mongolian 7778 Nauru 7865 Nepali 7869 Norwegian 7879 Oriya 7982 Panjabi 8065 Pashto Pushto 8083 Persian 7065 Polish 80...

Страница 80: ...Press blue B coloured button to start the update procedure Software Update You can update the player using the latest software to enhance the products operation and or add new features You can update the software by connecting the unit directly to the software update server CAUTION Before updating the software in your player remove any disc and USB Device from the player Before updating the softwa...

Страница 81: ...pdate and downloaded file will not be re usable To update software the next time the software update procedure has to be started from the beginning again CAUTION Do not turn off the power during the software update NOTE If the software includes the driver update disc tray may open during the process 9 When the update is completed the message Update is complete will appear and then power will turn ...

Страница 82: ...lect a resolution manually and then connect the HDMI jack to TV and your TV does not accept it the resolution setting is set to Auto If you select a resolution that your TV does not accept the warning message will appear After resolution change if you cannot see the screen please wait 20 seconds and the resolution will automatically revert back to the previous resolution The 1080p video output fra...

Страница 83: ...and worldwide patents issued pending DTS is a registered trademark and the DTS logos Symbol DTS HD and DTS HD Master Audio Essential are trademarks of DTS Inc 1996 2008 DTS Inc All Rights Reserved HDMI the HDMI logo and High Definition Multimedia Interface are trademarks or registered trademarks of HDMI licensing LLC DVD Logo is a trademark of DVD Format Logo Licensing Corporation DLNA the DLNA Lo...

Страница 84: ...nnect specifically to iPod and has been certified by the developer to meet Apple performance standards Works with iPhone means that an electronic accessory has been designed to connect specifically to iPhone and has been certified by the developer to meet Apple performance standards Apple is not responsible for the operation of this device or its compliance with safety and regulatory standards Gra...

Страница 85: ...TICAL 1 2 3 V p p Optical jack x 2 PORT IN 0 5 Vrms 3 5 mm stereo jack Tuner FM Tuning Range 87 5 to 108 0 MHz or 87 50 to 108 00 MHz Amplifier Power output 4 Ω PEAK Total 1100 W Front 180 W x 2 Centre 180 W Rear 180 W x 2 Sub Woofer 200 W Passive Power output 4 Ω RMS THD 10 4 Ω 3 Ω Total 980 W Front 160 W x 2 Centre 160 W Rear 160 W x 2 Sub Woofer 180 W Passive System Laser Semiconductor laser Wav...

Страница 86: ...edance Rated 4 Ω Input Power 180 W Max Input power 360 W Net Dimensions 320 x 103 x 86 mm W x H x D Net Weight 1 0 kg Subwoofer Type 1 Way 1 speaker Impedance Rated 3 Ω Input Power 200 W Max Input power 400 W Net Dimensions 190 x 385 x 318 mm W x H x D Net Weight 5 0 kg Wireless receiver Power requirements AC 200 240 V 50 60 Hz Power consumption Refer to main label on the bottom of the receiver Ex...

Страница 87: ...ING BUT NOT LIMITED TO WARRANTIES OF MERCHANTABILITY OR FITNESS FOR A PARTICULAR PURPOSE UNDER NO CIRCUMSTANCES AND UNDER NO LEGAL THEORY WHETHER IN CONTRACT TORT STRICT LIABILITY OR OTHERWISE SHALL LG BE LIABLE TO YOU OR ANY THIRD PARTY FOR ANY DIRECT INDIRECT INCIDENTAL SPECIAL STATUTORY CONSEQUENTIAL OR OTHER DAMAGES OR ATTORNEY FEES OR EXPENSES RELATING TO OR ARISING OUT OF THE NETWORK SERVICE...

Страница 88: ...copyright 2001 2002 Thomas Broyer Charlie Bozeman and Daniel Veillard mng copyright 2000 2007 Gerard Juyn Glenn Randers Pehrson ntp copyright David L Mills 1992 2006 openSSL cryptographic software written by Eric Young eay cryptsoft com software written by Tim Hudson tjh cryptsoft com software developed by the OpenSSL Project for use in the OpenSSL Toolkit http www openssl org pixman copyright 198...

Страница 89: ...d to do so subject to the following conditions THE SOFTWARE IS PROVIDED AS IS WITHOUT WARRANTY OF ANY KIND EXPRESS OR IMPLIED INCLUDING BUT NOT LIMITED TO THE WARRANTIES OF MERCHANTABILITY FITNESS FOR A PARTICULAR PURPOSE AND NONINFRINGEMENT IN NO EVENT SHALL THE AUTHORS OR COPYRIGHT HOLDERS BE LIABLE FOR ANY CLAIM DAMAGES OR OTHER LIABILITY WHETHER IN AN ACTION OF CONTRACT TORT OR OTHERWISE ARISI...

Страница 90: ...enote Inc may enforce its rights under this Agreement against you directly in its own name The Gracenote service uses a unique identifier to track queries for statistical purposes The purpose of a randomly assigned numeric identifier is to allow the Gracenote service to count queries without knowing anything about who you are For more information see the web page for the Gracenote Privacy Policy f...

Страница 91: ...HB905TAW FH BNZLLLK_ENG_0854 ind91 91 HB905TAW FH BNZLLLK_ENG_0854 ind91 91 2010 5 28 3 48 30 PM 2010 5 28 3 48 30 PM ...

Страница 92: ...HB905TAW FH BNZLLLK_ENG_0854 ind92 92 HB905TAW FH BNZLLLK_ENG_0854 ind92 92 2010 5 28 3 48 30 PM 2010 5 28 3 48 30 PM ...

Отзывы: