background image

22

Installation

3

Ins
talla

tion

7-1.  

Select this option and press 

ll

. The IP address information window is displayed.

7-2.  

Select [Next] and press 

OK

 to go to the next step or press 

ll

.

•  Static: Select this option when you set the network configuration manually.

7-1.  

Select this option and press 

ll

.

7-2.  

Set the below options.


-

IP Address: Enter the static IP address of the device.


-

Subnet Mask: Enter the subnet mask IP address.


-

Gateway: Enter the gateway IP address.


-

DNS Server: Enter the IP address to configure DNS servers.

7-3.  

Select [Next] and press 

OK

 to go to the next step or press 

ll

.

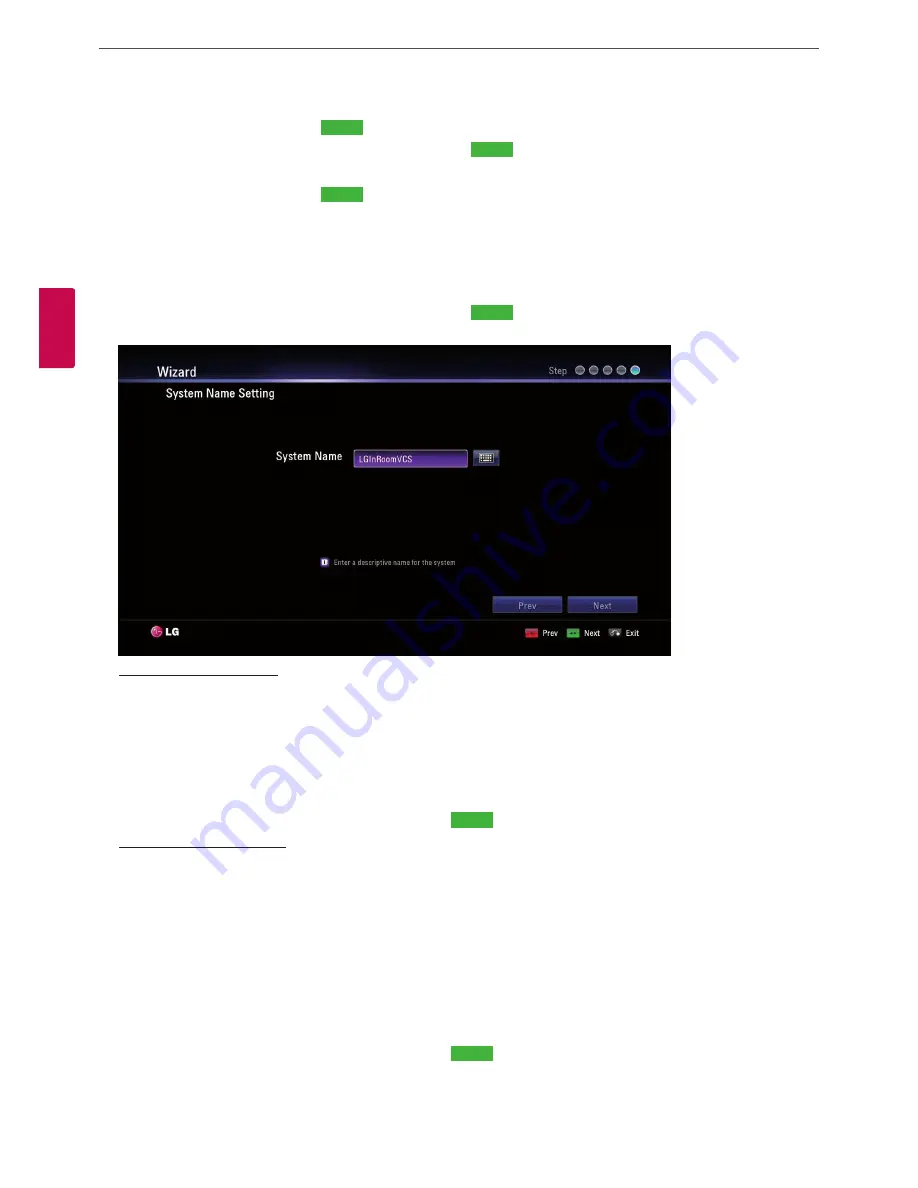
8.  Enter a descriptive name for the system.

When using the remote control 
8-1.  

Press 

OK

 to edit the system name.

8-2.  

Enter the system name using the Remote control buttons and press 

OK

 to confirm it.

•  DEL.: Deletes the previous character at the cursor position.
•  SPACE: Inserts space at the cursor position.
•  1/a/A: Changes the input type to numbers, small letters or capital letters.
•  Numbers/[.*#]: Select the numbers, small letters or capital letters as selected input type. Press the button repeatedly to select 

the character or symbol as you want.

8-3.  

Select [Next] and press 

OK

 to go to the next step or press 

ll

.

When using the virtual keyboard.
8-1.  

Select the virtual keyboard icon and press 

OK

. The virtual keyboard input menu displayed.

8-2.  

Use the arrow buttons to select a letter and 

OK

 to confirm your selection.

•   

a

: Moves cursor to left. 

•   

d

: Moves cursor to right. 

•  Clear: Deletes the previous character at the cursor position.
•  Clear All: Clear all the entered characters, numbers and symbols.
•  Space: Inserts space at the cursor position.
•  a/A/?!: Changes the virtual keyboard settings to small letters, capital letters or symbols.
•  OK: Confirm and exit the menu.
•  Cancel: Returns to the previous screen.

8-3. 

Select [Next] and press 

OK

 to go to the next step or press 

ll

.

9.   The Wizard finish message is displayed, press 

OK

 to start VCS. The VCS main screen will be displayed.

Содержание RVF1000

Страница 1: ...OWNER S MANUAL Video Conference System Please read this manual carefully before operating your set and retain it for future reference MODEL RVF1000 P NO MFL66683302 1105 V1 5 ...

Страница 2: ...orrect the interference at his own expense A suitable conduit entries knock outs or glands shall be provided in the cable entries of this product in the end user Caution Danger of explosion if battery is incorrectly replaced Replaced only with the same or equivalent type recommended by the manufacturer Dispose of used batteries according to the manufacturer s instructions Holes in metal through wh...

Страница 3: ...uld be disposed separately from the municipal waste stream via designated collection facilities appointed by the government or the local authorities 4 The correct disposal of Your old batteries accumulators will help to prevent potential negative consequences for the environment animal and human health 5 For more detailed information about disposal of Your old batteries accumulators please contact...

Страница 4: ...holes in the outlet are too loose This may cause fire or electric shock Do not attempt to disassemble repair or modify the system on your own It is extremely dangerous due to the high voltage running through the system This may cause fire electric shock or serious injury Check for any danger signs such as a wet floor a loosened or damaged power cable or an unstable surface If you encounter any pro...

Страница 5: ...th magnetic objects electric frequencies or vibration Do not place any heavy object on the system This may cause system breakdown Install the system on a stable level surface The system may not operate properly Install the system in a place with appropriate moisture and temperature levels Avoid installing the system in a place with high over 40 C or low under 0 C temperature The system can be dama...

Страница 6: ...tion 3 Installation 13 Connections 13 Precautions 13 Connection Overview 14 HDMI Connection 15 HD Camera Connection 16 PC Connection 17 Connecting to a Network 18 Connecting a Headphone 18 Connecting a Microphone 19 Connecting Power 19 System Connection Check 20 Initial Settings 23 Main Screen Overview 24 System Configuration Menu 25 User Settings 25 General 26 Audio 27 Video 28 Date Time 29 Admin...

Страница 7: ...44 Get the Snapshot 44 Managing the Directory 44 Adding an Entry to the Directory 45 Editing or Deleting an Entry from the Directory 46 Copying an Entry from the Call History 46 Copying an Entry from the Corporate Contact 46 Deleting an Entry from the Call History 47 Sorting and Searching 47 Placing a Call when the Device is Registered in Gatekeeper Server 47 Making a Call when the Device is Regis...

Страница 8: ...and immediately saving travel time cost and energy VCS VCS Network Features Convenient and easy graphical user interface H 323 SIP network Internation Standard codec HD video quality 1 280 X 720 30 fps Editable screen layouts Graphic presentation using Content Sharing Technology Share Document Audio Video Administrator password and H235 codec Advanced Encryption Standard for security One touch cal...

Страница 9: ...e any missing accessories contact the local dealer where you purchased your product The illustrations in this manual may differ from the actual product and item Codec Unit HD Camera Remote Control and Batteries Power Adapter HDMI Cable Camera Connection Cable Owner s Manual CD MicPod Carrying Case ...

Страница 10: ...onnection port Connects the HD camera f RGB PC IN port Connects the PC with a D sub cable for presentation g LAN port Connects to a network via a hub with RJ 45 connector h Power input jack Connects to a DC 12 V power supply using proper cables i Power button Turns the unit on or off You must turn the unit on using the Power button after connecting the power cable You can use this button to reset ...

Страница 11: ...l microphone b Remote sensor Point the remote control here c Camera activation indicator Lights when the camera is connected to the codec unit and activates correctly d CAMERA IN port Connects the codec unit and the HD camera with the supplied camera connection cable ...

Страница 12: ...far end camera OK Confirms menu selections Use this button to return to the previous condition Use this button to change the screen layout Use this button to return to the main screen Use this button when the system receives a call or manully make a call Displays the directory menu Use this button when you want to hang up the call Use these buttons to input text or numbers 1 a A Change the input t...

Страница 13: ...nd other attached devices are turned off Connection Overview The illustration below shows the connections of the system For specific information of each connection refer to the next pages Connection Overview POWER DC IN LAN RGB PC IN CAMERA HDMI OUT 2 1 Optional Optional 3 4 HDMI CABLE CAMERA CABLE D sub CABLE LAN CABLE 3 Installation ...

Страница 14: ... TV the distance between the camera and the TV should be more than 1 meter The recommended distance between the camera and the user is about 1 m to 2 m If you connect the Codec unit to the DVI port of monitor TV using HDMI to DVI converter you should hear the audio through built in speaker or headphone because DVI does not support audio interface Please go to Setup User Audio Audio Out and change ...

Страница 15: ...lowing illustrations HD Camera Connection POWER DC IN LAN RGB PC IN CAMERA HDMI OUT NOTE After connection is completed adjust the angle of the camera to suit your view If you use the built in speaker of the codec unit the distance between the camera and the codec unit should be more than 1 meter The recommended distance between the camera and the user is about 1 m to 2 m ...

Страница 16: ...gnal from your PC to codec unit Connect the PC and the codec unit with the optional D sub 15 pin signal cable as shown in the following illustrations You can give a presentation to the far end user with this connection PC Connection POWER DC IN LAN RGB PC IN CAMERA HDMI OUT ...

Страница 17: ...ponding port on your router or network using the optional LAN or Ethernet cable with RJ 45 connector Network Connection POWER DC IN LAN RGB PC IN CAMERA HDMI OUT NOTE When plugging or unplugging the LAN cable hold the plug portion of the cable When unplugging you should hold the lock of the plug portion ...

Страница 18: ... illustrations Headphone Connection POWER DC IN LAN RGB PC IN CAMERA HDMI OUT Connecting a Microphone Connect a microphone to the MIC port of the codec unit as shown in the following illustrations Microphone Connection POWER DC IN LAN RGB PC IN CAMERA HDMI OUT NOTE The recommended distance between the microphone and the user is about 1 m to 2 m ...

Страница 19: ...tions are completed follow the steps below to check the system operation 1 Turn on the monitor 2 Press POWER on the rear of the codec unit System booting will commence When the booting is completed the initial configuration menu will be displayed If it is not displayed check the device connections and make sure the connections are correctly set Now you can use the system Do the next configuration ...

Страница 20: ...ote controller 2 Turn on the unit System booting will commence The logo image will be displayed during the system booting 3 When the booting is complete the initial configuration menu will be displayed 4 Select the language for the text displayed on the screen 4 1 Press OK or The language list is displayed 4 2 Select the language using or and press OK 4 3 Select Next and press OK to go to the next...

Страница 21: ...m configuration manually NOTE If you setup incorrectly in Manual Setting you may not be able to connect to calls 5 2 Select Next and press OK to go to the next step or press ll 6 Select the time zone 6 1 Use or to select the time zone and press OK 6 2 Use or to select the country where the device is located and press OK 6 3 Select Next and press OK to go to the next step or press ll 7 Select the o...

Страница 22: ... the cursor position 1 a A Changes the input type to numbers small letters or capital letters Numbers Select the numbers small letters or capital letters as selected input type Press the button repeatedly to select the character or symbol as you want 8 3 Select Next and press OK to go to the next step or press ll When using the virtual keyboard 8 1 Select the virtual keyboard icon and press OK The...

Страница 23: ...ation NOTE Additionally refer to the on screen instructions for each option s setting If you want to move to the previous option settings select Previous and press OK or press l Main Screen Overview a b c d e f g h i j k l m n ...

Страница 24: ...tem name h IP Address Displays the current IP address of the unit i Text Input Field Enter the dial numbers or IP address manually j Call Button Use this button when you want to make a call k Menu Hide You can hide the user interface elements and you can show the user interface element other remote key l System Info You can display system status Audio Video Network Utility and Server Status m Setu...

Страница 25: ...tically answers the incoming call Manual You must manually answer incoming calls Do not disturb me When the system Do Not Disturb feature is enabled the system displays the main screen Callers hear a busy signal and missed calls appear in the Call History Consider using this feature for example if you are using the meeting room for a purpose other than a video conference and do not wish to be dist...

Страница 26: ...n the echo cancellation Off Select when you want to turn off the echo cancellation Audio Out Select the location for audio output during calls Auto The system selects the audio output automatically If you select this option basically the unit selects the built in speaker of the codec unit If you connect through the headset jack audio is output via the connected headset device If you want to listen...

Страница 27: ...affected by the type of light source Auto The whitebalance function is activated automatically Manual Adjust the white balance level on the Whitebalance level menu Whitebalance Level Set the white balance level This option is activated when you set to manual in the Camera Whitebalance setting menu 1 Press OK and adjust white balance using the left or right arrow button 2 Press OK to confirm the se...

Страница 28: ...40 Time Server Address Enter the IP address or hostname of the time server This option is activated when you set to manual in the Time Server setting menu Date Format Select the display format for date Daylight Saving Set the daylight savings time 1 Press OK and then the daylight savings time setting menu will be displayed 2 Mark up to set the daylight savings function 3 Set the daylight savings s...

Страница 29: ...rotocol to use when attempting to outgoing Call You can choose H 323 SIP or Auto If you select H 323 or SIP you can make a call selected value If the far site user does not enable the same protocol you can t connect to the far site If you selected Auto you are able to connect moderately with the far site setting H 323 is tried before the SIP If H 323 does not connect a SIP call is attempted automa...

Страница 30: ...ES encryption enabled When set to AES calls connect are encrypted only if the far end supports AES encryption If the far end user does not support AES encryption calls are not encrypted Use Gatekeeper Set to On when you use the gatekeeper function This unit supports the H 460 protocol for firewall and NAT traversal of H 323 calls You must have an H 460 server configured in your environment for thi...

Страница 31: ...server address and proxy server port options are enabled to set it User Name Enter the SIP server authorization username Password Enter the SIP server authorization password TLS When users call TLS gives safe information about any message If you set to On the register server port and proxy server port options are set to 5061 automatically Register Server Address Enter the hostname or IP address of...

Страница 32: ...IP Quality of Service QoS that your network uses None Not used DiffServ Set to DiffServ differentiated services type of Service QoS for audio video and data packets IntServ Set to IntServ integrated services type of Service QoS for audio video and data packets of the Service ToS preference If you select this option the IntServToS option is enabled to set it IntServToS Select IP Type of Services Th...

Страница 33: ...net mask gateway main DNS and sub DNS options are dimmed STATIC Select this option when you set the network configuration manually IP Address Enter the static IP address of the device Subnet Mask Enter the subnet mask IP address Gateway Enter the default gateway IP address Main DNS Enter the Primary domain name server that translates the hostnames into IP address Sub DNS Enter the sub DNS server a...

Страница 34: ...ghest number in the reserved range of the UDP port numbers Service Web Server If you set to On you can connect to this device using the web browser Telnet If you set to On you can connect to this device using the telnet SSH If you set to On you can connect to this device using the SSH SNMP SNMP Allows administrators to manage the system remotely using SNMP Disable Not used with this function Enabl...

Страница 35: ...s function Enable Selects when the LDAP server allows access to this device Hostname Enter the host name or IP address of your LDAP server User Enter the username of your LDAP server Password Enter the password your LDAP server Base Enter the base Distinguished Name DN used to query your LDAP server Filter Enter filter strings that you use to specify a subset of data items in an LDAP data type IEE...

Страница 36: ...Use EAP MD5 If you use EAP MD5 you do not need to upload any files in the web service When User Use EAP TTLS 1 If you use EAP TTLS you must receive ca pem client pem client key from the 802 1x network manager 2 Upload the ca pem client pem client key files to the web service of your system as shown in the picture below When User Use EAP PEAP 1 If you use EAP PEAP you must receive a ca pem file fro...

Страница 37: ...ted Setup Initialization You can initialize the configuration of the setup menu 1 Select Reset and press OK The warning window is displayed 2 Select OK and press OK The system will be initialized and restarted Factory Reset You can reset the system to its original factory settings 1 Select Reset and press OK The warning window is displayed 2 Select OK and press OK The system will be reset to facto...

Страница 38: ...d configuration Audio Video You can check the audio video condition How to Test the Audio Output 1 Select the Audio Out Test option using the arrow button 2 Press OK and select the audio output option among the HDMI Built In Speaker or Headset Out option 3 Press OK and select Start 4 Press OK again to test the audio output You will hear three beeps sound then exit the test If you cannot hear the b...

Страница 39: ...d 2 Press OK to enter a value If necessary use 1 a A to change the method of text entry for text fields or select the keyboard icon to display the virtual keyboard After entering a value hide the keyboard if you used it to it enter the value and press OK to exit the field 3 Select the option of the command menu Ping The ping command tests responsiveness between two devices Traceroute The tracerout...

Страница 40: ... appears too dark you may need to adjust the room lighting or camera brightness and white balance and check the Camera Exposure menu Placing a Call You can place a call from your system to another VCS system Begin a call in one of the following ways Placing a Call Manually You can place a call by entering the IP address manually 1 Select the Text input field and press OK 2 Enter an IP address or d...

Страница 41: ...hed The last call placed always appears first on the list 1 From the main screen press the upper arrow button The Call History tab is expanded 2 Use the left or right button to select an entry 3 Press OK to place a call The call status dialog box is displayed NOTE To cancel the call press OK during the dialing Placing a Call from the Directory The directory stores a list of names and numbers from ...

Страница 42: ...ssed calls appear in the Call History list Consider using this feature for example if you are using the meeting room for a purpose other than a video conference and do not wish to be disturbed by incoming calls NOTE If you call to another system with the Do not disturb function is enabled the warning window is displayed and the call is disconnected automatically Managing a Call During a call you c...

Страница 43: ...turens to the camera screen NOTE This unit supports 640x480 800x600 1024x768 and 1280x768 resolutions for PC output resolutions Viewing Call Information You can view the call information 1 During a call press INFO The current call information window is displayed on the screen Call Protocol Shows the call protocol Resolution Shows the resolution in pixels of the video image transmitted or received ...

Страница 44: ...ou have access to the local directory you can add remove or edit entries Adding an Entry to the Directory You can create up to 1000 entries in the directory To add an entry in the directory follow these steps 1 From the main screen press DIRECTORY on the remote control or select Directory button the main screen and press OK to access the directory 2 Select the My Contact tab using the arrow button...

Страница 45: ...peed Dial If you want to remove a saved Speed Dial number you can remove by selecting in the Edit to directory 7 1 From the main screen press DIRECTORY on the remote control or select Directory on the main screen and press OK to access the directory 7 2 Select the My Contact tab using the arrow buttons 7 3 Use the arrow buttons to move a modifying list and press lll 7 4 Use the arrow buttons to se...

Страница 46: ...e Add to Directory window is displayed 5 Select OK of the Add to Directory window If you want to edit the item change the value before you save it 6 Press OK on the remote control Copying an Entry from the Corporate Contact When LDAP is enabled Corporate Contact is displayed in the Directory 1 Enter Corporate Contact tab and select an entry and press lll 2 Copy to My Contact window is displayed Se...

Страница 47: ... system will disconnect the call automatically Making a Call when the Device is Registered in SIP Server 1 You must confirm registered far site name in SIP server 2 Select the Text input field and press OK 3 Enter an registered far site name Use 1 a A to change the method of text entry for text input field 4 After entering a value press OK is selected automatically 5 Press OK again to place a call...

Страница 48: ...ot be configured on the unit You can also update the system upload certification import or export address book in the web service Upgrading your System Software To upgrade the software for your system follow these steps 1 Start the web browser The recommended browser is Internet Explorer with Windows 2 In the Address Box enter HTTP and the IP Address of the VCS You can use the Host Name that you e...

Страница 49: ...ow steps 1 3 described in Upgrading your System Software 2 Select the Directory tab 3 Click the Export File menu The exporting window is displayed 4 Click Save 5 Select the folder and modify the export file name 6 Click Save Importing the Address Book 1 Follow steps 1 3 described in Upgrading your System Software 2 Select the Directory tab 3 Click the Import File menu The Import CSV File window is...

Страница 50: ...mera connection status as camera icon in main screen The image is not visible Check that the camera cable is connected correctly on device You can confirm camera connection status as camera icon in main screen The sound is not audible Muffled audio reception from the far side may be caused by highly reverberant rooms If you are experiencing poor audio reception add more sound absorbency to the roo...

Страница 51: ...th default 1024 kbps Check with each site s IP operators that your video UDP traffic is NOT being blocked by IPS Intrusion Protection System Check the remote user s VCS video capability What video resolution is supported HD 720p SD 720x480 What video codec is supported H 264 H 263 Can t see the PC screen after I press CONTENT Check that the D sub cable is connected properly between the PC and the ...

Страница 52: ...udes other open source software Copyright David L Mills 1992 2006 Copyright 1998 2003 Daniel Veillard Copyright 1998 1999 Thai Open Source Software Center Ltd Copyright 1990 The Regents of the University of California Copyright 1998 2005 The OpenSSL Project Copyright 1991 1992 Paul Kranenburg pk cs few eur nl Copyright 1993 Branko Lankester branko hacktic nl Copyright 1993 Ulrich Pegelow pegelow m...

Страница 53: ... Device 6 08 mm Color CMOS Effective Pixels 1 M Pixels Lens 4 0 mm Fixed lens Resolution 1280 x720p 30 fps Extra Functions Built in IR Receiver Microphone Built in Microphone Power DC 5 V MicPod Microphone Type Electret condenser microphone omni directional type Operating Temperature 40 ºC to 85 ºC Sensitivity 30 dB 3 SNR 58 dB 1 kHz at 1 Pa Frequency Range 50 Hz to 22 kHz Cable Spec Thickness 2 m...

Страница 54: ...y Multiple languages supported Do Not Disturb mode Security Secure password authentication Ability to disable HTTP services H 235 AES encryption support including strict compliance SNMP security alerts Ability to disable HTTP SSH and Telnet services TLS support IEEE 802 1x support Intelligent Network Features Network Far End Camera Control H 224 H 281 AES FIPS197 H 235 NAT Firewall Client H 460 17...

Страница 55: ...ng Temperature 0 C 32 F to 40 C 104 F Operating Humidity 15 to 85 non condensing Storage Temperature 20 C 4 F to 60 C 140 F Storage Humidity 10 to 90 non condensing Camera Dimensions Width 106 mm Depth φ 106 mm Height 64 mm folded 90 mm Weight 270 g Codec Dimensions Width 142 mm Depth 220 mm Height 37 mm Weight 630 g ...

Страница 56: ......

Отзывы: