background image

Montage

Benutzerhandbuch  7

DEUTSCH

CN-REMO

LO2K

J15

LO1K

LO1D

C07D

C01K

J14

CN-DISP

CN-M

CN-ZONE
C

IC01A

5

The position of the fixing screws

Main 

indoor unit

Red      Yellow  Brown

Mainfraim

Fixing the 

remote controller

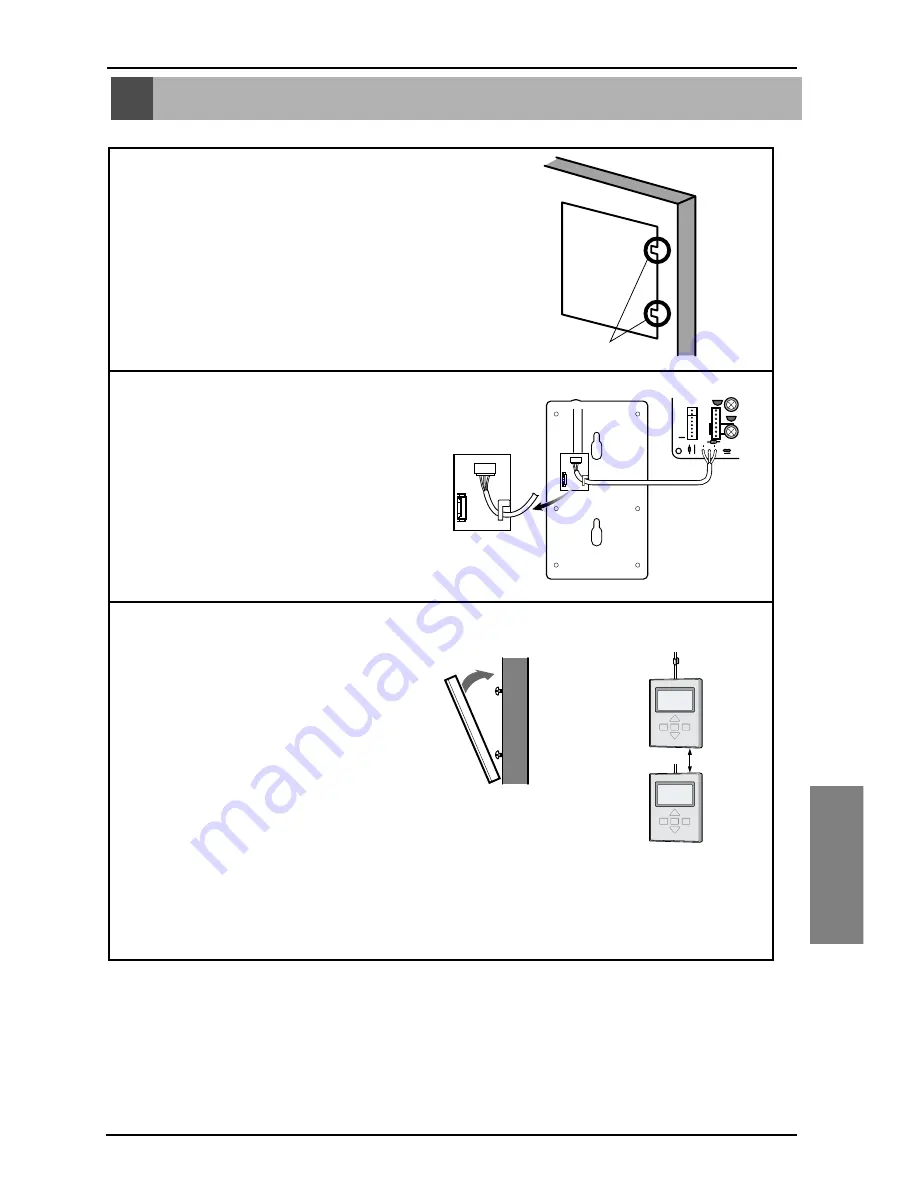
1

Legen Sie die Montageschablone an und bestimmen Sie die
Position und Höhe für die Montageschrauben der
Kabel-Fernbedienung. 
• Verwenden Sie dazu die bedruckte Seite der

Montageschablone.

2

Schließen Sie das Anschlusskabel am
Innengerät an. 
• Bei Auslieferung des Gerätes ist das Kabel nur

an der Fernbedienung angeschlossen.
Befestigen Sie das Anschlusskabel
anschließend mit der Kabelhalterung.

3

Entfernen Sie vor dem Anbringen der
Fernbedienung die Montageschablone, um das
Gerät korrekt auszurichten.

* Die Fernbedienung darf nicht in der Wand eingelassen werden. (Ansonsten besteht die Gefahr von

Ausfällen des Temperatursensors.)

* Um mehrere Fernbedienungen untereinander zu befestigen, sollte zwischen den Geräte ein Abstand

von 5 cm eingehalten werden. (Ansonsten besteht die Gefahr von Ausfällen des
Temperatursensors.)

Montage

Содержание PQRCFCS0

Страница 1: ... installing the product Installation work must be performed in accordance with the national wiring standards by authorized personnel only Please retain this installation manual for future reference after reading it thoroughly Owner s Installation Manual Models PQRCFCS0 ENGLISH ITALIANO ESPAÑOL FRANÇAIS DEUTSCH ...

Страница 2: ...nstallation Method 7 Necessary function before using 8 10 Trial Operation 8 Setting the Central Control Address 9 ESP Function 10 How to use the Mode Selection Button 11 17 Cooling Operation 11 Heating Operation 12 Automatic Operation 13 Dry Dehumidification Operation 14 Fan Operation 14 Fan Speed Selection 15 Indoor Temperature Display 16 Child Lock 17 ...

Страница 3: ...t expose the product to the rain in order to prevent product breakdown Installation Service Center Original Parts Service Center Safety Precaution The installation requires expert skills and it should be installed by the service center or other shops specialized in the installation and recognized by our company For all the problems arising after installation by someone who has no relevant qualific...

Страница 4: ...ubmerged under water ask the service center for instruction It may cause fire or an electric shock unless you do that In use In use Service Center Make sure children or senor citizens use the product under proper observation in order to prevent safety accident Do not subject the product to shock It will cause product breakdown Do not pick the product with a sharp tool It may cause product breakdow...

Страница 5: ...P Cooling Heating Auto Dry Fan Defrost Preheat Out door Slo Lo Med Hi Po Room Temp Total on Central Run 1 Wired Remote Controller 2 LCD Screen 3 Connecting Cable and Connector Part Description Accessory Connecting Cable 1EA Fixing Screw 2EA Use Installation Manual Installation Paper ...

Страница 6: ...eating Auto Dry Fan Defrost Preheat Out door Slo Lo Med Hi Po Room Temp Total on Central Run 1 2 3 4 5 Each function will be shown on the display panel for three second or so when the initial power is on 1 Operation Display Panel 2 On Off Function 3 Fan Speed Button 4 Temperature Control Button 5 Room Temperature Button ...

Страница 7: ...controller Fix the connecting cable with the cable rack 3Remove the installation paper before installing the remote controller so that it can fit into the right place Do not embed the remote controller into the wall It may cause the breakdown of the temperature sensor If you want to install a number of remote controller on the same place in a vertical line install them at regular intervals of 5cm ...

Страница 8: ...or three seconds 2Then the product will begin the trial operation and the display will be like the following picture 3If you want to unset the trial operation mode just press the On Off button 4The trail operation will be shut down automatically after 18 minutes and the standby mode will begin Trial Operation The trial operation is to check the installation status of the product The temperature wi...

Страница 9: ...r Unit Number 3 3Set the address by pressing the two temperature control buttons at the same time for three seconds Multi Model Connect the outdoor unit with PI485 for the outdoor unit Single Model Connect the indoor unit with PI485 for the indoor unit If you connect the indoor unit to the central controller you should set the network address of the indoor unit so that the central controller could...

Страница 10: ...to 255 3If you press the Off button while setting the ESP function it will be canceled The picture on the left side is the example of setting the Hi wind to ESP 10 4Press the Room Temperature button and the temperature increasing button at the same time for three seconds Then the ESP setting will be activated after the temperature display flashes three times E S P function is setting the volume of...

Страница 11: ...g function will not begin and just the blowing operation will continue 3 If you want to change mode during the operation the operation mode will be changed in the order of cooling heating automation dry dehumidification fan by only central controller 4If you press the On Off button the cooling operation will stop What is the three minute delay function The function to protect the compressor delays...

Страница 12: ...he expected temperature is set higher than the current room temperature the cooling function will not begin and just the blowing operation will continue 3If you want to change Mode during the operation the operation mode will be changed in the order of cooling heating automation dry dehumidification and fan by central controller 4If you press the On Off button the heating operation will stop What ...

Страница 13: ...controller after pressing the On Off button 2When the room temperature is lower than the expected temperature Heating Operation When the room temperature is higher than the expected temperature Cooling temperature 3If you want to change Mode during the operation the operation mode will be changed in the order of cooling heating automation dry dehumidification and fan by central controller Automati...

Страница 14: ...e rainy season or high humidity you can have both of effective dehumidifying and air conditioning effect Temperature control is not available in the Dehumidification Operation 1Press the On Off button on the remote controller 2Please choose the fan by central controller 3When the Fan is being done fn will be displayed on the display panel 4 Fan does not output cool air but just the fan air By givi...

Страница 15: ...e proper Fan speed which you want by pressing the Fan speed button on the remote controller If you press the Fan speed button the strength of the Fan speed will change in the order of Low Medium Hi Power The initial Fan speed is Hi If the product is not compatible with the Fan speed control it will not function as your selection You can easily control the Fan speed If the indoor unit is compatible...

Страница 16: ...te Controller Defrost PQRCFCS0 FAN SPEED ROOM TEMP Room Temp 1When the Room Temperature button is pressed on the remote controller the indoor temperature will be displayed for about 5 seconds then change back to the previous screen Indoor Temperature Display ...

Страница 17: ...ll come back to the original mode A click of another button will not be recognized while the CL is being shown on the display panel for three seconds 2If you want to unset the child lock mode press the temperature increasing button and the Fan speed button for three seconds 3If you want to press the child lock button in the standby mode just press the temperature increasing button and the Fan spee...

Страница 18: ...Memo 18 Simple Wired Remote Controller ...

Страница 19: ...one prima di installare il prodotto Il servizio di installazione deve essere eseguito solo da personale autorizzato e in conformità con gli standard di cablaggio nazionali Dopo aver letto interamente il manuale conservarlo per riferimento futuro Proprietario Manuale Dell Installazione Modelli PQRCFCS0 ...

Страница 20: ...aria prima dell uso 8 10 Funzionamento di prova 8 Impostazione dell indirizzo di comando centrale 9 Funzione E S P 10 Tasto selezione modalità di funzionamento 11 17 Funzionamento in raffreddamento 11 Funzionamento in riscaldamento 12 Funzionamento automatico 13 Funzionamento in deumidificazione 14 Funzionamento in ventilatore 14 Selezione velocità ventilatore 15 Display temperatura interna 16 Blo...

Страница 21: ...odotto alla pioggia per impedire guasti al prodotto Installazione Service Center Original Parts Service Center Precauzioni di sicurezza L installazione del prodotto richiede la perizia di un esperto e deve essere eseguita dal centro di assistenza o altro centro specializzato nell installazione e riconosciuto dalla società Per eventuali problemi sorti in seguito all installazione eseguita da person...

Страница 22: ...ssistenza per ricevere istruzioni in merito In caso contrario si potrebbero causare incendi o scosse elettriche Durante l uso Durante l uso Service Center In presenza di bambini o persone anziane il prodotto deve essere utilizzato rispettando le norme per impedire il verificarsi di incidenti Non sottoporre il prodotto ad urti In caso contrario si potrebbero verificare guasti al prodotto Non urtare...

Страница 23: ...Cooling Heating Auto Dry Fan Defrost Preheat Out door Slo Lo Med Hi Po Room Temp Total on Central Run 1 Telecomando cablato 2 Schermo LCD 3 Cavo di collegamento e connettore Descrizione dei componenti Accessori Cavo di connessione 1EA Vite di fissaggio 2EA Uso Manuale di installazione Schema di installazione ...

Страница 24: ...Dry Fan Defrost Preheat Out door Slo Lo Med Hi Po Room Temp Total on Central Run 1 2 3 4 5 Ogni funzione viene visualizzata sul pannello del display per circa tre secondi o all accensione iniziale 1 Pannello del display di funzionamento 2 Funzione On Off 3 Pulsante velocità ventilatore 4 Pulsante di controllo temperatura 5 Temperatura ambiente ...

Страница 25: ...pato dello schema di installazione 2Inserire il cavo nell unità interna Il prodotto viene inviato con il cavo connesso esclusivamente al telecomando Fissare il cavo di connessione con la presa del cavo 3Rimuovere le schema di installazione prima di installare il telecomando remoto in modo che venga posizionato in modo idoneo in sede Non inserire il telecomando nella parete Si può provocare la rott...

Страница 26: ...à di raffreddamento vento hi comp on 1Per impostare il funzionamento di prova premere contemporaneamente il pulsante della temperatura ambiente e il pulsante del flusso dell aria per tre secondi 2A questo punto l unità avvia il funzionamento di prova e la visualizzazione del display sarà come rappresentato nella seguente immagine 3Se si desidera disabilitare la modalità di funzionamento di prova p...

Страница 27: ... 2 Numero unità interna 3 3Impostare l indirizzo premendo contemporaneamente i due pulsanti di controllo della temperatura per tre secondi Modello multiplo Collegare l unità esterna con PI485 per l unità esterna Modello singolo Collegare l unità interna con PI485 per l unità interna Se si collega l unità interna al controller centrale è necessario impostare l indirizzo di rete dell unità interna i...

Страница 28: ... un intervallo da 1 a 255 3Premendo il pulsante Off durante l impostazione della funzione ESP questa viene annullata L immagine a sinistra illustra un esempio di impostazione di vento hi a ESP 10 4Premere contemporaneamente il pulsante modalità e il pulsante di aumento della temperatura per tre secondi A questo punto l impostazione ESP viene attivata dopo che il display della temperatura ha lampeg...

Страница 29: ...ntinuerà soltanto la funzione di ventilazione 3Se si cambia modalità durante il funzionamento questa cambia secondo l ordine raffreddamento riscaldamento automazione deumidificazione ed essiccazione solo con l unità di controllo centrale 4Premendo il pulsante On Off si arresta il raffreddamento Cos è la funzione dei tre minuti di ritardo La funzione per proteggere il compressore che ritarda la pro...

Страница 30: ... su un valore superiore alla temperatura ambiente la funzione di raffreddamento non viene avviata e continuerà soltanto la funzione di ventilazione 3Se si cambia modalità durante il funzionamento questa cambia secondo l ordine raffreddamento riscaldamento automazione deumidificazione ed essiccazione solo con l unità di controllo centrale 4Premendo il pulsante On Off si arresta il riscaldamento Cos...

Страница 31: ...dopo aver premuto il pulsante On Off 2Quando la temperatura ambiente è inferiore alla temperatura desiderata Funzionamento in riscaldamento Quando la temperatura ambiente è superiore alla temperatura desiderata Temperatura di riscaldamento 3Se si cambia modalità durante il funzionamento questa cambia secondo l ordine raffreddamento riscaldamento automazione deumidificazione ed essiccazione solo co...

Страница 32: ...enere sia la deumidificazione effettiva che il condizionamento dell aria Il controllo della temperatura non è disponibile durante la deumidificazione 1Premere il pulsante On Off sul telecomando 2Selezionare l essiccazione mediante l unità di controllo centrale 3Effettuata la ventilazione sul pannello del display viene visualizzata l indicazione fn 4 Durante la ventilazione non viene prodotta aria ...

Страница 33: ...rato appropriato premendo il pulsante del flusso dell aria sul telecomando Se si preme il pulsante del flusso dell aria la forza velocità ventilatore viene modificata nel seguente ordine Basso Mezzo Hi Potente Il flusso iniziale dell aria è Hi Se il prodotto non è compatibile con il controllo velocità ventilatore il funzionamento non avviene secondo la scelta effettuata Velocità ventilatore è cont...

Страница 34: ...cablato Defrost PQRCFCS0 FAN SPEED ROOM TEMP Room Temp 1Quando si preme il pulsante della temperatura ambiente sul telecomando la temperatura interna viene visualizzata per circa 5 secondi quindi l unità ritorna alla visualizzazione precedente Display temperatura interna ...

Страница 35: ...tre l indicazione CL è visualizzata sul pannello del display per tre secondi non viene riconosciuta l attivazione di altri pulsanti 2Se si desidera disattivare la modalità di blocco sicurezza per i bambini premere per tre secondi il pulsante per l aumento della temperatura e il pulsante per il velocità ventilatore 3Se si desidera inserire in modalità standby il pulsante della modalità di blocco si...

Страница 36: ...Note 18 Telecomando ad semplice cablato ...

Страница 37: ...es de instalar el producto Las tareas de instalación deben realizarse de acuerdo con la Normativa Eléctrica Nacional y sólo puede llevarlas a cabo personal autorizado Conserve este manual de instalación para futuras consultas después de haberlo leído completamente Manual de usuario instalación Modelos PQRCFCS0 ...

Страница 38: ...de instalación 7 Función necesaria previa al uso 8 10 Funcionamiento de prueba 8 Configuración de la dirección de control central 9 Función ESP 10 Durante el uso 11 17 Función enfriamiento 11 Función calefacción 12 Función automática 13 Función deshumidificación 14 Ventilador funcionameiento 14 Selección de la velocidad del ventilador 15 Pantalla de temperatura interior 16 Bloqueo infantil 17 ...

Страница 39: ... avería del producto Instalación Service Center Original Parts Service Center Precauciones de seguridad La instalación requiere de personal experto y deberá ser llevada a cabo por el centro de servicio u otra tienda especializada en su instalación y reconocida por nuestra empresa Nuestra empresa no proporcionará la reparación gratuita de los problemas que surjan tras la instalación si ésta ha sido...

Страница 40: ...a solicite instrucciones al centro de servicio Podría ser causa de fuego o descarga eléctrica a menos que solicite esas instrucciones Durante el uso Durante el uso Service Center Asegúrese que los niños o personas mayores utilicen el producto bajo supervisión a fin de evitar accidentes por falta de seguridad No someta el producto a descargas de ningún tipo Sería la causa de la avería del producto ...

Страница 41: ...ting Auto Dry Fan Defrost Preheat Out door Slo Lo Med Hi Po Room Temp Total on Central Run 1 Atada con alambre remoto Controlador 2 Pantalla LCD 3 Cable de conexión y conector Descripción de las piezas Accesorios Cable de conexión 1EA Tornillo de fijación 2EA Manual de uso instalación Diseño de instalación ...

Страница 42: ...Dry Fan Defrost Preheat Out door Slo Lo Med Hi Po Room Temp Total on Central Run 1 2 3 4 5 El panel de visualización mostrará cada función durante tres segundos aprox al activar la potencia inicial 1 Panel de visualización del funcionamiento 2 Función encendida apagada 3 Botón de la velocidad del ventilador 4 Botón de control de la temperatura 5 Temperatura ambiente ...

Страница 43: ...el diseño de instalación 2Enchufe el cable de conexión en la unidad interior El paquete del producto se entrega de fábrica sólo el cable de conexión al mando a distancia ya conectado Fije el cable de conexión mediante portacables 3Retire el diseño de instalación antes de instalar el mando a distancia a fin de ajustarlo de forma precisa No empotre el mando a distancia en la pared Podría causar la a...

Страница 44: ...gundos 2A continuación el producto iniciará el funcionamiento de prueba y la pantalla tendrá este aspecto 3Si desea desactivar el modo funcionamiento de prueba simplemente presione le botón On Off encendido apagado 4El funcionamiento de prueba se apagará automáticamente tras 18 minutos y comenzará el modo en espera Funcionamiento de prueba La misión del funcionamiento de prueba es revisar el estad...

Страница 45: ...nidad interior 3 3Configure la dirección presionando los dos botones de control de temperatura simultáneamente durante tres segundos Múltiples modelos Conecte la unidad exterior con PI485 para la unidad exterior Único modelo Conecte la unidad interior con PI485 para la unidad interior Si conecta a unidad interior al controlador central deberá configurar la dirección de red de la unidad interior de...

Страница 46: ...lor de la ESP puede ajustarse de 1 a 255 3Si presiona el botón Off durante la configuración de la función ESP ésta se cancelará La imagen de la izquierda es un ejemplo de configuración de ventilación fuerte a ESP 10 4Presione el botón de modo y el botón de aumento de temperatura simultáneamente durante tres segundos Una vez que la pantalla de temperatura parpadee tres veces se activará la configur...

Страница 47: ...únicamente mediante el controlador central 4Si presiona el botón On Off encendido apagado cesará la función de enfriamiento Si la temperatura prevista se configura superior a la temperatura ambiente actual el funcionamiento de enfriamiento no comenzará y sólo continuará la función de ventilación Qué es la función tres minutos de retardo La función de protección del compresor retardará la salida de...

Страница 48: ...ante el funcionamiento el modo de funcionamiento cambiará en este orden enfriamiento calefacción automatización deshumidificación y aire seco únicamente mediante el controlador central 4Si presiona el botón On Off encendido apagado cesará la función de calefacción Qué es la función tres minutos de retardo La unidad tardará un tiempo en emitir aire caliente Esta demora es la justa para proteger el ...

Страница 49: ...ón On Off Conectado Desconectado 2Cuando la temperatura ambiente sea inferior que la prevista Funcionamiento de calefacción Cuando la temperatura ambiente sea superior que la prevista Temperatura de enfriamiento 3Si desea cambiar de modo durante el funcionamiento el modo de funcionamiento cambiará en este orden enfriamiento calefacción automatización deshumidificación y aire seco únicamente median...

Страница 50: ...ufrir defectos tanto en la función de deshumidificación como en la de aire acondicionado El control de temperatura no está disponible en el funcionamiento de deshumidificación 1Presione el botón On Off encendido apagado en el mando a distancia 2Por favor seleccione el funcionamiento en modo Seco mediante el controlador central 3El panel de visualización mostrará fn durante el proceso de ventilació...

Страница 51: ...e aire adecuado presionando el botón de flujo de aire en el mando a distancia Presionando el botón de flujo de aire su potencia cambiará en este orden Bajo Medium Fuerte Energía El flujo de aire inicial está configurado en Fuerte Si el producto no fuera compatible con el control de flujo de aire este no funcionará según su selección Controlará fácilmente el flujo de aire Si la unidad interior es c...

Страница 52: ...t PQRCFCS0 FAN SPEED ROOM TEMP Room Temp 1Al presionar el botón Room Temperature Temperatura ambiente en el mando a distancia la pantalla mostrará la temperatura interior durante cerca de 5 segundos después regrese a la pantalla anterior Pantalla de temperatura interior ...

Страница 53: ... modo original Mientras la pantalla muestre CL no se reconocerá el clic de otro botón durante tres segundos 2Si desea desactivar el modo de bloqueo infantil presione el botón de aumento de temperatura y el botón de flujo de aire durante tres segundos 3Si desea presionar el botón de bloqueo infantil en modo en espera simplemente presione el botón de aumento de temperatura y el botón de flujo de air...

Страница 54: ...Note 18 Simple atada con alambre remoto Controlador ...

Страница 55: ...uit Le travail d installation doit être effectué conformément aux standards nationaux en matière d installations électriques seulement par du personnel agréé Après avoir lu en entier ce manuel d installation veuillez le conserver pour future consultation Manuel d installation d utilisation MODELE PQRCFCS0 FRANÇAIS ...

Страница 56: ...n 7 Fonction nécessaire avant utilization 8 10 épreuve Fonctionnement 8 Réglage de l adresse du contrôle central 9 Fonction ESP 10 Pendant l utilisation 11 17 Fonctionnement Refroidissement 11 Fonctionnement Chauffage 12 Fonctionnement Automatique 13 Fonctionnement Déshumidificateur 14 Fonctionnement Ventilateur 14 La Vitesse du ventilateur sélection 15 Affichage Température ambiante 16 Verrou enf...

Страница 57: ...reil à la pluie afin d éviter tout risque de panne Installation Service Center Original Parts Service Center Consignes de Sécurité L installation doit être réalisée par notre service client ou bien par un technicien spécialisé dans l installation et agréé par notre société En cas de problèmes survenus à la suite d une installation effectuée par une personne non qualifiée notre société ne fournira ...

Страница 58: ...é dans l eau demandez la procédure à suivre au service client Dans le cas contraire il y aurait un risque de court circuit Pendant l utilisation Pendant l utilisation Service Center Assurez vous de bien surveiller les enfants et les personnes âgées lorsqu ils utilisent l appareil afin d éviter tout accident Éviter tout choc avec le produit cela pourrait provoquer une panne Ne pas manipuler l appar...

Страница 59: ...ng Heating Auto Dry Fan Defrost Preheat Out door Slo Lo Med Hi Po Room Temp Total on Central Run 1 Boîtier de Contrôle Filaire 2 Écran LCD 3 Câble de connexion et raccord Description des composants Accessoires Câble de connexion 1EA Vis de fixation 2EA Manuel d installation d utilisation Papier d installation ...

Страница 60: ...rost Preheat Out door Slo Lo Med Hi Po Room Temp Total on Central Run 1 2 3 4 5 Chaque fonction s affichera à l écran d information pendant environ 3 secondes lors de la mise sous tension de l appareil 1 Écran d affichage d informations 2 Fonction Marche Arrêt On Off 3 Bouton La Vitesse du ventilateur 4 Bouton De Commande De Température 5 Température ambiante ...

Страница 61: ... installation 2Branchez le câble de connexion dans l unité intérieure L appareil est livré avec le câble relié uniquement au boîtier de contrôle Fixez le câble de connexion dans le support du câble 33 Retirez le papier d installation avant d installer le boîtier de contrôle afin qu il puisse rentrer dans l emplacement approprié Ne pas encastrer le boîtier de contrôle dans le mur Cela pourrait endo...

Страница 62: ...pérature ambiante et Flux d air pendant trois secondes 2L appareil passe en Fonctionnement et l écran affiche le symbole suivant 3Pour annuler le Fonctionnement appuyez sur la touche Marche Arrêt On Off 4Le Fonctionnements éteint automatiquement au bout de 18 minutes et l appareil se met en veille Fonctionnement Le Fonctionnement sert à vérifier l installation du produit La température ne sera pas...

Страница 63: ...e 2 Numéro de l unité intérieure 3 3Réglez l adresse en appuyant simultanément sur les deux touches de réglage de la température pendant trois secondes Modèle Multi Connectez l unité extérieure avec PI485 pour l unité extérieure Modèle Simple Connectez l unité intérieure avec PI485 pour l unité intérieure Si vous reliez l unité intérieure au boîtier de contrôle central vous devez d abord régler l ...

Страница 64: ...entilateur pour sélectionner La Vitesse du ventilateur La valeur ESP peut être réglée entre 1 et 255 3Si vous appuyez sur le bouton Arrêt Off pendant le réglage de la fonction ESP vous annulez le réglage L image de gauche montre le réglage de l option Salut à ESP 10 4Appuyez simultanément pendant trois secondes sur les touches mode et d augmentation de la température Puis l écran température clign...

Страница 65: ... se met en route 3Si vous souhaitez changer de mode en cours de fonctionnement la sélection peut être changée uniquement à partir du panneau de contrôle et passera successivement en mode Froid Chaud Automatique Déshumidificateur et Sec 4Si vous appuyez sur la touche Marche Arrêt On Off le refroidissement cesse Qu est ce la fonction 3 minutes de Délai Il s agit d une fonction protégeant le compress...

Страница 66: ...la pièce la fonction de refroidissement ne se lance pas et seule la fonction ventilation se met en route 3Si vous souhaitez changer de mode en cours de fonctionnement la sélection peut être changée uniquement à partir du panneau de contrôle et passera successivement en mode Froid Chaud Automatique Déshumidificateur et Sec 4Si vous appuyez sur la touche Marche Arrêt On Off le Fonctionnement Chauffa...

Страница 67: ...r la touche Marche Arrêt On Off 2Lorsque la température de la pièce est inférieure à la température réglée Fonctionnement Chauffage Lorsque la température de la pièce est supérieure à la température réglée Mode Froid 3Si vous souhaitez changer de mode en cours de fonctionnement la sélection peut être changée uniquement à partir du panneau de contrôle et passera successivement en mode Froid Chaud A...

Страница 68: ...humidité est très salute cela vous permet de déshumidifier et rafraîchir efficacement la pièce Le contrôle de la température n est pas possible en Fonctionnement Déshumidificateur 1Appuyez sur la touche Marche Arrêt On Off de la télécommande 2Choisissez le mode Sec via le panneau de contrôle 3Pendant le Fonctionnement du Fonctionnement Ventilateur fn apparaît sur l écran d affichage 4 En Fonctionn...

Страница 69: ...r la Bouton De Commande De Température de la télécommande Lorsque vous appuyez sur la Bouton De Commande De Température la force de la vitesse du ventilateur change dans l ordre suivant Bas Milieu Salut Puissant Le flux de base est en position Salut Si l appareil ne reconnaît pas la fonctionnalité de contrôle de la vitesse du ventilateur il ne prendra pas compte de votre sélection Vous pouvez faci...

Страница 70: ...Contrôle filaire Defrost PQRCFCS0 FAN SPEED ROOM TEMP Room Temp 1Lorsque vous appuyez sur la touche Température Ambiante de la télécommande la température de la pièce s affiche pendant environ 5 secondes puis l écran redevient normal Affichage de la température ambiante ...

Страница 71: ...ît Pendant les 3 secondes que dure l affichage du symbole CL toutes les touches sont inactives 2Si vous souhaitez enlever le verrou enfant appuyez pendant 3 secondes sur les touches d augmentation de la température et de contrôle de la vitesse du ventilateur 3Si vous souhaitez appuyez sur la touche du verrou enfant en mode veille appuyez tout simplement pendant 3 secondes sur les touches d augment...

Страница 72: ...Nota 18 Simple Boîtier de Contrôle filaire ...

Страница 73: ...or der Montage des Gerätes sorgfältig durch Die Montage der Elektrik muss darf nur von qualifiziertem Personal und gemäß den nationalen Bestimmungen vorgenommen werden Bewahren Sie dieses Benutzerhandbuch nach sorgfältigem Lesen auf Bedienungs Montageanleitung MODELLE PQRCFCS0 ...

Страница 74: ... Montage 7 Erforderliche Schritte vor der Inbetriebnahme 8 10 Testbetrieb 8 Einstellung der Adresse der Zentralsteuerung 9 ESP Externer statischer Druck der Rohrleitung 10 Während des Betriebs 11 17 Kühlungsbetrieb 11 Heizbetrieb 12 Automatik Betrieb 13 Entfeuchtungsbetrieb 14 Lüftungsbetrieb 14 Auswahl Luftstrom 15 Innentemperaturanzeige 16 Kindersicherung 17 ...

Страница 75: ... von Geräteausfällen Das Gerät niemals Regen aussetzen Ansonsten besteht die Gefahr von Geräteausfällen Montage Service Center Original Parts Service Center Sicherheitshinweise Die Montage sollte nur durch erfahrene Benutzer erfolgen z B durch den Servicebetrieb oder durch spezialisierte und von uns zugelassene Händler Bei Störungen auf Grund einer unsachgemäßen Montage durch nicht qualifizierte P...

Страница 76: ...e verständigen Sie sofort einen Servicebetrieb Ansonsten besteht die Gefahr von Bränden oder Stromschlägen Während des Betriebs Während des Betriebs Service Center Um Unfälle zu vermeiden sollten Kinder oder ältere Personen das Gerät niemals unbeaufsichtigt bedienen Das Gerät niemals Erschütterungen aussetzen Ansonsten besteht die Gefahr von Geräteausfällen Das Gerät niemals mit scharfen Gegenstän...

Страница 77: ...ng Heating Auto Dry Fan Defrost Preheat Out door Slo Lo Med Hi Po Room Temp Total on Central Run 1 Kabel Fernbedienung 2 LCD Bildschirm 3 Anschlusskabel und Anschluss Bauteilbezeichnungen Zubehör Anschlusskabel 1 Stk Montageschraube 2 Stk Bedienungs Montageanleitung Montageschablone ...

Страница 78: ...N SPEED ROOM TEMP Cooling Heating Auto Dry Fan Defrost Preheat Out door Slo Lo Med Hi Po Room Temp Total on Central Run 1 2 3 4 5 Jede Funktion leuchtet beim Einschalten ca drei Sekunden lang im Anzeigefeld auf 1 Bedienungsfeld 2 Netzschalter 3 Luftstromtaste 4 Temperaturregler 5 Raumtemperatur ...

Страница 79: ... das Anschlusskabel am Innengerät an Bei Auslieferung des Gerätes ist das Kabel nur an der Fernbedienung angeschlossen Befestigen Sie das Anschlusskabel anschließend mit der Kabelhalterung 3Entfernen Sie vor dem Anbringen der Fernbedienung die Montageschablone um das Gerät korrekt auszurichten Die Fernbedienung darf nicht in der Wand eingelassen werden Ansonsten besteht die Gefahr von Ausfällen de...

Страница 80: ...tstrom gleichzeitig drei Sekunden lang gedrückt 2Das Gerät beginnt den Testbetrieb und die Anzeige gleicht der folgenden Abbildung 3Um den Testbetrieb zu deaktivieren drücken Sie die Ein Aus Taste 4Der Testbetrieb endet automatisch nach 18 Minuten und das Gerät wechselt in den Standby Modus Testbetrieb Der Testbetrieb dient zur Überprüfung der Montage des Gerätes Die Temperatur wird dabei nicht ge...

Страница 81: ...resse 2 Innengerätenummer 3 3Halten Sie zum Einstellen der Adresse gleichzeitig beide Temperaturregler drei Sekunden lang gedrückt Mehrfachgerät Schließen Sie das Außengerät PI485 an Einzelgerät Schließen Sie das Innengerät PI485 an Beim Anschluss des Innengerätes an die Zentralsteuerung sollte die Netzwerkadresse des Innengerätes so gewählt werden dass diese von der Zentralsteuerung erkannt werde...

Страница 82: ...ellt werden 3Beim Betätigen des Ausschalters wird die Einstellung der ESP Funktion abgebrochen Die Abbildung links zeigt ein Beispiel für die Einstellung Starker Luftstrom auf ESP 10 4Halten Sie gleichzeitig die Betriebsmodus Taste sowie die Taste zur Erhöhung der Temperatur drei Sekunden lang gedrückt Die ESP Einstellung wird nach dreimaligem Aufblinken der Temperaturanzeige aktiviert Der externe...

Страница 83: ...gestellt wird wird der Kühlungsbetrieb nicht aktiviert und es wird nur der Lüfter betrieben 3Der Betriebsmodus wird nur durch die Zentralsteuerung bei einem Wechsel in der Reihenfolge Kühlung Heizen Automatisierung Entfeuchtung und Trocknung geändert 4Beim Drücken der Ein Aus Taste wird der Kühlungsbetrieb angehalten Wozu dient die dreiminütige Verzögerung Diese Funktion dient zum Schutz des Kompr...

Страница 84: ...ein 16 30 C Falls die erwartete Temperatur höher als die aktuelle Raumtemperatur eingestellt wird wird der Kühlungsbetrieb nicht aktiviert und es wird nur der Lüfter betrieben 3Der Betriebsmodus wird nur durch die Zentralsteuerung bei einem Wechsel in der Reihenfolge Kühlung Heizen Automatisierung Entfeuchtung und Trocknung geändert 4Beim Drücken der Ein Aus Taste wird der Heizbetrieb angehalten W...

Страница 85: ...ie Zentralsteuerung den Betriebsmodus Automatisierung 2Falls die Raumtemperatur unterhalb der erwarteten Temperatur liegt Heizbetrieb Falls die Raumtemperatur oberhalb der erwarteten Temperatur liegt Kühlungsbetrieb 3Der Betriebsmodus wird nur durch die Zentralsteuerung bei einem Wechsel in der Reihenfolge Kühlung Heizen Automatisierung Entfeuchtung und Trocknung geändert Automatik Betrieb ...

Страница 86: ... Luftfeuchtigkeit ist sowohl die Entfeuchtung als auch die Klimatisierung der Raumluft möglich Die Temperaturregelung ist im Entfeuchtungsbetrieb nicht verfügbar 1Drücken Sie die Ein Aus Taste auf der Fernbedienung 2Bitte wählen Sie den Trocknungsmodus über die Zentralsteuerung 3Während des Lüftungbetriebs erscheint das Symbol fn im Anzeigefeld 4 Beim Lüftungsbetrieb wird keine Kaltluft ausgestoße...

Страница 87: ...Luftstrom Taste auf der Fernbedienung Beim Drücken der Luftstrom Taste ändert sich die Stärke des Luftstroms in der folgenden Reihenfolge Gering Mittel Stark Hohe Leistung Die Grundeinstellung lautet Stark Falls das Gerät die Regelung des Luftstroms nicht unterstützt ist keine Auswahl möglich Der Luftstrom kann auf einfache Weise beeinflusst werden Falls das Innengerät die Funktionen geringer mitt...

Страница 88: ...ng Defrost PQRCFCS0 FAN SPEED ROOM TEMP Room Temp 1Beim Drücken der Taste für die Raumtemperatur auf der Fernbedienung wird die Innentemperatur ca fünf Sekunden lang angezeigt Danach wird wieder der vorherige Bildschirm angezeigt Innentemperaturanzeige ...

Страница 89: ...wieder in den vorherigen Modus Während der Anzeige von CL im Anzeigefeld ist kein Tastendruck möglich 2Um die Kindersicherung zu deaktivieren halten Sie die Taste zum Erhöhen der Temperatur sowie die Luftstrom Taste drei Sekunden lang gedrückt 3Um die Kindersicherungs Taste im Standby Modus zu betätigen halten Sie die Taste zum Erhöhen der Temperatur sowie die Luftstrom Taste drei Sekunden lang ge...

Страница 90: ...P No 3828A20561E Printed in Korea After reading this manual keep it in a place easily accessible to the user for future reference ...

Отзывы: