3-15
COMPONENT ACCESS
REMOVING & REPLACING THE LIT
REMOVING & REPLACING THE LIT
-OFF OVEN DOOR
-OFF OVEN DOOR
AND DRA
AND DRA
WER
WER
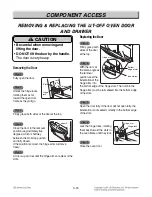
Replacing the Door
Step. 1
Firmly grasp both
sides of the door
at the top.
Step. 2
With the door at
the same angle as
the removal
position, seat the
indentation of the
hinge arms into
the bottom edge of the hinge slots. The notch in the
hinge arms must be fully seated into the bottom edge
of the slots.
Step. 3
Open the door fully. If the door will not open fully, the
indentation is not seated correctly in the bottom edge
of the slots.
Step. 4
Lock the hinge locks, rotating
them back toward the slots in
the oven frame until they lock.
Step. 5
Close the oven door.
Removing the Door
Step. 1
Fully open the door.
Step. 2
Unlock the hinge locks,
rotating them as far
toward the open door
frame as they will go.
Step. 3
Firmly grasp both sides of the door at the top.
Step. 4
Close the door to the removal
position (approximately five
degrees) which is halfway
between the broil stop position
and fully closed.
If the position is correct, the hinge arms will move
freely.
Step. 5
Lift door up and out until the hinge arms are clear of the
slots.
Slot
Lock
Unlock
Hinge
lock
about 5°
Hinge arm
Indentation
Bottom
edge of slot
Hinge arm
Hinge lock
CAUTION
• Be careful when removing and
lifting the door.
• DO NOT lift the door by the handle.
The door is very heavy.
!
Содержание LSE4613BD
Страница 49: ...5 3 OVEN LIGHT CR COOK TOP ELEMENT For Model LSE4613ST LSE4613BD LR RR COOK TOP ELEMENT ...
Страница 50: ...5 4 RF COOK TOP ELEMENT LF COOK TOP ELEMENT For Model LSE4613ST LSE4613BD ...
Страница 51: ...5 5 WARM PROOF EASY CLEAN BROIL ...
Страница 82: ...EXPLODED VIEW EV INTRODUCTION 9504 9501 9506 Customer Model Product Code SVC Model MODEL ...
Страница 85: ... EV COOKTOP PARTS 3056 3215 3006 3016 330M 330H 3205 3022 3204 330S 330S 301C ...
Страница 86: ...DRAWER PARTS 8523 8507 8501 8514 8517 8524 8602 8520 8512 5505 5505 8504 6008 8508 8513 1009 8708 8708 W230 EV ...
Страница 88: ......

