background image

4

(Only 55LS64**)


y

Image shown may differ from your TV .

OPTICAL

 DIGITAL 

AUDIO OUT 

AUDIO IN

RS-232C IN

(CONTROL & SERVICE)

RGB IN (PC)

2

1

USB IN

R

OPTICAL

 DIGITAL 

AUDIO OUT 

AUDIO IN

(RGB/DVI)

RGB IN (PC)

1

2

VOLUME 

CONTROL

STEREO

(8    )  

SPEAKER

OUT

VIDE

O

AUDI

O

VIDE

O

AV

 IN

L/MONO

AUDI

O

R

OK

SETTINGS INPUT

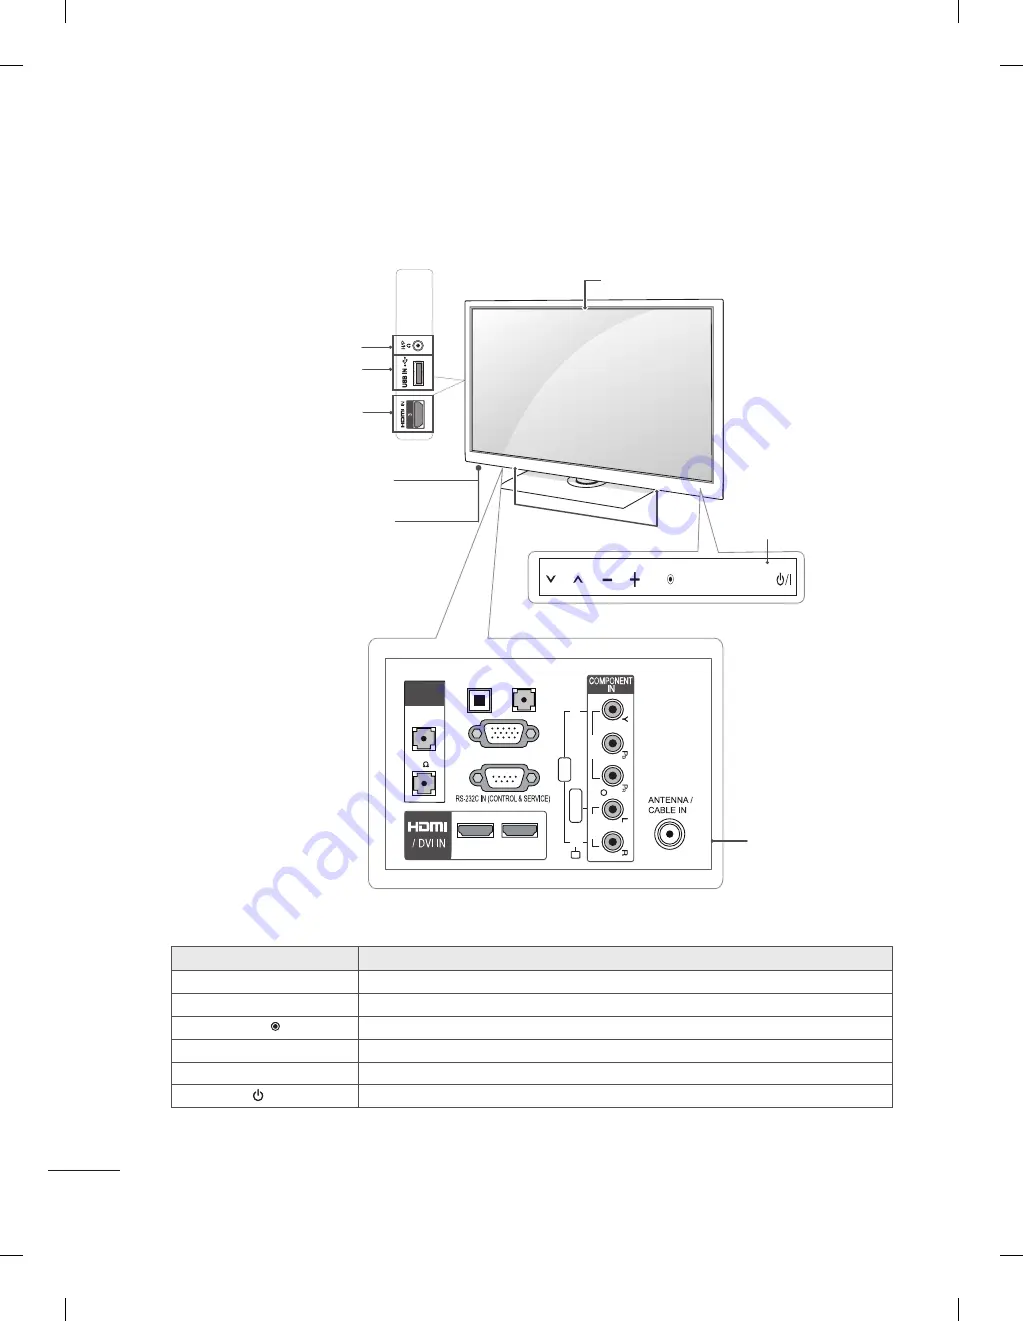
power Indicator

(Can be adjusted using 

the Power Indicator in the 

optIon

 -menu .)

hDMI In

usB input

remote control

headphone socket

screen

connection panel


speakers

touch buttons

touch button

Description

∨∧

Scrolls through the saved programmes .

- +

Adjusts the volume level .

OK 

Selects the highlighted menu option or confirms an input .

SETTINGS

Accesses the main menu, or saves your input and exits the menus .

INPUT

Changes the input source .

 / 

I

Turns the power on or off .

Содержание LS64 Series

Страница 1: ...P NO MFL67099961 1204 REV00 Printed in Korea www lg com INSTALLATION MANUAL LED LCD TV Please read this manual carefully before operating your set and retain it for future reference LT64 LT65 LS64 ...

Страница 2: ......

Страница 3: ... 17 Password Change 18 Set ID Setup 18 Configuration Setup 19 20 External Speaker 21 Speaker Output Setup 22 Pro Centric 23 Power Saving 24 CEC Setup 25 Clock Setup 26 Download extra contents 27 28 Download a splash image 29 30 Location and function of controls 2 4 EzManager Introduction 5 Pro Centric Auto 5 Pro Centric Manual 6 USB Cloning 7 Non Pro Centric 8 ...

Страница 4: ...y differ from your TV Power Indicator Can be adjusted using the Power Indicator in the OPTION menu HDMI IN USB input Remote control Clock LED Headphone Socket USB IN IN 3 R AUDIO IN RGB DVI RS 232C IN CONTROL SERVICE ANTENNA CABLE IN RGB IN PC 1 2 VOLUME CONTROL STEREO 8 SPEAKER OUT VIDEO AUDIO VIDEO AV IN L MONO AUDIO R DC IN Screen Connection panel Speakers buttons Only LT64 ...

Страница 5: ... TV USB IN IN 3 R OPTICAL DIGITAL AUDIO OUT AUDIO IN RGB DVI RS 232C IN CONTROL SERVICE RGB IN PC 1 2 VOLUME CONTROL STEREO 8 SPEAKER OUT VIDEO AUDIO VIDEO AV IN L MONO AUDIO R ANTENNA CABLE IN Power Indicator Can be adjusted using the Power Indicator in the OPTION menu HDMI IN USB input Remote control Clock LED Headphone Socket Screen Connection panel Speakers buttons Only LT64 ...

Страница 6: ...n be adjusted using the Power Indicator in the OPTION menu HDMI IN USB input Remote control Headphone Socket Screen Connection panel Speakers Touch buttons Touch button Description Scrolls through the saved programmes Adjusts the volume level OK Selects the highlighted menu option or confirms an input SETTINGS Accesses the main menu or saves your input and exits the menus INPUT Changes the input s...

Страница 7: ...it is turned on first time or user selects Factory Reset of main menu If TV fails to set up and turn it off TV will show failure message and run installation again on next power cycle Auto Installation Processing Pro Centric Configuration Step 2 may take up to 30 min s Please wait 10 Step 1 searching for the network type RF Step 2 searching for the server setting In progress Step 3 searching for t...

Страница 8: ...Use the OK button to select Country 2 Country Depending on model 1 2 A RF Type Data range DTV Cable DTV Default DTV B Channel Number or RF Freq Default Set the physical number or frequency for data channel C Symbol rate 1 7400 Default D Modulation 16 32 64 128 256QAM Symbol rate and Modualtion are Enable when RF Type is CABLE DTV If current selected channel is data channel this menu will show data...

Страница 9: ...ning Non Pro Centric USB Clonning WELCOME For more details see p 15 USB Cloning Procedure TV is cloning image from the USB xx4 LOW00001 TLL xx4 LOW00005 TLL xx4 LOW99999 TLL Choose a file to be written to the target TV Use the button to select the USB Cloning Use the OK button and then button to select USB Cloning 1 2 3 4 ...

Страница 10: ...Centric Auto Pro Centric Manual USB Clonning Non Pro Centric Non Pro Centric WELCOME Use the button to select the Non Pro Centric Use the OK button and then button to select Non Pro Centric 1 2 Non Pro centric will help you to select a language a country and customize the basic settings ...

Страница 11: ...seconds using the user remote control programme information will appear at top left on the screen Enter a four digit password and press OK button The TV is set with the initial password 1 1 0 5 Use the button to select the desired menu 1 2 3 TV 7 C05 y y Image shown may differ from your TV PICTURE SETUP TIME AUDIO OPTION LOCK MY MEDIA INPUT Installation Menu V2 23 LG Hotel Mode Setup TV Link Loade...

Страница 12: ...le list are deleted and the reservation function is not supported applied for the model offering the reservation function The TV triggered by the external device ex SIMPLINK TVLink Tuner etc operates separately from the Hotel mode When it is set to Yes User Menu Option Factory Reset and Demo Mode are disabled When Hotel Mode Operation is set to Yes Work all skipped programs are not tuned by number...

Страница 13: ...mpossible TV RADIO key and INPUT key doesn t work When Input Source Change is set to No Change impossible user s input pressing Programme key numeral key List key Q View key in all Input source except TV source doesn t work and when enter ing Setup Menu item in the Main Menu OSD except TV mode doesn t accepted Because entering Setup Menu item makes present mode as TV mode even though present mode ...

Страница 14: ...orking in service mode is still avail able When Local Key Operation is set to Yes Work all Local Key working is available When set both Local Key and Remocon Operation as No Do Not Work Power key of Remocon work as exceptional case Even when the local key operation is set to No when you press the local key for 5 seconds the Home key will operate to access the Installation Menu Exception In case of...

Страница 15: ...nd Language Teletext language ARC Data Except these other Parameters are applied differently according to the TVSet 12 4 A V Setting 13 Radio Video Blank If the Input source is DTV or ATV or Radio the set programme is played when the power is turned on Only when the Input source is DTV or ATV it can be entered into the Programme item When the Input source is turned off the Last input at the time o...

Страница 16: ...arting programme 13 2 No of PR Initial Configuration and Configuration Detail Item Active De active Initial Yes Yes Yes Yes Yes Yes Yes Yes Auto Yes ATV MAX_INPUT 1 Max PR 0 100 Yes Yes 0 100 0 199 0 10 No No No No No No No No Manual No Off 0 Off No No No STD Yes Yes Yes Yes Yes Yes Yes 100 Auto No Off 0 Off No No 1 1 Hotel Mode Operation Power On Status Setup Menu Programme Change Input Source Ch...

Страница 17: ...this time Use the UP DOWN button to select the TVLink Loader Press the MODE button in order to change from key to key and then press the UP button Press the SEND or RECEIVE button RECEIVE RS232 is the main connection for receiving data SEND For transmitting reserved data can be done by wireless IR Signal or RS232 1 Press SEND button to select IR Send to send data through IR or RS Send to send data...

Страница 18: ...wing 1 TV data includes A Installer Menu settings B Main menu settings Audio Picture etc 2 Analog Digital Channel information includes A Channel numbers B Channel label C Channel attributes including channel type skipping status and etc The user needs a USB memory card with FAT formatted to make successive cloning via USB port A USB memory card size more than 128 Mega Bytes and less than 4 Giga By...

Страница 19: ...ed in USB memory card As previously warned in Send To USB process the user should not turn TV off nor unplug the USB memory card Detailed steps for Receive From USB are illustrated below The following images might be slightly different than the OSD image The process will be shown with progress bar and as soon as sending the current profile is finished a message acknowl edging the learning process ...

Страница 20: ...9 1 Set ID Setup 1 2 3 Change Password Confirm Password Password Change OK y y Image shown may differ from your TV Previous Set ID Lock Set ID No 1 OK Previous Set ID Setup Installation Menu V2 23 LG Hotel Mode Setup TV Link Loader Password Change Set ID Setup Configuration Setup External Speaker Pro Centric Power Saving CEC Setup Clock Setup OK S WV02 05 01 01 MCUV02 04 FPGAVd 279 Password Change...

Страница 21: ...y time The time can be set to between 0 and 10 seconds 3 Splash Offset Time When Auto Teletext is set to Yes you can use automatic teletext function Auto Teletext function can be operated in Australia country and Analog signal teletext only 4 Auto Teletext Installation Menu V2 23 LG Hotel Mode Setup TV Link Loader Password Change Set ID Setup Configuration Setup External Speaker Pro Centric Power ...

Страница 22: ...rt when select 12V the 12V is forwarded through the port 1 Interface box It is a mode to set whether to update dtv channel automatically or not When DTV Channel Update is set to Auto the function to update TV s programme map according to dtv programme s stream information DTV Channel Update is set to Manual the function to keep TV s programme map even though dtv programme s information is changed ...

Страница 23: ...ff 1 Volume Control This item is enabled when Volume Control is set to Fixed You can choose one of 7 steps 0 01 0 03 0 05 0 1 0 2 0 5 1 Watts The Default is 0 01 Watt 2 Output When Off is selected the main speaker will not work When On is selected the main speaker will work 3 Main Speaker Volume Control Output Off 0 01 Watt External Speaker OK Main Speaker On Installation Menu V2 23 LG Hotel Mode ...

Страница 24: ... AUDIO VIDEO AV IN L MONO AUDIO R ANTENNA CABLE IN Control port for Speaker out UP DOWN R R L L Each Up Down pin is pulled to 3 3V with CPU GPIO CPU detects sort to gnd for volume control Method of Volume control port Cable Spec GND Up Down NOTE External speaker must be used four plug BTL Bridge Tied Load Stereo as shown in the drawings and external speaker fully inserted with external Speaker Jac...

Страница 25: ... set to Off Clock Freq The default value is Off If it is set to Off the time set from the main menu will be used If it is set to Clock Freq the time will be updated from a specific channel If it is set to Off or Flash the clock frequency KHz will be disabled 5 Clock Update The default value is Set the RF frequency of the channel from which to update the time 6 Clock Freq KHz Mode Receive Data RF T...

Страница 26: ... if there is no key input for the preset time period Standby The function controls 5V power supplied to the Clock LED and IR_OUT to reduce power consumption in Standby Set the OFF 1 99 When Standby is set to Passive Clock Setup Clock Display should be set to No When Clock Setup Clock Display is set to Yes Standby should be set to Active For RS232C Command TVLink tuner Interactive Standby should be...

Страница 27: ...that LG is currently using is 4 so this item is always set to 4 and disabled 3 Custom Code Control IR Decoding No No CEC Setup OK Custom Code 4 Device ID E Forced Initialize No Sets the ID of a device connected to the TVLink CEC Line You can choose between 1 and E The default value is E 4 Device ID If No is selected a command should be sent and received between the TV and a device for proper initi...

Страница 28: ...t the number of programme Set up the programme in accordance with the condition of the hotel clock source Offset ATV Clock In the case when there is difference between the time information received from the Teletext and the time of the current area it can be set up to correct this The initial value is 0 and it can be changed in the range of 12Hrs 12Hrs You can select YES or NO by pressing button 2...

Страница 29: ...lled hcapfs as abs_service must exist in USB drive root directory The file called xait xml must exist in the hcapfs as abs_service folder The file called I_AM_FLASH must exist in the hcapfs config folder with Flash mode The file called I_AM_GEM must exist in the hcapfs config folder with GEM mode You will have no response even if selecting Yes in step 3 when the above conditions are not met NOTE Y...

Страница 30: ...n file FLASH or GEM file the buttons are controlled according to the settings of the Extra Contents option 3 4 Yes No Continue to replace Extra Contents with one in USB memory Change Mode other than Flash or GEM under Pro Centric in Installation Menu When you change the Mode the downloaded content is deleted from the memory To stop playing the Application file TV is in updating process Please wait...

Страница 31: ... menu will appear or Select OPTION 1 2 Select OPTION 3 Press 7 button seven times TV Software Update Expert menu will appear 7 7 y y Image shown may differ from your TV Home Home OPTION OK Move Language Language Country UK Disability Assistance Standby Light On My Media Setting Factory Reset Set ID 1 Demo Mode Off 1 2 HDMI DVI IN RGB LAN AUX LAN USB IN H P SPEAKER OUT VOLUME CONTROL STEREO 8 ANTEN...

Страница 32: ...g update files are found in the USB device Select the file you want to apply to update this TV Or press EXIT to cancel the update TV Software Update INPUT MENU OK P Splash Image update function supports only JPEG format file of less than 1 MB file size Except for JPEG images with progressive encoding The resolution of Splash image should be 1920 x 1080 for full HD panel 1360 x 768 for HD panel Min...

Страница 33: ......

Страница 34: ......

Страница 35: ......

Страница 36: ......

Отзывы: