5-1
Tools required
• Adjustable wrench
• 13/32” or 10mm open-end wrench
• Phillips head screwdriver
• Flat bladed screwdriver(blade width approximately
3/32” across)
• Nut drivers : 13/32” or 10mm
1. PREPARE RANGE FOR CONVERSION
1) Turn off gas supply to the range.
2) Turn off the electrical power to the range.
WARNING
• Turn off the electrical supply and
gas supply going to the range.
• Replace all panels and parts before
operating.
• RECONNECT all grounding devices.
- Failure to do so can result in severe personal
injury, death or electrical shock.
CAUTION
• Be careful when you work on the
gas range handling the sheet metal
part.
- Sharp edge may be present and you can cut
yourself.
CAUTION
• If the gas supply to the range is
disconnected for any reason see
the installation instructions for
proper connection and safety
precautions.
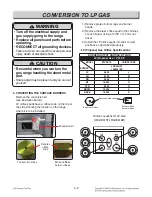
2. CONVERT THE PRESSURE REGULATOR
Pull the range away from the wall and the
pressure regulator is located at the rear of the
range.
3. CONVERTING YOUR REGULATOR
1) Unscrew the hex-nut cap by using an
adjustable wrench.
2) Separate plastic cap and hex-nut cap by
turning the plastic cap to 90°.
3) Assemble plastic cap in the opposite side.
4) Screw the hex-nut cap back into the regulator.
Do not over tighten.
WARNING
• Do not remove the pressure
regulator from the range.
LPG
Natural
Pressure regulator
CONVERSION TO LP GAS


