background image

2

TABLE OF CONTENTS

SAFETY............................................................. 3-4

Precautions to Avoid Possible Exposure 
to Excessive Microwave Energy ......................... 3
Grounding Instructions........................................ 3
Important Safety Instructions  ............................. 4

UNDERSTANDING YOUR 
MICROWAVE OVEN  ...................................... 5-11

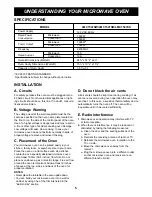
Specifications ...................................................... 5  
Installation ........................................................... 5
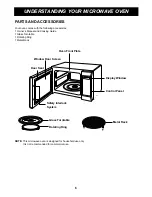
Parts and Accessories ........................................ 6    
Control Panel ...................................................... 7
Cooking Comparison Guide................................ 8
Cookware Guide ................................................. 9
Using the Oven Rack.......................................... 9
Tips for Microwave Cooking ............................. 10
Precautions ....................................................... 11
Cleaning ............................................................ 11

USING YOUR MICROWAVE OVEN ............. 12-22

Setting the Clock............................................... 12
Timer On/Off ..................................................... 12
Child Lock ......................................................... 12
Ez-On ................................................................ 12
Hold Warm ........................................................ 13
Start/Pause ....................................................... 13
Clear ................................................................. 13
More/Less ......................................................... 14
Custom Set ....................................................... 14
Custom Set Chart ............................................. 14
Timed Cooking .................................................. 14
Help................................................................... 14
Multi-Stage Cooking.......................................... 15
Microwave Power Levels .................................. 15
Sensor Touch Operation Instruction ................. 16

Sensor Cook ..................................................... 16

Sensor Popcorn ................................................ 16

Sensor Reheat .................................................. 16
Sensor Cook Guide ..................................... 17-19
Sensor Reheat Guide ....................................... 20
Auto/Time Defrost ............................................. 21
Auto Defrost ...................................................... 21
Auto Defrost Chart ............................................ 21
Time Defrost ..................................................... 22
Ez-Defrost ......................................................... 22

UNDERSTANDING YOUR 
CONVECTION OVEN ........................................ 23

Tips for Convection Cooking............................. 23
Precautions ....................................................... 23

USING YOUR CONVECTION OVEN  .......... 24-30

Auto Bake ......................................................... 24
Auto Roast ........................................................ 24
Auto Bake Guide............................................... 25
Auto Roast Guide ............................................. 26
Convection ........................................................ 27
Convection Cooking Guide .......................... 28-30 

UNDERSTANDING YOUR 
COMBINATION OVEN ....................................... 31

Tips for Combination Cooking .......................... 31
Helpful Hints for Combination Cooking ............. 31
Precautions ....................................................... 31
Combination ...................................................... 31

USING YOUR COMBINATION OVEN ............... 32

Combination Cooking Guide ............................. 32

HEATING/REHEATING GUIDE.......................... 33

FRESH VEGETABLE GUIDE ............................ 34

TROUBLESHOOTING .................................. 35-37 

Questions and Answers ............................... 35-36
Before Calling for Service ................................. 37

WARRANTY ....................................................... 38

The serial number is found on the front of this
unit. This number is unique to this unit and not
available to others. You should record request-
ed information here and retain this guide as a
permanent record of your purchase.

Date of Purchase:

Dealer Purchase From:

Dealer Address:

Dealer Phone No.:

Model No.:

Serial No.:

Содержание LMC1541SB

Страница 1: ...P NO 3828W5A4208 Printed in Korea LMC1541SW LMC1541SB LMC1543SS website http www lg ca M ...

Страница 2: ...20 Auto Time Defrost 21 Auto Defrost 21 Auto Defrost Chart 21 Time Defrost 22 Ez Defrost 22 UNDERSTANDING YOUR CONVECTION OVEN 23 Tips for Convection Cooking 23 Precautions 23 USING YOUR CONVECTION OVEN 24 30 Auto Bake 24 Auto Roast 24 Auto Bake Guide 25 Auto Roast Guide 26 Convection 27 Convection Cooking Guide 28 30 UNDERSTANDING YOUR COMBINATION OVEN 31 Tips for Combination Cooking 31 Helpful H...

Страница 3: ...lt in a risk of electric shock Consult a qualified electrician if the grounding instructions are not completely understood or if doubt exists as to whether the appliance is properly grounded and either 1 If it is necessary to use an extension cord use only a 3 wire extension cord that has a 3 blade grounding plug and a 3 slot recepta cle that will accept the plug on the appliance The marked rating...

Страница 4: ...Do not store this appliance outdoors Do not use this product near water for example near a kitchen sink in a wet basement or near a swimming pool and the like 12 Do not immerse cord or plug in water 13 Keep cord away from heated surfaces 14 Do not let cord hang over the edge of a table or counter 15 When cleaning surfaces of door and oven that come together on closing the door use only mild nonabr...

Страница 5: ...can be placed easily in your kitchen family room or anywhere else in your home Place the oven on a flat surface such as a kitchen countertop or a specially designed microwave oven cart at least 100cm 39 4 inches from floor Do not place oven above a gas or electric range Free air flow around the oven is important Allow at least 2 inches of space at the top sides and back of the oven for proper vent...

Страница 6: ...s Manual and Cooking Guide 1 Glass Turntable 1 Rotating Ring 1 Metal Rack Metal Rack Oven Front Plate Window Door Screen Door Seal Safety Interlock System Control Panel Display Window Glass Turntable Rotating Ring NOTE This microwave oven is designed for household use only It is not recommended for commercial use ...

Страница 7: ...o subtract time from Sensor Cook Time Cook and other oven functions or to decrease temperature in the convection cooking 12 CLOCK Touch this pad to enter the time of day 13 TIMER ON OFF Touch this pad to use your microwave oven as a kitchen timer 14 CUSTOM SET Touch this pad to select sound control clock Off or On scroll speed Demo Off or On lbs F kg C 15 HOLD WARM Touch this pad to keep hot cooke...

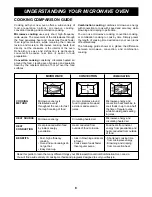
Страница 8: ...nd your oven turns off automatically The following guide shows at a glance the difference between microwave convection and combination cooking MICROWAVE Microwave energy is distributed evenly throughout the oven for fast thorough cooking of food Microwave energy Heat produced within food by instant energy penetration Fast high efficiency cooking Oven and surroundings do not get hot Easy clean up C...

Страница 9: ...light tender crust Glass or glass ceramic casserole or baking dishes are best suited for egg and cheese recipes due to the cleanability of glass Combination Cooking Glass or glass ceramic baking containers are recommended Be sure not to use items with metal trim as it may cause arcing sparking with oven wall or oven shelf damaging the cookware the shelf or the oven Heat resistant plastic microwave...

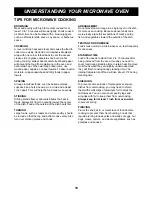
Страница 10: ...ch as roasts and whole poultry should be turned so that the top and bottom cook evenly Also turn over chicken pieces and chops ARRANGEMENT Do not stack food Arrange in a single layer in the dish for more even cooking Because dense foods cook more slowly place thicker portions of meat poultry fish and vegetables toward the outside of the dish TESTING FOR DONENESS Foods cook quickly in a microwave o...

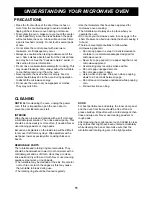
Страница 11: ... in a paper bag that is not microwave approved Overcooking may result in smoke and fire Do not repop unpopped kernels Do not reuse popcorn bags Listen while corn pops Stop oven when popping slows to 2 3 seconds between pops Do not leave microwave unattended while popping corn Follow directions on bag NOTE Before cleaning the oven unplug the power cord If this is impossible open the oven door to pr...

Страница 12: ...cook for 2 minutes 1 Touch and hold Start Pause until LOCKED disappears from the display To cancel the Child Lock 1 Touch Clear 2 Touch Timer On Off Display scrolls the words ENTER TIME IN MIN AND SEC 3 Enter the time by touching the numbers in sequence Display scrolls the words TOUCH TIMER 4 Touch Timer On Off To cancel timer at any time touch Timer On Off TIMER ON OFF Timer On Off operates as a ...

Страница 13: ...self or to automatically follow a timed cooking cycle To use HOLD WARM START PAUSE Touch this pad to 1 Start the function you set 2 Pause the oven temporarily during cooking Touch this pad again to restart after PAUSE CLEAR Touch this pad to 1 Cancel a program during cooking 2 Erase or reset during programming NOTES Opening the door or touching Clear cancels HOLD WARM Close the door and touch HOLD...

Страница 14: ...me Display scrolls the words ENTER COOKING TIME 2 Touch 5 3 and 0 Display scrolls the words TOUCH START OR POWER 3 Touch Power Display scrolls the words ENTER POWER LEVEL 1 10 4 Touch 8 Display scrolls the words P 80 TOUCH START 5 Touch Start Pause 6 At the end of the cook time four tones will sound The oven will stop TIMED COOKING This feature lets you program a specific cook time and power There...

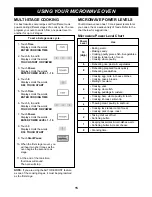
Страница 15: ... Use Power Level NOTE If you are using the AUTO DEFROST feature as one of the cooking stages it must be programmed as the first stage MULTI STAGE COOKING For best results some recipes call for different cook powers during different stages of a cook cycle You can program your oven to switch from one power level to another for up to 2 stages 1 Touch Time Display scrolls the words ENTER COOKING TIME ...

Страница 16: ...en will cook food automatically by sensor system To reheat casserole 1 Touch Clear 2 Touch Sensor Popcorn The oven will cook food automatically by sensor system To pop 3 5 oz SENSOR POPCORN SENSOR POPCORN lets you pop commercially packaged microwave popcorn 1 75 to 3 5 ounces For best results Use fresh popcorn Place only one bag of prepackaged microwave popcorn on the center of turntable SENSOR TO...

Страница 17: ...r Cover with plastic wrap and vent Most vegetables need stirring and 2 to 3 minutes standing time after cooking To cook frozen vegetables Serving size is 1 to 4 cups 250mL to 1L Remove from package and place vegetable in a microwavable container Add 2 to 4 tablespoons water Cover with plastic wrap and vent Most vegetables need stirring and 2 to 3 minutes standing after cooking To cook a frozen ent...

Страница 18: ...ngredients per the recipe in a 1 to 2 quart 1 to 2 L casserole dish Cover with plastic wrap and vent After cooking is complete allow 3 minutes standing time To cook ground meat Serving size is 4 to 32 oz 1 4 to 2 lbs Crumble meat into a microwavable container Season and cover with plastic wrap Vent cover for well done meat Cover dish for medium cooked meat such as meat to be used in another dish a...

Страница 19: ...uart 1L casserole dish Add 1 tablespoon 15mL milk or water per egg and beat Cover with plastic wrap and vent When cooking is complete remove from oven stir and allow 1 to 2 minutes standing time To cook frozen pizza Use only frozen pizza made for microwave use Do not cover the kind that comes with a succeptor cooking tray Serving size is 1 or 2 pizzas Follow package directions ...

Страница 20: ...ce food to be heated on a dinner plate or similar dish Cover with plastic wrap and vent To reheat soup sauce Serving size is 1 to 4 cups 250mL to 1L Place food to be heated in a casserole dish Cover with plastic wrap and vent To reheat casserole Serving size is 1 to 4 cups 250mL to 1L Place food to be heated in a casserole dish Cover with plastic wrap and vent ...

Страница 21: ...g scrape off thawed meat when the beep sounds and continue defrosting Place foods in a shallow glass baking dish or on a microwave roasting rack to catch drippings Foods should still be somewhat icy in the center when removed from the oven NOTE After you touch Start Pause the display counts down the defrost time The oven will beep once during the Defrost cycle At this time open the door and turn s...

Страница 22: ... 1 Touch Clear 2 Touch Ez Defrost Display scrolls the words MEAT TOUCH 1 POULTRY TOUCH 2 FISH TOUCH 3 3 Touch 1 Display scrolls the words TOUCH START 4 Touch Start Pause To defrost 1 lb of meat EZ DEFROST The Ez Defrost feature provides you with the quick defrosting method for 1 0 pound frozen foods The oven automatically sets the defrosting time for each food Three quick defrost settings are pres...

Страница 23: ...ion cooking however you may need to lower some temperatures or reduce some cooking times from the convection oven cooking directions See examples in the charts in this section 6 When baking cakes cookies breads rolls or other baked foods most recipes call for preheating Preheat the empty oven just as you do a regular oven You can start heavier dense foods such as meats casseroles and poultry witho...

Страница 24: ...25 for more information NOTE Auto Roast can be programmed with More Less When you want to adjust the time of the preset program use More or Less after Step 4 The available weight for each food is different Refer to the Auto Roast Guide on page 26 NOTE To improve the cooking performance frozen pizza in Auto Bake and all Auto menus uses microwave and convection cooking features at the same time When...

Страница 25: ... Place short rack on turntable After PREHEAT use 6 cup muffin pan place pan on rack To cook biscuits dinner rolls or bread sticks For best results bake one pan of biscuits dinner rolls or breadsticks at a time After PREHEAT place the biscuits 1 to 2 inches apart on engrossed 12 inch round pizza pan or cookie sheet on short rack Cool on rack for 10 minutes after cooking To cook frozen french fries ...

Страница 26: ... Place a microwave safe heat proof plate on turntable to catch drippings Place chicken breast side up on short rack After cooking loosely tent roast chicken with aluminum foil and let stand for 10 minutes Weight range 2 5 to 6 lbs To cook turkey breast Weigh turkey breast and pat dry with paper towels Brush turkey breast with melted butter Place a microwave safe heat proof plate on turntable to ca...

Страница 27: ... 325 F for 45 minutes with preheat To set the convection cooking at 375 F for 45 minutes without preheat To cook 1 Put food on the oven rack and close the door 2 Touch Clear 3 Touch Convection Cook Display scrolls the words 350F TOUCH MORE OR LESS FOR TEMP SET OR START OR ENTER COOKING TIME 4 Touch More once to set 375 F Display scrolls the words 375F TOUCH START FOR PREHEAT OR ENTER COOKING TIME ...

Страница 28: ...l Food Cheesecake Coffee Cake Cup Cakes Fruit Cake loaf Gingerbread Butter Cakes Cake Mixes 2 layers Fluted Tube Cake Pound Cake Bar Drop or Sliced 400 F 400 F 400 F 350 F 350 F 375 F 350 F 350 F 350 F 350 F 350 F 300 F 350 F 350 F 350 F 350 F 350 F 375 F 10 to 12 15 to 20 18 to 24 30 to 40 55 to 65 18 to 25 13 to 16 40 to 50 60 to 65 25 to 30 15 to 20 80 to 90 35 to 40 30 to 40 40 to 50 60 to 70 ...

Страница 29: ... cookware with shallow sides Pudding is done when knife inserted near center comes out clean Puncture puffs twice with toothpick to release steam after 25 minutes of baking time Set cups in baking dish Pour boiling water around cups to a depth of 1 inch When done turn oven off and let shells stand in oven 1 hour to dry Follow package directions Follow package directions Follow package directions L...

Страница 30: ...thick 2 chops 4 chops 6 chops Whole Chicken 21 2 to 31 2 lbs Chicken Pieces 21 2 to 31 2 lbs Cornish Hens Unstuffed 1 to 11 2 lbs Stuffed 1 to 11 2 lbs Duckling 4 to 5 lbs Turkey Breast 4 to 6 lbs Fish whole 3 to 5 lbs Lobster Tails 6 to 8 oz each 21 to 26 26 to 31 31 to 36 25 to 30 30 to 35 35 to 40 12 to 16 16 to 20 45 to 50 20 to 25 20 to 25 17 to 20 21 to 26 26 to 31 25 to 30 29 to 34 26 to 30...

Страница 31: ... cooking PRECAUTIONS 1 All cookware used for combination cooking must be BOTH microwave safe and ovenproof 2 During combination baking some baking cookware may cause arcing when it comes in contact with the oven walls or metal accessory racks Arcing is a discharge of electricity that occurs when microwaves come in contact with metal If arcing occurs place a heatproof dish between the pan and the m...

Страница 32: ...hops 3 4 to 1 inch thick 2 chops 4 chops 6 chops Turn over after half of cooking time Whole Chicken 21 2 to 6 lbs Chicken Pieces 21 2 to 6 lbs Cornish Hens Unstuffed Stuffed Duckling Turkey Breast 4 to 6 lbs Turn breast side up after half of cooking time Fish 1 lb fillets Lobster Tails 6 to 8 oz each Shrimp 1 to 2 lbs Scallops 1 to 2 lbs 300 F 300 F 300 F 300 F 300 F 300 F 300 F 300 F 275 F 300 F ...

Страница 33: ...z 4 6 minutes and vent Casserole 1 cup 1 31 2 minutes COOK covered in microwavable casserole Stir once halfway 4 cups 5 8 minutes through cooking Casserole cream or cheese 1 cup 11 2 3 minutes COOK covered in microwavable casserole Stir once halfway 4 cups 31 2 51 2 minutes through cooking Sloppy Joe or Barbecued Beef Reheat filling and bun separately 1 sandwich 1 21 2 minutes Cook filling covered...

Страница 34: ...11 2 qt baking dish 2 3 minutes Cover Mushrooms 1 2 Ib 2 31 2 Place mushrooms in 11 2 qt covered casserole 2 3 minutes Fresh Sliced Stir halfway through cooking Parsnips Fresh 1 Ib 4 8 Add 1 2 cup water in 11 2 qt covered casserole 2 3 minutes Sliced Stir halfway through cooking Peas Green 4 cups 7 10 Add 1 2 cup water in 11 2 qt covered casserole 2 3 minutes Fresh Stir halfway through cooking Swe...

Страница 35: ...ppliance it is possible to overcook food to the point that the food creates smoke and even possibly fire and damage to the inside of the oven It is always best to be near the oven while you are cooking The microcomputer controlling your oven may temporarily become scrambled and fail to function as programmed when you plug in for the first time or when power resumes after a power interruption Unplu...

Страница 36: ...s being popped If corn fails to pop after the suggested time discontinue cooking Overcooking could result in an oven fire CAUTION Never use a brown paper bag for popping corn or attempt to pop leftover kernels Do not pop prepackaged commercial microwave popcorn directly on the glass turntable To avoid excessive heating of the glass turntable place the popcorn bag on a plate Listen while corn pops ...

Страница 37: ...d to handle your service requirements Is the power cord plugged in Is the door closed Is the cooking time set Are you using approved cookware Is the oven empty Have you tried to reset the time of day Are you using approved cookware Is the glass turntable in the oven Did you turn or stir the food while it was cooking Were the foods completely defrosted Was the time cooking power level correct Was t...

Страница 38: ...38 ...

Страница 39: ...Memo ...

Отзывы: