32
Using Windows 8.1
Start Screen
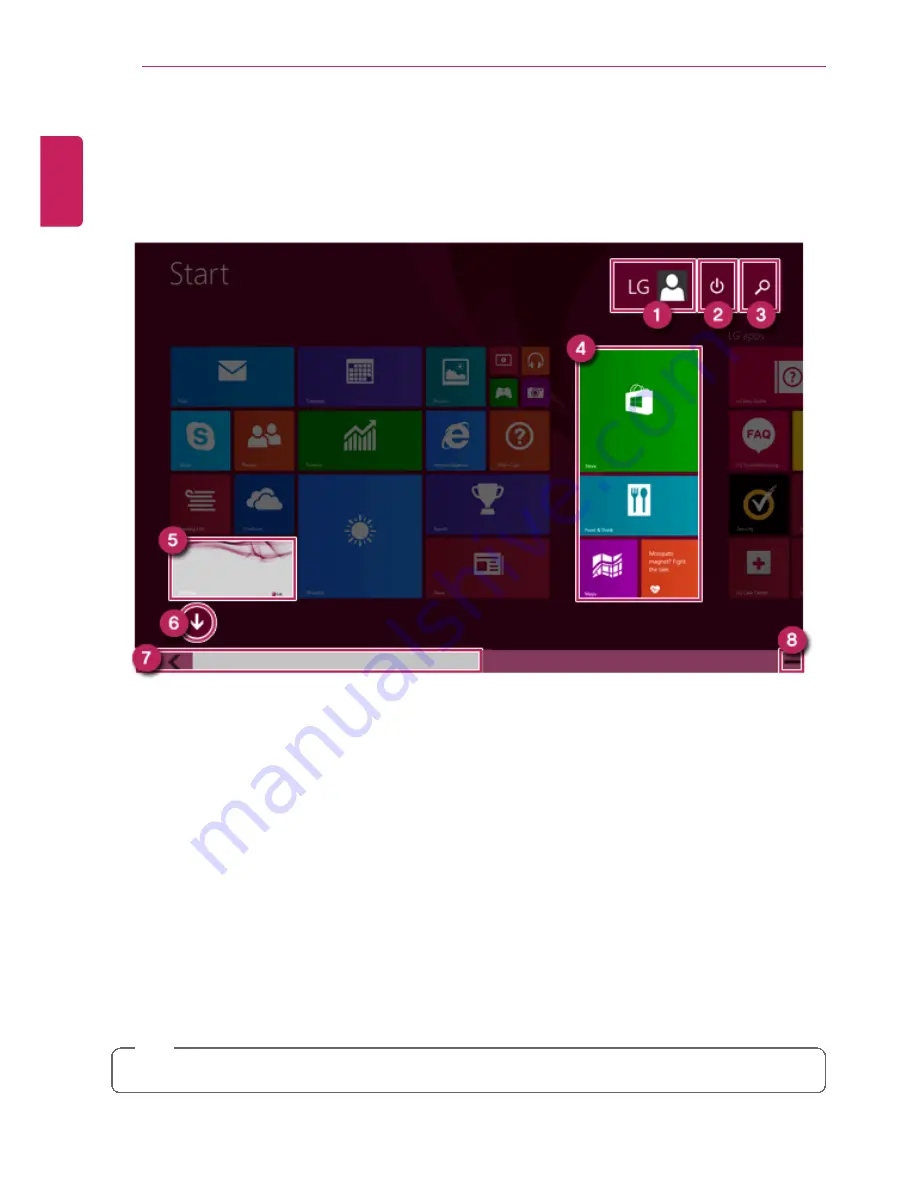
Windows 8.1's new Start screen has tiles to allow you to use apps more easily and check
updates, alarms, and information at a glance.
1
User Account
: It is possible to use the Change Picture, Lock, and Logout manuals.
2
Power Options
: It is possible to use the Hibernation, System Shutdown, and Restart
manuals.
3
Search
: Search system files, folders and other resources.
4
App Tile
: Windows Store apps and Desktop apps are arranged and displayed in the tile
format.
5
Desktop Tile
: Switch to Desktop.
6
View All Apps
: You can view the list of all apps at a glance.
7
Screen Scroll
: Scroll the Start screen horizontally.
8
Zoom Out
: You can quickly move to an app you want to use by zooming out from the
Start screen to see the entire screen at a glance.
TIP
If you move your mouse to the bottom of the Start screen, the taskbar appears.
ENGLISH
Содержание LG22V24
Страница 1: ......
Страница 25: ...Instruction Safety Information 25 Regulatory Notices ENGLISH ...
Страница 29: ...Using Windows 8 1 29 ENGLISH ...
Страница 35: ...Using Windows 8 1 35 ENGLISH ...
Страница 44: ...44 Using Windows 8 1 2 When the title bar appears click the icon at the top right to close the app ENGLISH ...
Страница 48: ...48 Using Windows 8 1 ENGLISH ...
Страница 50: ...50 Using Windows 8 1 2 The basic categories appear on the Store screen ENGLISH ...
Страница 58: ...58 Using Windows 8 1 2 Move the cursor to the top center of the running app screen ENGLISH ...
Страница 59: ...Using Windows 8 1 59 3 When you drag the cursor down the screen is reduced in size ENGLISH ...
Страница 62: ...62 Using Windows 8 1 6 Click on the empty screen to go to the Start screen ENGLISH ...
Страница 80: ...80 Using the PC 2 In the Charms click Settings Change PC Settings ENGLISH ...
Страница 82: ...82 Using the PC 5 When a device is found click the device to connect ENGLISH ...
Страница 83: ...Using the PC 83 6 When the passwords are matched click Yes to complete the connection ENGLISH ...
Страница 86: ...86 Using the PC 4 Click Change Adapter Settings ENGLISH ...
Страница 87: ...Using the PC 87 5 Right click Ethernet and select Properties ENGLISH ...
Страница 88: ...88 Using the PC 6 Select Internet Protocol Version 4 TCP IPv4 and click Properties ENGLISH ...
Страница 91: ...Using the PC 91 3 Near available Access Point wireless network is automatically searched ENGLISH ...
Страница 114: ...114 Restoring the System ENGLISH ...
Страница 119: ...Setup and Upgrade 119 2 In Charms click Setup Change PC Changes Update and Recovery manual ENGLISH ...
Страница 120: ...120 Setup and Upgrade 3 As shown in the figure when the Windows update window appears click Check now ENGLISH ...
Страница 122: ...122 Setup and Upgrade 5 In View Details click Select all important updates and the Install button to proceed ENGLISH ...
Страница 127: ...Setup and Upgrade 127 1 Reboot the system and press F2 ENGLISH ...
Страница 130: ...130 Setup and Upgrade 2 When the following screen appears click Enter in the Set Supervisor Password menu ENGLISH ...
Страница 134: ...134 Setup and Upgrade 1 After opening the system setup screen click the Security button ENGLISH ...
Страница 135: ...Setup and Upgrade 135 2 When the following screen appears click Enter in the Set User Password menu ENGLISH ...
Страница 139: ...Setup and Upgrade 139 1 After opening the system setup screen click the Security button ENGLISH ...
Страница 149: ...Setup and Upgrade 149 2 When the following screen appears click Enter in the Set Supervisor Password menu ENGLISH ...
Страница 151: ...Setup and Upgrade 151 4 Press Enter in Enter New Password and Confirm New Password ENGLISH ...
Страница 153: ...Setup and Upgrade 153 7 When the following message appears click YES The PC will restart ENGLISH ...
Страница 157: ...Setup and Upgrade 157 5 Press Enter in Enter New Password and Confirm New Password ENGLISH ...
Страница 159: ...Setup and Upgrade 159 8 When the following message appears click YES The PC will restart ENGLISH ...
Страница 161: ...Setup and Upgrade 161 2 When the Exit menu appears click Load Setup defaults ENGLISH ...
Страница 165: ...Setup and Upgrade 165 2 When the system setup screen appears click the Boot button ENGLISH ...
Страница 168: ...168 Setup and Upgrade Selecting a Boot Device to Use 1 Reboot the system and press F10 ENGLISH ...
Страница 173: ...Setup and Upgrade 173 2 Insert the replacement memory into the memory slot in the direction of the arrow ENGLISH ...
Страница 174: ...174 Setup and Upgrade 3 Push the memory in the direction of the arrow until you hear a click sound ENGLISH ...
Страница 177: ...FAQ 177 2 In Charms click Setup Change PC Changes Update and Recovery manual ENGLISH ...
Страница 178: ...178 FAQ 3 As shown in the figure when the Windows update window appears click Check now ENGLISH ...
Страница 179: ...FAQ 179 4 As shown in the figure when a message that new updates are available appears click View Details ENGLISH ...
Страница 180: ...180 FAQ 5 In View Details click Select all important updates and the Install button to proceed ENGLISH ...
Страница 185: ...FAQ 185 ENGLISH ...
Страница 188: ...188 FAQ 3 Near available Access Point wireless network is automatically searched ENGLISH ...
Страница 191: ...FAQ 191 4 In the Charms click Settings Control Panel View By Small Icon Network and Sharing Center ENGLISH ...
Страница 192: ...192 FAQ 5 Click Change Adapter Settings ENGLISH ...
Страница 193: ...FAQ 193 6 Right click Ethernet and select Properties ENGLISH ...
Страница 194: ...194 FAQ 7 Select Internet Protocol Version 4 TCP IPv4 and click Properties ENGLISH ...


