background image

14 LG GS500v  |  User Guide

Memory card

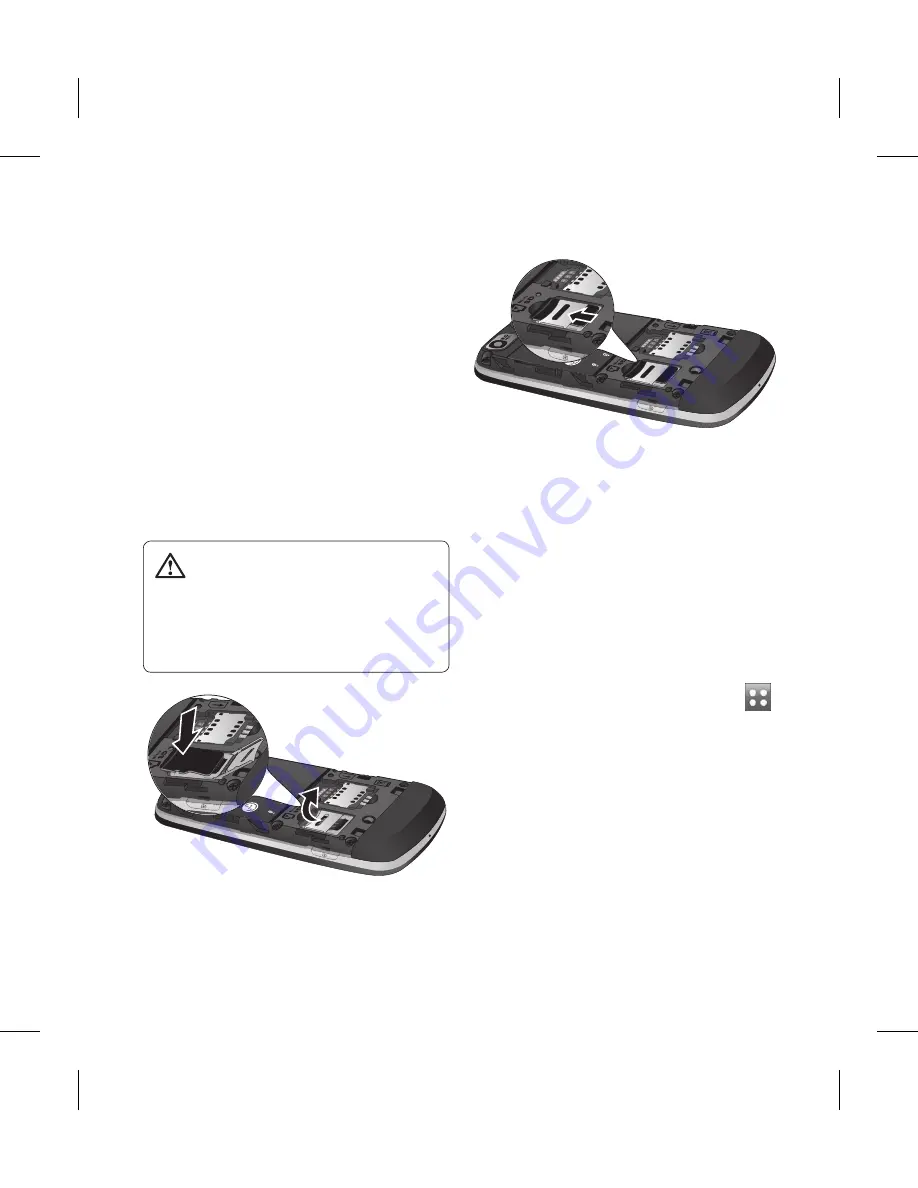
Installing a memory card

You can expand the available 

memory space on your phone by 
using a memory card. 

NOTE:

 A memory card is an optional 

accessory.
Slide the memory card into the slot 
at the top, until it clicks into place. 
Make sure the gold contact area is 
facing downwards.


WARNING:

 Slide into 

the memory card to the slot, 

otherwise, the card can be 

damaged.

Formatting the memory card

Your memory card may already be 
formatted. If it isn’t, you will need 
to format it before you can start to 
use it.

NOTE:

 All files get deleted while 

formatting.

From the home screen select

1  


and choose 

Phone settings

 from 

the SETTINGS tab.
Scroll and touch 

2  

Memory info


then scroll and select 

External 

memory

.

Touch 

3  

Format

 and then confirm 

your choice.

Содержание LG-GS500v

Страница 1: ...OWNER S MANUAL LG GS500v P NO MMBB0369526 1 0 G www lg com ENGLISH ...

Страница 2: ...Bluetooth QD ID B016193 ...

Страница 3: ...e of the advanced and compact GS500v phone by LG designed to operate with the latest digital mobile communication technology Some of the contents in this manual may differ from your phone depending on the software of the phone or your service provider ...

Страница 4: ...ttery 12 Charging your phone 13 Memory card 14 Menu map 16 Using your touch screen 17 Your home screen 18 Calls 20 Contacts 25 Messaging 28 E mail 32 SNS 34 Camera 35 Video camera 39 Your photos and videos 43 Multimedia 52 UTILITIES 62 PC Suite 66 The web 70 Settings 74 Accessories 81 Technical data 82 Trouble shooting 83 Contents ...

Страница 5: ...n Rate or SAR Tests for SAR are conducted using standardised methods with the phone transmitting at its highest certified power level in all used frequency bands While there may be differences between the SAR levels of various LG phone models they are all designed to meet the relevant guidelines for exposure to radio waves The SAR limit recommended by the International Commission on Non Ionizing R...

Страница 6: ...hat of the parts being replaced Keep away from electrical appliances such as TVs radios and personal computers The unit should be kept away from heat sources such as radiators or cookers Do not drop Do not subject this unit to mechanical vibration or shock Switch off the phone in any area where you are required by special regulations For example do not use your phone in hospitals as it may affect ...

Страница 7: ...t touch the antenna unnecessarily Do not use the phone or accessories in places with high humidity such as pools greenhouses solariums or tropical environments it may cause damage to the phone and invalidation of warranty Efficient phone operation Electronic and medical devices All mobile phones may get interference which could affect performance Do not use your mobile phone near medical equipment...

Страница 8: ...sts are designed to prevent possible interference with sensitive medical equipment Road safety Check the laws and regulations on the use of mobile phones in the area when you drive Do not use a hand held phone while driving Give full attention to driving Use a hands free kit if available Pull off the road and park before making or answering a call if driving conditions so require RF energy may aff...

Страница 9: ...ass Parts Some parts of your mobile device are made of glass This glass could break if your mobile device is dropped on a hard surface or receives a substantial impact If the glass breaks do not touch or attempt to remove Stop using your mobile device until the glass is replaced by an authorised service centre Blasting area Do not use the phone where blasting is in progress Observe restrictions an...

Страница 10: ...solely on the phone for emergency calls Check with your local service provider Battery information and care You do not need to completely discharge the battery before recharging Unlike other battery systems there is no memory effect that could compromise the battery s performance Use only LG batteries and chargers LG chargers are designed to maximize the battery life Do not disassemble or short ci...

Страница 11: ...eries according to the manufacturer s instructions Please recycle when possible Do not dispose as household waste If you need to replace the battery take it to the nearest authorized LG Electronics service point or dealer for assistance Always unplug the charger from the wall socket after the phone is fully charged to save unnecessary power consumption of the charger Actual battery life will depen...

Страница 12: ... the home screen Turns the phone on off Volume keys When the screen is idle Touch tone or ring tone volume press long the down key to Silent on off During a call earpiece volume When playing a track controls the volume continuously Camera key Go to camera menu directly by pressing and holding the key Press twice to go to Sweet draw You can edit the image and send it in this menu Notice This functi...

Страница 13: ...11 WARNING Putting a heavy object on the phone or sitting on it can damage its LCD and touch screen functionality Open view Battery cover Battery SIM card socket Camera lens Memory card socket ...

Страница 14: ...amage the phone Install the USIM card 2 Slide the USIM card into the USIM card holder Make sure the gold contact area on the card is facing downwards To remove the USIM card gently pull it outwards Install the battery 3 Insert the top of the battery into the top edge of the battery compartment first Ensure that the battery contacts align with the phone s terminals Press the bottom of the battery d...

Страница 15: ...ide of your GS500v Insert the charger and plug it into a mains electricity socket Your GS500v must be charged until the Battery full message appears on the screen NOTE The battery must be fully charged initially to improve battery lifetime Charging your phone ...

Страница 16: ...ct area is facing downwards WARNING Slide into the memory card to the slot otherwise the card can be damaged Formatting the memory card Your memory card may already be formatted If it isn t you will need to format it before you can start to use it NOTE All files get deleted while formatting From the home screen select 1 and choose Phone settings from the SETTINGS tab Scroll and touch 2 Memory info...

Страница 17: ...ture may be different after formatting since all files will have been deleted Transferring your contacts To transfer your contacts from your SIM phone to your phone SIM From the Communication tab 1 scroll to Contacts and select Settings Select 2 Copy Move Choose 3 Handset to SIM or SIM to handset Choose Select all or select names 4 one by one and touch Copy Move ...

Страница 18: ...enu map COMMUNICATION Contacts Recent history Messaging E mail Dialling Social network Speed dials New message UTILITIES Browser Google Alarms Organiser Memo Voice recorder Tools Sweet draw SETTINGS Profiles Screen settings Phone settings Call settings Bluetooth Touch settings Connectivity Phone guide ENTERTAINMENT Camera Gallery Music My stuff Games Apps Pocket Apps FM radio Muvee studio ...

Страница 19: ... require Be careful not to touch any other keys Whenever your GS500v is not in use it will return to the lock screen Control the touch screen The controls on the GS500v touch screen change dynamically depending on the task you are carrying out Opening Applications To open any application simply touch its icon Scrolling Drag from side to side to scroll On some screens such as the Recent history lis...

Страница 20: ...sage edit or delete the contact directly in this home screen Active Livesquare home screen On the Livesquare screen You can easily make a call and send a message to the number allocated to an avatar To use the call messaging or contacts function select an avatar and choose the Quick key icon you want to use You can drag all of the avatars by six and even send the message at once Active Quick key i...

Страница 21: ...l Message sending failed Multimedia message sending failed An alarm is set Customised Profile in use The number in the icon will vary Icon Description Normal profile in use Outdoor profile in use Silent profile in use Headset in use Calls are diverted EDGE in use Roaming Flight mode is on Bluetooth is active BGM play BGM pause Memory card is enabled for use For incoming Push email Check Push email...

Страница 22: ...the first few letters of the contact you would like to call using the keypad From the filtered list touch the 3 Call icon next to the contact you want to call The call will use the default number if there is more than one for that contact Or you can touch the contact 4 name and select the number to use if there is more than one for that contact to use You can also touch to initiate the call to the...

Страница 23: ...rn off the microphone so the person you are talking to cannot hear you Speaker Touch to turn the speaker phone on Options Touch to bring up a list of further in call options Touch to search your contacts during a call Touch to add another person to the call Touch to open a numerical keypad for making a second call This function also allows you to navigate menus with numbered options when you dial ...

Страница 24: ...e To find a contact tap the Name field box and enter the first letter of the name of the contact required Making a second call During your initial call touch 1 and type the number you want to call Touch 2 to connect the call Both calls will be displayed on 3 the call screen Your initial call will be locked and the caller put on hold To change between the calls 4 touch or press the number of the he...

Страница 25: ...barring Touch 1 Call settings in the SETTINGS tab Touch 2 Call barring Choose any or all of the five 3 options All outgoing Outgoing international Outgoing international calls except home country All incoming Incoming when abroad Enter the call barring password 4 Please check with your network operator about this service TIP Select Fixed dial numbers from the Call settings options to turn on and c...

Страница 26: ...hether your number will be displayed when you call someone Auto redial Slide the switch left for ON or right for OFF Minute minder Slide the switch left to ON to hear a tone every minute during a call BT answer mode Select Hands free to be able to answer a call using a Bluetooth headset or select Handset to press a key on the handset to answer a call Save new number Select Yes to save a new number...

Страница 27: ...ntact Choose whether to save the 2 contact to your Handset or SIM Enter your first and last name 3 You can enter up to five different 4 numbers per contact Each entry has a preset type Mobile Home Office Pager and Fax Add an email addresses You can 5 enter up to two different email addresses per contact Assign the contact to one or 6 more groups You can assign up to three groups per contact Choose...

Страница 28: ...COMMUNICATION tab and touch Settings From here you can adjust the 2 following settings Contact list settings Adjust the Contacts location Name display and Quick command key settings Copy Copy your contacts from your handset to your SIM or from your SIM to your handset You can choose one at a time or all at once Move This works in the same way as Copy but the contact will only be saved to the locat...

Страница 29: ...ing information Touch 1 Contacts in the COMMUNICATION tab and touch Information From here you can view your 2 Service dial numbers your Own number your Memory info showing your memory usage and My business card TIP To add your own business card select My business card and enter your details as you would for any contact Touch Save to finish ...

Страница 30: ...enter the number or touch to select a contact You can even add multiple contacts Touch 4 Send when ready WARNING If an image video or sound is added to an SMS it will be automatically converted to an MMS and you will be charged accordingly TIP You can send SMS to many users at a time Recipient and selecting search icon will open the contacts list where in user can mark unmark contacts for sending ...

Страница 31: ...change between numbers symbols and text input Use Shift key to change between capital or lowercase input T9 mode The T9 mode uses a built in dictionary to recognise the words you re writing based on the sequence of keys you ve touched It predicts the word you are inputting and suggests alternatives Handwriting recognition In Handwriting mode you simply write on the screen and your GS500v will conv...

Страница 32: ...ssage You can make changes to Text message centre Enter the details of your message centre Delivery report Slide the switch left to receive confirmation that your messages have been delivered Validity period Choose how long your messages are stored at the message centre Message types Convert your text into Text Voice Fax X 400 or E mail Character encoding Choose how your characters are encoded Thi...

Страница 33: ...ge mode Delivery time Choose how long to wait before a message is delivered Multi msg centre Choose one from the list or add a new message centre Changing your other settings Touch Messaging in the COMMUNICATION tab And touch Settings Voicemail Touch to add a new Voicemail service Contact your network operator for more information about the service they provide Service message Choose to receive or...

Страница 34: ... new emails To check manually Touch 1 E mail in the COMMUNICATION tab Touch the account you want to 2 use Sending an email using your new account Touch 1 New e mail and a new email will open Complete the message 2 Touch 3 Send and your email will be sent Changing your email settings Touch 1 E mail in the COMMUNICATION tab Touch 2 and select E mail settings and then you can adapt the following sett...

Страница 35: ...de the original attachment in any reply Auto retrieval in roaming Choose whether to retrieve your messages automatically when abroad roaming New e mail notification Choose whether to be alerted to new emails Signature Switch this feature ON and create an email signature Priority Choose the priority level of your email messages Maximum sending size Set the maximum size of sending mail E mail counte...

Страница 36: ...ll see your friend s updated status Input your comment about new status or check others You can also write comments by selecting icon Profile You can select the Wall Status updates and write the current status See your info detail and upload the photo by touching Album Upload Photo Choose from Go to images or Take a picture and then input some caption with images Friends You can find many friends ...

Страница 37: ...on the centre right of the viewfinder Once you ve taken the photo Your captured photo will appear on the screen The image name is shown with four icons on the right hand side Touch to send the photo as a message email via Bluetooth or Blogger Touch to set a Home Screen Contact Startup Shutdown image Touch to edit the photo Touch to rename the photo Touch to return to the previous menu Touch to del...

Страница 38: ...memory space or take a picture preset to the correct size for a contact Select a pixel value from the six numerical options 3M 2048x1536 2M 1600x1200 1M 1280x960 VGA 640x480 WQVGA 400x240 QVGA 320x240 Continuous shot This enables you to take 3 6 9 shots automatically in very quick succession Exposure A low contrast image will appear foggy whereas a high contrast image will appear much sharper Zoom...

Страница 39: ... bottum of the screen and select the option Colour Effect Choose a colour tone to apply to the photo you re taking There are four colour tone options Off Black White Negative or Sepia White balance Choose from Auto Incandescent Sunny Fluorescent or Cloudy Night mode Useful to use in dark places Self timer The self timer allows you to set a delay before the camera takes the picture after the captur...

Страница 40: ... the camera settings icons to be hidden manually or automatically Shutter sound Select one of the three shutter sounds Grid screen Choose from Off Simple cross or Trisection Noise reduction This can help to reduce noise Swap cam For self portraits switch to the inner camera Reset settings Reset all the camera settings Viewing your saved photos You can access your saved photos 1 from within the cam...

Страница 41: ...video touch 5 and resume by selecting Touch 6 on screen or press the a second time to stop recording After making a video A still image representing your captured video will appear on the screen The name of the video runs along the bottom of the screen together with eight icons down the left and right sides Touch to play the video Touch to send the video as a Message or Email or by Bluetooth or Yo...

Страница 42: ...switch to camera mode Start recording Gallery Video mode Video mode is selected Settings Touch this icon to open the settings menu See Using the advanced settings View Mode Choose from Full screen or Full image Video size Choose from QVGA 320x240 or QCIF 176x144 Exposure A low contrast video will appear foggy whereas a high contrast video will appear much sharper Zoom zoom in or zoom out Video siz...

Страница 43: ... the option Colour Effect Choose a colour tone to use on your new video Off Black White Negative Sepia White balance The white balance ensures that any white in your videos is realistic In order for your camera to correctly adjust the white balance you may need to determine the light conditions Choose from Auto Incandescent Sunny Fluorescent or Cloudy Quality Choose between Super fine Fine and Nor...

Страница 44: ...her or not to record a video with sound Hide icons Choose the camera settings icons to be hidden manually or automatically Reset settings Reset all the video camera settings Watching your saved videos In the viewfinder touch 1 Your gallery will appear on the 2 screen Touch a video once to bring it to 3 the front of the gallery Video camera ...

Страница 45: ... right corner to move the focus area Adjusting the volume when viewing a video To adjust the volume of a video while it is playing touch the volume bar on the screen bottom after pressing the loudspeaker symbol Alternatively use the volume keys on the side of the phone Capturing an image from a video Select the video you would like 1 to capture an image from Touch 2 to pause the video on the frame...

Страница 46: ...ct Slide show The slideshow will begin 2 There are options within slideshows Touch to go back Touch to pause the slideshow on a particular photo Touch again to resume playback Touch to show random Touch to increase or decrease the speed of the slideshow Setting a photo as wallpaper Touch Gallery in the 1 ENTERTAINMENT tab Touch the photo you would like 2 to set as wallpaper Touch the screen to ope...

Страница 47: ...ate your photo with stamps Choose from the different stamps and colours and touch your photo where you want to place them Erase whatever you draw You can also select the eraser size Touch to return to the gallery Save the changes you have made to the photos Select to save the changes over the Original file or as a New file If you select New file enter a file name Undo the last effect or edit you m...

Страница 48: ...crop When you are finished with your 4 selection touch Adding an effect to a photo From the editing screen touch 1 Choose to apply any of the 2 options to the photo Face beautify Automatically detect a face in the image and brighten it up Tunnel effect Lomo camera effect Colour negative Colour negative effect Black and white Black and white colour effect Sepia Give a Sepia effect Blur Give a blurr...

Страница 49: ...cartoon effect Water color Give a watercolour effect To undo an effect simply touch 3 Undo Trimming the length of your video Open the video you d like to edit 1 select and touch to bring up the options Select 2 and choose Trim Touch 3 and mark the new start and end points using Touch 4 Preview cropped to ensure you are happy with the new cut Touch 5 Save icon or alternatively touch to return to th...

Страница 50: ...these steps to merge 7 more photos Merging a photo with a video Open the video you d like to edit 1 select and touch to bring up the options Select 2 and choose Image merge The My stuff folder will open 3 select either My Images or My memory card if fitted Choose the photo you would like to merge into your video and touch Select Touch and slide the photo 4 to merge it to the end or the beginning o...

Страница 51: ... icon followed by Yes to save Choose to save over the original file or as a new file Repeat these steps to add more 8 voice recordings to the video Adding a soundtrack to your video Open the video you d like to edit 1 select and touch to bring up the options Select 2 and choose Audio dubbing The My stuff folder will open 3 select either My sounds or My memory card if fitted Choose the track you wo...

Страница 52: ...d by Yes Choose to save over the original file or as a new file Repeat these steps to add more 9 text Overlaying a photo Open the video you d like to edit 1 select and touch to bring up the options Select 2 and choose Image overlay The My stuff folder will open 3 select either My images or My memory card if fitted Choose the photo you would like to overlay your video and touch Select Touch 4 and m...

Страница 53: ... a new file Repeat these steps to add more 9 photos Changing the speed of your video Open the video you d like to edit 1 select and touch to bring up the options Select 2 and choose Time scaling Select one of the four speed 3 options x4 x2 x1 4 x1 2 Choose to save over the original 4 file or as a new file NOTE Only 3gp Video file can be edited ...

Страница 54: ...es including default images pre loaded onto your phone images you have downloaded and those taken on your phone s camera My images options menu The options available to you in Images depend on the type of image you have selected All options will be available for pictures you have taken on the phone s camera but only the Use as Slide show and File info options are available for default images Sendi...

Страница 55: ...p image Set an image to appear when you switch the phone on Shut down image Set an image to appear when you switch the phone off Printing an image Touch 1 then select My stuff from ENTERTAINMENT tab Touch 2 Images Select an image and touch 3 Touch 4 Print then choose between Bluetooth and PictBridge Moving or copying an image An image can be moved or copied between the phone memory and the memory ...

Страница 56: ... can manage or send sounds or set them as ringtones Using a sound Touch 1 then select My stuff from ENTERTAINMENT tab Touch 2 Sounds Select 3 Default sounds or Download sound Select a sound and touch the 4 play icon It will start to play You can use the sound for various 5 tones by selecting the Use as menu Choose between 6 Voice ringtone and Message tone Videos The My videos folder shows a list o...

Страница 57: ... and Applications You can download new games and applications to your phone to keep you enjoy Playing a game Touch 1 then select Games Apps on the ENTERTAINMENT tab Touch 2 Games or Applications menu Touch to launch a game or an 3 application DataWallet This application is used to keep personal informations Bank Account Credit Card Loan Email ID details LG Help Desk This application has all India ...

Страница 58: ...pplication Touch 1 then select My stuff on the ENTERTAINMENT tab If you insert new memory card 2 touch External Memory menu Select the file jad or jar you 3 want to download and install the file NOTE The Java program files are in jad or jar format The jad file should contain its own jar file Once installed the Java program 4 can be viewed in the Games or Applications menu where you can select exec...

Страница 59: ...g music using Bluetooth Make sure your phone and 1 computer have Bluetooth switched on and are within range of each other Use your computer to send the 2 file via Bluetooth When the file is sent accept it on 3 your phone by touching Yes The file should appear in your 4 Corresponding folder Others The Others folder is used to store files that are not pictures audio files videos games or application...

Страница 60: ...hen Save Location to choose where to save the movie Music Your LG GS500v has a built in music player that lets you play all your favourite tracks To access the music player touch then select Music from ENTERTAINMENT tab From here you can access a number of folders Recently played Plays the songs you have played recently All tracks Contains all the songs you have on your phone except the pre loaded...

Страница 61: ...opyrighted material Before downloading or copying the file please check the national legislation of the applicable country concerning the use of such material Transferring music onto your phone The easiest way to transfer music onto your phone is via Bluetooth or the data cable You can also use LG PC Suite To transfer music using Bluetooth Make sure both devices have 1 Bluetooth switched on and ar...

Страница 62: ... TIP To change the volume while listening to music touch Creating a playlist You can create your own playlists by choosing a selection of songs from the Playlists folder Touch 1 Music in the ENTERTAINMENT tab Touch 2 Playlists then Add new playlist enter the playlist name and touch Save The All tracks folder will show all 3 the songs in your phone Touch all of the songs that you would like to incl...

Страница 63: ...o the phone as this acts as the antenna To auto tune Scroll and touch 1 FM radio in the ENTERTAINMENT tab then Touch 2 Auto scan A confirmation message appears Select Yes then the stations will be automatically found and allocated to a channel in your phone NOTE You can also manually tune into a station by using and displayed in the centre of the screen If you press and hold and the stations will ...

Страница 64: ...if it is an Appointment Set 7 Alarm and Repeat Select 8 Save and your event will be saved in the calendar A square cursor will mark the day that any events have been saved to and a bell will ring at the start time of your event so that you can stay organised TIP User can schedule an SMS so that it can be sent to the destination on Set date and Set time by selecting Message option in Calendar Addin...

Страница 65: ...ew alarm Set the time you would like the 3 alarm to sound in the Time field box Choose how you would like your 4 alarm to repeat in the Repeat box Select 5 Alarm type to select the type of alarm you want Choose 6 Alarm bell and select a sound from the folder To listen to sounds touch the sound followed by Add a memo for the alarm in the 7 Memo box Finally you can set the snooze 8 interval to 5 10 ...

Страница 66: ...o pause recording Touch 3 to end recording Touch 4 to listen to your recording Using your calculator Touch 1 Tools in the UTILITIES tab Select 2 Calculator Touch the numeric keys using the 3 keypad to input numbers For simple calculations touch the 4 function you require followed by For more complex calculations 5 touch and choose from sin cos tan log ln exp sqrt deg or rad etc Converting a unit T...

Страница 67: ...Tools in the UTILITIES tab Select 2 Stopwatch Touch 3 Start on the bottom of the screen to begin the timer Touch 4 Lap if you want to record a lap time Touch 5 Stop to end the timer Touch 6 Resume to restart or touch Reset to begin the time again Sweet draw Press twice to capture the current image When Auto Save is Off you can edit the image after capturing an image Notice This function may not be...

Страница 68: ...re t Go to Manual S W Download Section Installing the LG PC Suite on your computer From the home screen touch 1 and then click Connectivity on the SETTINGS Tab Select 2 USB connection mode and click PC Suite Connect handset and PC via USB 3 cable and wait for a while Installation guide message will 4 be displayed Caution If installation guide message is not displayed on your PC please check your C...

Страница 69: ... Backup or Restore Choose whether to back 3 up Contents Data and or Phonebook Schedule Todo Memo Data Select the location you want to back up the information to or restore it from Click OK Your information will be backed 4 up Viewing phone files on your PC Connect your phone to your PC 1 as outlined above Click on the Manage Photos 2 Videos or Music icon Images audio files and videos 3 you have sa...

Страница 70: ... on the Messages icon 2 All your phone messages will 3 be displayed in folders on the screen Use the toolbar at the top of 4 the screen to edit and rearrange messages Music Sync This menu lets you add music to your GS500v Before you start transferring music from your PC to your phone make sure your computer has the following set up and accessory is at hand Microsoft Windows XP or Vista Windows Med...

Страница 71: ...en you try to connect the 4 handset to your PC your handset will read Music Sync followed by Connected The PC will prompt you to 5 launch your preferred music management software Select Window Media Player 6 Go to the Sync Tab then drag 7 and drop the music you wish to transfer into the Sync List panel Click on the 8 Start Sync button This starts the transfer process WARNING Do not disconnect your...

Страница 72: ...g to these services and downloading content Check data charges with your network provider Adding and accessing bookmarks For easy and fast access to your favourite websites you can add bookmarks Touch 1 Browser in the UTILITIES tab Select Bookmarks A list of your 2 Bookmarks will appear on the screen To add a new bookmark touch 3 Add bookmark Enter a name for your bookmark followed by the URL in t...

Страница 73: ...reader or by clicking an RSS icon in a browser that starts the subscription process The reader checks the user s subscribed feeds regularly for new content and downloads any updates that it finds Accessing a saved page From the home screen select 1 then scroll to Browser on the UTILITIES tab Select 2 Saved pages Select the page you want to view 3 and it will open Viewing your browser history From ...

Страница 74: ... Suite 1 installed on your PC Connect your GS500v and your 2 PC using the USB cable and launch the LG PC Suite software Click 3 Internet Connection on your PC Suite Then click Add and select Specific Operator setting required Click 4 Connect and your PC will connect via your GS500v Using Bluetooth Ensure Bluetooth is switched 1 On and Visible for both your PC and GS500v Pair your PC and GS500v so ...

Страница 75: ...e specifically designed for mobile phones and devices Mail The Gmail website will be launched YouTube You can watch videos on YouTube Mobile from your mobile device You may want to contact your carrier for more information about the availability of data streaming on your mobile device Blogger You can manage your account and share your blog It is available to upload a picture and video ...

Страница 76: ...e SETTINGS tab You can choose the option menu 2 from Handset theme You can choose Black or White Cartoon styled UI Wallpaper Widget homescreen or Speed dial homescreen or Lock screen Livesquare Touch Livesquare guide to check its functions Top menu Choose the style of the top menu choose Zigzag or Scrolling or Screen by screen Lock screen Choose the unlock type on the lock screen Dialling Adjust t...

Страница 77: ...isplay Motion silent Make the GS500v go into the mute or snooze settings by flipping it over when it is ringing Auto key lock Lock the keypad automatically on the home screen Security Adjust your security settings including PIN code request handset lock Change codes and ATMT AntiTheft MobileTracker When the handset is stolen handset sends the SMS to the numbers configured by real owner To activate...

Страница 78: ... service and quality If you select Manual all the currently available networks are shown and you can select one of them for registration Network mode You can select a network manually and set a network Preferred lists You can add a preferred network to connect to If the network is searching automatically simply choose one from the network list and if not add a new network manually Internet profile...

Страница 79: ...t if you want to make changes Using memory manager Your GS500v has three available memories the phone itself the SIM Card and an external memory card which you may need to purchase separately You can use memory manager to determine how each memory is used and see how much space is available From the home screen select then scroll to Phone settings on the SETTINGS tab Select Memory info Handset com...

Страница 80: ...ght mode prevents you making calls connecting to the Internet sending messages or using Bluetooth Sending and receiving your files using Bluetooth To send a file Open the file you want to send 1 typically this will be a photo video or music file Choose 2 Send Choose Bluetooth If you have already paired the 3 Bluetooth device your GS500v will not automatically search for other Bluetooth devices If ...

Страница 81: ... can choose to View the file or Use as wallpaper Files will usually be saved to the appropriate folder in My stuff Changing your Bluetooth settings Touch Bluetooth in the SETTINGS tab And select and choose Settings Make your changes to My device visibility Choose to be Visible Hidden or Visible for 1 min My device name Enter a name for your GS500v Supported services Select how to use Bluetooth in ...

Страница 82: ... on screen Choose the device you want to 4 pair with and select OK Your phone will then connect to 5 the other device on which a new default passcode will be create fo this connection Your passcode protected 6 Bluetooth connection is now ready Using a Bluetooth headset Check your Bluetooth is 1 On and Visible Follow the instructions that 2 came with your headset to put it in pairing mode and pair ...

Страница 83: ...on requirements Please consult your local dealer for availability The items described below are supplied in the box Charger Data cable To connect and synchronise your GS500v and PC Battery Stereo headset User Guide GS500v User Guide NOTE Always use genuine LG accessories Failure to do this may invalidate your warranty Accessories may vary in different regions Accessories ...

Страница 84: ...2 EN 301 489 24 V1 4 1 EN 300 328 V 1 7 1 EN 60950 1 2001 EN 50360 2001 EN62209 1 2006 EN 301 511 V9 0 2 EN 301 908 1 V3 2 1 EN 301 908 2 V3 2 1 Supplementary Information The conformity to above standards is verified by the following Notified Body BABT BABT Forsyth House Churchfield Road Walton on Thames Surrey KT12 2TD United Kingdom Notified Body Identification Number 0168 Declaration I hereby declar...

Страница 85: ... GSM network area Move towards a window or into an open area Check the Network Operator coverage map Codes do not match To change a security code you will need to confirm the new code by entering it again The two codes you have entered do not match Contact your Service centre Function cannot be set Not supported by Service Provider or registration required Contact your Service Provider Calls not a...

Страница 86: ...ty Temperature out of range Contact problem No mains voltage Charger defective Wrong charger Battery defective Charge battery Make sure the ambient temperature is right wait for a while and then charge again Check the power supply and connection to the phone Check the battery contacts and clean them if necessary Plug in to a different socket or check the voltage If the charger does not warm up rep...

Страница 87: ......

Страница 88: ... B 71 Sahakar Marg Lal Kothi Scheme Jaipur 302015 5111118 5113028 5105392 Jalandhar LGEIL Village Khajurla Near Hawali Resturant Jallandhar Phagwara Highway G T Road Jallandhar 502667 508025 502668 Jammu LGEIL Plot No 52 Yard No 6 Transport Nagar Narwal Jammu 180006 2477420 2477419 2474396 2474384 Jodhpur LGEIL 22 1 A 21 2 B 2 RIICO Heavy Industrial area Jodhpur 342003 2742384 392 Kolkata LGEIL 1 ...

Страница 89: ...DODP 06 HQHUDO 72 2 0 1 0 06 1 5 1685 1 2 7 QG ORRU EHU LW 3KDVH XUJDRQ DU DQD HQHUDO QVXUDQFH R WG KRODPDQGDODP 06 HQ EHU LW 3KDVH D 1R RODPV PXUXJDSSD FRP 2 0 1 0 06 1 5 1685 1 2 7 QG ORRU EHU LW 3KDVH XUJDRQ ...

Страница 90: ...2IIHU DSSOLFDEOH RQ DOO SXUFKDVHV PDGH IURP WK SULO WR WK SULO XQGHU 3ROLF 1R 3 DWHG ...

Страница 91: ...WK SULO WR WK SULO G ...

Страница 92: ...G ORRU EHU LW 3KDVH XUJDRQ DU DQD KRODPDQGDODP 06 HQHUDO QVXUDQFH R WG QVXUDQFH R WG IRU VXUYH KRODPDQGDODP 06 HQ HUDO QVXUDQFH R WG QG ORRU EHU LW 3KDVH XUJDRQ 7HO 1R D 1R H PDLO LG FXVWRPHUFDUH FKRODPV PXUXJDSSD FRP 2 0 1 0 06 QG ORRU XUJ For a pleas Cus ...

Страница 93: ...For any query related to the after sales service and customer support please contact us at below details Customer Information Center ...

Страница 94: ...MEMO ...

Страница 95: ...MEMO ...

Страница 96: ...MEMO ...

Страница 97: ...MEMO ...

Страница 98: ...MEMO ...

Отзывы: