14
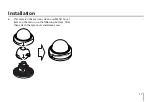
5. Assemble the camera and mounting bracket after
align the front part of the camera and mounting
bracket. Connect the unit by following step
a
and
b
.
예비
FRONT
PRODUCT CENT
ER POSITION
MEZ626
8770
3
n
100 Cutt
ing Li
ne
4 Place
SELFTAPPING SCREW
CABLE HOLE
(LCV5300)
CABLE HOLE
(LCD5300)
FRONT
PRODUCT CENTE
R POSITION
MEZ62
68770
3
n
100 Cutti
ng Line
4 Place
SELFTAPPING SCR
EW
CABLE HOLE (LCV5300)
CABLE HOLE (LCD5300)
FRONT
PRODUCT CEN
TER POSITION
MEZ6268
7703
n
100 Cutt
ing Li
ne
4 Plac
e
SELFTAPPING
SCREW
CABLE HOLE
(LCV5300
)
CABLE HOLE (LCD5300)
FRONT
PRODUCT CENTER POSITION
MEZ62
68770
3
n
100 Cut
ting Li
ne
4 Place
SELFTAPPING SCREW
CABLE HOLE (L
CV5300)
CABLE HOLE (LCD5300
)
Image Adjustment
You can manually adjust the pan/tilt/azimuth angles, focus,
and zoom while observing the connected monitor.
Notes:
•
Do not hold the camera by lens unit to adjust panning,
tilting, or azimuth.
•
The video output to the BNC will be interrupted while
a portable monitor is connected to the video jack.
1. Disassemble the Dome Cover from the main body
by turning it counterclockwise and detach the Lens
-cover.
TILT
PAN
ROTATE
WIDE
TELE
NEAR
FAR
Installation
Содержание LCD5100-BN
Страница 38: ......

