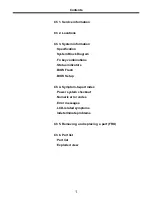


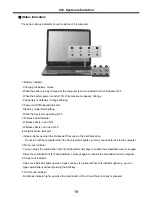
15
-CPU
· Dothan 1.60GHz~1.86GHz
·
Celeron 1.20GHz~1.50GHz
· μFCPGA
- Main Chipset & Graphic
· Intel 915GM, ICH6-M
- Memory
· 2 SODIMM
· DDR2 PC2-4300 Capable(533MHz)
- LCD
· 15” XGA
- HDD
· 2.5" 9.5mm 40/60GB PATA Type
- Communication
· MDC AC’97
· Realtek 8100C
- Wireless LAN Solution
· 802.11 bg
- Card Slot
· Express Card Slot
·
Cardbus Card Slot(PCMCIA)
· 3-in-1 Card Slot
- ODD
· Fixed Optical Storage
· DVD-Combo/DVD Super multi
- Port
· VGA, 3X USB(2.0), RJ11, RJ45, Headphone-out, Mic-in, AC-in, IEEE1394, S-Video
- Input Devices
· Keyboard:86Key Keyboard
· Touchpad
- Buttons
· Power, Volume Down, Volume Up
- Indicator (LED)
· Power On, Charge, HDD, Caps Lock, Num Lock, Wireless
Specification
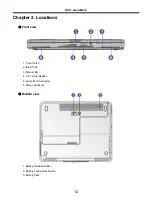
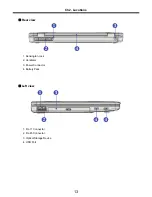
Chapter 3. System information
Ch3. System information
Содержание K1
Страница 1: ...0 Service Manual K1 LG Electronics ...
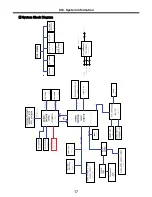
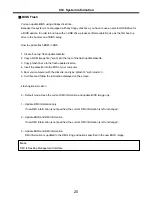
Страница 18: ...17 System Block Diagram Ch3 System information ...
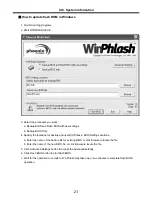
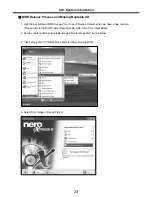
Страница 25: ...24 Ch3 System information c Select File Format as Image Files iso d Open Image File iso which is sent from LGE ...
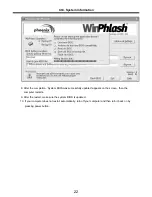
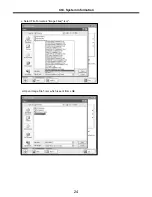
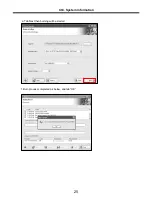
Страница 26: ...25 Ch3 System information e Tab Next then burning will be started f Burn process completed as below and tab OK ...
Страница 58: ...57 3 Remove HDD using a tag Ch5 Removing and replacing a part ...
Страница 59: ...58 Ch5 Removing and replacing a part ...
Страница 61: ...60 3 Remove the Memory Ch5 Removing and replacing a part ...
Страница 64: ...63 2 Disconnect the Fan Assembly connector 3 Remove the Fan Assembly Ch5 Removing and replacing a part ...
Страница 67: ...66 Ch5 Removing and replacing a part ...
Страница 69: ...68 3 Disconnect the Connector 4 Remove the Retainer Ch5 Removing and replacing a part ...
Страница 71: ...70 3 Disconnect the Keyboard Connector then remove the Keyboard Ch5 Removing and replacing a part ...
Страница 73: ...72 2 Disconnect the LVDS Inverter Cable Ch5 Removing and replacing a part ...
Страница 74: ...73 3 Remove the Display Module Ch5 Removing and replacing a part ...
Страница 77: ...76 4 Remove the Keydeck 5 Disconnect the Touchpad Connector Ch5 Removing and replacing a part ...
Страница 78: ...77 6 Disconnect the Power Cable then remove the Keydeck Ch5 Removing and replacing a part ...
Страница 80: ...79 2 Remove the Main Board 3 Disconnect the DC In LAN USB Cable Ch5 Removing and replacing a part ...
Страница 81: ...80 4 Disconnect the MDC Cable Ch5 Removing and replacing a part ...
Страница 83: ...82 7 Remove the USB Board Ch5 Removing and replacing a part ...
Страница 90: ...K1 Buffalo EXPLODED VIEW 2 NHDDB NCVRH NSCRF NSCRF NSCRF NSCRF NBRKB ...


