


7
Safety inspection guide
The purpose of this inspection guide is to assist you in identifying potentially unsafe conditions.
As each machine was designed and built, required safety items were installed to protect users and service
personnel from injury. This guide addresses only those items. You should use good judgment to identify
potential safety hazards due to attachment of non-LG features or options not covered by this inspection
guide.
If any unsafe conditions are present, you must determine how serious the apparent hazard could be and
whether you can continue without first correcting the problem.
· Consider these conditions and the safety hazards they present
1. Electrical hazards, especially primary power (primary voltage on the frame can cause serious or fatal
electrical shock)
2. Mechanical hazards, such as loose or missing hardware
Refer to the following checklist and begin the checks with the power off, and the power cord disconnected.
· Checklist
1. Check exterior covers for damage (loose, broken, or sharp edges)
2. Power off the computer. Disconnect the power cord.
3. Check the power cord for :
a. A third-wire ground connector in good condition. Use a meter to measure third-wire ground continuity
for 0.1 or less between the external ground pin and frame ground.
b. The power cord should be the type specified in the parts list.
c. Insulation must not be frayed or worn.
4. Remove the cover.
5. Check for any obvious non-LG alterations. Use good judgment as to the safety of any non-LG
alterations.
6. Check inside the unit for any obvious unsafe conditions, such as metal filings, contamination, water or
other liquids, or signs of fire or smoke damage.
7. Check for worn, frayed, or pinched cables.
8. Check that the power-supply cover fasteners (screw or rivets) have not been removed or tampered with.
Ch1. Service information
Содержание F1
Страница 1: ...0 Service Manual F1 LG Electronics ...
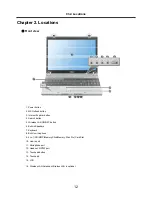
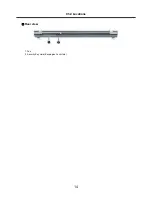
Страница 15: ...14 Ch2 Locations Rear view 1 Fan 2 Security Key Hole Kensington Lock Hole ...
Страница 25: ...24 Ch3 System information c Select File Format as Image Files iso d Open Image File iso which is sent from LGE ...
Страница 26: ...25 Ch3 System information e Tab Next then burning will be started f Burn process completed as below and tab OK ...
Страница 56: ...55 Ch5 Removing and replacing a part ...
Страница 58: ...57 3 Remove the Memory Module Ch5 Removing and replacing a part ...
Страница 63: ...62 Ch5 Removing and replacing a part ...
Страница 65: ...64 Ch5 Removing and replacing a part ...
Страница 67: ...66 3 Remove the Keyboard Ch5 Removing and replacing a part ...
Страница 69: ...68 3 Remove the Button Sub Board Ch5 Removing and replacing a part ...
Страница 72: ...71 4 Remove the Display Module Ch5 Removing and replacing a part ...
Страница 76: ...75 5 Remove the Main Board Ch5 Removing and replacing a part ...
Страница 81: ...80 3 Remove the USB Sub Board 2 Disconnect the USB Sub Board Connector Ch5 Removing and replacing a part ...
Страница 86: ...85 8 Disconnect the LCD Cable and the Inverter Connector Ch5 Removing and replacing a part ...
Страница 92: ...91 NBATM NCVRB NCVRH NHDD1 NRUBS NSCR1 ...
Страница 93: ...92 NODD1 NMEM1 NLAN1 NMDM1 NFAN1 ...
Страница 94: ...93 NKBD1 NCPU1 NMCP1 NSPK1 NSPK1 NMLB1 NSUBU NSETR NCAPH NCABM NCAB3 NRUBR ...
Страница 95: ...94 NCSEK NANTL NANTR NBRKR NSCR2 NCAB1 ...
Страница 96: ...95 NSUBB NCSEB ...
Страница 97: ...96 NBRKH NCSEF NHNGL NHNGR NSETR ...
Страница 98: ...97 NSETF NCSER NLCD1 NNVE1 NCABN NCABL NPLTL ...
Страница 99: ...98 NBRKL NBRKL NBRKL ...