


2
Chapter 1. Service information
1-1. Important service information
Strategy for replacing parts (FRU-Field Replaceable Units)
Before replacing parts
Make sure that latest BIOS and drivers are installed before replacing any parts (FRUs) listed in this
Caution
The BIOS configuration on the computer you are servicing may have been customized.
Running Automatic Configuration my alter the settings. Note the current configuration settings;
then, when service has been completed, verify that those settings remain in effect.
Strategy for replacing a hard-disk drive
You have to get a User’s approval before formatting or replacing a hard-disk drive. You must let the User
know that the user is responsible for the loss data
Caution
The drive startup sequence in the computer you are servicing may have been changed. Be
extremely careful during write operations such as copying, saving, or formatting. If you select an
incorrect drive, data or programs can be overwritten.
Use the following strategy to prevent unnecessary expense for replacing and servicing parts
1. If you are instructed to replacing a part but the replacement does not correct the problem, reinstall the
original part before you continue.
2. Some computers have both a processor board and system board. If you are instructed to replace either
the processor board or the system board, and replacing one of them does not correct the problem,
reinstall that board, and then replace the other one.
3. If an adapter or device consists of more than one part, any of the parts (FRUs) may be the cause of the
error. Before replacing the adapter or device, remove the parts (FRUs), one by one, to see if the
symptoms change. Replace only the part that changed the symptoms.
Ch1. Service information
Содержание F1
Страница 1: ...0 Service Manual F1 LG Electronics ...
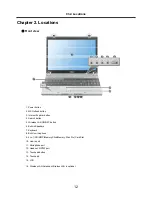
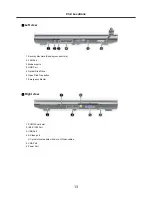
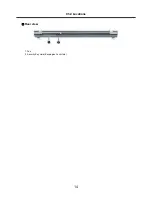
Страница 15: ...14 Ch2 Locations Rear view 1 Fan 2 Security Key Hole Kensington Lock Hole ...
Страница 25: ...24 Ch3 System information c Select File Format as Image Files iso d Open Image File iso which is sent from LGE ...
Страница 26: ...25 Ch3 System information e Tab Next then burning will be started f Burn process completed as below and tab OK ...
Страница 56: ...55 Ch5 Removing and replacing a part ...
Страница 58: ...57 3 Remove the Memory Module Ch5 Removing and replacing a part ...
Страница 63: ...62 Ch5 Removing and replacing a part ...
Страница 65: ...64 Ch5 Removing and replacing a part ...
Страница 67: ...66 3 Remove the Keyboard Ch5 Removing and replacing a part ...
Страница 69: ...68 3 Remove the Button Sub Board Ch5 Removing and replacing a part ...
Страница 72: ...71 4 Remove the Display Module Ch5 Removing and replacing a part ...
Страница 76: ...75 5 Remove the Main Board Ch5 Removing and replacing a part ...
Страница 81: ...80 3 Remove the USB Sub Board 2 Disconnect the USB Sub Board Connector Ch5 Removing and replacing a part ...
Страница 86: ...85 8 Disconnect the LCD Cable and the Inverter Connector Ch5 Removing and replacing a part ...
Страница 92: ...91 NBATM NCVRB NCVRH NHDD1 NRUBS NSCR1 ...
Страница 93: ...92 NODD1 NMEM1 NLAN1 NMDM1 NFAN1 ...
Страница 94: ...93 NKBD1 NCPU1 NMCP1 NSPK1 NSPK1 NMLB1 NSUBU NSETR NCAPH NCABM NCAB3 NRUBR ...
Страница 95: ...94 NCSEK NANTL NANTR NBRKR NSCR2 NCAB1 ...
Страница 96: ...95 NSUBB NCSEB ...
Страница 97: ...96 NBRKH NCSEF NHNGL NHNGR NSETR ...
Страница 98: ...97 NSETF NCSER NLCD1 NNVE1 NCABN NCABL NPLTL ...
Страница 99: ...98 NBRKL NBRKL NBRKL ...