


18
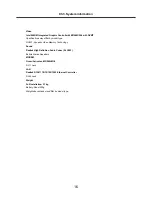
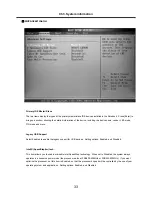
Fn key combinations
The following table shows the function of each combination of Fn with a function key.
Function of Fn keys has nothing to do with Operating System.
Ch3. System information
End
Fn + PgDn
Home
Fn + PgUp
Changes the status to System standby.
Fn + F12
MUTE On/Off
Fn + F9
Increases the speaker volume. The volume can be adjusted within a 25 grade range.
Fn + F8
Decreases the speaker volume. The volume can be adjusted within a 25 grade range.
Fn + F7
Increases the LCD brightness. The brightness can be adjusted within a nine-grade range.
Fn + F5
Decreases the LCD brightness. The brightness can be adjusted within a nine-grade
range.
Fn + F4
Switches between Touchpad Disable and
Touchpad-Enable. (The initialization takes 1 ~ 2 seconds. It is recommended that you
use it after initialization.)
Fn + F3
Switches the monitors. If you have an external monitor connected, press
Fn + F2 keys to
rotate the display mode in order between
Default LCD Only, External Only, and Both
Default LCD and External.
Fn + F2
Содержание F1
Страница 1: ...0 Service Manual F1 LG Electronics ...
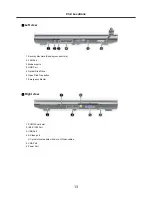
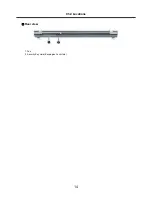
Страница 15: ...14 Ch2 Locations Rear view 1 Fan 2 Security Key Hole Kensington Lock Hole ...
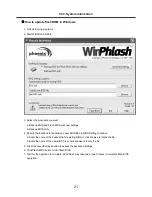
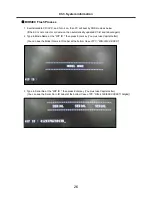
Страница 25: ...24 Ch3 System information c Select File Format as Image Files iso d Open Image File iso which is sent from LGE ...
Страница 26: ...25 Ch3 System information e Tab Next then burning will be started f Burn process completed as below and tab OK ...
Страница 56: ...55 Ch5 Removing and replacing a part ...
Страница 58: ...57 3 Remove the Memory Module Ch5 Removing and replacing a part ...
Страница 63: ...62 Ch5 Removing and replacing a part ...
Страница 65: ...64 Ch5 Removing and replacing a part ...
Страница 67: ...66 3 Remove the Keyboard Ch5 Removing and replacing a part ...
Страница 69: ...68 3 Remove the Button Sub Board Ch5 Removing and replacing a part ...
Страница 72: ...71 4 Remove the Display Module Ch5 Removing and replacing a part ...
Страница 76: ...75 5 Remove the Main Board Ch5 Removing and replacing a part ...
Страница 81: ...80 3 Remove the USB Sub Board 2 Disconnect the USB Sub Board Connector Ch5 Removing and replacing a part ...
Страница 86: ...85 8 Disconnect the LCD Cable and the Inverter Connector Ch5 Removing and replacing a part ...
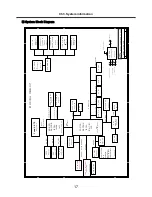
Страница 92: ...91 NBATM NCVRB NCVRH NHDD1 NRUBS NSCR1 ...
Страница 93: ...92 NODD1 NMEM1 NLAN1 NMDM1 NFAN1 ...
Страница 94: ...93 NKBD1 NCPU1 NMCP1 NSPK1 NSPK1 NMLB1 NSUBU NSETR NCAPH NCABM NCAB3 NRUBR ...
Страница 95: ...94 NCSEK NANTL NANTR NBRKR NSCR2 NCAB1 ...
Страница 96: ...95 NSUBB NCSEB ...
Страница 97: ...96 NBRKH NCSEF NHNGL NHNGR NSETR ...
Страница 98: ...97 NSETF NCSER NLCD1 NNVE1 NCABN NCABL NPLTL ...
Страница 99: ...98 NBRKL NBRKL NBRKL ...