background image

33

ENTERTAINMENT

5

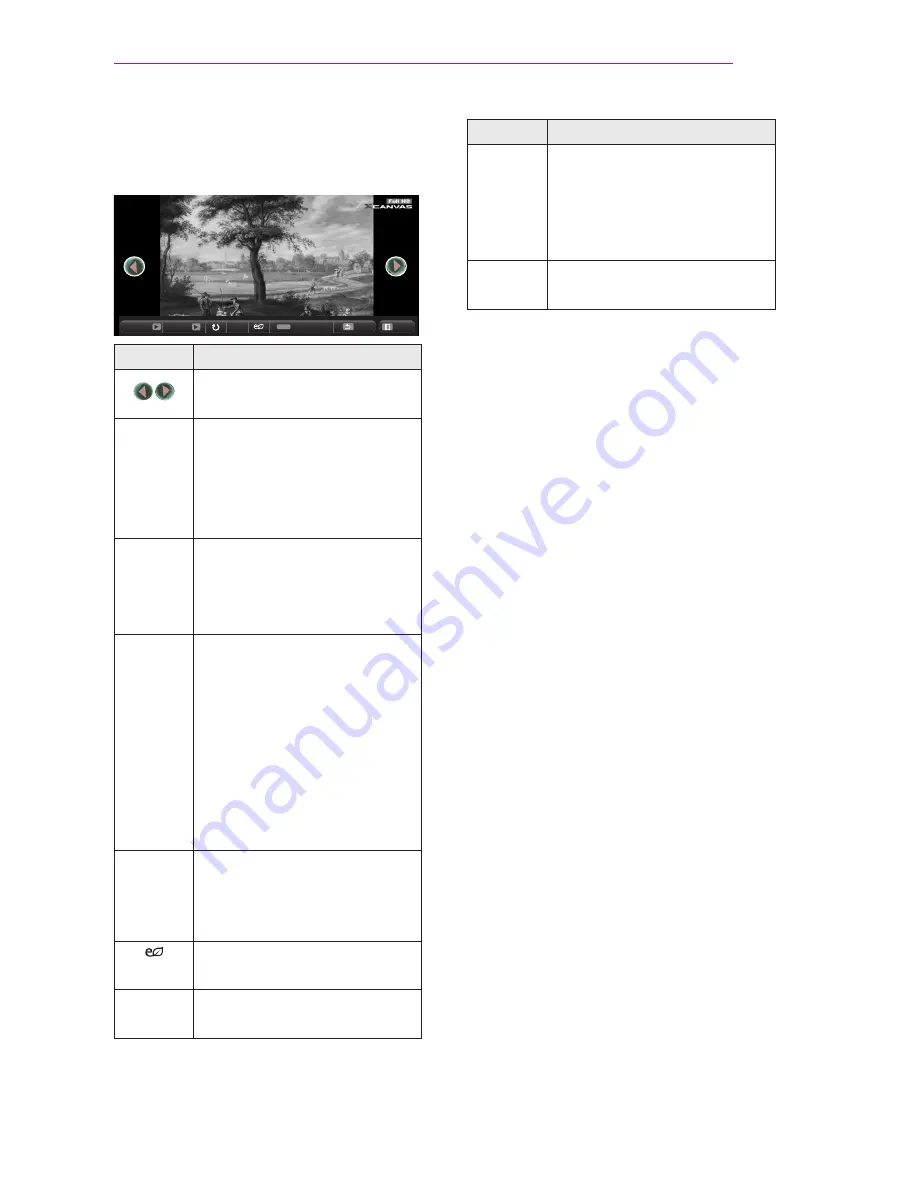
 Control playback by using the follow-

ing buttons.


01_a.jpg

2008/12/10

1920 x 1080

479 KB

[1/4]

Q.MENU

Option

Slideshow

BGM

Hide

Exit

Setting

Description

Selects the previous or next 
photo.

Slide-

show

All photos are displayed 
during slide show.

y

y

Set the time interval of 
the slide show in Option 

 Set Photo View menu.

BGM

You can listen to music while 
viewing photos in full size.

y

y

Set the BGM in Option 

 Set Photo View menu.

Rotates photos.

y

y

Rotates a photo 90°, 
180°, 270°, 360° clock-
wise.

y

y

Photos cannot be rotated 
if their width is greater 
than the height of the 
max. supported resolu-
tion.

Views the photo in full mode 

or original mode.
Press the 

blue button to 

enlarge the image.
You can use the Energy Sav-
ing mode.

Option A pop-up window will ap-

pear.

Setting

Description

Hide

Hides the menu on the full 

size screen.

y

y

To see the menu, press 
the 

OK button on the 

remote control.

Exit

Exit from full screen photo 
view.

Содержание DLP PROJECTOR

Страница 1: ...Owner s Manual DLP PROJECTOR PB60G Please read this manual carefully before operating your projector and retain it for future reference www lg com ...

Страница 2: ...DEO ON DEMAND This DivX Certified device must be registered in order to play purchased DivX Video on Demand VOD movies To obtain your registration code locate the DivX VOD section in your device setup menu Go to vod divx com for more information on how to complete your registration DivX Certified to play DivX video up to HD 1080p including premium content DivX DivX Certified and associated logos a...

Страница 3: ...uipment off and on the user is encouraged to try to correct the interference by one or more of the following measures Reorient or relocate the receiving antenna Increase the separation between the equipment and receiver Connect the equipment into an outlet on a circuit different from that to which the receiver is connected Consult the dealer or an experienced radio TV technician for help SAFETY IN...

Страница 4: ...ot use the projector in a damp place such as a bathroom where it is likely to get wet This may cause a fire or an electric shock y y Do not allow a tablecloth or curtain to block the vents This may cause the internal tem perature of the projector to rise and cause a fire y y The distance between the projector and the wall should be more than 30 cm for ventilation purposes Otherwise this may cause ...

Страница 5: ...d so it is easy to access for operation CAUTION y y Hold the plug firmly when unplug ging A broken wire in the cord may cause a fire y y Ensure the power cord or plug is not damaged modified severely bent twisted pulled sandwiched or heated Do not use a loose wall outlet This may cause a fire or an electric shock y y Keep the power cord away from any heating devices The cord coating may melt and c...

Страница 6: ...lowed by a child please consult a doctor immediately y y Do not remove any covers except for the lens cap There is a high risk of electric shock y y Do not look directly into the lens when the projector is in use The strong light may damage your eyes y y When the lamp is on or has just been turned off avoid touching the air vent or lamp because these will be very hot y y If there is a gas leak do ...

Страница 7: ...y to persons or damage to the projector y y The distance between your eyes and the screen must be around 5 7 times the diagonal length of the screen If you watch the screen at a close distance for a long time your eye sight may become worse Cleaning WARNING y y Do not spray the projector with water when cleaning Do not allow water to go into the projector or do not allow it to get wet This may cau...

Страница 8: ...rojector For inspection adjustment or repair con tact your seller or the Service Center Otherwise this may cause a fire or an electric shock y y Dispose of the used battery properly Otherwise this may result in explosion or fire y y The correct method of disposal may vary depending on your country or region Dispose of the battery pack according to the appropriate instructions y y Do not throw or d...

Страница 9: ...rrectly y y Incorrect battery replacement may cause fire CAUTION y y Unplug the power cord if the projec tor is not used for a long period Accumulated dust may cause overheating an electric shock from corroded insulation and a fire from an electrical surge y y Only use the specified type of battery Otherwise this may cause an elec tric shock caused by overheating and leakage ...

Страница 10: ...ens 55 Cleaning the Projector Case 55 SPECIFICATIONS 56 LICENSES 2 SAFETY INSTRUCTIONS 3 PREPARATION 11 Accessories 11 Optional Extras 12 Parts and Components 13 Installation 14 Installation Precautions 14 Projection Distance per Screen Size 15 How to Install the Projector Using a Tripod 16 Kensington Security System 16 REMOTE CONTROL 17 USING THE PROJECTOR 19 Watching Projector 19 Turning on the ...

Страница 11: ...able to the HDMI or USB port it may not be connected properly if the size of jack to the USB HDMI port is too big Use a standard sized jack 219 4 76 0276 81 7 2 761 0 6ꕯ ꕣ 5 66 0 5 3 07 56 4 1 4 6 1 75 4 5 5 Remote Control Mercury battery CR 2032 Owner s Manual CD Owner s manual Computer Cable Composite Gender AC DC Adaptor Power Cord Pouch ...

Страница 12: ...etail store where you purchased the product Without prior notice optional extras are subject to change in order to improve the per formance of the product and new accessories may be added Screen for Projector Tripod HDMI Cable Video Cable Audio Cable 3D glasses DLP LINK or DLP Ready Type RGB to Component cable Component Cable ...

Страница 13: ...and does not indicate a malfunction When powered on the LED of the control panel turns on Speaker Focus ring Lens2 Button Description Power Turns the projector on or off Menu Selects or closes menus Sets the function or moves the cursor ꔉ OK Checks present mode and saves function changes 1 Due to the high temperature air coming out of the vents do not get close to the vents 2 Do not touch the lens...

Страница 14: ...e projector in a hot or humid environment Do not place the projector in a hot cold or humid environment See56Page regarding operating temperature and humidity y y Do not place the projector in a place where it will easily attract dust This may cause a fire y y Do not remove any covers except for the lens cap There is a high risk of electric shock y y The projector is manufactured using high precis...

Страница 15: ...poor If the screen image is crooked use the Keystone function see page21 4 Connect the power cords of the projector and the connected devices to the wall outlet Ratio of upward projection 100 16 10 Screen Screen Size mm Screen Width Y mm Screen Height X mm Projection Distance D mm 635 538 337 803 762 646 404 966 889 754 471 1130 1016 861 539 1293 1143 969 606 1456 1270 1077 673 1619 1397 1185 741 ...

Страница 16: ...that prevent expensive elec tronic equipment such as a computer or laptop from being stolen Internet Homepage http www kensington com How to Install the Projector Using a Tripod y y You can install this projector using a camera tripod As shown below you can mount the projector instead of a camera on the tripod y y When stabilizing the tripod we recommend using the locking bolt of standard size 4 5...

Страница 17: ...source MUTE Mutes all sounds VOLUME Adjusts the volume level PAGE Moves to the previous or next screen AUTO Automatically adjusts the RGB PC input image BLANK Turns the projector screen on or off Up Down Left Right Buttons Sets the function or moves the cursor OK Checks present mode and saves function changes EXITꕯ Clears all on screen displays and returns to projector viewing ꕣ Returns to the pre...

Страница 18: ...ny other accessories in the bag Otherwise it may significantly reduce the battery life 219 4 76 0276 81 7 2 761 0 6ꕯ ꕣ 5 66 0 5 3 07 56 4 1 4 6 1 75 4 5 5 STILL Freezes the moving image Available in any mode other than USB mode RATIO Resizes an image USB Accesses USB mode MARK Allows you to select optional functions KEY S Adjusts Keystone Playback Control Buttons Controls playback of MY MEDIA 3D S...

Страница 19: ... Screen Image When an image appears on the screen check if it is in focus and fits the screen properly Focus ring y y To adjust the focus of the image rotate the focus ring Watching Projector 1 In Standby mode press the POWER button to turn the projector on 2 Press the INPUT button and select the input signal you want 3 Control the projector using the fol lowing buttons while watching projec tor B...

Страница 20: ...utting off the edges NOTE y y If you select Just Scan you may see image noises at the edge or edges of the screen Set By Program Displays images in the same aspect ratio as the original image 4 3 Resizes images to the 4 3 aspect ratio Zoom Enlarges an image to fit the screen width The top and bottom of the image may be truncated y y Press the or button to zoom in or out of the image y y Press the ...

Страница 21: ...ing the Input List Using the Input List 1 Press the INPUT button to access the input sources The connected input mode appears first However AV Component input is always activated ꕯ INPUT INPUT Component USB RGB PC HDMI ꔂ Move ꔉ OK Exit Input Label 2 Select an input signal using the INPUT button and the projector is switched only to the connected input mode You can use the or button to switch betwe...

Страница 22: ...K button 3 Press the or button to select Blank Image and press the OK button 4 Use the button to move to the setting or option you want and press the OK button Using the Quick Menu You can customize frequently used menus 1 Press Q MENU to access the quick menus 2 Press the or button to scroll through the following menus and press OK Menu Description Aspect Ratio Resizes an image see page20 Picture...

Страница 23: ...ears You cannot write or delete data on the USB storage device USB memory stick To disconnect the USB storage device 1 Press the Q MENU button 2 Use the or button to move to USB Device and press the OK button 3 Remove the USB device NOTE y y After the USB storage device is disconnected it cannot be read Remove the USB storage device and connect it again ENTERTAINMENT ...

Страница 24: ...device may not be recognized y y Please connect a USB storage device with a cable provided by the USB manufacturer When you use a cable that is not provided by a USB manu facturer or an excessively long cable the device may not be recognized y y Some USB devices may not be sup ported or will not work properly y y If the length of a folder or file is too long the folder or file may not be recognize...

Страница 25: ... y y Video files with higher resolution than the maximum supported for each frame may not be played properly y y Video files in formats other than the ones specified above may not be played properly y y Streaming files which include GMC Global Motion Compensation or Qpel Quarterpel Motion Estimation is not supported y y Up to 10 000 sync blocks are sup ported in the subtitle file y y Seamless play...

Страница 26: ...WMA Standard WMA 9 Professional DTS Korea only mp4 m4v Video H 264 AVC Main Profile Level 4 1 High Profile Level 4 1 e g 720p60 1080i60 1080p30 MPEG 4 Part 2 Advanced Simple Profile 720p 1080i Audio HE AAC HE AAC LC and HE AAC mkv Video H 264 AVC Main Profile Level 4 1 High Profile Level 4 1 e g 720p60 1080i60 1080p30 Audio HE AAC HE AAC LC and HE AAC Dolby Digital DTS Korea only ts trp tp Video H...

Страница 27: ...20 kbps 32 kHz 48 kHz DTS Audio codec is Korea only 2 AC3 32 kbps 640 kbps 32 kHz 44 1 kHz 48 kHz 3 MPEG 32 kbps 448 kbps 32 kHz 48 kHz 4 AAC HEAAC 24 kbps 3844 kbps 8 kHz 96 kHz 5 CDDA 1 44 kbps 44 1 kHz 6 LPCM 1 41 Mbps 9 6 Mbps Multi channel 44 1 kHz 88 2 kHz 48 kHz 96 kHz Stereo 176 4 kHz 192 kHz ...

Страница 28: ...r pages Current page Total no of file pages Moves to the top level folder Moves to the upper level folder Exit Movie List 5 Control playback by using the follow ing buttons 01 02 30 02 30 25 Q MENU Option Hide Exit Setting Description Shows the current playing position Use buttons to move forward or backward ꕗ Stops playing and returns to Movie List Returns to normal playback ꕘ Pauses the media pl...

Страница 29: ...e file with multiple audio tracks This option is not available if the file has only one audio track Subtitle Lan guage The subtitle can be turned on or off y y Language One of any of the available languages can be selected y y Code Page A character set used for a subtitle can be selected By default the subtitle is displayed in a language configured in OPTION Menu Language Setting Description Subti...

Страница 30: ... to AUDIO Settings on page 47 Registering the DivX code Please check your DivX code For more information on the registration process visit www divx com vod After registra tion your can enjoy DivX VOD content protected by the DivX DRM code 1 In the Home menu move to OPTION and press DivX R VOD Registration Deregistration Close 2 Press the or button to move to Registration and press the OK but ton C...

Страница 31: ... No Your device is already registered Are you sure you wish to deregister Yes No Deregistration code Deregister at http vod divx com Continue with registration i 3 Select Yes NOTE y y What is DRM Digital Rights Management This is a technology and service that prevents the illegal use of digital contents to protect the benefits and rights of the copyright owner Files can be played after the license...

Страница 32: ...t be displayed properly y y It may take some time to view high resolution images in full screen Browsing Photo List 1 Connect a USB storage device 2 Press the USB button 3 Use the or button to select Photo List and press the OK button 4 Use the or button to select the file you want and press the OK button Photo List USB STORAGE DEVICE Butterfly_ d 01 34 33 book doc pic vid ꔅ Go to root folder ꔅ Go...

Страница 33: ...e viewing photos in full size y y Set the BGM in Option Set Photo View menu Rotates photos y y Rotates a photo 90 180 270 360 clock wise y y Photos cannot be rotated if their width is greater than the height of the max supported resolu tion ꔦ Views the photo in full mode or original mode Press the blue button to enlarge the image You can use the Energy Sav ing mode Option A pop up window will ap p...

Страница 34: ...deo settings Refer to PICTURE Settings on page 44 AUDIO Settings You can change audio settings Refer to AUDIO Settings on page 47 MUSIC LIST You can play audio files stored on the connected device Supported Music Files MP3 Bit rate range 32 Kbps 320 Kbps y y Sampling rate MPEG1 Layer 3 32 kHz 44 1 kHz 48 kHz y y Sampling rate MPEG2 Layer 3 16 kHz 22 05 kHz 24 kHz Browsing Music List 1 Connect a US...

Страница 35: ...ings on page 47 Description Thumbnails Abnormal file File not supported File List Moves to the upper level folder Current page Total no of folder pages Current page Total no of file pages Moves to the top level folder Moves to the upper level folder Exit 5 Control playback by using the follow ing buttons Music List USB STORAGE DEVICE Butterfly_ d 01 34 33 Drive1 Page 1 1 Page 1 1 ꘧ Page Change Q M...

Страница 36: ... it may take longer to load the document y y Unsupported fonts may be replaced by other fonts Browsing File List 1 Connect a USB storage device 2 Press the USB button 3 Use the or button to select File List and press the OK button 4 Use the or button to select the file you want and press the OK button File List USB STORAGE DEVICE Butterfly_ d 01 34 33 Drive1 ꔅ Go to root folder ꔅ Go to upper folde...

Страница 37: ...on to make it appear Exit Returns to the File Viewer screen Set FileViewer Option Setting Description Single Page Loading On Loads and displays pages one by one The initial loading time is short but a content heavy page may be displayed slowly Off Loads all pages of a file to memory before it starts to display them The initial loading time is long but you can navigate pages quickly after loading i...

Страница 38: ...ry 1 hour of viewing If vision varies between each eye correct the variation before beginning to watch a 3D video Ensure that the 3D video is directly in front of you at eye level You should stop watching if you experience a headache fatigue or dizziness Do not view 3D images when you are tired or ill Before Watching 3D While Watching 3D WARNING y y If you view 3D images too closely for a long per...

Страница 39: ...lasses must be DLP LINK DLP Ready type y y You may not be able to watch 3D properly if there is an obstacle be tween the projector and 3D glasses y y Install the 3D projector as far as pos sible from other devices Please check the following when using 3D glasses y y Do not use 3D glasses as ordinary glasses sunglasses or protective goggles If you do so this may cause injury y y Do not store 3D gla...

Страница 40: ...OTE y y The pairing with the DLP LINK glasses is affected by the intensity of light reflected from the screen Therefore the pairing with DLP LINK glasses may not work properly if the light reflected from the screen is not bright enough such as when the surrounding area is bright the screen is big or the maximum energy saving mode is enabled y y Some menus may not work while playing a 3D video y y ...

Страница 41: ...d support 120 vertical frequency Hz Recommended video card requirements Graphic Processor speed 700 MHz higher Memory 512 MB higher y y A laptop equipped with the chipsets above can be used but it may not work properly 2 Set the video output to XGA 120 Hz and play a video file using a video player that supports 3D output The following video players support 3D output Stereoscopic Player nVidia 3D V...

Страница 42: ...ame Sequential Frame Alternative RGB PC XGA 1024 x 768 120 Frame Sequential Frame Alternative y y The resolution supporting 3D mode is 1024 x 768 for HDMI and RGB input y y Some menus may not work in 120 Hz input Watching 3D Images 1 Play supported 3D video titles 2 For RGB PC you must press AUTO on the remote control before watching 3D 3 Press the 3D button 4 While watching 3D images from the pro...

Страница 43: ...utton to set up a desired item and press the OK button 4 When you are finished press EXIT Menu Description PICTURE Adjusts the image quality for optimal viewing AUDIO Adjusts the sound quality and volume level TIME Time related features OPTION Customizes the general settings INPUT Selects the desired input source MY MEDIA Accesses photo music movie and document files ...

Страница 44: ...ess and sharpness Standard Has the contrast brightness and sharpness at normal levels Cinema Optimizes the image for movie Sport Optimizes the image for sports by emphasizing primary colors and dynamic actions GAME Optimizes the image for playing games on fast moving screens Expert Adjusts the detailed image settings CON TRAST Increases or decreases the gradient of the video signal BRIGHT NESS Adj...

Страница 45: ...ro jector and various PC graphic signals y y You can also use the AUTO button on the remote control Position Moves the image up down left right Size Changes the screen size Phase Makes the picture look clear by removing horizontal noise Reset Restores all the settings to the factory default Advanced Control Setting Description Dynamic Con trast Adjusts the contrast to keep it at the best level acc...

Страница 46: ...he options of each mode Gamma Select 1 9 2 2 or 2 4 a Method 2 points Pattern Inner Outer Contrast Red Green Blue Brightness Red Green Blue Adjustable range 50 50 b Method 10 points IRE Pattern Inner Outer IRE Institute of Radio Engineers is the unit that indicates the size of the video signal and can be set as either 10 20 30 90 or 100 You can fine tune for each setting as shown below Luminance I...

Страница 47: ...risp and clear Balance Adjusts the balance of the left and right speakers Sound Mode Adjusts sound Option Standard Select when you want standard quality sound Music Select when you listen to music Cinema Select when you watch movies Sport Select when you watch sports events Game Select when you play games Infinite Surround LG s unique sound option provides 5 1 channel stereo sound from two speaker...

Страница 48: ...d press EXIT The available time settings are described as follows Setting Description Sleep Timer The projector is turned off at the preset time Auto Off If there is no signal the projector automatically turns off after the preset time has elapsed Automatic Standby If there is no press any button when Automatic Standby function is on the Projector automatically switches to the standby mode TIME Sl...

Страница 49: ...ight of the speaker changes automatically Auto Keystone Auto Keystone provides a rectangular screen image by automatically adjusting the Keystone number when there is a trapezoidal screen image caused by tilting of the projector Option ON Automatically adjusts the Keystone number Off Manually adjusts the Keystone number Keystone To prevent the screen image from becoming trapezoidal Keystone adjust...

Страница 50: ...ated If this happens turn the projector off and then on again after waiting for several minutes Caption If the language for the AV input is set to Korean captions can be turned on or off Standby Light Adjusts the LED button indicator Option On When the buttons are touched their indicators are all turned on at maximum brightness In standby mode all LED indicators are turned on at 20 of the maximum ...

Страница 51: ...CTIONS You can connect various external devices to the ports on the projector HDMI 52Page Component 54Page INPUT AV 53Page RGB 52Page Memory 23Page Headphones 54Page Computer Notebook Video DVD Digital Device USB Headphones Game Console ...

Страница 52: ... and sound Press the INPUT button on the remote control to select HDMI 0 Connecting to a PC The projector supports Plug Play A PC will automatically recognize the projector and requires no driver to be installed RGB Connection Connect the PC output and the PC video input port of the projector with the RGB cable For audio signal connect the PC and the projector with an optional audio cable 8 2 287 ...

Страница 53: ...nect the output ports of an external device and the AV INPUT port of the projector Press the INPUT button to select AV 9 287 HIW 5LJKW 8 2 287 AUDIO OUT RGB OUT PC You can connect the audio cable without using a gender as shown in the illustra tion above ...

Страница 54: ...ou connect an external device with a RGB IN port to the component port of the projector Press the INPUT button on the remote control to select Component VIDEO OUT L Y PB PR R AUDIO OUT Connecting to Headphones You can listen to the audio through a headphone 1 5 1 9 1 20321 17 1 ...

Страница 55: ...or stains use an air spray or apply a small amount of clean ing agent onto a swab or soft cloth to lightly rub the lens Please be aware that liquid may flow onto the lens if the product is sprayed directly onto the lens Cleaning the Projector Case To clean the projector case first unplug the power cord To remove dust or stains use only a dry lint free nonabrasive cloth to polish the lens Do not us...

Страница 56: ... 254 0 cm Ratio of upward projection 100 Working range of the remote control 3 m Video input NTSC M PAL B D G H I PAL M PAL N PAL 60 SECAM AC DC Adaptor 19 5 V 4 62 A Audio Output 1 W 1 W Height mm 33 8 without foot 38 3 with foot Width mm 158 Depth mm 101 5 Weight g 445 USB Device 5 V 0 5 A Max Operation environ ment Temperature Operation 0 C 40 C Storage 20 C 60 C Relative Humidity Operation 0 8...

Страница 57: ...ot be displayed properly on the screen or a message such as No Signal or Invalid Mode will be displayed y y The projector supports the DDC1 2B type as the Plug Play function Auto recog nition of PC monitor y y PC synchronization signal types sup ported Separate type synchronization y y In PC mode 1280 x 800 is recommend ed for the best picture quality Supported Monitor Display Resolution Horizonta...

Страница 58: ...opensource lge com In addition to the source code all re ferred license terms warranty disclaim ers and copyright notices are available for download If you send an email to opensource lge com to request for the software s open source code installed into the projector within three years of purchase we will send you a CD ROM You will only be charged a minimum for packaging and delivery ...

Страница 59: ...The model and serial number of the projec tor are located on the back or on the side of the projector Record them below should you ever need service MODEL SERIAL ...

Отзывы: