
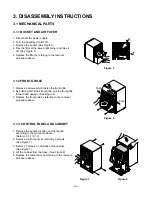


3.1 MECHANICAL PARTS
3.1.1 BUCKET AND AIR FILTER
1. Disconnect the power supply.
2. Turn the Humidity Control off.
3. Remove the bucket (See Figure 5)
4. Flex the filter at the lower right corner and take it
off. (See Figure 5)
5. Replace the filter by referring to the removal
procedure above.
3.1.2 FRONT GRILLE
1. Remove 2 screws which fasten the front grille.
2. By pushing both sides front grille, pull the front grille
forward and upward. (See Figure 6)
3. Replace the front grille by referring to the removal
procedure above.
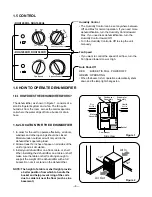
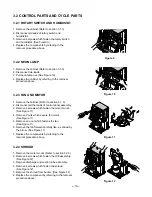
3.1.3. CONTROL PANEL AND CABINET
1. Remove the bucket, air filter, and front grille
according to the procedure above.
(Refer to 3.1.1/ 3.1.2)
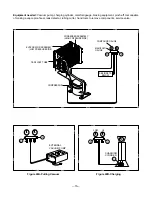
2. Remove control panel by removing 3 screws.
(See Figure 7)
3. Remove 7 screws on all sides of the cabinet.
(See Figure 7)
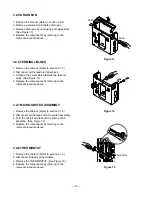
4. Lift the cabinet from the base. (See Figure 8)
5. Replace the component by referring to the removal
procedure above.
—9—
3. DISASSEMBLY INSTRUCTIONS
1
2
Push
Push
Figure 5
Figure 6
Figure 7
Figure 8
Содержание DHA1260HL
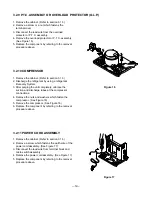
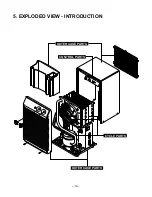
Страница 19: ...5 EXPLODED VIEW INTRODUCTION 19 OUTER CASE PARTS OUTER CASE PARTS CONTROL PARTS CYCLE PARTS ...
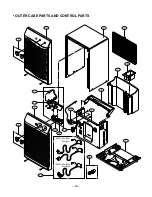
Страница 21: ... CYCLE PARTS AND CONTROL PARTS 21 21 20 32 36 19 30 33 18 35 34 25 26 27 ...
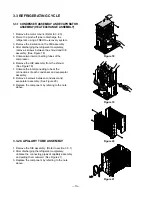
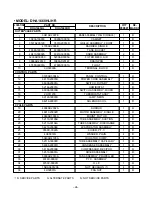
Страница 22: ... CYCLE PARTS 22 22 23 29 24 29 24 28 31 MODEL DHA1660HL HR MODEL DHA1260HL HR ...
Страница 25: ...P No 3828A30001W Printed in China ...