NSTALLATION INSTRUCTIONS
I
8
Step 6 :
WATER SUPPLY CONNECTION
1
2
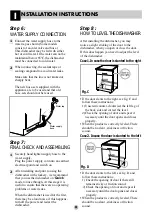
Connect the water supply hose to the
water tap as shown.(Some models
consist of an inlet valve and hose.)
This dishwasher may be fed with either
hot or cold water. If the water can not be
maintained below 65ºC, the dishwasher
must be connected to cold water.
When connecting, the sealant tape or
sealing compound to avoid water leaks.
Make sure that the line is not kinked or
sharply bent.
The new hose-sets supplied with the
appliance are to be used and that old
hose-sets should not be reused.
Water tap
Water supply
hose
Step 7 :
FINAL CHECK AND ASSEMBLING
1
2
Securely hand tighten supply hose to the
water supply.
Plug the power supply cord into an earthed
electrical point and switch on.
After installing and prior to using the
dishwasher with crockery, we recommend
that you use the dishwasher on ‘
Quick
’
mode to rinse through. At this stage it is
useful to ensure that there are no operating
problems or water leaks.
When the dishwasher is used for the first,
there may be a loud noise, if this happens,
turn off the power and restart the
dishwasher.
Step 8 :
HOW TO LEVEL THE DISHWASHER
After installing the dishwasher, you may
notice a slight sticking of the door to the
dishwasher, when you open or close the door.
If this does happen you need to adjust the level
of the dishwasher.
• If the door slants to the right, see fig, C and
follow these instructions:
1) Unscrew(counter-clockwise) the left leg of
the back side and correct the level.
2) Check the opening of door and repeat if
necessary until the door opens and closes
properly.
• When the product is correctly leveled, There
should be no slant , stickiness or friction
sound.
• If the door slants to the left, see fig. D and
follow these instructions:
1) Check the opening of door if there still
remains sticky or friction sound.
2) Check the opening of door and repeat if
necessary until the door opens and closes
properly.
• When the product is correctly leveled, There
should be no slant , stickiness or friction
sound.
Fig. C
Fig. D
Case 1. In case the door is slanted to the right
Case 2. In case the door is slanted to the left
Содержание D1420AF
Страница 26: ...EMO M 26 ...
Страница 27: ...EMO M 27 ...


