background image

Getting Started

5

Ge
tting S

tar

ted

1

FCC Compliance Statement 


This device complies with part 15 of the FCC 
rules. Operation is subject to the following two 
conditions:
(1) This device may not cause harmful interference, 
and 
(2) This device must accept any interference 
received, including interference that may cause 
undesired operation.

NOTE:

 This equipment has been tested and found 

to comply with the limits for a Class B digital 
device, pursuant to Part 15 of the FCC Rules. 
These limits are designed to provide reasonable 
protection against harmful interference in a 
residential installation. This equipment generates, 
uses, and can radiate radio frequency energy 
and, if not installed and used in accordance with 
the instructions, may cause harmful interference 
to radio communications. However, there is no 
guarantee that interference will not occur in a 
particular installation. 
If this equipment does cause harmful interference 
to radio or television reception, which can be 
determined by turning the equipment off and 
on, the user is encouraged to try to correct the 
interference by one or more of the following 
measures:


y

Reorient or relocate the receiving antenna.


y

Increase the separation between the equipment 
and receiver.


y

Connect the equipment into an outlet on a 
circuit different from that to which the receiver 
is connected.


y

Consult the dealer or an experienced radio/TV 
technician for help.

CAUTION :

 Any changes or modifications not 

expressly approved by the party responsible for 
compliance could void the user’s authority to 
operate this equipment.

FCC WARNING:

 This equipment may generate 

or use radio frequency energy. Changes or 
modifications to this equipment may cause harmful 
interference unless the modifications are expressly 
approved in the instruction manual. The user could 
lose the authority to operate this equipment if an 
unauthorized change or modification is made.

FCC RF Radiation Exposure Statement :

 This 

equipment complies with FCC radiation exposure 
limits set forth for an uncontrolled environment. 
This equipment should be installed and operated 
with  minimum distance 20 cm between the 
radiator and your body. End users must follow the 
specific operating instructions for satisfying RF 
exposure compliance. This transmitter must not be 
co-located or operating in conjunction with any 
other antenna or transmitter.

CAUTION:

 Regulations of the FCC and FAA prohibit 

airborne operation of radio-frequency wireless 
devices because their signals could interfere with 
critical aircraft instruments.

Responsible Party :


LG Electronics USA, Inc. 1000 Sylvan Avenue 
Englewood Cliffs, NJ 07632 
TEL. : +1-800-243-0000

Содержание CM4350

Страница 1: ...www lg com Please read this manual carefully before operating your set and retain it for future reference OWNER S MANUAL Mini Hi Fi System CM4550 CM4550 CMS4550F CMS4550W P NO MFL69181412_REV1 0 ...

Страница 2: ...a built in installation such as a bookcase or rack unless proper ventilation is provided or the manufacturer s instruction has been adhered to CAUTION This product employs a Laser System To ensure proper use of this product please read this owner s manual carefully and retain it for future reference Shall the unit require maintenance contact an authorized service center Use of controls adjustments...

Страница 3: ...t in the appropriate container at designated collection points Do not dispose of batteries or battery together with other waste It is recommended that you use local free reimbursement systems batteries and accumulators The battery shall not be exposed to excessive heat such as sunshine fire or the like CAUTION The apparatus shall not be exposed to water dripping or splashing and no objects filled ...

Страница 4: ...ug does not fit into your outlet consult an electrician for replacement of the obsolete outlet 10 Protect the power cord from being walked on or pinched particularly at plugs convenience receptacles and the point where they exit from the apparatus 11 Only use attachments accessories specified by the manufacturer 12 Use only with the cart stand tripod bracket or table specified by the manufacturer ...

Страница 5: ...nd receiver y y Connect the equipment into an outlet on a circuit different from that to which the receiver is connected y y Consult the dealer or an experienced radio TV technician for help CAUTION Any changes or modifications not expressly approved by the party responsible for compliance could void the user s authority to operate this equipment FCC WARNING This equipment may generate or use radi...

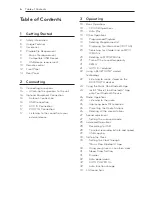
Страница 6: ...rmation ID3 TAG 20 Searching for a folder and an MP3 WMA file 20 Deleting an MP3 WMA file 21 Turn off the sound temporarily 21 DEMO 21 AUTO DJ playback 22 Using a BLUETOOTH wireless technology 22 Listening to music stored on the BLUETOOTH devices 24 Using the Music Flow Bluetooth App 24 Install Music Flow Bluetooth App onto Your Bluetooth Device 26 Radio Operations 26 Listening to the radio 26 Imp...

Страница 7: ...e of Contents 7 1 2 3 4 5 4 Troubleshooting 34 Troubleshooting 5 Appendix 35 General specifications 36 Speaker specifications 37 Maintenance 37 Handling the Unit 37 Notes on Discs 37 Trademarks and Licenses ...

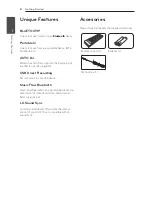
Страница 8: ...er for seamless playback USB Direct Recording Records music to your USB device Music Flow Bluetooth Music Flow Bluetooth is an app designed to let you take control of some of LG s latest Audio devices Refer to page 24 25 LG Sound Sync Controls volume level of this unit by the remote control of your LG TV that is compatible with LG Sound Sync Accesories Please check and identify the supplied access...

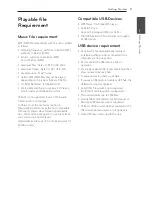
Страница 9: ...ve File System you cannot use it on LG players Mastered Live File System Disc format system for Windows Vista Compatible USB Devices y y MP3 Player Flash type MP3 player y y USB Flash Drive Devices that support USB2 0 or USB1 1 y y The USB function of this unit does not support all USB devices USB device requirement y y Devices which require additional program installation when you have connected ...

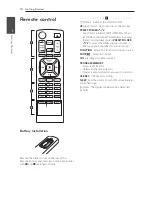
Страница 10: ...When a CD USB containing MP3 WMA files in several folders is being played press PRESET FOLDER W S to select the folder you want to play Chooses a preset number for a radio station FUNCTION Selects the function and input source MUTE Mutes the sound VOL Adjusts speaker volume PROGRAM MEMORY Stores radio stations Deletes all the saved stations Creates a programmed list you want to listen to USB REC U...

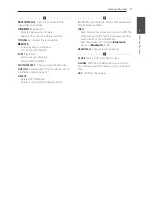
Страница 11: ...Selects the AUTO DJ mode For more information refer to page 21 DELETE Deletes MP3 WMA files Deletes a song on the programmed list c 0 to 9 numerical buttons Selects numbered tracks files or preset number INFO Sees informations about your music An MP3 file often come with ID3 tag The tag gives the Title Artist Album or Time information Sees the address of connected Bluetooth device in Bluetooth mod...

Страница 12: ...Getting Started 12 Getting Started 1 Front Panel a b c d e f g h i j k l m n p o ...

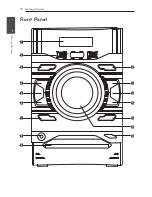
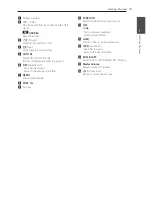
Страница 13: ...efer to page 21 f Y Skip Search Searches backward Skips to the previous track file g DEMO Shows demo mode h PORT IN i Disc tray j FUNCTION Selects the function or input source k T ST MO Starts or pauses playback Selects Stereo Mono l LG EQ You can choose sound impressions m U Skip Search Searches forward Skips to the next track file n BASS BLAST Selects BASS or STANDARD effect directly o Master Vo...

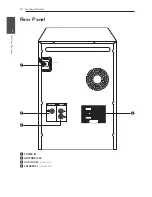
Страница 14: ...Getting Started 14 Getting Started 1 Rear Panel a b c d POWER IN a POWER IN b ANTENNA FM c AUX IN L R connectors d SPEAKERS terminal cord ...

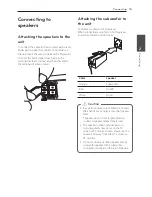
Страница 15: ...yer When connecting a woofer cord to the player insert the connector until it clicks Color Speaker Orange Subwoofer Red Front R White Front L y y Be careful to make sure children do not put their hands or any objects into the speaker duct Speaker duct A hole for plentiful bass sound on speaker cabinet enclosure y y The speakers contain magnet parts so color irregularity may occur on the TV screen ...

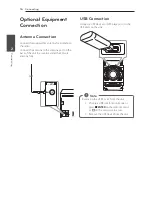
Страница 16: ... the antenna port on the back of the unit Be sure to extend the FM wire antenna fully FM USB Connection Connect a USB device or MP3 player etc to the USB ports on the unit Removing the USB Device from the unit 1 Choose a different function mode or press Z ENTER on the remote control or I on the unit twice in a row 2 Remove the USB device from the unit Note ...

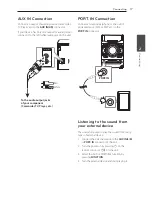
Страница 17: ...etc PORT IN Connection Connect an output earphone or line out of portable device MP3 or PMP etc to the PORT IN connector PORT IN Listening to the sound from your external device The unit can be used to play the sound from many types of external device 1 Connect the external device to the AUX IN L R or PORT IN connector of the unit 2 Turn the power on by pressing 1 on the remote control or 1 on the...

Страница 18: ...on the remote control or U on the unit to go to the next track file Playing less than 2 seconds press C on the remote control or Y on the unit to go to the previous track file Playing after 3 seconds press C on the remote control or Y on the unit to go to the beginning of the track file Playing repeatedly or randomly Press REPEAT MENU on the remote control repeatedly Refer to the note for details ...

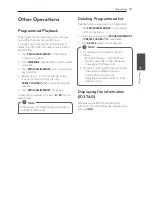
Страница 19: ...programmed list press d M after you make the list When making or modifying the programmed list REPEAT mode is off Note Deleting Programmed list Deleting function only works in the edit mode 1 Press PROGRAM MEMORY on the remote control in stop status 2 Select a song by pressing PROGRAM MEMORY or PRESET FOLDER W S repeatedly 3 Press DELETE while a song is selected y y Programmed list is cleared in t...

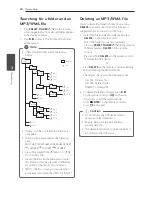
Страница 20: ...n you can see when a computer recognize the USB CD is ROOT Note Deleting an MP3 WMA file You can delete file folder or format by pressing DELETE on the remote control This function is supported only in stop status USB only 1 Select the file you want to delete and press DELETE on the remote control Select the folder you want to delete by pressing PRESET FOLDER W Son the remote control and press DEL...

Страница 21: ...end of one song into the beginning of another for seamless playback It equalizes volume across tracks for uninterrupted playback Press AUTO DJ on the remote control or unit repeatedly the display changes as followings RANDOM AUTO DJ RANDOM RPT AUTO DJ SEQUENTIAL AUTO DJ OFF Mode Display Window Description OFF AUTO DJ OFF RANDOM RANDOM AUTO DJ RANDOM The music is played randomly on this mode REPEAT...

Страница 22: ...ur Bluetooth device s user guide Once a pairing operation is performed it does not need to be performed again 1 Press the FUNCTION button until the Bluetooth function is selected BT READY appears on the display window 2 Operate the Bluetooth device and perform the pairing operation When searching for this unit with the Bluetooth device a list of the devices found may appear in the Bluetooth device...

Страница 23: ...ted devices Note y y When this unit connected with multiple Bluetooth devices only one device which you are playing keeps Bluetooth connection when you change the function to the others y y The sound may be interrupted when the connection has interference from other electronic devices y y You cannot control the Bluetooth device with this unit y y Depending on the type of the device you may not be ...

Страница 24: ...or installation 3 Tap an icon for downloading y y Make sure that your Bluetooth device is connected to the Internet y y Make sure that your Bluetooth device has a scanning software application If you don t have one download one from Google Android Market Google Play Store y y Depending on area QR code may not work Note Install Music Flow Bluetooth App through Google Android Market Google Play Stor...

Страница 25: ...plied remote control Use the supplied remote control as necessary y y Depending on the Bluetooth device Music Flow Bluetooth app may not work y y After connection of Music Flow Bluetooth app music may be output from your device In this case try connecting procedure again y y If you operate the other applications or change the settings on your Bluetooth device while using Music Flow Bluetooth app M...

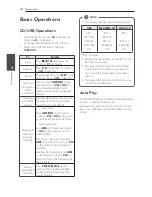
Страница 26: ... to mono and usually improve the reception Presetting the Radio Stations You can preset 50 stations for FM Before tuning make sure to turn down the volume 1 Press FUNCTION until FM appears in the display window 2 Select the desired frequency by pressing TUNING on the remote control or Y U on the unit 3 Press PROGRAM MEMORY on the remote control A preset number will blink in the display window 4 Pr...

Страница 27: ...imilar to the genre of which is included in the MP3 ID3 tag of song files POP CLASSIC JAZZ ROCK This program lends an enthusiastic atmosphere to the sound giving you the feeling you are at an actual rock pop jazz or classic concert BASS Reinforces the treble bass and surround sound effect FOOT BALL You can enjoy the sound effect FOOTBALL STADIUM FLAT Provides balanced sound BOOST Boosts the mid ra...

Страница 28: ...which you want to record blinks in the display window 4 To stop recording press Z ENTER on the remote control or I on the unit Pausing recording During recording press d M on the remote control or T on the unit to pause recording Press it again to restart recording Only Tuner AUX PORTABLE To select recording bit rate and speed 1 Press USB REC on the remote control or USB REC on the unit for longer...

Страница 29: ...n the display window during the recording MP3 WMA CD Only y y During recording MP3 WMA there is no sound y y When you stop recording during playback the file that has been recorded at that time will be stored Except MP3 WMA files y y Do not remove the USB device or turn off the unit during USB recording If does not an incomplete file may be made and not deleted on PC y y If USB recording does not ...

Страница 30: ...Press and hold ALARM 3 Press C V on the remote control to change the hours and minutes and press SET to save 4 Press C V on the remote control to select function and press SET to save Press C V to select a memory No when you select Tuner and then press SET If there is no memory No this step is skipped 5 Press C V on the remote control to change the volume and press SET to save The clock icon shows...

Страница 31: ... repeatedly until SLEEP 10 appears and then press SLEEP once again while SLEEP 10 is displayed y y You can check the remaining time before the unit is turned off y y Press SLEEP The remaining time appears in the display window Note Dimmer Press SLEEP once The display window will be darkened by half To cancel it press SLEEP repeatedly until dim off All the LED turns off when Dimmer is being operate...

Страница 32: ...e it is recommended to disconnect the connection before turning off the unit y y If you try to connect to the Music Flow Bluetooth app Bluetooth function of this unit is turned on y y If you turn on the unit using LG TV or Bluetooth function proper function of this unit is turned on y y If you have already paired with this unit automatically this unit can turn on by an input source when this unit ...

Страница 33: ...of time to turn off this unit is different depending on your TV y y Details of TV setting menu vary depending on the manufacturers or models of your TV y y If you connect LG Sound Sync when Music Flow Bluetooth app is connected control through the app is available y y If you turned off the unit directly by pressing 1 Power LG Sound Sync will be disconnected To use this function again you should re...

Страница 34: ...sert a playable disc y y No disc is inserted Insert a disc y y The disc is dirty Clean the disc Refer to page 37 y y The disc is inserted upside down Place the disc with the label or printed side facing upwards Radio stations cannot be tuned in properly y y The antenna is positioned or connected poorly Connect the antenna securely y y The signal strength of the radio station is too weak Tune to th...

Страница 35: ...t Weight Approx 3 kg Operating temperature 5 C to 35 C Operating humidity 5 to 90 Bus Power Supply 5 V 0 500 mA Inputs AUX IN 2 0 Vrms 1 kHz 0 dB 75 Ω RCA jack L R Port In 1 2 Vrms 3 5 mm stereo jack Tuner FM Tuning Range 87 5 to 108 0 MHz or 87 50 to 108 00 MHz Amplifier Total Output 700 W Front 230 W X 2 3 Ω at 1 kHz Subwoofer 240 W 3 Ω at 1 kHz THD 20 CD Frequency Response 100 to 20000 Hz Signa...

Страница 36: ...30 W Max Input power 460 W Net Dimensions W x H x D 266 x 306 x 263 mm Net Weight 3 1 kg Subwoofer speaker Type 1 Way 1 Speaker Impedance 3 Ω Rated Input Power 240 W Max Input power 480 W Net Dimensions W x H x D 266 x 306 x 232 mm Net Weight 4 7 kg y y Design and specifications are subject to change without notice ...

Страница 37: ...s are dirty or worn the picture quality could be diminished For details please contact your nearest authorized service center Notes on Discs Handling Discs Never stick paper or tape on the disc Storing Discs After playing store the disc in its case Do not expose the disc to direct sunlight or sources of heat and never leave it in a parked car exposed to direct sunlight Cleaning Discs Do not use st...

Страница 38: ......
Отзывы: