


9
Plac
e the
spac
er
In
the line
HERE
Plac
e the
spa
cer
In
the line
HERE
Plac
e the spac
er
In the
line HERE
Plac
e the spa
cer
In the
line HERE
Plac
e the spac
er
In the line HERE
Pla
ce the spa
cer
In the line HERE
Plac
e the spac
er
In the line HERE
Pla
ce the spa
cer
In the line HERE
TPA
Sensing connector
Power connector
Fron
t
Fron
t
Front
Front
Sensing connector
Power connector
“Click!”
TPA
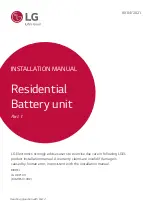
10. Connect the power and sensor
connectors on the right and left sides
(2 each). Assemble the connectors
until you hear a “Click”. After that,
lock the power connector by pressing
TPA (Terminal Position Assurance).
Plac
e the spac
er
In
the line HERE
Plac
e the spa
cer
In
the line HERE
Plac
e the spac
er
In the line HERE
Plac
e the spa
cer
In the line HERE
Plac
e the spac
er
In the line HERE
Pla
ce the spa
cer
In the line HERE
Plac
e the spac
er
In the line HERE
Pla
ce the spa
cer
In the line HERE
Handle
LED power indicator
LED fault indicator
11. Check the operation of the battery
pack by following the steps below.
1) Hold and turn the handle
counterclockwise.
2) Open the front cover and turn on
the circuit breaker switch.
3) If there are no problems with the
assembly process or the product
itself, the LED power indicator will
turn on. Sixty (60) seconds later,
the LED fault indicator will blink
(due to a lack of communication
with the inverter, not due to a
product defect).
4) Turn off the Circuit Breaker switch.
Then, close the front cover and turn
the handle counterclockwise.
* If you experience any problems
at this stage, go to Section 5
Troubleshooting.
Plac
e th
e sp
acer
In the line HERE
Plac
e th
e sp
acer
In the line HERE
Plac
e th
e sp
acer
In the line HERE
Plac
e th
e sp
acer
In the line HERE
Pla
ce t
he
spa
cer
In the line HERE
Pla
ce t
he
spa
cer
In the line
HERE
Pla
ce t
he
spa
cer
In the line HERE
Pla
ce t
he
spa
cer
In the line HERE
12. Double-check the alignment of the
Battery Control Unit.
Pla
ce t
he
spa
cer
In the line HERE
Plac
e th
e sp
acer
In the line HERE
Plac
e th
e sp
acer
In the line HERE
Plac
e th
e sp
acer
In the line HERE
Plac
e th
e sp
acer
In the line HERE
Pla
ce t
he
spa
cer
In the line HERE
Pla
ce t
he
spa
cer
In the line HERE
Plac
e th
e sp
acer
In the line HERE
Plac
e th
e sp
acer
In the line HERE
Pla
ce t
he
spa
cer
In the line HERE
Pla
ce t
he
spa
cer
In the line HERE
Plac
e th
e sp
acer
In the line HERE
Plac
e th
e sp
acer
In the line HERE
Pla
ce t
he
spa
cer
In the line HERE
Plac
e th
e sp
acer
In the line HERE
Plac
e th
e sp
acer
In the line HERE
Plac
e th
e sp
acer
In the line HERE
Plac
e th
e sp
acer
In the line HERE
Pla
ce t
he
spa
cer
In the line HERE
Pla
ce t
he
spa
cer
In the line HERE
C
Remove a spacer
A
Grab
here
E
Remove another one in
the same way
D
Settle slowly
B
Lift (just few mm)
13. Remove one spacer by lifting one
side of the Battery Control Unit. After
that, remove the other spacer in the
same way.
* Be careful not to pull on the cables
by lifting the Battery Control Unit
too high. Doing so may cause
damage to the cables or cause the
unit to disconnect.
* Before setting down the Battery
Control Unit, the cable connection
should be checked once more.
Plac
e th
e sp
acer
In
the line HERE
Plac
e th
e sp
acer
In the line HERE
Pla
ce t
he
spa
cer
In the line HERE
Pla
ce t
he
spa
cer
In the line HERE
Plac
e th
e sp
acer
In
the line HERE
Plac
e th
esp
acer
In
the line HERE
Plac
e th
e sp
acer
In
the line HERE
Plac
e th
e sp
acer
In
the line HERE
Pla
ce t
he
spa
cer
In the line HERE
Pla
ce t
he
spa
cer
In the line HERE
Pla
ce t
he
spa
cer
In the line HERE
Pla
ce t
he
spa
cer
In the line HERE
Plac
e th
e sp
acer
In
the line HERE
Plac
e th
e sp
acer
In
the line HERE
Plac
e th
e sp
acer
In the line HERE
Plac
e th
e sp
acer
In the line HERE
Pla
ce t
he
spa
cer
In the line HERE
Pla
ce t
he
spa
cer
In the line HERE
Pla
ce t
he
spa
cer
In the line HERE
Pla
ce t
he
spa
cer
In the line HERE
Plac
e th
e sp
acer
In the line HERE
Plac
e th
e sp
acer
In the line HERE
Pla
ce t
he
spa
cer
In the line HERE
Pla
ce t
he
spa
cer
In the line HERE
14. Realign the Battery Control Unit.
Plac
e th
e sp
acer
In the line HERE
Plac
e th
e sp
acer
In the line HERE
Plac
e th
e sp
acer
In the line HERE
Plac
e th
e sp
a
In the line HERE
Pla
ce t
he
spa
cer
In the line HERE
Pla
ce t
he
spa
cer
In the line HERE
Plac
e th
e sp
acer
In the line HERE
Plac
e th
e sp
acer
In the line HERE
Pla
ce t
he
spa
cer
In the line HERE
Pla
ce t
he
spa
cer
In the line HERE
M5xL65 Flange Bolt
Top Cover
15. Loosen 4 bolts and remove the Top
Cover.
M5xL200 Flange long Bolt
16.
Tighten six (6) long fl ange bolts with
a torque of 5N·m.
* While assembling, open the front
cover and check that all M5 Flange
long bolts are placed accordingly.
17. Move the Battery pack to set the right
position for assembly of the Standing
bracket.
Standing bracket_2
Standing bracket 2
18.
Assemble Standing Bracket 2 (fl at)
using six (6) M6 bolts to fi x the pack
onto the wall.
Содержание BLGRESU10HP
Страница 19: ......


