background image

Remote Control

Location & Function

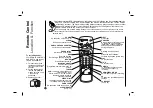
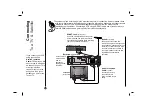
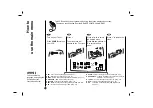
Your video recorder (VCR) is designed so that almost all of its features can be controlled from the

REMOTE CONTROL HANDSET. Some features can also be controlled from the FRONT PANEL

of the video recorder. The maximum operating distance that you may control your video recorder

is about 7.5 metres (25 feet). It must also be within an angle of 30 degrees either side of the
REMOTE SENSOR on the front of your video recorder.

To avoid damage from possible battery leakage, remove the batteries if you do not plan to use the remote

control handset for an extended period of time. Do not use batteries of differing age or type. Always discard 

batteries safely.

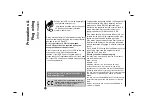
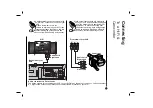
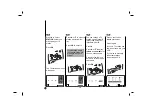
To install batteries:

Your REMOTE CONTROL
HANDSET is powered by
two AA type batteries.

1.

To insert them, push 
the tab backwards and 
lift off the cover of the 
handset.

2.

Put the two batteries 
into the compartment 
making sure the + and 
– are correctly 
positioned.

3.

Replace the cover.

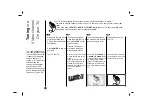
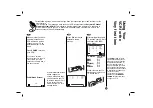
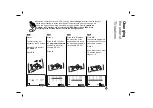
POWER

EJECT

CLK/CNT

REC/
ITR

1

2

3

4

5

6

7

8

9

TV/VCR

C.LOCK

ez POWER OFF

ez REPEAT

LP

AV

0

CM SKIP

CLEAR

OK

i

P/STILL

STOP

PLAY

REW

FF

SHOWVIEW

VIDEO Plus+

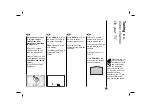
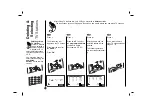
POWER

Switches the VCR on and off 

CLEAR

Reset tape counter to zero

OK/CLOCK/TAPE COUNTER

Calls the on screen display.

PAUSE/STILL

Switches to a still picture

REW

Rewinds the tape

Reverse high speed picture play

REC/ITR

Starts instant recording 

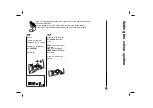
Numbered buttons

To select channels.

Programme number information on 

screen.

TV/VCR

VCR; 

to monitor, view playback or 

view the VCR’s tuner

TV; 

to watch TV or view another 

programme while recording 

another programme

VIDEO Plus+

To display the programme menu

for VIDEO Plus+ programming

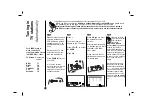
CHILD LOCK

Switches the Child Lock on and off

ez POWER OFF

(see p. 32)

EJECT

Ejects tape

CURSORS

During playback, tracking control

To control on screen display

information, channel up & down

selection and vertical tremble

during still picture.

i

Displays on screen menu

FF

Winds the tape forwards

Forward high speed picture play

PLAY

To play the tape

STOP

To stop the tape

CM SKIP

To fast forward picture search

through 30 seconds of a

recording

AUDIO/VIDEO MODE

Select input source for recording 

LP

To select the recording speed of

the tape

ez REPEAT

(see p. 32)

AA

AA

4

Содержание BC969NI

Страница 1: ...th VIDEO Plus OWNER S MANUAL MODEL BC999NI BC969NI PAL Before connecting operating or adjusting this product please read this instruction booklet carefully and completely FOR THE GUARANTEE TERMS CONDITIONS PLEASE REFER TO BACK COVER OF THIS MANUAL ...

Страница 2: ...a 5 Amp BS 1362 approved type Never use this plug with the fuse cover omitted To obtain a replacement fuse cover contact your supplying dealer or LG Electronics U K LTD If the mains sockets in your home differ or are not suitable for the type of plug supplied then the plug should be removed and a suitable type fitted If the mains plug becomes severed from the mains lead it must be destroyed A main...

Страница 3: ... TV Stations Manually 13 14 Changing the order of TV Stations 15 Deleting Selecting TV Stations 16 Basic Operations 17 20 Playing a tape 17 18 Setting the Colour System 19 Setting the Clock Manually 20 Advanced Operations 21 32 Instant Timer Recording ITR 21 22 VIDEO Plus Recording 23 24 Timer Recording using On Screen Display 25 26 Energy Saving 27 On Screen Display 27 Tape Counter Memory Stop 28...

Страница 4: ... 9 TV VCR C LOCK ez POWER OFF ez REPEAT LP AV 0 CM SKIP CLEAR OK i P STILL STOP PLAY REW FF SHOWVIEW VIDEO Plus POWER Switches the VCR on and off CLEAR Reset tape counter to zero OK CLOCK TAPE COUNTER Calls the on screen display PAUSE STILL Switches to a still picture REW Rewinds the tape Reverse high speed picture play REC ITR Starts instant recording Numbered buttons To select channels Programme...

Страница 5: ...Power On Off 2 Stop Tape Eject 3 Cassette Compartment 4 VCR Display 5 Remote Control Sensor 6 REC ITR Instant Record 7 REW 8 PLAY 9 FF 10 Video IN socket 11 Audio IN sockets 12 Channel Programme Selectors 13 Pause Still 14 OPR see p 18 P STILL PROG REC ITR VIDEO IN L AUDIO IN R AV3 1 2 3 4 5 6 7 8 9 10 11 12 14 13 MODEL BC999NI 1 2 3 4 5 6 7 8 9 10 11 12 13 MODEL BC969NI ...

Страница 6: ...ad not supplied If you use a SCART lead picture quality will be improved and you will be able to enjoy stereo when playing tapes providing your TV supports stereo sound Back view of your VCR Aerial not supplied The quality of the sound and picture can be greatly influenced by the positioning quality and state of repair of your external aerial If you are unsure about the condition of your aerial pl...

Страница 7: ...UDIO IN R SYNC UBB LIV HAL 60 160 400 1K 6 3K SYNC SYNC UBB LIV LIV HAL HAL 60 160 400 1K 6 3K 6 3K MEMOR SLEE AUTO KHz MHz AM PM REPEAT 1 1 2 3 4 5 6 7 8 9 10 11 12 13 14 15 16 AL DIS RECORD RE NR SYNC UBB DISCO LIV 60 160 400 1K 2 5K 6 3K 16kHz PM AM FLA PO ROC STEREO MEMORY SLEEP AUTO KHz MHz CLASSI HAL MUTE DSP A B RANDOM PROGRA OVER HI DUBB ENTREE ANTENNE SORTIE ANTENNE G R AUDIO EURO AV2 DEC...

Страница 8: ...nnel The AV channel is already pre tuned for opti mum video playback on your TV Store this channel on your TV You will need to look at the TV instruction book if you do not know how to do this 8 Tuning in a Video channel On your TV Your TV receives signals from the video recorder VCR like another TV station You have to select a channel number on your TV and tune it in so that you may watch video t...

Страница 9: ...e TV screen Press PROG D or E on the VCR to select another video channel You may select any channel number between 22 and 68 Select a TV channel number on which you wish to watch video s Tune this channel so that a bright blue screen appears Store this channel on your TV Press POWER on the front of your VCR when you have finished Tuning in a Video channel On your TV Make sure that you have correct...

Страница 10: ...CT CLK CNT CLEAR OK i P STILL O REC Timer recording setting see p 25 to 26 O PR Manual tuning setting see p 13 to 14 O ACMS ACMS Automatic Channel Memory System see p 12 O TIME DATE Date clock setting see p 20 O SYSTEM To set the Colour System see p 19 O ABC OSD To change the language setting for OSD see left O DR To check a problem with your VCR see p 30 O AUDIO To select the channel for audio ou...

Страница 11: ...ollowing steps we assume that you have just connected your video recorder for the very first time To make tuning TV stations an easy task your VCR incorporates the Automatic Channel Memory System ACMS This system will automatically tune and store TV channels in VIDEO Plus order to your VCR While this is happening the clock date time in the video recorder will be set automatically The ACMS system r...

Страница 12: ...ion While automatic tuning is taking place the time and date will set automatically If appears in the VCR display it means that the broadcast signal is weak and the clock was not set Please turn to CLOCK SET section of this book on page 20 12 Tuning in TV stations Automatically The guidance given on the opposite page is for first time use of your VCR Should you wish to perform the Automatic Channe...

Страница 13: ...tly This is important because you will only be able to successfully record TV programmes using VIDEO Plus if your VCR has stored them in a set order You must tune in these weaker broadcast stations manually in order for your VCR to store them Remember for VIDEO Plus to work correctly TV stations must be stored in VIDEO Plus order For VIDEO Plus to work correctly TV sta tions must be stored in VIDE...

Страница 14: ...t Press i again Your new TV station has now been tuned into your VCR If you wish to manually tune other stations repeat stages 1 8 CLK CNT CLEAR OK i PAUSE PR CH MFT 06 00 PR C40 BORDE ANGLI ITV BBC2 BBC1 CH TV WEST GRANA i OK If your station name isn t on the list do not press OK but go to stage 7 POWER EJECT CLK CNT CLEAR OK i PR CH MFT STATION 06 00 C40 PR i OK CH TV CLK CNT CLEAR OK i P STILL ...

Страница 15: ...ey are stored without having to retune them again The instructions given on this page will show you how you can simply move them into your desired order However be warned if TV stations are not stored in VIDEO Plus order VIDEO Plus recordings may not take place or record the wrong channel POWER EJECT CLK CNT CLEAR OK i P STILL RET AV PR CH MFT STATION 01 00 BBC1 C26 PR i CLK CNT CLEAR OK i PAUSE 0...

Страница 16: ...lete any unwanted TV stations Selecting stored TV stations Stored TV stations can be selected in either of two ways Press D or E to select different stations that are tuned into your VCR You may also directly select stations using the numbered buttons on the remote control POWER EJECT CLK CNT CLEAR OK i P STILL PR CH MFT STATION 01 00 BBC1 C26 PR i CLK CNT CLEAR OK i PAUSE 02 C33 00 BBC2 03 C23 00...

Страница 17: ...amaging the tape or your VCR Press PLAY to continue playing your tape Picture search During playing back press either FF or REW to this will enable you to rapidly wind the tape 7 times normal playback speed and see where you are on the tape Logic search During fast forwarding or rewinding press and hold FF or REW the picture will be played back at 7 times normal playback speed Playing a tape You w...

Страница 18: ... or another programme material Repeatedly press CM SKIP to skip material 1 Press 30 seconds 2 Press 60 seconds 3 Press 90 seconds 4 Press 120 seconds 5 Press 150 seconds 6 Press 180 seconds OPR Optimum Picture Response This feature automatically improves playback picture quality by adjusting your VCR to the condition of the tape Press i Press F or G to select OPR Press OK Press D or E repeatedly t...

Страница 19: ... Your VCR is equipped with dual colour standard you can play back a tape in PAL and MESECAM During playback your VCR detects the colour system automatically It there are colour problem please select the colour system manually REC i DR VCR OPR AUDIO 16 9 4 3 NIC Pr 12 ACMS PSET R 1 2 TIME DATE SYS TEM SYS TEM OSD ON OFF OSD f AUTO PAL MESECAM A B C OSD POWER EJECT CLK CNT CLEAR OK i P STILL RET AV ...

Страница 20: ...s display 20 Setting the clock Manually The clock in your VCR controls time day and date settings for your VCR For VIDEO Plus to work correctly the correct time and date must be set The clock is set automatically during ACMS Automatic Channel Memory System when your VCR detects a channel that broadcasts a Teletext signal If the broadcast signal is weak the clock will not be set and will require se...

Страница 21: ...icture recording using the upper SCART socket on the back of your VCR AV3 Recording from VIDEO IN and AUDIO IN Left Right using the sockets on the front of your VCR Instant Timer Recording ITR Your VCR allows you to make recordings using a variety of simple methods Instant Timer Recording ITR start recording immediately for a set period of time or until the video cassette runs out Timer Recording ...

Страница 22: ...to end recording Press EJECT EJECT will appear on the TV screen for a few seconds If the end of the tape is reached your VCR will stop recording automatically rewind stop eject the tape and place itself into power off 22 Your VCR incorporates Long Play LP which enables you to record up to twice the amount of time on a video cassette For example an E 180 will record up to 180 minutes using Standard...

Страница 23: ...cord If you make a mistake press F then enter the revised number VIDEO Plus recording VIDEO Plus greatly simplifies entering the date channel start and end times of a Timer recording by simply entering a PlusCode PlusCodes are published in most TV guide magazines they can vary from one to nine numbers in length PLEASE NOTE VIDEO Plus can only work successfully if TV channels have been tuned and st...

Страница 24: ...s displayed you have entered incorrect information and will need to re enter the data If you want to make other VIDEO Plus recordings repeat stages 2 7 Press i to remove the menus Press POWER to switch your VCR off TIMER will appear in the vide recorder s display while your VCR waits to make the recording 24 VIDEO Plus and PlusCode are registered trademarks of Gemstar Development Corporation The V...

Страница 25: ...mbers by pressing or Once selected press G PR DATE T I M E SP SP SP SP SP SP SP i DELETE OK POWER EJECT CLK CNT CLEAR OK i P STILL RET AV PR DATE T I M E SP SP SP SP SP SP SP i CLK CNT CLEAR OK i CLK CNT CLEAR OK i PAUSE ENR DEP 1 2 3 4 5 6 7 8 9 TV VCR 0 CM SKIP PR DATE T I M E SP SP SP SP SP SP BBC1 SP i If you choose not to use VIDEO Plus Recording you can set timed recordings manually You may ...

Страница 26: ...ill appear in the video recorder s display while your VCR waits to make the recording 26 If at a later date you wish to delete or change any of the settings in timer event memory you may do so without having to enter all the timer event information again Simply display the timer event screen Press D or E to select the event that you wish to delete or change Press F to delete the event Press OK to ...

Страница 27: ...reen Press OK CLK CNT again to remove all displays from the TV screen Energy Saving On Screen Display Your VCR has an Energy Save feature which if set will place your VCR into an economic power save where the clock display will disappear If you have programmed a recording this feature will not work You may easily display the current time or tape counter and amount of tape left day month year day o...

Страница 28: ...t STOP EJECT If any buttons on the front of your VCR are pressed SAFE will flicker in your video recorder s display Press C LOCK again to switch off the child lock SAFE will disappear on the TV screen OFF will flicker in your video recorder s display for a few seconds 28 Tape Counter Memory Stop Child Lock The Digital Tape Counter can be displayed on your TV screen instead of the time by pressing ...

Страница 29: ... connect your VCR to the TV using a SCART cable Wide Screen Compatibility 16 9 Your VCR can record and play back wide screen aspect ratio programmes 16 9 To record a wide screen format programme successfully the correct type of wide screen signal must be broadcast by the TV station POWER EJECT CLK CNT CLEAR OK i P STILL RET AV CLK CNT CLEAR OK i P STILL LECT REW AV REC i DR VCR OPR AUDIO NIC Pr 12...

Страница 30: ...r recording NEXT TIMER PROGRAMME OBBC1 26 10 00 11 00 Shows the current status of timer recording Press i 30 Automatic Memory Power Shut Off This feature of your VCR enables you to switch off your VCR automatically after tape rewind has been completed Video Doctor Self Diagnosis This feature informs you that there is a problem with your VCR These error messages will appear on the TV screen Automat...

Страница 31: ...channel and the secondary channel is output simultaneously from the right channel when audio output is set to STEREO The primary language will be output from both channels when the audio setting is MONO Please note that when adjusting the tracking control Hi Fi stereo sound may revert to MONO Press i to return to a TV picture Hi Fi Stereo Sound System Your VCR will record and playback Hi Fi stereo...

Страница 32: ...utomatically Pressing ez REPEAT again during repeat play will return to normal play 32 ez easy operations ez easy power off The sequence of Stop Rewind Eject Power Off is operated automatically by pressing ez POWER OFF ez easy repeat By pressing holding ez REPEAT during play back the holding section is replayed twice automatically STOP REWIND EJECT POWER OFF TV VCR C LOCK ez POWER OFF ez REPEAT LP...

Страница 33: ... to copyright laws General Power 200 240V 50Hz Power consumption Approx 18 Watts Energy saving mode 3 Watts Video Head System Double azimuth 4 heads helical scanning Tape speed 23 39 mm sec SP mode 11 69 mm sec LP mode Tape format Tape width 12 7 mm 0 5 inch Maximum recording 4 hours SP mode E 240 tape time 8 hours LP mode E 240 tape Rewind time Approx 65 10 sec E 180 tape Dimensions 360 x 94 x 27...

Страница 34: ...E Can you get a picture on the TV Are the aerial leads and special RF connector lead between your VCR and TV connected Are the TV channels tuned in properly Has the safety tab on the video cassette been removed to prevent recording Try another station maybe a weak signal Check aerial is it plugged into TV Check points Is the cassette compartment empty Are you trying to insert the cassette the righ...

Страница 35: ...cted to the dealer from whom the equipment was originally purchased The dealer may before carrying out service under guarantee require a receipted account as evi dence of the date of purchase D We respectfully point out that your dealer is not obligated to replace batteries if they become exhausted or worn in use E Aerial alignment and consumer control adjustments are not covered by this guarantee...

Отзывы: