background image

12

ENG

English

USING THE MONITOR SET

USING THE MONITOR SET

Connecting Input Signal Cable


y

This monitor supports the *Plug and Play 
feature.
*Plug and Play: A feature that allows you to 

add a device to your computer, without having 

to reconfigure anything or install any manual 

drivers.

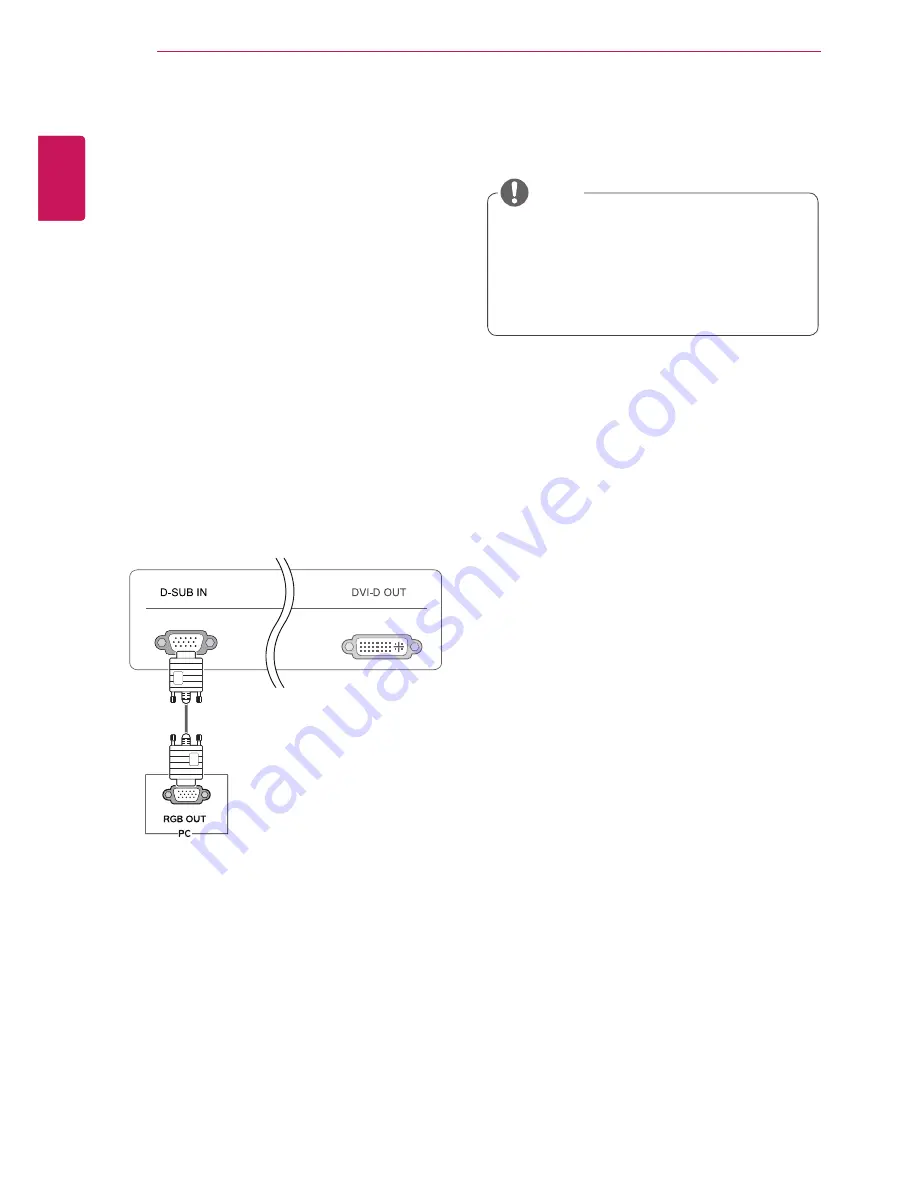
D-SUB IN connection - PC

D-SUB IN transfers analog video signals from the 
PC to the monitor. 
Connect the monitor to the PC using the provided 
15-pin D-SUB signal cable as illustrated below.

NOTE

RGB IN

MONITOR


y

Apple Adapter

An adapter may be needed for Apple 
computers. This adapter can be purchased 
from Apple.

Содержание 19CNT42K

Страница 1: ...www lg com OWNER S MANUAL CLOUD MONITOR LED MONITOR 19CNT42K Please read the safety information carefully before using the product CLOUD Monitor LED Monitor Model English ...

Страница 2: ...talling the wall mount plate 10 Mounting on a wall 12 USING THE MONITOR SET 12 Connecting Input Signal Cable 12 D SUB IN connection PC 13 DVI connection 14 Connecting LAN Peripherals 14 LAN connection 15 Peripheral device connection 16 Self Image Adjustment 17 CUSTOMIZING SETTINGS 18 Customizing Settings 18 Menu Settings 19 PICTURE 20 COLOR 21 DISPLAY 22 OTHERS 23 VOLUME 24 TROUBLESHOOTING 26 PROD...

Страница 3: ...r adapter y y Damage caused by other power adapters is not covered by warranty y y Note that the components may look different from those shown here y y Without prior notice all information and specifications in this manual are subject to change to improve the performance of the product y y To purchase optional accessories visit an electronics store or online shopping site or contact the retail st...

Страница 4: ...English ASSEMBLING AND PREPARING Parts and buttons Power Indicator y y LED On Power is on y y LED Off Power is off Front Side Buttons Input Connectors See p 12 to 15 Power Button Input Connectors See p 15 1 1 ...

Страница 5: ...monitor y y Avoid touching the screen at all times as this may result in damage to the screen or pixels CAUTION y y It is recommended to move the Monitor in the box or packing material that the Monitor originally came in y y Before moving or lifting the Monitor disconnect the power cord and all cables y y Hold the top and bottom of the Monitor frame firmly Make sure not to hold the transparent par...

Страница 6: ...ustrated below y y Be careful not to touch or press the screen area when adjusting the angle of the monitor WARNING Mounting on a table 1 Lift the monitor and place it on the table in an upright position Install at least 10 cm away from the wall to ensure sufficient ventilation 2 Connect the adaptor to the monitor then plug the power cord into the wall outlet 3 Press the Power button on the front ...

Страница 7: ...ensington lock is optional The accessories can be purchased at your local electronics store NOTE y y Once the pin is removed it is not necessary to re insert it to adjust the height Adjusting the stand height 1 Place the monitor mounted on the stand base in an upright position 2 Remove the tape attached at the bottom rear of the stand body then pull out the locking pin 3 The height can be adjusted...

Страница 8: ...ing in damage or injury y y To avoid damaging the screen when lifting or moving the monitor only hold the stand or the plastic cover This avoids putting unnec essary pressure on the screen y y Only remove the tape and the locking pin when the monitor is mounted on the stand base and is in an upright position Otherwise the stand body may protrude which may lead to injury Detaching the stand base 1 ...

Страница 9: ...on Using the Pivot function The pivot function allows you to rotate the screen 90 degrees clockwise 2 Landscape Portrait You can rotate the panel 90 clockwise Please be cautious and avoid contact between the monitor head and the Stand Base when rotating the screen to access the Pivot function If the monitor head touches the Stand Base then the Stand Base could crack Head section Stand section 3 Be...

Страница 10: ...4 mm 31 0 inch and above Please use VESA standard wall mount pad and screws Mounting on a wall Install the monitor at least 10 cm away from the wall and leave about 10 cm of space at each side of the monitor to ensure sufficient ventilation De tailed installation instructions can be obtained from your local retail store Please refer to the manual to install and set up a tilting wall mounting brack...

Страница 11: ...ct warranty y y Use the wall mounting bracket and screws that conform to the VESA standard Dam age caused by the use or misuse of inap propriate components will not be covered by the product warranty y y Use the screws specified in the VESA stan dard y y The wall mount kit includes the installation guide and necessary parts y y The wall mounting bracket is optional The accessories can be purchased...

Страница 12: ...a device to your computer without having to reconfigure anything or install any manual drivers D SUB IN connection PC D SUB IN transfers analog video signals from the PC to the monitor Connect the monitor to the PC using the provided 15 pin D SUB signal cable as illustrated below NOTE y y Apple Adapter An adapter may be needed for Apple computers This adapter can be purchased from Apple ...

Страница 13: ...ord to the out let use a grounded 3 hole multi socket or a grounded wall outlet y y The monitor may flicker when turned on in an area of low temperature This is normal y y Sometimes red green or blue spots may ap pear on the screen This is normal y y Connect the input signal cable and tighten in the direction of the arrow To prevent disconnection secure the cable tightly y y Do not press on the sc...

Страница 14: ...illustrated below y y The LAN cable is sold separately y y The following LAN cable type can be used Standard IEEE 802 3 ETHERNET y y If a device is connected into the earphone out port via a LAN cable you can adjust the volume with the volume icon on PC taskbar y y Connect the LAN cable and the peripheral devices prior to booting up the PC NOTE ...

Страница 15: ...ed plugs may have clear ance issues use straight plugs when pos sible Angle Type Straight Type Peripheral device connection Connect peripheral devices to the monitor using USB microphone and headphone ports NOTE NOTE y y Headphones speakers or microphone may not work normally depending on the server PC settings y y Virtual solutions may affect the functions or speed of the specific USB storage dev...

Страница 16: ...nd performs automatic image adjustment for each signal only available for analog D SUB input signals to provide an optimal screen display Self Image Adjustment Press the power button on the front to turn on the monitor When powered on the Self Image Adjustment function will run automatically only available for analog D SUB input signals NOTE ...

Страница 17: ...d mode the left arrow key CLOUD Disconnects the connection when the key is pressed for a few seconds while in Cloud mode the right arrow key AUTO To adjust the monitor settings press the AUTO button on the MONITOR SETUP OSD menu only supported for analog signal For optimal screen display use the following resolution Optimal Resolution 1440 x 900 INPUT Allows selection of the input signal y y If yo...

Страница 18: ...A To customize the color of the screen COLOR TEMP DISPLAY HORIZONTAL To adjust the position of the screen VERTICAL CLOCK To improve the clarity and stability of the screen PHASE OTHERS LANGUAGE To customize the screen status for a user s operating environment CLOUD POWER INDICATOR y y CLOUD Using PC via a network MENU D SUB CLOUD Description BRIGHTNESS To adjust the brightness contrast of the scre...

Страница 19: ...on to enter the more option settings 3 Enter to PICTURE by pressing the button 4 Set the options by pressing the or buttons 5 Select EXIT to leave the OSD menu To return to the upper menu or set other menu items use the up arrow button Each option is explained below MENU NEXT MENU PICTURE Description SHARPNESS To adjust the clearness of the screen ...

Страница 20: ... set other menu items use the up arrow button Each option is explained below MENU NEXT MENU COLOR Description GAMMA Set your own gamma value GAMMA 0 GAMMA 1 GAMMA 2 on the monitor high gamma values display whitish images and low gamma values display blackish images COLOR TEMP CUSTOM RED Set your own red color levels GREEN Set your own green color levels BLUE Set your own blue color levels Select t...

Страница 21: ...eave the OSD menu To return to the upper menu or set other menu items use the up arrow button Each option is explained below MENU NEXT MENU DISPLAY Description HORIZONTAL To move image left and right VERTICAL To move image up and down CLOCK To minimize any vertical bars or stripes visible on the screen background The horizontal screen size will also change PHASE To adjust the focus of the display ...

Страница 22: ...he OSD menu To return to the upper menu or set other menu items use the up arrow button Each option is explained below MENU NEXT MENU OTHERS Description LANGUAGE To choose the language in which the control names are displayed CLOUD Off CLOUD is disabled in D SUB input mode On CLOUD is enabled in D SUB input mode POWER INDICATOR Use this function to set the power indicator on the bottom side of the...

Страница 23: ...itor to display the VOL OSD menu 2 Press the or button to adjust the volume 3 Press the button to enable or disable Mute 4 Select EXIT to leave the OSD menu Each option is explained below MENU NEXT MENU VOLUME Description VOLUME Adjusts the volume only available in CLOUD input mode DUAL WEB ...

Страница 24: ...The OSD LOCKED message is displayed Is the OSD LOCKED message displayed when the MENU button is pressed y y The OSD lock feature is enabled to prevent undesired modification of the OSD settings Press and hold the MENU button for a couple of seconds to unlock the OSD The OSD UNLOCKED message will be displayed The screen retains an image Does image sticking occur even when the monitor is turned off ...

Страница 25: ...rred text a dimmed screen a truncated display area or misalignment of the display y y The configuration procedure may differ depending on your computer and or operating system Also some video cards may not support certain resolutions If this is the case contact the computer or video card manufacturer for assistance y y The AUTO option is only available for D SUB analog signals The display color is...

Страница 26: ...n D SUB Analog Power 19 V 2 3 A Power Consumption CLOUD D SUB On Mode 17 W D sub 24 W CLOUD Power Saving Mode 0 5 W CLOUD mode 8 5 W Off Mode 0 5 W AC DC Adapter Type PA 1650 68 manufactured by LITE ON TECHNOLOGY CORPORATION OUTPUT 19 V 3 42 A Dimension Weight Monitor Size Width x Height x Depth With Stand 440 2 mm x 370 mm x 225 mm Without Stand 440 2 mm x 303 2 mm x 47 mm Weight Without Packagin...

Страница 27: ...n Horizontal Frequency kHz Vertical Frequency Hz Polarity H V Remark 720 x 400 31 468 70 08 640 x 480 31 469 59 94 800 x 600 37 879 60 317 1024 x 768 48 363 60 1440 x 900 55 935 59 888 Recommended Mode Power Indicator Mode LED Color On Mode Red Power Saving Blinking Red Off Mode Off ...

Страница 28: ...ak every hour y y The stand is designed to best support the monitor when the optimal conditions are selected Adjust the angle of the monitor from 5 to 15 to obtain the best view of the screen You should be looking slightly down at the screen Place your hands gently on the keyboard keeping your arms bent at the elbows and extended horizontally in front of you Adjust the angle from 5 to 15 so that t...

Страница 29: ... y y Network status If a network is connected the text Connected appears with a green circle button If not the text Disconnected ap pears with a red circle button When you click the Network status link the network setting screen is displayed If a network is being connected the mes sage Connecting is displayed with Figure Red y y Remember me If you select this button the system saves your user name...

Страница 30: ...age Set a language to use on the network monitor home screen After setting the language click the OK button The default is English Network Set a wired wireless network Support for the wireless connection is planned to begin in 2013 Restart Menu Select the Restart menu and click the OK button in the Restart pop up to restart the system ...

Страница 31: ...eway and DNS Server fields and then click the OK button Wireless setting support planned to begin in 2013 y y The AP list for wireless network connection is displayed Click the Refresh button to update the list of accessible APs y y Double click an AP or click the Connect but ton after selecting an AP to access the AP When the connection is established the AP is marked as connected in the list y y...

Страница 32: ...P is set to Off the input window is displayed for detailed setting Enter the IP Address Subnet Mask Default Gateway and DNS Server fields and then click the OK button y y Activity setting Set to turn on off a wireless network Enable Wireless network is used Disable Wireless network is not used Server Set Citrix VDI server and eZ CMS server address eZ CMS is a cloud monitor management software prov...

Страница 33: ...CNT42K The network monitor supports 2 resolutions including Auto 1440x900 1024x768 When it is set to Auto the monitor is auto matically adjusted to the optimal resolution y y Rotation Set the angle of a LCD screen to normal 90 degree counter clockwise or 90 degree clockwise eZ CMS setting y y Enter the address of eZ CMS server to con nect to ...

Страница 34: ...l Monitor You can specify the extension mode Span Mode allows to extend display Mirror Mode allows to copy display In Mirror Mode the resolution and rotation menus are disabled When you click the OK button the system is restarted and the selected settings are ap plied NOTE y y The settings are enabled only when the DVI D monitor is connected Volume You can adjust the system volume and mike vol ume...

Страница 35: ...ware information of a network monitor y y Hardware Information Network monitor mod el name and asset number The asset number can be set in eZ CMS y y Software information Firmware version soft ware file name and publisher information y y Wake on LAN Status of Wake on LAN NOTE y y Wake on LAN can only be set in the LGMC y y eZ CMS is a cloud management software applica tion provided by LG Electroni...

Страница 36: ...n y y Wired Connection IP address and MAC ad dress of a wired network y y Wireless Connection IP address and MAC address of a wireless network Ping Tab By pinging you check the network connection to a specific IP or host from a local client and also local network status NOTE y y Only IP or host name can be entered The parameters of ping can not be used ...

Страница 37: ...MPL and other open source licenses that is contained in this product please visit http opensource lge com In addition to the source code all referred license terms warranty disclaimers and copyright notices are available for download LG Electronics will also provide open source code to you on CD ROM for a charge covering the cost of performing such distribution such as the cost of media shipping a...

Отзывы: