background image

37

W

A

TCHING 

TV 

PR
OGR

AMME 

CONTR

OL

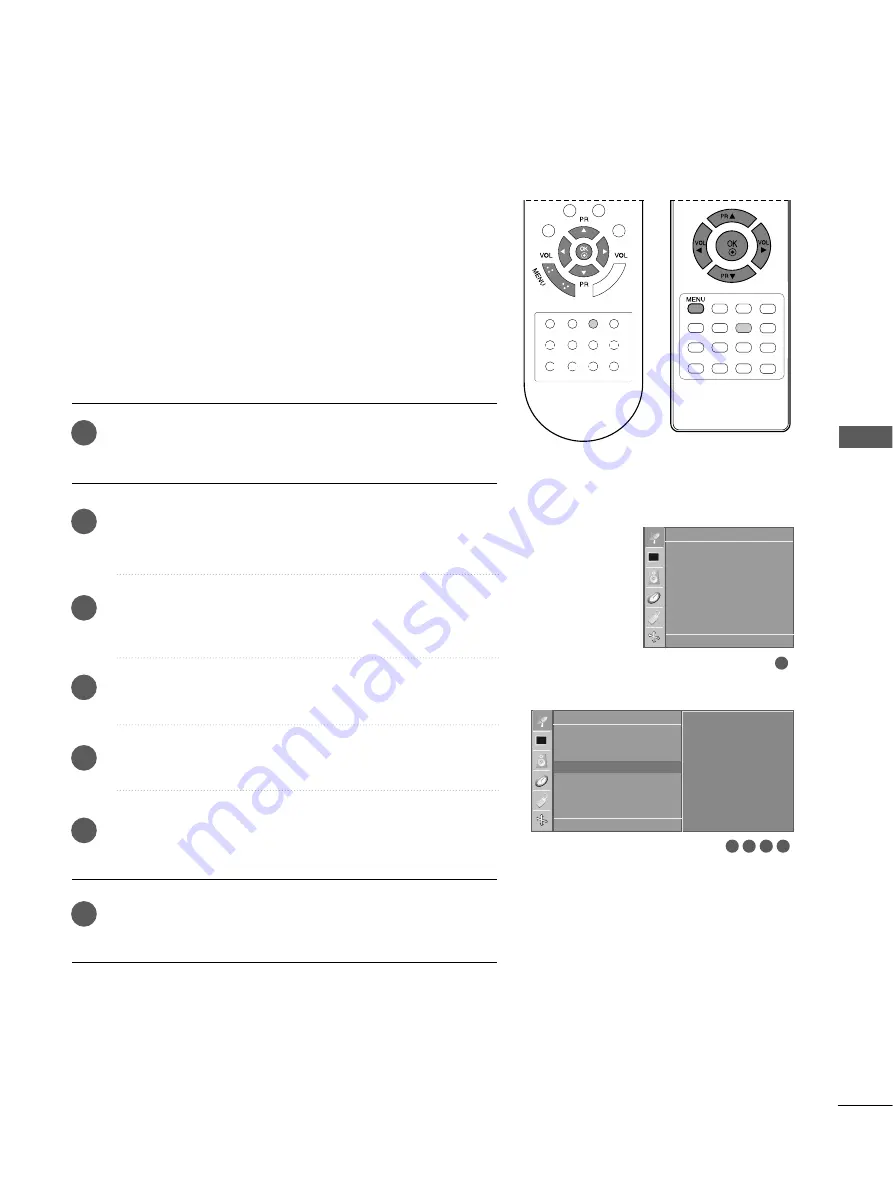
FAVOURITE PROGRAMME

Press the M

ME

EN

NU

U button and then 

D

D

//  

E

E

button to select the

Station

menu.

Press the 

G

G

button and then 

D

D

//  

E

E

button to select

Favourite Programme

.

Press the 

G

G

button and then 

F

F

//  

G

G

button to select 

On 

or

Off

.

Press the 

D

D

//  

E

E

button to select - -  - - - - -. 

Select a desired programme with the 

F

F

//  

G

G

button.

To store another programme, repeat steps

4

to 

5

You can store up to 8 programmes.

Repeatedly press the MENU button to return to normal TV
viewing.

This function lets you select your favourite programmes directly.

Repeatedly press the YELLOW button to select stored favourite

programmes while it is selected On. Repeatedly press the Y

Y E

E LL --

LL O

O W

W  button to select previous programmes while it is selected

Off.

1

2

3

4

5

6

7

1

2 3 4 5

Station

DE  F G

OK MENU

Auto programme

Manual programme

Programme edit

Favourite programme

Station

DE  F G

OK MENU

Auto programme

Manual programme

Programme edit

Favourite programme

G

O f f
- -     - - - - -
- -     - - - - -
- -     - - - - -
- -     - - - - -
- -     - - - - -
- -     - - - - -
- -     - - - - -
- -     - - - - -

Содержание 17LS5R-TA

Страница 1: ...LS5R Please read this manual carefully before operating your set Retain it for future reference Record model number and serial number of the set See the label attached on the back cover and quote this information to your dealer when you require service ENGLISH ...

Страница 2: ......

Страница 3: ...te Control or Power Cord Cable Management ACCESSORIES Polishing Cloth Polish the screen with the cloth This feature is not available for all models Slightly wipe stained spot on the exterior only with the cleans ing cloths for the product exterior if there is stain or fingerprint on surface of the exterior Do not wipe roughly when removing stain Please be cautious of that excessive power may cause...

Страница 4: ... Volume Leveler 50 Preset Sound Settings Sound Mode 51 Sound Setting Adjustment User Mode 52 Balance 53 I II Stereo Dual Reception 54 NICAM Reception 55 Speaker Sound Output Selection 55 ON SCREEN MENU LANGUAGE SELECTION 56 EXTERNAL EQUIPMENT SETUP HD Receiver Setup 16 DVD Setup 1 8 VCR Setup 20 Headphone SETUP 23 PC Setup 24 Screen Setup for PC Mode 27 WATCHING TV PROGRAMME CONTROL Remote Control...

Страница 5: ... Maintenance 66 Product Specifications 67 TIME SETTING Clock Setup 57 Auto On Off Timer Setting 58 Sleep Timer Setting 59 Auto Shut off Setting 60 TELETEXT Switch On Off 61 SIMPLE Text 61 TOP Text 62 FASTEXT 62 Special Teletext Functions 63 ...

Страница 6: ...s a protection film attached remove the film and then wipe the product with a polishing cloth 17LS5R 20LS5R INPUT MENU VOL PR I OK INPUT MENU VOL PR I OK PROGRAMME Buttons VOLUME Buttons MENU Button OK Button INPUT Button POWER Button Remote Control Sensor Power Standby Indicator illuminates red in standby mode illuminates green when the set is switched on 17LS5R 20LS5R ...

Страница 7: ...l Sensor Power Standby Indicator illuminates red in standby mode illuminates green when the set is switched on 19LS4R 22LS4R INPUT MENU VOL PR I OK PROGRAMME Buttons VOLUME Buttons MENU Button OK Button INPUT Button POWER Button ...

Страница 8: ...ions page Never attempt to operate the TV on DC power RGB Audio Input Connect the monitor output from a PC DTV to the appropriate input port Antenna Input Connect over the air signals to this jack Component Input Connect a component video audio device to these jacks Audio Video Input Connect audio video output from an external device to these jacks S Video Input Connect S Video out from an S VIDEO...

Страница 9: ...er SERVICE ONLY Antenna Input Connect over the air signals to this jack Component Input Connect a component video audio device to these jacks Audio Video Input Connect audio video output from an external device to these jacks S Video Input Connect S Video out from an S VIDEO device Headphone Input 1 2 3 4 5 6 7 SERVICE ONLY 480i 480p 576i 576p 1 AC IN 2 3 5 4 6 7 ...

Страница 10: ...rate the TV on DC power HDMI DVI IN Input Connect a HDMI signal to HDMI IN Or DVI VIDEO signal to HDMI DVI port with DVI to HDMI cable RGB Audio Input Connect the monitor output from a PC DTV to the appropriate input port Antenna Input Connect over the air signals to this jack Audio Video Input Connect audio video output from an external device to these jacks Component Input Connect a component vi...

Страница 11: ...yplacetheproductscreensidedownonacushioned surface that will protect product and screen from damage 19 22LS4R 2 Assemble parts of stand body with theproduct of the stand Insert stand body into theproduct until clicking sound stand body Hold the h hi in ng ge e b bo od dy y and bend it upward Hinge Body Insertthes st ta an nd d b bo od dy yintotheproductuntilclickingsound Stand Body Assemble the pa...

Страница 12: ...on or soft cloth Pull cover base backward during pressing botton on stand body Hold cover base and pull with shake it backward to separate from stand body 4 Hold the stand and bend it upward 5 Pull stand body to separate from set during pressing 2 latches Here shown may be somewhat different from your TV ...

Страница 13: ...LE E M MA AN NA AG GE EM ME EN NT T as shown 2 First press the cable management Hold the C CA AB BL LE E M MA AN NA AG GE EM ME EN NT T with both hands and pull it upward NOTE G G Do not hold the C CA AB BL LE E M MA AN NA AG GE EM ME EN NT T when moving the product If the product is dropped you may be injured or the product may be broken How to remove the cable management Here shown may be somewh...

Страница 14: ...ll WALL MOUNT HORIZONTAL INSTALLATION For proper ventilation allow a clearance of 4 on each side and from the wall Detailed installation instructions are available from your dealer see the optional Tilt Wall Mounting Bracket Installation and Setup Guide 4 inches 4 inches 4 inches 4 inches 4 inches 4 inches 4 inches 4 inches 4 inches ...

Страница 15: ...onto the screen Care should be taken not to expose the set to any unnecessary vibration moisture dust or heat Also ensure that the set is placed in a position to allow a free flow of air Do not cover the ventilation openings on the back cover If you intend to mount the TV to a wall attach VESA standard mounting interface optional parts to the back of the TV When you install the set to use the wall...

Страница 16: ...homepage of the Kensington company Kensington sells security systems for expensive electronic equipment such as note book PCs and LCD projectors NOTE The Kensington Security System is an optional accessory NOTES a If the TV feels cold to the touch there may be a small flicker when when it is turned on This is normal there is nothing wrong with TV b Some minute dot defects may be visible on the scr...

Страница 17: ...s Houses Connect to wall jack for outdoor antenna Outdoor Antenna Wall Antenna Socket RF Coaxial Wire 75 ohm Antenna UHF Signal Amplifier VHF In poor signal areas to get better picture quality install a signal amplifier to the antenna as shown above If signal needs to be split for two TVs use an antenna signal splitter for connection To prevent the equipment damage never plug in any power cords un...

Страница 18: ... I IN N V VI ID DE EO O sockets Y PB PR on the set Connect the audio cable from the SET TOP to C CO OM MP PO O N NE EN NT T I IN N A AU UD DI IO O sockets of the set Press the I IN NP PU UT T button to select Component 19 22LS4R 1 7LS5R 480i 576i 480p 576p 720p 1080i 20LS5R 480i 480p 576i 576p 2 3 1 16 EXTERNAL EQUIPMENT SETUP EXTERNAL EQUIPMENT SETUP HD RECEIVER SETUP To prevent the equipment dam...

Страница 19: ...g with a HDMI Only 19 22LS4R Connect the HDMI output of the digital set top box to the H HD DM MI I D DV VI I I IN N jack on the set Select HDMI DVI DTV input source with using the I IN NP PU UT T button on the remote control 2 1 HDMI DVI IN 1 ...

Страница 20: ...Y Y Y PB B Y Cb Pb PR R Y Cr Pr Connect the video output sockets Y Cb Cr Y Pb Pr Y B Y R Y or Y PB PR of the DVD to the C CO OM MP PO ON NE EN NT T I IN N V VI ID DE EO O sockets Y PB PR of the set Connect the audio cable from the DVD to C CO OM MP PO ON NE EN NT T I IN N A AU UD DI IO O sockets of the set Press the I IN NP PU UT T button to select Component 19 22LS4R 1 7LS5R 480i 576i 480p 576p 7...

Страница 21: ...on the remote control 2 1 1 G G TV can receive the video and audio signal simultaneously with using a HDMI cable G G If the DVD supports Auto HDMI function the output resolu tion of the source device will be automatically set to 1280x720p G G If the DVD player does not support Auto HDMI you need to set the DVD output resolution appropriately To get the best picture quality adjust the output resolu...

Страница 22: ...remain visible on the screen OUTPUT SWITCH ANT IN R S VIDEO VIDEO ANT OUT L ANTENNA IN Wall Jack Antenna 1 2 When connecting with an antenna Connect the RF out socket of the VCR to the aerial socket of the set Connect the aerial cable to the RF aerial in socket of the VCR Store the VCR channel on a desired programme number using the Manual programme tuning section Select the programme number where...

Страница 23: ...dio cable from the VCR to the A AU UD DI IO O L L M MO ON NO O jack of the set NOTE VCR SETUP When connecting with a RCA cable Connect the audio video out sockets of the VCR to AUDIO VIDEO in sockets of the set Press the INPUT button to select AV Press the PLAY button on the VCR The VCR playback picture appears on the screen 2 3 1 1 ...

Страница 24: ...TUP When connecting with an S Video cable Connect the S Video socket of the VCR to the S VIDEO socket of the set Connect the audio cable from the S VIDEO VCR to the AUDIO sockets of the set Press the INPUT button to select AV Press the PLAY button on the VCR The VCR playback picture appears on the screen 2 3 4 1 1 2 VCR SETUP ...

Страница 25: ...a Headphone cable Insert the headphone plug to the headphone socket of the set You can listen to the sound through the headphone To adjust the head phone volume press the F F G G button If you press the MUTE button the sound from the head phone is switched off 1 H P ...

Страница 26: ...nect the audio cable from the PC to the A AU UD DI IO O R RG GB B I IN N sock ets of the set Press the INPUT button to select RGB PC Switch on the PC and the PC screen appears on the set The set can be operated as the PC monitor 2 3 1 4 Connect the signal cable from the monitor output socket of the PERSONAL COMPUTER to the PC input socket of the set Connect the audio cable from the PC to the A AU ...

Страница 27: ...ode to obtain the best image quality for your LCD moni tor If used under the other resolutions some scaled or processed pictures may appear on the screen The set has been preadjusted to the mode VESA 1280x1024 60Hz 17LS5R 1440x900 60Hz 19LS4R 1680x1050 60Hz 22LS4R G G Some dot defects may appear on the screen like Red Green or Blue spots However this will have no impact or effect on the monitor pe...

Страница 28: ...363 60 00 63 981 60 02 55 50 59 90 65 290 59 954 Resolution 1440x900 640x480 800x600 1024x768 RGB DTV HDMI DVI DTV mode Horizontal Vertical Frequency kHz Frequency Hz 31 47 59 94 31 50 60 00 31 25 50 00 37 50 50 00 44 96 59 94 45 00 60 00 33 72 59 94 33 75 60 00 28 125 50 00 Resolution 720x480p 720x576p 1280x720p 1920x1080i Horizontal Vertical Frequency kHz Frequency Hz 31 47 59 94 31 50 60 00 31 ...

Страница 29: ...ss the F F G G button to make appro priate adjustments H H P Po os si it ti io on n V V P Po os si it ti io on n This function is to adjust picture to left right and up down as you prefer C Cl lo oc ck k This function is to minimize any vertical bars or stripes visible on the screen background And the horizontal screen size will also change P Ph ha as se e This function allows you to remove any ho...

Страница 30: ...lects a programme Selects numbered items in a menu Switches the set on from standby LIST Q VIEW Displays the programme table Returns to the previously viewed programme w wi it th ho ou ut t A AR RC C 2 1 3 MUTE PSM SSM Switches the sound on or off Recalls your preferred picture setting Recalls your preferred sound setting 4 THUMBSTICK Up Down Left Right OK Allows you to navigate the on screen menu...

Страница 31: ...es matching correct polarity with with Install two 1 5V AAA batteries Don t mix old or used batteries with new ones Close cover W Wi it th h T TE EL LE ET TE EX XT T W Wi it th ho ou ut t T TE EL LE ET TE EX XT T I II Selects the sound output 7 ARC Select your desired picture format No function 8 MENU SLEEP Selects a menu Sets the sleep timer 9 5 ...

Страница 32: ...E CONTROL If your TV will be turned on you will be able to use its features First connect power cord correctly At this moment the TV switches to standby mode In standby mode to turn TV on press the I IN NP PU UT T P PR R D D E E button on the TV or press the P PO OW WE ER R T TV V I IN NP PU UT T P PR R D D E E N Nu um mb be er r 0 0 9 9 button on the remote control and then the TV will switch on ...

Страница 33: ...ion enables you to adjust the screen status conveniently since it pro vides graphical presentation b In this manual the OSD On Screen Display may be different from your TV s because it is just example to help the TV operation c In the teletext mode menus are not displayed 1 2 3 Station menu Picture menu Sound menu Special menu Time menu Screen menu 19LS4R 22LS4R Screen DE F G OK MENU Auto config M...

Страница 34: ...tton to begin auto tuning All receivable stations are stored To stop auto programming press the M ME EN NU U button When auto programming is completed the Programme edit menu appears on the screen See the Programme edit section to edit the stored programme Repeatedly press the M ME EN NU U button to return to normal TV viewing 1 2 3 4 5 6 7 8 9 Up to 100 TV stations can be stored by programme numb...

Страница 35: ...r Cable on the Band menu Press the O OK K button Press the D D E E button to select Channel Select the desired programme with F F G G button or NUMBER buttons Press the O OK K button Press the D D E E button to select Search Press the G G button and then F F G G button to commence search ing on the Search pull down menu If a station is found the search will stop Press the O OK K button to store it...

Страница 36: ...nu Press the O OK K button Repeatedly press the M ME EN NU U button to return to normal TV viewing 1 2 3 4 5 6 Normally fine tuning is only necessary if reception is poor The finely tuned programme will be indicated by orange number during programme selection 3 4 5 1 2 Station DE F G OK MENU Auto programme Manual programme Programme edit Favourite programme Manual programme DE F G OK MENU Storage ...

Страница 37: ...9 and the alphabet A to Z It can be saved 5 digits for name With the F F button you can select in the opposite direction Press the F F G G button to select the position and make your choice of the second character and so on Press the O OK K button to store it Repeatedly press the M ME EN NU U button to return to normal TV viewing 1 2 3 4 5 6 7 3 4 5 1 2 Station DE F G OK MENU Auto programme Manual...

Страница 38: ... 1 Select a programme to be moved with the D D E E F F G G button 2 Press the YELLOW button 3 Move the programme to the desired programme number with the D D E E F F G G button 4 Press the YELLOW button again to release this function A A S Sk ki ip pp pi in ng g a a p pr ro og gr ra am mm me e n nu um mb be er r 1 Select a programme number to be skipped with the D D E E F F G G button 2 Press the ...

Страница 39: ...peat steps 4 to 5 You can store up to 8 programmes Repeatedly press the MENU button to return to normal TV viewing This function lets you select your favourite programmes directly Repeatedly press the YELLOW button to select stored favourite programmes while it is selected On Repeatedly press the Y YE EL L L LO OW W button to select previous programmes while it is selected Off 1 2 3 4 5 6 7 1 2 3 ...

Страница 40: ...a programme with the D D E E F F G G button Then press the O OK K button The set switches to the chosen programme number A A P Pa ag gi in ng g t th hr ro ou ug gh h a a p pr ro og gr ra am mm me e t ta ab bl le e There are 10 programme table pages in which contain 100 pro grammes Pressing the D D E E F F G G button repeatedly turns the pages Press the L LI IS ST T button to return to normal TV vi...

Страница 41: ... trol it This feature can be used to prevent unauthorized viewing Press the M ME EN NU U button and then D D E E button to select the Special menu Press the G G button and then D D E E button to select Child lock Press the G G button and then D D E E button to select On or Off Repeatedly press the M ME EN NU U button to return to normal TV viewing 1 2 3 4 1 3 2 Special DE F G OK MENU Language Chil...

Страница 42: ...y in non lin ear proportion to fill the entire screen O Or riig giin na all When your TV receives the wide screen signal it will be automatically changed to the picture format to be sent 4 4 3 3 Following selection will lead you to view a picture with an original 4 3 aspect ratio with gray bars appearing at both the left and right sides 1 16 6 9 9 Following selection will lead you to adjust the pi...

Страница 43: ...icture without any alternation while filling the entire screen However the top and bot tom portions of the picture will be cropped Z Zo oo om m2 2 Choose Zoom2 when you want the picture to be altered both horizontally extended and vertically cropped The picture taking a halfway trade off between alteration and screen coverage PICTURE CONTROL 41 NOTE G G ARC menu is not available in RGB HDMI Compon...

Страница 44: ...n to select the Picture menu Press the G G button and then D D E E button to select PSM Press the G G button and then D D E E button to select a pic ture setting on the PSM menu Repeatedly press the M ME EN NU U button to return to normal TV viewing You can also recall a desired picture Dynamic Standard Mild Game or User with PSM button on the remote con trol The picture Dynamic Standard Mild and ...

Страница 45: ...E E button to select CSM Press the G G button and then D D E E button to select a color setting on the CSM menu Cool Normal Warm or User Repeatedly press the M ME EN NU U button to return to normal TV viewing 1 2 3 4 Auto Color Tone Control Warm Normal Cool 1 3 2 Picture DE F G OK MENU PSM CSM G Cinema Reset Cool Normal Warm User Picture DE F G OK MENU PSM CSM Cinema Reset ...

Страница 46: ...o on nt tr ra as st t Adjusts the difference between the light and dark levels in the picture B Br ri ig gh ht tn ne es ss s Increases or decreases amount of white in the your picture C Co ol lo ou ur r Adjusts intensity of all colours S Sh ha ar rp pn ne es ss s Adjusts the level of crispness in the edges between the light and dark areas of the picture The lower the level the softer the image T T...

Страница 47: ...utton and then D D E E button to select User Press the G G button and then D D E E button to select Red Green or Blue Press the F F G G button to make appropriate adjustments Repeatedly press the M ME EN NU U button to return to normal TV viewing 1 2 3 4 5 6 1 Picture DE F G OK MENU PSM CSM Cinema Reset 3 2 Picture DE F G OK MENU PSM CSM G Cinema Reset Cool Normal Warm User 5 4 User DE F G OK MENU...

Страница 48: ...mal TV viewing XD is LG electronic s unique picture improving technology to display a real HD source through an advanced digital signal pro cessing algorithm It s not available to use this function in RGB PC mode This feature is not available for all models A A X XD D C Co on nt tr ra as st t Optimizing the contrast automatically according to the brightness of the reflection A A X XD D C Co ol lo ...

Страница 49: ... the MENU button and then D D E E button to select the Special menu Press the G G button and then D D E E button to select XD Demo Press the G G button to begin XD Demo To stop X XD D D De em mo o press the M ME EN NU U button 1 2 3 4 XD Demo Off On Exit MENU 1 3 2 Special DE F G OK MENU Language Child lock Demo G To start Special DE F G OK MENU Language Child lock Demo ...

Страница 50: ... EN NU U button and then D D E E button to select the Picture menu Press the G G button and then D D E E button to select Cinema Press the G G button and then D D E E button to select On or Off Repeatedly press the M ME EN NU U button to return to normal TV viewing 1 2 3 4 3 2 1 Picture DE F G OK MENU PSM CSM XD Cinema Reset Picture DE F G OK MENU PSM CSM XD Cinema G Reset On Off ...

Страница 51: ...t Press the M ME EN NU U button and then D D E E button to select the Picture menu Press the G G button and then D D E E button to select Reset Press the G G button to initialize the adjusted value Repeatedly press the M ME EN NU U button to return to normal TV viewing Returns to the default settings PSM CSM XD Cinema at the factory 1 2 3 4 ...

Страница 52: ...utton and then D D E E button to select AVL Press the G G button and then D D E E button to select On or Off Repeatedly press the M ME EN NU U button to return to normal TV viewing Auto Volume automatically keeps on an equal volume level even if you change programmes 1 2 3 4 3 2 Sound DE F G OK MENU SSM AVL Balance 0 Sound DE F G OK MENU SSM AVL G Balance 0 On Off ...

Страница 53: ... when lis tening to the music M Mo ov vi ie e Select this option to enjoy sublime sound S Sp po or rt ts s Select this option to watch sports broadcasting U Us se er r Select this option to use the user defined audio set tings Press the M ME EN NU U button and then D D E E button to select the Sound menu Press the G G button and then D D E E button to select SSM Press the G G button and then D D E...

Страница 54: ...utton to select User Press the G G button Select a sound band by pressing the F F G G button Make appropriate sound level with the D D E E button Press the O OK K button to store it for the sound User Repeatedly press the M ME EN NU U button to return to normal TV viewing Adjust the sound equalizer 1 2 3 4 5 6 7 5 1 Sound DE F G OK MENU SSM AVL Balance 0 Sound DE F G OK MENU SSM G AVL Balance 0 Fl...

Страница 55: ... D D E E button to select the Sound menu Press the G G button and then D D E E button to select Balance Press the G G button and then F F G G button to make desired adjustment Repeatedly press the M ME EN NU U button to return to normal TV viewing 1 2 3 4 1 3 2 Sound DE F G OK MENU SSM AVL Balance 0 Sound DE F G OK MENU SSM AVL Balance R15G ...

Страница 56: ...d du ua al l l la an ng gu ua ag ge e b br ro oa ad dc ca as st t If a programme received two languages dual language you can switch to DUAL I DUAL II or DUAL I II by pressing the I I I II I button repeatedly DUAL I Sends the primary broadcast language to the loudspeakers DUAL II Sends the secondary broadcast language to the loudspeakers DUAL I II Sends a separate language to each loudspeaker Broa...

Страница 57: ...tion the high quality NICAM Near Instantaneous Companding Audio Multiplex digital sound can be received Sound output can be selected according to the type of received broadcast as follows by press ing the I II button repeatedly Speaker Sound Output Selection In AV S Video Component RGB except 20LS5R and HDMI 19 22LS4R only mode you can select output sound for the left and right loudspeakers Repeat...

Страница 58: ...button and then use D D E E button to select the Special menu Press the G button and then use D D E E button to select Language Press the G button and then use D D E E button to select your desired language Press the O OK K button Press the M ME EN NU U button to return to normal TV viewing NOTE G G If you intend to be away on vacation disconnect the power plug from wall power outlet 1 2 3 4 5 ...

Страница 59: ... the hour Press the G G button and then D D E E button to set the min utes Repeatedly press the M ME EN NU U button to return to normal TV viewing You must set the time correctly before using on off time func tion In the event of power interruption disconnection or power fail ure the clock must be reset 1 2 3 4 5 1 3 4 2 Time DE F G OK MENU Clock Off time On time Auto sleep Time DE F G OK MENU Clo...

Страница 60: ... button and then D D E E button to adjust volume level at turn on Press the M ME EN NU U button to save Repeatedly press the M ME EN NU U button to return to normal TV viewing The Off time automatically switches the set to standby at the preset time Two hours after the set is switched on by the on time function it will automatically switch back to standby mode unless a button has been pressed Once...

Страница 61: ...inutes The display will appear on the screen followed by 10 20 30 60 90 120 180 and 240 When the number of minutes you want is displayed on the screen the timer begins to count down from the number of minutes selected 1 2 NOTE G G To view the remaining sleep time press the S SL LE EE EP P button once G G To cancel the sleep time repeatedly press the S SL LE EE EP P button until the display appears...

Страница 62: ...ng Press the M ME EN NU U button and then D D E E button to select the Time menu Press the G G button and then D D E E button to select Auto Sleep Press the G G button and then D D E E button to select On or Off Repeatedly press the M ME EN NU U button to return to normal TV viewing 1 1 2 3 4 2 3 Time DE F G OK MENU Clock Off time On time Auto sleep Time DE F G OK MENU Clock Off time On time Auto ...

Страница 63: ... the corresponding coloured button on the remote control handset Press a coloured button Using the NUMBER buttons select the page you wish to programme Press the O OK K button Then the selected page is stored as the selected page number by blinking once From now on you can select this page with the same coloured button The three other coloured buttons are programmed in this way SIMPLE TEXT 1 2 1 2...

Страница 64: ...to previous selection Alternatively the E E button can be used A A Direct page selection Corresponding to the SIMPLE teletext mode you can select a page by entering it as a three digit number using the NUMBER buttons in TOP mode 4 4 1 2 3 FASTEXT The teletext pages are colour coded along the bottom of the screen and are selected by pressing the correspond ing coloured button A A Page selection Pre...

Страница 65: ...teletext page A A H HO OL LD D Stops the automatic page change which will occur if a teletext page consists of 2 or more sub pages The num ber of sub pages and the sub page displayed is usually shown on the screen below the time When this button is pressed the stop symbol is displayed at the top left hand corner of the screen and the automatic page change is inhibited To continue press this button...

Страница 66: ...Please contact your service center if the picture has not appeared after five minutes Adjust Color in menu option Keep a sufficient distance between the product and the VCR Try another channel The problem may be with the broadcast Are the video cables installed properly Activate any function to restore the brightness of the picture Check for local interference such as an electrical appliance or po...

Страница 67: ... is s o ou ut t o of f r ra an ng ge e S Sc cr re ee en n c co ol lo ou ur r i is s u un ns st ta ab bl le e o or r s si in ng gl le e c co ol lo ou ur r V Ve er rt ti ic ca al l b ba ar r o or r s st tr ri ip pe e o on n b ba ac ck kg gr ro ou un nd d H Ho or ri iz zo on nt ta al l N No oi is se e I In nc co or rr re ec ct t p po os si it ti io on n T Th he e a au ud di io o f fu un nc ct ti io o...

Страница 68: ...ter and a little fabric softener or dish washing detergent Wring the cloth until it s almost dry and then use it to wipe the screen Make sure the excess water is off the screen and then let it air dry before you turn on your TV Cleaning the Cabinet To remove dirt or dust wipe the cabinet with a soft dry lint free cloth Please be sure not to use a wet cloth Extended Absence If you expect to leave y...

Страница 69: ...0 20 60 C 4 140 F Less than 85 with stand without stand with stand without stand 394 5x394 0x169 4mm 15 5x15 5x6 7inches 394 5x352 0x66 0mm 15 5 x13 9x2 6inches 4 4kg 9 7lbs 4 1kg 9 1lbs AC100 240V 50 60Hz0 8A 474 1x464 6x184 3mm 1 8 7x18 3x7 3inches 474 1x419 5x72 8mm 1 8 7x16 5x2 9inches 6 8kg 15 0lbs 6 4kg 14 1lbs AC100 240V 50 60Hz1 0A 456 8x396 6x172 0mm 1 8 0x15 6x6 8inches 456 8x368 5x70 5m...

Страница 70: ......

Страница 71: ......

Страница 72: ......

Отзывы: