background image

Introduction / Important Safety Precautions

47

ENGLISH

Содержание 14Z90N Series

Страница 1: ...LG EASY GUIDE NOTEBOOK 14Z90N Series www lg com Copyright 2020 LG Electronics Inc All rights reserved ...

Страница 2: ...ubleShooting Guide to users for their easy and convenient use of the product TIP LG Easy Guide and LG TroubleShooting are provided with the UWP app and they can be downloaded again on the Microsoft Store if they are deleted If you want to download the files again connect to the Microsoft Store search for the files and install them Press the button to run LG Easy Guide 2 0 or LG TroubleShooting 2 0...

Страница 3: ...ovide warranty for data loss In order to minimize damage from data loss please make backup copies of important data The optical disk drive DVD CD ROM etc is optional and may not be provided upon purchasing the product Manufacturers and installers cannot provide services related to human safety as this wireless device may cause radio interference Safety Precaution Notations The below symbols are to...

Страница 4: ...M Express Inc Manufacturer and Copyright represent the logo and trademark of the manufacturer and bear no relationship to the functions supported by the product LG logo is a registered trademark of LG Electronics inc Micro SD Logo is a trademark of SD 3C LLC The UFS Logo is a trademark of the Universal Flash Storage Association UFSA For DTS patents see http patents dts com Manufactured under licen...

Страница 5: ... opensource lge com In addition to the source code all referred license terms warranty disclaimers and copyright notices are available for download LG Electronics will also provide open source code to you on CD ROM for a charge covering the cost of performing such distribution such as the cost of media shipping and handling upon email request to opensource lge com This offer is valid for a period ...

Страница 6: ...pacity RAM capacity shown by Windows may be lower than the actual capacity because the PC uses shared memory for BIOS and the integrated graphics card Due to BIOS using shared memory 1 024 MB RAM may be reported as 1 022 MB or slightly less If the PC has integrated graphics card 1 024 MB RAM may be reported as 1 022 MB or less than 1 000 MB Adjusting Volume headset and speakers Check the volume be...

Страница 7: ... Safety Precautions Please use the machine in the proper environment to extend the machine s lifespan Use the machine in a safe and stable place The warranty does not cover any damage resulting from reckless use or use in undesirable environments ENGLISH ...

Страница 8: ...ot use the PC on a bag with magnetic objects attached to it Otherwise the storage device and the system may be damaged and the system may fail to operate properly Operate the product where there is no electromagnetic interference Keep a proper distance between the PC and electronic appliances such as radios or speakers that generate strong magnetic fields Otherwise data may be lost from the storag...

Страница 9: ...get damaged Install a vaccine program on your PC and do not download illegal programs nor access any corruptive web site such as those pushing pornographic contents The system may be infected and impaired Do not insert devices other than designated ones in the ports Otherwise the product may get damaged Do not press the eject button while the optical disk drive CD DVD Blu ray is running An error m...

Страница 10: ... the memory cover is open It may damage the machine Please use parts certified by LG Electronics Inc Otherwise a fire or product damage may occur If there is a problem with peripheral devices contact the device manufacturer The product may get damaged Handle devices and parts of the machine with care The product may get damaged Do not drop any part or device of the machine while disassembling it I...

Страница 11: ...the PC In the case that liquid goes inside the PC a fire or electric shock may occur If you have dropped or damaged the PC disconnect the power and contact the local service center for a safety check If a damaged PC is used continuously an electric shock or fire may occur Do not put a lit candle or live cigarette on the PC A fire may occur If you detect or smell smoke from the PC stop use immediat...

Страница 12: ...as a heater The product may get deformed or catch on fire Prevent children from thrusting their finger into the optical disk drive CD DVD Blu ray tray The finger may be stuck in the tray and injured Do not block the ventilation hole with any object Otherwise an electric shock may occur When upgrading your PC turn off the power and disconnect the power cable battery and LAN There is a risk of elect...

Страница 13: ...and contact the local service center Product Storage Transportation Precautions CAUTION Before carrying the machine turn off the power and disconnect all the cables Otherwise you may trip over the wire damaging the PC and sustaining an injury Do not carry the machine with the LCD open Otherwise the product may get damaged Protect the machine from any shock while carrying it System damage or an inj...

Страница 14: ...in a car avoid exposure to direct sunlight The product may get deformed or catch on fire due to a temperature rise Do not put any heavy object on the power cable and AC adapter and avoid damage from impacts A malfunction or fire may occur Do not leave the powered on PC in a space without enough ventilation i e bags for an extended or repeated time The battery may overheat and cause a fire ENGLISH ...

Страница 15: ... not throw or disassemble the battery The resulting damage may cause an injury explosion or fire Use batteries certified and acknowledged by LG Electronics Inc Otherwise an explosion or fire may occur Prevent the battery from being in contact with any metallic object like a car ignition key or a paper clip Otherwise this may cause damage to the battery a fire or burn due to overheat in the battery...

Страница 16: ...t may explode or cause a fire Keep the battery out of the reach of children or pets If damaged it may cause an injury Keep the battery from being pierced by a sharp object or chewed by pets It may explode or cause a fire Do not put the battery in water Otherwise the battery may be damaged or explode Do not use the PC on top of carpet blanket or bed Also do not put the adapter under the blanket Thi...

Страница 17: ...er and power jack Otherwise a fire or product damage may occur Operate the product at the proper voltage Excessive voltage may result in damage on the product electric shock or fire Use power outlets with an earth pin installed and proper supply of rated electricity An electric leakage may cause an electric shock or fire The shape of the power cord and outlet may differ by country and region In th...

Страница 18: ... and all other lines before contacting the local service center An electric shock or fire may occur Ensure that the battery pack is locked to the machine after installation Otherwise the battery may be damaged Other Safety Precautions CAUTION Handle the machine with care to prevent loss of data from the storage device HDD SSD eMMC Since the storage device is fragile you need to back up your import...

Страница 19: ... moved shaken or exposed to external shock while the storage device is running file damage or bad sectors may occur To minimize data loss resulting from storage device damage HDD SSD eMMC frequently back up important data The manufacturer is not responsible for any data loss We do not refund or replace a product that malfunctions due to the installation or use of an operating system other than the...

Страница 20: ...ucts The energy consumption of this product was decreased along with the cost Also it helps preserve natural resources This PC includes the following power management functions Turn off the display When you don t use the PC for up to 15 minutes Sleep after When you don t use the PC for up to 30 minutes To leave sleep mode click a mouse button or press any key on the keyboard Power Management Optio...

Страница 21: ...afety Precautions 21 Turn off the display Turns off the screen when you don t use the PC for a set period of time Put the computer to sleep Switches to the Sleep mode when you don t use the PC for a set period of time ENGLISH ...

Страница 22: ...22 Introduction Important Safety Precautions Regulatory Notices ENGLISH ...

Страница 23: ...Introduction Important Safety Precautions 23 ENGLISH ...

Страница 24: ...24 Introduction Important Safety Precautions ENGLISH ...

Страница 25: ...Introduction Important Safety Precautions 25 ENGLISH ...

Страница 26: ...26 Introduction Important Safety Precautions ENGLISH ...

Страница 27: ...Introduction Important Safety Precautions 27 ENGLISH ...

Страница 28: ...28 Introduction Important Safety Precautions ENGLISH ...

Страница 29: ...Introduction Important Safety Precautions 29 ENGLISH ...

Страница 30: ...30 Introduction Important Safety Precautions ENGLISH ...

Страница 31: ...Introduction Important Safety Precautions 31 ENGLISH ...

Страница 32: ...32 Introduction Important Safety Precautions ENGLISH ...

Страница 33: ...Introduction Important Safety Precautions 33 ENGLISH ...

Страница 34: ...34 Introduction Important Safety Precautions ENGLISH ...

Страница 35: ...Introduction Important Safety Precautions 35 ENGLISH ...

Страница 36: ...36 Introduction Important Safety Precautions ENGLISH ...

Страница 37: ...Introduction Important Safety Precautions 37 ENGLISH ...

Страница 38: ...38 Introduction Important Safety Precautions ENGLISH ...

Страница 39: ...Introduction Important Safety Precautions 39 ENGLISH ...

Страница 40: ...40 Introduction Important Safety Precautions ENGLISH ...

Страница 41: ...Introduction Important Safety Precautions 41 ENGLISH ...

Страница 42: ...42 Introduction Important Safety Precautions ENGLISH ...

Страница 43: ...Introduction Important Safety Precautions 43 ENGLISH ...

Страница 44: ...44 Introduction Important Safety Precautions ENGLISH ...

Страница 45: ...Introduction Important Safety Precautions 45 ENGLISH ...

Страница 46: ...46 Introduction Important Safety Precautions ENGLISH ...

Страница 47: ...Introduction Important Safety Precautions 47 ENGLISH ...

Страница 48: ...48 Introduction Important Safety Precautions ENGLISH ...

Страница 49: ...Introduction Important Safety Precautions 49 ENGLISH ...

Страница 50: ...50 Introduction Important Safety Precautions ENGLISH ...

Страница 51: ...Introduction Important Safety Precautions 51 ENGLISH ...

Страница 52: ...52 Introduction Important Safety Precautions ENGLISH ...

Страница 53: ...Introduction Important Safety Precautions 53 ENGLISH ...

Страница 54: ...54 Introduction Important Safety Precautions ENGLISH ...

Страница 55: ...Introduction Important Safety Precautions 55 ENGLISH ...

Страница 56: ...56 Introduction Important Safety Precautions ENGLISH ...

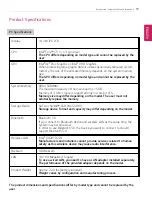
Страница 57: ...rarily replace the memory Storage Device SATA or NVMe SSD M 2 2280 Storage device format and capacity may differ depending on the model Bluetooth Bluetooth 5 0 If you connect to Bluetooth device and wireless LAN at the same time the system may become slow In order to use Bluetooth 5 0 the device you want to connect to should support Bluetooth 5 0 Wireless LAN Intel AX201D2W Manufacturers and insta...

Страница 58: ...charging hours may be longer Operating temperature may be different from the actual room temperature Operating and Storage Conditions Operating Temperature 50 F to 95 F Operating Humidity 20 RH to 80 RH Storage Temperature 23 F to 104 F Storage Humidity 5 RH to 90 RH Power Consumption Power consumption of this product during operation standby sleep mode and manual off modes may differ depending on...

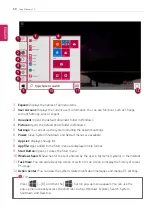
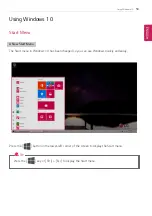
Страница 59: ...A New Start Menu The Start menu in Windows 10 has been changed so you can use Windows quickly and easily Press the button in the lower left corner of the screen to display the Start menu TIP Press the key or Ctrl Esc to display the Start menu ENGLISH ...

Страница 60: ...ble 7 App List Displays the app list 8 AppTile Apps added to the Start menu are displayed in tile format 9 Start Button Opens or closes the Start menu 10 Windows Search Searches for the text entered by the user in My Items system or the Internet 11 Task View You can add a Desktop screen or switch to the screen to display the history of recent PC usage 12 Action Center You can view the system relat...

Страница 61: ...p apps remain unchanged from the previous Windows apps but Windows apps have been changed to include various functions The Windows apps provide easy to use menus according to the window size and a variety of convenient functions such as Update and Alarm ENGLISH ...

Страница 62: ...following method 1 Press the button and select and run the app you want from the app list TIP Press the key or Ctrl Esc to display the Start menu 2 To exit an app press the button on the top of the app screen Deleting Apps You can delete apps from the Start menu tiles or the app list TIP The basic Windows apps that are required may not be deleted ENGLISH ...

Страница 63: ...Using Windows 10 63 1 Click the button to display the Start menu TIP Press the key or Ctrl Esc to display the Start menu ENGLISH ...

Страница 64: ...64 Using Windows 10 2 Go to the Start menu app tiles or the app list and right click the app you wish to delete ENGLISH ...

Страница 65: ...0 65 3 When the pop up menu appears select Uninstall TIP If you are deleting a desktop app the Programs and Features window appears Right click the app you wish to delete and press the Uninstall Change button ENGLISH ...

Страница 66: ...10 4 When prompted to confirm the deletion click the Uninstall button to delete the app Adding Apps to Start Menu Taskbar You can add frequently used apps on the Start menu and taskbar for easy and quick access ENGLISH ...

Страница 67: ...Using Windows 10 67 1 Press the button to display the Start menu TIP Press the key or Ctrl Esc to display the Start menu ENGLISH ...

Страница 68: ...68 Using Windows 10 2 Right click the app you want from the app list and then click Pin to Start or More Pin to Taskbar 3 The selected app is added to the Start menu or taskbar ENGLISH ...

Страница 69: ...ou can toggle the running apps easily and quickly and add desktops to use them like multiple PCs TIP For an app that does not allow multitasking you may be switched to the desktop where the app was executed or you may have an error message 1 In the taskbar press ENGLISH ...

Страница 70: ... between apps and desktops appears and the running apps are displayed in the preview TIP Press the button of an app in the preview to exit the app You can use the timeline displayed on the Desktop screen to check the history of PC usage ENGLISH ...

Страница 71: ...Using Windows 10 71 3 Click the New Desktop tile 4 Desktop 1 and Desktop 2 are created ENGLISH ...

Страница 72: ...72 Using Windows 10 5 Select an app in the preview or desktop 6 The screen is toggled to the selected app or desktop ENGLISH ...

Страница 73: ...Using Windows 10 73 TIP Press the button in the app preview to exit the app In the desktop preview press the button to delete the desktop and move running apps to another desktop ENGLISH ...

Страница 74: ...lt key and press the Tab key to view the running apps in the preview Press Tab repeatedly to select the app you wish to switch to and then release the Alt key Alt Ctrl Tab The running apps on the screen are displayed in the preview Select and switch to an app Tab If the desktop toggling screen appears select an app or desktop you wish to switch to ENGLISH ...

Страница 75: ...Windows 10 75 Splitting the App Screen In Windows 10 you can easily adjust window sizes and split windows if necessary TIP Some apps that cannot adjust the window size do not support the screen split ENGLISH ...

Страница 76: ... Windows 10 Full Screen 1 Drag and drop an app to the top end of the screen to change the app to the full screen size 2 Drag and drop the app again to a different location to return to its original size ENGLISH ...

Страница 77: ...Using Windows 10 77 Screen Split intoTwo 1 Drag and drop an app to the right end or left end to reduce the size by half TIP The screen is split according to the guideline ENGLISH ...

Страница 78: ...78 Using Windows 10 2 Select a running app displayed in the preview on the split screen 3 Drag and drop the app again to a different location to return to its original size ENGLISH ...

Страница 79: ...Using Windows 10 79 Screen Split into Four 1 Drag and drop an app to the left corner to reduce the app to 1 4 size of the screen TIP The screen is split according to the guideline ENGLISH ...

Страница 80: ...80 Using Windows 10 2 You can use this method to place up to four apps on the screen 3 Drag and drop the app again to a different location to return to its original size ENGLISH ...

Страница 81: ...instructions on the screen to switch the local account to a Microsoft account You can also do so by selecting Start menu Account Change Account Settings If you switch to a Microsoft account your PC settings background user settings etc may be changed to the previous settings 1 Press the button to move to the Start menu and select the Microsoft Store tile TIP Press the key or Ctrl Esc to display th...

Страница 82: ...82 Using Windows 10 2 Select the app or use the search function on the store screen to install the desired app ENGLISH ...

Страница 83: ...Using Windows 10 83 Switching toTablet Mode If you are using Windows on a tablet PC you can easily switch to the tablet mode 1 Press the Action Center icon on the right side of the taskbar ENGLISH ...

Страница 84: ...84 Using Windows 10 2 Select Tablet Mode to switch Windows to tablet mode 3 Select Tablet Mode again to deactivate the mode ENGLISH ...

Страница 85: ...k screen appears for security purposes and may be unlocked by using the following method 1 From the lock screen press any key on the keyboard or drag up while you click and hold the mouse button 2 When the login window appears enter the password and click Enter If no password is set press the login button to immediately unlock the screen ENGLISH ...

Страница 86: ...ng easily and quickly Using Action Center You can use the Action Center to easily change the settings for tablet mode display media connection and network settings The functions supported by the Action Center may differ depending on the model 1 Press the Action Center icon on the right side of the taskbar ENGLISH ...

Страница 87: ...ngs as needed TIP If the tile does not appear press the Expand menu CAUTION Using the Reader Mode and the Night light at the same time can cause color distortion If color distortion occurs deactivate the Reader Mode or the Night light ENGLISH ...

Страница 88: ...88 Using Windows 10 3 To change the detailed settings of the PC press the All Settings tile ENGLISH ...

Страница 89: ...Using Windows 10 89 Using the Start Menu 1 Press the button and select the Settings menu 2 When the screen for PC s detailed settings appears select and change the settings as needed ENGLISH ...

Страница 90: ...ion by following these steps 1 Click the button and select the Power menu TIP Press the key or Ctrl Esc to display the Start menu 2 Select a Windows shutdown option TIP On the Desktop screen press Alt F4 to use the Windows shutdown option Pressing Alt F4 on a running app may end the app ENGLISH ...

Страница 91: ...rarily disassembling the product may void the warranty If you need to disassemble or replace the battery please visit the designated LG Electronics Service Center We charge a fee for removing or replacing the battery Using an AC Adapter The AC Adapter can be used from 100 V to 240 V 1 Connect the AC adapter to a power outlet 2 Connect the AC adapter to the PC 3 Adjust the LCD to the most comfortab...

Страница 92: ... use an AC adapter follow the below directions 140 F or more high humidity spaces for example inside cars or saunas should be avoided when you use or store it Do not disassemble or modify the AC adapter Do not twist the AC adapter plug When you connect the AC adapter do not forcefully push the plug Checking the Battery State 1 Connect the AC adapter to the power port in the PC ENGLISH ...

Страница 93: ... and check the charging state When the AC adapter lamp is blinking charge it fully with the AC adapter before using it CAUTION Use batteries certified and acknowledged by LG Electronics Inc Uncertified batteries may explode ENGLISH ...

Страница 94: ...se the machine placed on a heating blanket or other heat reserving materials Do not leave the machine turned on inside a closed space Make sure that the power ports are not touched by any metallic objects like a key coin necklace and watch Use only a lithium secondary battery certified and guaranteed by mobile device manufactures Do not disassemble or modify the battery Do not compress or pierce t...

Страница 95: ... of its battery based on usage conditions and then calculates and correctly indicates the actual remaining level of the battery The battery is wearable goods and thus the life span may become shorter with use The battery running time may also become shorter accordingly When the battery is fully charged the machine stops recharging It resumes recharging when the battery charge rate drops below 95 T...

Страница 96: ...attery sufficiently before using it 2 Power lamp a model with fingerprint recognition system On The system is on and running by the AC adapter or battery Off When the system is turned off or in Hibernate mode Blinking The system is in the standby mode 3 Power lamp a model without fingerprint recognition system On The system is on and running by the AC adapter or battery Off When the system is turn...

Страница 97: ... is activated Off When the touchpad is deactivated 6 Reader Mode Lamp On When the Reader Mode is activated Off When the Reader Mode is deactivated 7 Webcam Operation Status Lamp On When the webcam is operating Off When the webcam is not operating ENGLISH ...

Страница 98: ... eleven different levels Fn F3 Increases LCD brightness which can have eleven different levels Fn F4 Runs the mode defined in Windows Sleep Mode Example Standby Mode Hibernate Mode Fn F5 Every time you press Fn F5 the mode switches between Touchpad Off touchpad is disabled and Touchpad On touchpad is enabled To set Touchpad Auto touchpad is disabled when an external USB mouse is inserted press the...

Страница 99: ...Up key Fn Works as the Page Down key Shortcut Keys TIP To change the input mode temporarily you can press the Shift key together with the letter you want to enter By doing so you can enter an uppercase letter when the Caps Lock key is not pressed and a lowercase letter when it is pressed To use Windows more conveniently remember the following Windows key combinations R Displays an input window for...

Страница 100: ...at have the Keyboard Backlight function Configuring Keyboard Backlight TIP You can use hot keys to use the Keyboard Backlight function more conveniently Each time you press the Fn F8 keys the status changes to KBD Backlight Off KBD Backlight Low and then KBD Backlight High in the specified order 1 Select the button LG Software to run LG Control Center 2 On the LG Control Center screen select the S...

Страница 101: ...Using the PC 101 3 Go to Keyboard Backlight and select your desired options ENGLISH ...

Страница 102: ...ss the F2 key to darken the screen or the F3 key to brighten it Press the Action Center icon on the right side of taskbar to run the Action Center Then move the screen brightness bar to adjust the screen brightness Volume Fn F11 F12 Press the F11 key to lower the volume or F12 key to increase the volume Press the icon on the right side of the taskbar to adjust the volume Mute Fn F10 Press the butt...

Страница 103: ...n feature to protect your ears from pressurized sound while using earphones or headphones The feature is set to off by default and can be manually turned on as follows 1 Press the SmartAudio 2 button to execute SMART Audio TIP The feature may take a few minutes if it is the first time ENGLISH ...

Страница 104: ...104 Using the PC 2 The on screen picture turns to a headphone icon when you connect a headphone or earphones ENGLISH ...

Страница 105: ...Using the PC 105 3 Toggle Hearing Protection Feature on and off by pressing the headphone icon Hearing Protection Feature On Hearing Protection Feature Off ENGLISH ...

Страница 106: ...106 Using the PC TIP A warning message will be displayed if the volume is high while this feature is on ENGLISH ...

Страница 107: ...ality as an external mouse You can use the touchpad and USB mouse simultaneously 1 Touchpad Moves the cursor 2 Left button Use to select or execute programs 3 Right button Functions as the right button of a mouse in most cases However the usage may differ depending on programs ENGLISH ...

Страница 108: ...Precautions for Using the Touchpad If you are using a touchpad use the area marked with a red line shown below Touching an edge or border of the touchpad may not work The functioning touch area may differ depending on the product Moving the Cursor Pointer on the Screen Place a finger on the touchpad and glide the finger ENGLISH ...

Страница 109: ... once Do this for example to select a menu or icon and to place the cursor to type on a word processor file Double click Execute Press the left button twice consecutively and release the button Or tap the touchpad twice Do this for example to run a program after selecting its execution file or icon ENGLISH ...

Страница 110: ...rtable position Otherwise it may result in a finger or wrist injury Right button Press and release the right button swiftly Functions as the right button of a mouse but the usage may differ depending on programs Drag Drop To drag click and hold an icon and move it to another location To drop release the dragged icon in the location you want To move a file icon to another folder or to Recycle Bin p...

Страница 111: ...ssing and holding the left button 2 Drop Release the left button to drop it into the Recycle Bin By using this you can drop a file into the Recycle Bin at will ClickLock When activated this feature allows you to drag scroll without pressing and holding the left button ENGLISH ...

Страница 112: ...112 Using the PC 1 Click the button and select the Settings menu TIP Press the key or Ctrl Esc to display the Start menu ENGLISH ...

Страница 113: ...Using the PC 113 2 When the Settings screen appears select Devices 3 Select Mouse Additional Mouse Options ENGLISH ...

Страница 114: ...114 Using the PC 4 When Mouse Properties screen appears select Turn on ClickLock 5 Press Settings to set the time for the ClickLock ENGLISH ...

Страница 115: ... the drag scroll feature 8 Press the left mouse button to turn off the ClickLock Touchpad Gesture The touchpad gesture feature allows you to use Windows programs more easily by utilizing multi touch functions Windows 10 Touchpad Gestures allow you to use the PC more easily The touchpad gesture feature may not be supported in some models ENGLISH ...

Страница 116: ...wo fingers on the touchpad and move up down left right to scroll the screen It operates only on an app or screen which scrolling is available Place two fingers on the touchpad and widen or narrow them to zoom out or in ENGLISH ...

Страница 117: ...ad features or enable disable the gesture feature The figures herein may differ by language selection and are subject to change without prior notice 1 Click the button and select the Settings menu TIP Press the key or Ctrl Esc to display the Start menu ENGLISH ...

Страница 118: ...118 Using the PC 2 When the Settings screen appears select Devices 3 Change the settings as needed on the Touchpad menu ENGLISH ...

Страница 119: ...efore connecting the external monitor to the PC 1 Connect the HDMI cable to the PC and the external device TV monitor that supports HDMI 2 HDMI port transfers both video and audio simultaneously Hence there is no need for a separate audio connection 3 On the PC press Fn F7 to display monitor projector toggling screen Select the desired screen output TIP Everytime P keys are pressed the screen outp...

Страница 120: ...UTION If you do not set Speaker as the default value after disconnecting the HDMI cable the system may not produce any sound If a program was running already you must exit and restart the program to produce sound ENGLISH ...

Страница 121: ...must support this feature To connect to the display device that does not support wireless display you must separately purchase a wireless display connection device Once the wireless display connection is established no additional procedures and searching are necessary the next time you try to connect Connecting to Wireless Display 1 Press the Action Center icon on the right side of the taskbar ENG...

Страница 122: ...122 Using the PC 2 When the Action Center screen appears press the Connect tile TIP If the tile does not appear press the Expand menu 3 Search for wireless display devices in the proximity ENGLISH ...

Страница 123: ...Using the PC 123 4 Once the wireless display device is connected it outputs the PC screen and its sound ENGLISH ...

Страница 124: ...u can use the USB C port to output a screen to an external display TIP The Alternate mode allows you to use the DP DisplayPort and HDMI outputs through the USB C port We support DP DisplayPort interface standards CAUTION You must use a cable that supports Alternate Mode to output a screen to another display If you use USB C accessories cables interface adapters etc that are used for other products...

Страница 125: ... the user manual provided with the device to be connected Connecting two notebook PCs that support Thunderbolt Use Thunderbolt to connect two PCs easily and quickly and send and receive data between them 1 Press the button and select the Settings menu TIP Press the key or Ctrl Esc to display the Start menu 2 Select Network Internet Status Network and Sharing Center Change advanced sharing settings...

Страница 126: ...ge sharing options for different network profiles and save the changes 4 Use the Thunderbolt cable to connect two notebook PCs 5 A while later an icon of the connected computer appears on the desktops of the two notebook PCs ENGLISH ...

Страница 127: ...e click the connected computer icon to open the authentication screen 7 Input the user name and password to connect to the other PC TIP If there is no shared folder in the connected PC nothing may appear on the screen ENGLISH ...

Страница 128: ... A when connected whereas a regular USB device supports general charging at 10 W 5 V 2 A When the remaining battery capacity of the notebook PC falls below 10 both USB PD and regular USB device support charging at 10 W 5 V 2 A only Always On Charging is supported only with USB C ports but not with the regular USB ports If you connect an AC adapter while the notebook PC is being used to charge an e...

Страница 129: ...ted device When the connected device is set to Automatic charging the notebook PC or a connected device Charging the notebook PC by using the mobile phone is not supported When the connected device is set to Source the notebook PC is charged When the connected device is set to Sink the connected device is charged ENGLISH ...

Страница 130: ...130 Using the PC 2 Sink The connected device is used to charge the notebook PC TIP If the connected device is set to Sink the charging function does not work ENGLISH ...

Страница 131: ...et the charging function for a USB C port in LG Control Center beware of the following If you changed the charge setting it is recommended that you remove the USB C cable and re connect it If you restart the system or turn off the power the charge setting is changed to Automatic If the charge setting is set to Sink some of the devices connected to the USB C port may not work properly Always On Cha...

Страница 132: ...Bluetooth enabled PC or smartphone OPTION The Bluetooth device is optional and it may not be available in some models The figures herein may differ by language selection and are subject to change without prior notice For details on connecting a Bluetooth device refer to the user manual that came with the Bluetooth device 1 Click the button and select the Settings menu TIP Press the key or Ctrl Esc...

Страница 133: ...Using the PC 133 2 When the Settings screen appears select Devices ENGLISH ...

Страница 134: ...134 Using the PC 3 Select Bluetooth other devices Add Bluetooth or other device Bluetooth to search for Bluetooth devices ENGLISH ...

Страница 135: ...Using the PC 135 4 Select a device to connect to 5 Complete the Bluetooth connection as directed ENGLISH ...

Страница 136: ... LAN is installed with an automatic IP DHCP as default value Please refer to the following instructions for details on setting up an automatic IP DHCP or manual IP 1 Connect the LAN adapter to the USB C port on the PC TIP The recommended network cable for the optimal network environment is CAT5 or higher The network LAN cable may be connected when the LAN adapter is used ENGLISH ...

Страница 137: ...Using the PC 137 2 Connect the wired LAN cable to the LAN port ENGLISH ...

Страница 138: ...138 Using the PC 3 Press the button and select the Settings menu TIP Press the key or Ctrl Esc to display the Start menu ENGLISH ...

Страница 139: ...Using the PC 139 4 Select Network Internet Status Change adapter options ENGLISH ...

Страница 140: ...140 Using the PC 5 Right click Ethernet and select the Properties menu ENGLISH ...

Страница 141: ...Using the PC 141 6 Select Internet Protocol Version 4 TCP IPv4 and then click Properties ENGLISH ...

Страница 142: ...If you wish to use a static IP select Use the following IP address to enter the address Contact the network service provider or administrator to use a static IP 8 Press OK to complete the network setup 9 Click the Web Browser icon to check whether the Internet is operating normally ENGLISH ...

Страница 143: ... while keep the Airplane Mode turned on to reduce the battery power consumption Using the Wireless LAN If an Access Point wired or wireless router is in the vicinity of the PC the wireless LAN can easily be accessed During the search for a wireless network Wireless LAN various Access Points may be found according to the location where the PC is used In case there are no accessible wireless network...

Страница 144: ...144 Using the PC 2 Press the Network tile to search for a nearby Access Point TIP If Wi Fi is turned off press the Wi Fi tile ENGLISH ...

Страница 145: ...Using the PC 145 3 Select the Access Point you want to connect to and press Connect ENGLISH ...

Страница 146: ...146 Using the PC 4 If a connection is established Connected appears below the Access Point name 5 Click the Web Browser icon to check whether the Internet is operating normally ENGLISH ...

Страница 147: ...connected this may result in a slower connection In case of a wireless LAN it is recommended to change the network name and security settings for a more secure connection Network speed can differ according to operation environment and specifications 1 Connect the internet cable of the modem that was provided by your internet provider to the router s WAN port 2 Connect all devices PC IPTV internet ...

Страница 148: ...s UFS and Micro SD memory cards Directly applicable memory cards Mounting and Using Memory Card This product supports one UFS Micro SD slot Make sure that the insertion direction of the memory card is correct and push it in until the UFS or Micro SD memory card is fully seated ENGLISH ...

Страница 149: ...and select Format When the Format window appears press Start to continue If the write protection tab of memory card is locked the user cannot format the memory stick nor write or delete the data UFS and Micro SD memory cards can be used only as data storage devices and do not support the copyright protection feature Removing Memory Card Push the card with your finger to make the card spring out of...

Страница 150: ...he figures herein may differ by language selection and are subject to change without prior notice 1 Click Safely Remove Hardware and other Media icon on the right side of the taskbar 2 Select Remove Multi Card USB Device to safely remove hardware ENGLISH ...

Страница 151: ...ctions may differ depending on the model Please update the program to the latest version through LG Update Center The figures herein are subject to change without prior notice Running LG Control Center Select the button LG Software to run LG Control Center 1 Minimize Exit Button Minimizes the size of the window or exits the software 2 help info Button Runs Help or displays information about the so...

Страница 152: ...ng Mode You can set the cooling mode to any of the Silent Optimal and Performance modes according to the computer usage environment Silent This mode minimizes the use of the fan when used in a quiet environment CPU performance may reduce and it changes to Optimal Mode on reboot Optimal This mode optimizes Performance heating and noise of the system Performance This mode is suitable for CPU intensi...

Страница 153: ...to use the touchpad 4 Instant Booting You can set the system to automatically boot whenever you open the notebook PC 5 Keyboard Backlight Allows you to configure the Keyboard backlight 6 External Display Allows you to configure the connection mode of an external display connected to the PC 7 Hotkey mode setting Allows you to set the hot keys so that you can use them without pressing the Fn key 8 A...

Страница 154: ... when the PC is turned off Set Charging Function Sets the charging function for a USB C port Automatic Sink or Source 2 Battery State Allows you to measure the battery lifespan so that you can replace it timely 3 Extend Battery Life Allows you to increase the battery lifespan by lowering the battery charging level to 80 of the battery capacity Windows Security Screen You can change the User Accoun...

Страница 155: ...f the Windows firewall It may not work if other vaccine software is installed in the PC FAQ Q Battery status displays Warning The battery is a consumable item and its lifespan may decrease depending on the usage frequency and environment It is recommended that you visit the LG Electronics service center to have the battery replaced ENGLISH ...

Страница 156: ...drivers or reinstall any deleted drivers Use LG Update Center to keep your system current and optimized The figures herein are subject to change without prior notice Running LG Update Center Select the button LG Software to run LG Update Center 1 Minimize Exit Button Minimizes the size of the window or exits the software 2 help info Button Runs Help or displays information about the software 3 Req...

Страница 157: ...ll required items for the system 5 Notification Setting Sets up notifications for online updates for installed items Required Update You can install essential updates and drivers that are necessary for the system 1 Select the Required Update menu ENGLISH ...

Страница 158: ...the Required Update list appears select the updates to install and press the Installation button TIP All items are selected by default All List You can install all updates and drivers that can be installed in the system ENGLISH ...

Страница 159: ...Using Software 159 1 Select the All List Update needed menu item ENGLISH ...

Страница 160: ...TIP All items are selected by default Notification Setting You can check the critical updates to set whether to display the notifications for update installation TIP The Auto Update Search function is set to ON by default If you set it to OFF the notifications are not displayed ENGLISH ...

Страница 161: ...Using Software 161 1 Select the Notification Setting menu 2 Set Auto Update Search to ON or OFF ENGLISH ...

Страница 162: ...n status is not displayed in the program Check if your PC is properly connected to the wired or wireless LAN Check if Internet connection works properly Q I want to hide the update notifications Select the Notification Setting menu and set the Auto Update Search to OFF Select Notification List Setup menu to turn on off the notification for each item Q How can I update the items that are excluded f...

Страница 163: ...e and the Night light at the same time can cause color distortion When you use the Reader Mode turn off the Night light Press the icon to the right of the taskbar to run the Action Center and press the Night light tile to turn on off the Night light TIP You can use hot keys to use the Reader Mode function more conveniently Press the Fn F9 keys to switch the PC screen to reader mode Press them agai...

Страница 164: ...164 Using Software 1 Press the icon on the taskbar ENGLISH ...

Страница 165: ...Using Software 165 2 If you select the Reader Mode On menu item the PC screen switches to Reader Mode TIP Select Reader Mode Off to turn off the reader mode ENGLISH ...

Страница 166: ...ng Advanced Settings 1 Click the icon on the right of the taskbar and select the Advanced Settings menu item TIP The Advanced Settings menu is activated when Reader Mode is on 2 The Advanced Settings windows appears ENGLISH ...

Страница 167: ...g Software 167 1 System Brightness System brightness can be adjusted 2 Color Adjustment Color and its brightness contrast and gamma can be adjusted 3 Reset Settings are reset to the default settings ENGLISH ...

Страница 168: ...a may not be applied depending on the model The figures herein are subject to change without prior notice Running Program DTS X Ultra 1 Press the button to execute DTS X Ultra 2 The default is Internal Speakers Mode and it works in Headphones Mode when the earphone is connected DTS X Ultra Tour 1 Power DTS X Ultra Turns the power on off ENGLISH ...

Страница 169: ...vice Allows you to select the connected earphone headphone Provides headphone mode only 9 Personalized EQ Sets an equalizer optimized for your personal hearing Provides headphone mode only 10 Graphic EQ Sets the equalizer TIP If you want to remove Audio Driver or DTS X Ultra remove DTS X Ultra and Synaptics SmartAudio HD Audio Driver in the order specified and restart the system If you want to rei...

Страница 170: ...p and it can be downloaded again on the Microsoft Store if it is deleted If you want to download the files again connect to the Microsoft Store search for LG Power Manager and install them The figures herein are subject to change without prior notice Using LG Power Manager Click the button to launch LG Power Manager TIP Double click the icon on the right side of the taskbar to start the LG Power M...

Страница 171: ...nt Settings Allows you to set a window theme to Dark Mode or set the notification function for battery status 5 User Hibernate Mode Allows you to create a user mode and configure the detailed settings such as Display Off Time and Duration until Hibernate 6 Battery Use per App Allows you to check the battery use of a running app The actual content may differ depending on the Windows OS version and ...

Страница 172: ...er Manager is set to run automatically when running Windows You can change the Autorun settings by right clicking the icon on the right side of the taskbar and selecting the Run automatically when starting the Windows menu ENGLISH ...

Страница 173: ...cover or restore the system to its initial pre purchase state CAUTION If you have deleted the restoration data in the protected area of the disk or have arbitrarily installed another operating system the restore function may not work To recover the system the AC adapter must be connected 1 Click the button and select the Settings menu ENGLISH ...

Страница 174: ...174 Restoring the System 2 When the Settings screen appears select Update Security 3 Select the Recovery menu and press Get started in the Reset this PC menu ENGLISH ...

Страница 175: ...storing the System 175 4 If the following option screen appears select a desired option to proceed with recovery Keep My Files It removes the apps and their settings without loss of personal files ENGLISH ...

Страница 176: ...176 Restoring the System 1 Select Keep my files ENGLISH ...

Страница 177: ...Restoring the System 177 2 Check the current settings ENGLISH ...

Страница 178: ...178 Restoring the System 3 If you need to change the settings press Change settings and press the Confirm button ENGLISH ...

Страница 179: ...e everythings Removes all items from the system and restores the system to its initial pre purchase state CAUTION All data is lost during the initialization so you must backup all critical data in advance It may take about 5 hours or longer depending on the system conditions ENGLISH ...

Страница 180: ...180 Restoring the System 1 Select Remove everything ENGLISH ...

Страница 181: ...Restoring the System 181 2 Check the current settings ENGLISH ...

Страница 182: ...182 Restoring the System 3 If you need to change the settings press Change settings and press the Confirm button ENGLISH ...

Страница 183: ...Restoring the System 183 4 Press Next to proceed with installation as guided ENGLISH ...

Страница 184: ...rior notice Using LG Update Center to install the Driver 1 Select the button LG Software to run LG Update Center 2 Select Required Update or All List to install the driver TIP You can use the LG Update Center to quickly install the latest drivers or reinstall any deleted drivers Use LG Update Center to keep your system current and optimized ENGLISH ...

Страница 185: ...Setup and Upgrade 185 How to Download LG Update Center You can install LG Update Center by downloading it from the LG Electronics Website www lg com ENGLISH ...

Страница 186: ...to Setting the Password Refer to Changing or Deleting the Password Refer to Restoring the Factory Default Settings TIP To use the system setup F2 booting device selection F10 you need to restart the system click Restart in the system power menu and then immediately press the corresponding function key due to the fast booting speed CAUTION Do not change the system setup unless necessary Incorrect s...

Страница 187: ...Setup and Upgrade 187 1 Reboot the system and press F2 2 In a few moments the system setup screen appears ENGLISH ...

Страница 188: ...unction Enter Selects the current item Esc To deselect the current item or to move to the previous screen Arrow keys Moves the cursor up down left and right Increases or decreases the item value F10 Saves the new settings or exits the system setup ENGLISH ...

Страница 189: ...ithout the registered password access to the system will be denied Write down and keep the password in a safe place Set Supervisor Password The password prevents unauthorized people from accessing the PC By default no password is set for the machine If an unauthorized person changes the password in the System Setup you will be unable to access the system 1 After opening the system setup screen use...

Страница 190: ...uld not exceed 8 characters and should consist of English letters A Z numbers 0 9 and special characters or a combination of them 4 When the Notice screen appears press the Enter key 5 To save the changes in the system setup press F10 6 When the Setup Confirmation screen appears check Yes and press the Enter key The PC will restart ENGLISH ...

Страница 191: ...et User Password The password set by the Set User Password process is lower in level than that set by the Set Supervisor Password process and so the user can use the Set User Password only after setting a password in the Set Supervisor Password menu 1 After opening the system setup screen use the arrow keys to move to Security 2 When the Security item appears press the Enter button in the Set User...

Страница 192: ... not exceed 8 characters and should consist of English letters A Z numbers 0 9 and special characters or a combination of them 4 When the Notice screen appears press the Enter key 5 To save the changes in the system setup press F10 6 When the Setup Confirmation screen appears check Yes and press the Enter key The PC will restart ENGLISH ...

Страница 193: ...n boot Password on boot protects the system by requesting Set Supervisor Password or Set User Password during boot up 1 After opening the system setup screen use the arrow keys to move to Security 2 When the Security item appears set a password for Set Supervisor Password or passwords for both Set Supervisor Password and Set User Password ENGLISH ...

Страница 194: ...u name may be displayed as SSD Password NVMe Password etc For a model equipped with two SSD or NVMe devices the menu name may be displayed as SSD01 SSD02 NVMe 1 NVMe 2 etc For models with two SSD or NVMe devices you can set a password for each device If you set passwords for both the password input window will appear twice during booting The password input windows appear according to the Boot Prio...

Страница 195: ...the arrow keys and press the Enter key 3 When the Set SSD01 Password setting screen appears enter the password and press the Enter key The password should not exceed 8 characters and should consist of English letters A Z numbers 0 9 and special characters or a combination of them ENGLISH ...

Страница 196: ...tem setup press F10 6 When the Setup Confirmation screen appears check Yes and press the Enter key The PC will restart CAUTION If you forgot SSD Password NVMe Password you cannot restore the SSD NVMe The replacement of SSD NVMe due to a forgotten SSD Password NVMe Password is not covered by warranty ENGLISH ...

Страница 197: ...el in the example can differ from actual models and is subject to change for performance improvements without prior notice Changing the Password 1 Execute System Setup enter the password and click Enter 2 Change the password in the same way as setting one Deleting the Password 1 Execute System Setup enter the password and press Enter ENGLISH ...

Страница 198: ...moving Security by using the arrow keys from the setup start screen click Set Supervisor Password and press Enter 3 When the Set Supervisor Password setting screen appears enter the current password in Enter Current Password ENGLISH ...

Страница 199: ...ew Password and Confirm New Password 5 When the Notice screen appears press the Enter key 6 To save the changes in the system setup press F10 7 When the Setup Confirmation screen appears check Yes and press the Enter key The PC will restart ENGLISH ...

Страница 200: ...ter 2 After moving Security by using the arrow keys from the setup start screen click Set SSD01 Password and press Enter TIP Depending on the model the menu name may be displayed as SSD Password NVMe Password etc For a model equipped with two SSD NVMe devices the menu name may be displayed as SSD01 SSD02 NVMe 1 NVMe 2 etc ENGLISH ...

Страница 201: ...d setting screen appears enter the current password in Enter Current Password 4 Press Enter in Enter New Password and Confirm New Password 5 When the Notice screen appears press the Enter key 6 To save the changes in the system setup press F10 ENGLISH ...

Страница 202: ...202 Setup and Upgrade 7 When the Setup Confirmation screen appears check Yes and press the Enter key The PC will restart ENGLISH ...

Страница 203: ...nd is subject to change for performance improvements without prior notice 1 After opening the system setup screen use the arrow keys to move to Exit 2 Click Load Setup Defaults by using the arrow keys and pressing Enter 3 When the Setup Confirmation screen appears check Yes and press the Enter key The settings will be reset to the factory default 4 To save the changes in system setup press F10 ENG...

Страница 204: ...204 Setup and Upgrade 5 When the Setup Confirmation screen appears check Yes and press the Enter key The PC will restart TIP When you press F9 you can use Load Setup Defaults ENGLISH ...

Страница 205: ...t to change for performance improvements without prior notice TIP To use the system setup F2 booting device selection F10 you need to restart the system click Restart in the system power menu and then immediately press the corresponding function key due to the fast booting speed Changing the Boot Order 1 Reboot the system and press F2 2 Move to the Boot menu when the system setup screen appears EN...

Страница 206: ... to Boot Priority Order and press F5 or F6 to change the booting order 4 Press the F10 key and when the Setup Confirmation screen appears select Yes and press the Enter key 5 The changes are saved and the system reboots ENGLISH ...

Страница 207: ...Setup and Upgrade 207 Selecting a Booting Device to Use 1 Reboot the system and press F10 2 When the Select Booting Device screen appears select the device ENGLISH ...

Страница 208: ...208 Setup and Upgrade 3 Boots using the selected device ENGLISH ...

Страница 209: ...for user s convenience may partially blur the screen or display some icons and texts larger Refer to the following information to change the DPI scaling to suit your needs 1 Press the button and select the Settings menu TIP Press the key or Ctrl Esc to display the Start menu ENGLISH ...

Страница 210: ...210 Setup and Upgrade 2 Select System Display ENGLISH ...

Страница 211: ... Upgrade 211 3 Modify the Change the size of text apps and other items value to change the Auto Scaling settings TIP After auto scaling you may need to restart some apps to apply the new scale and layout ENGLISH ...

Страница 212: ...s the system to boot automatically when the notebook PC cover is opened so that you can use the system without pressing the power button 1 Select the button LG Software to run LG Control Center 2 On the LG Control Center screen select the System Settings menu ENGLISH ...

Страница 213: ...up and Upgrade 213 3 Set Instant Booting to ON 4 Shutdown the system and close the notebook PC cover 5 When the cover is opened the notebook PC turns on and the system starts to boot automatically ENGLISH ...

Страница 214: ... system to boot automatically when the notebook PC cover is opened so that you can use the system without pressing the power button 1 Select the button LG Software to run LG Control Center 2 On the LG Control Center screen select the System Settings menu ENGLISH ...

Страница 215: ...FAQ 215 3 Set Instant Booting to ON 4 Shutdown the system and close the notebook PC cover 5 When the cover is opened the notebook PC turns on and the system starts to boot automatically ENGLISH ...

Страница 216: ...r s convenience may partially blur the screen or display some icons and texts larger Refer to the following information to change the DPI scaling to suit your needs 1 Press the button and select the Settings menu TIP Press the key or Ctrl Esc to display the Start menu ENGLISH ...

Страница 217: ...FAQ 217 2 Select System Display ENGLISH ...

Страница 218: ...8 FAQ 3 Modify the Change the size of text apps and other items value to change the Auto Scaling settings TIP After auto scaling you may need to restart some apps to apply the new scale and layout ENGLISH ...

Страница 219: ...e system to its initial pre purchase state CAUTION If you have deleted the restoration data in the protected area of the disk or have arbitrarily installed another operating system the restore function may not work To recover the system the AC adapter must be connected 1 Click the button and select the Settings menu ENGLISH ...

Страница 220: ...220 FAQ 2 When the Settings screen appears select Update Security 3 Select the Recovery menu and press Get started in the Reset this PC menu ENGLISH ...

Страница 221: ...FAQ 221 4 If the following option screen appears select a desired option to proceed with recovery Keep My Files It removes the apps and their settings without loss of personal files ENGLISH ...

Страница 222: ...222 FAQ 1 Select Keep my files ENGLISH ...

Страница 223: ...FAQ 223 2 Check the current settings ENGLISH ...

Страница 224: ...224 FAQ 3 If you need to change the settings press Change settings and press the Confirm button ENGLISH ...

Страница 225: ...hings Removes all items from the system and restores the system to its initial pre purchase state CAUTION All data is lost during the initialization so you must backup all critical data in advance It may take about 5 hours or longer depending on the system conditions ENGLISH ...

Страница 226: ...226 FAQ 1 Select Remove everything ENGLISH ...

Страница 227: ...FAQ 227 2 Check the current settings ENGLISH ...

Страница 228: ...228 FAQ 3 If you need to change the settings press Change settings and press the Confirm button ENGLISH ...

Страница 229: ...FAQ 229 4 Press Next to proceed with installation as guided ENGLISH ...

Страница 230: ...e connecting the external monitor to the PC 1 Connect the HDMI cable to the PC and the external device TV monitor that supports HDMI 2 HDMI port transfers both video and audio simultaneously Hence there is no need for a separate audio connection 3 On the PC press Fn F7 to display monitor projector toggling screen Select the desired screen output TIP Everytime P keys are pressed the screen output o...

Страница 231: ...N If you do not set Speaker as the default value after disconnecting the HDMI cable the system may not produce any sound If a program was running already you must exit and restart the program to produce sound ENGLISH ...

Страница 232: ...cted this may result in a slower connection In case of a wireless LAN it is recommended to change the network name and security settings for a more secure connection Network speed can differ according to operation environment and specifications 1 Connect the internet cable of the modem that was provided by your internet provider to the router s WAN port 2 Connect all devices PC IPTV internet phone...

Страница 233: ...le keep the Airplane Mode turned on to reduce the battery power consumption Using the Wireless LAN If an Access Point wired or wireless router is in the vicinity of the PC the wireless LAN can easily be accessed During the search for a wireless network Wireless LAN various Access Points may be found according to the location where the PC is used In case there are no accessible wireless networks Wi...

Страница 234: ...234 FAQ 2 Press the Network tile to search for a nearby Access Point TIP If Wi Fi is turned off press the Wi Fi tile ENGLISH ...

Страница 235: ...FAQ 235 3 Select the Access Point you want to connect to and press Connect ENGLISH ...

Страница 236: ...236 FAQ 4 If a connection is established Connected appears below the Access Point name 5 Click the Web Browser icon to check whether the Internet is operating normally ENGLISH ...
Отзывы: