background image


IP8830 Broadworks IP Phone 


User 

Guide


 15 

Dec. 

‘08 

08:30

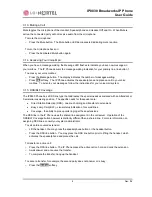
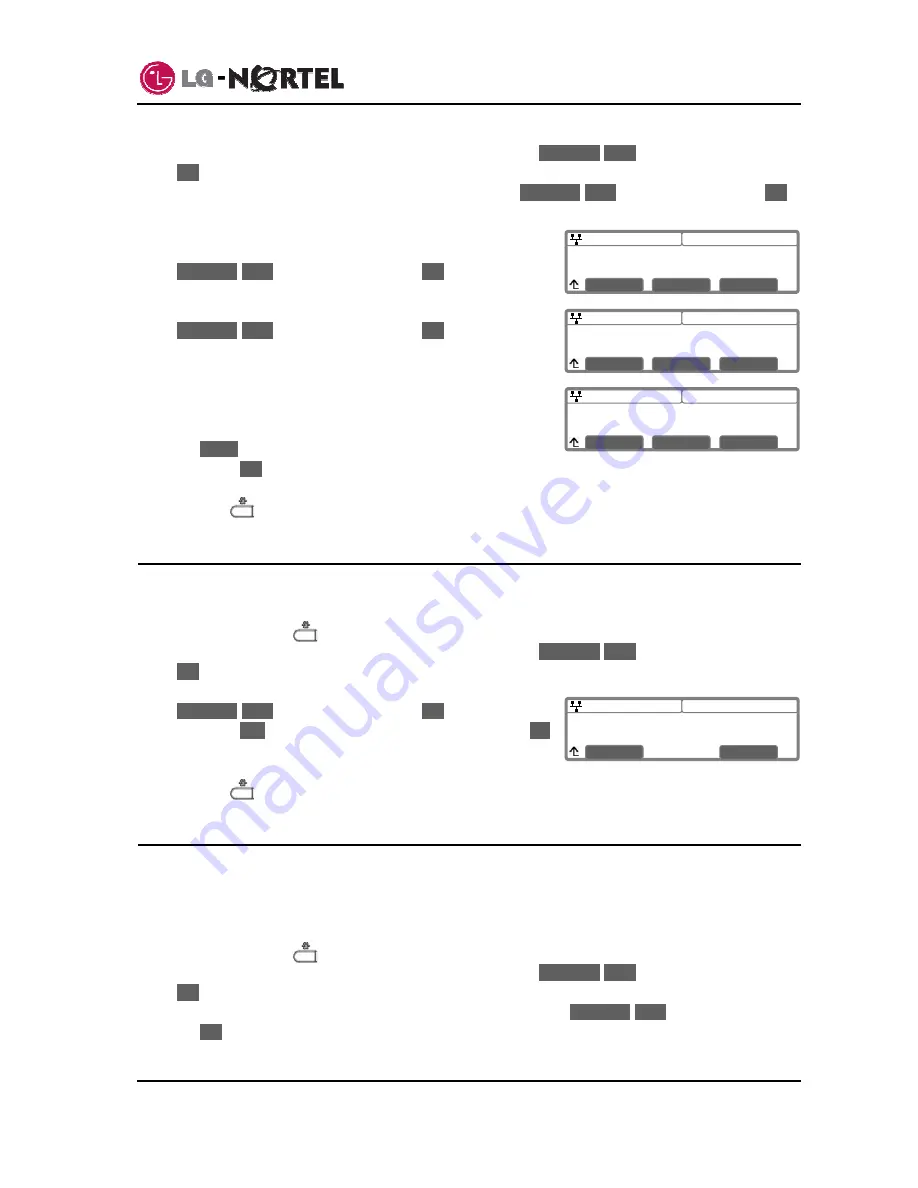
Delayed Ring Timer (1) 

Å

Clear 

OK

08:30 

Ring Setting 
>2.Line 1 Configuration 

Previous 

Next 

OK

08:30

Line 1 Configuration 
>2.Delayed Ring Timer 

Previous 

Next 

OK

08:30

Ringer Off 
Current value is ‘No’.


Yes

No

o

  Dial 3, or move the cursor to 

3.Phone Settings

 using the 

Previous

-

Next

 softkeys and press the 

OK

 softkey. 

o

  Dial 2, or move the cursor to 

2.Ring Setting

 using the 

Previous

-

Next

 softkeys and press the 

OK


softkey. 

o

  Dial the Line number plus one (2 for Line 1, 3 for Line 2, 

etc.), or move the cursor to 

Line 

n Configuration

 using the 

Previous

-

Next

 softkeys and press the 

OK

 softkey. The 

value of 

n

 is the Line button number.  

o

  Dial 2, or move the cursor to 

2.Delayed Ring

 using the 

Previous

-

Next

 softkeys and press the 

OK

 softkey. .  Note 

the line number is shown in parenthesis after “Delayed Ring 

Timer”. 

o

  Using the dial pad enter the desired delay up to 10 seconds 

in one-second increments, zero is no delay.  The 

backspace softkey will delete the previous character and 

the 

Clear

 softkey deletes the entire entry. 

o

 Press 

the 

OK

 softkey to save your entry. 

o

  Move to another parameter with the navigation buttons and continue the session or press the 

Setting (

) button to exit the configuration session. 


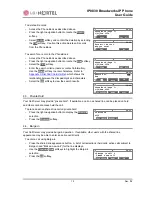
5.3. Ringer 

Off 

The IP Phone can be programmed not to ring when an incoming call is received. 

  To set the Ringer Off parameter: 

o

  Press the Setting (

) button. 

o

  Dial 3, or move the cursor to 

3.Phone Settings

 using the 

Previous

-

Next

 softkeys and press the 

OK

 softkey. 

o

  Dial 3, or move the cursor to 

3.Ringer Off

 using the 

Previous

-

Next

 softkeys and press the 

OK

 softkey. 

o

 Press 

the 

Yes

 softkey to enable Ringer Off, or press the 

No


softkey to disable Ringer Off. 

o

  Move to another parameter with the navigation buttons and continue the session or press the 

Setting (

) button to exit the configuration session. 


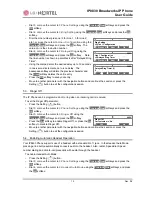
5.4.  Enabling Automatic Headset Operation 

Your IP8830 Phone supports use of a headset with a standard RJ-11 jack.  In the Headset Auto Mode, 

pressing a line button automatically connects audio to the headset.  Also, redial, Speed dial, Speed 

number dialing and click-to-call place calls with audio through the headset. 

  To enable Headset Auto Mode: 

o

  Press the Setting (

) button. 

o

  Dial 3, or move the cursor to 

3.Phone Settings

 using the 

Previous

-

Next

 softkeys and press the 

OK

 softkey. 

o

  Dial 4, or move the cursor to 

4.Headset Auto Mode

 using the 

Previous

-

Next

 softkeys and press 

the 

OK

 softkey. 

Содержание IP8830

Страница 1: ...LGN8830 1002SBUG 01 00 Dec 08 IP8830 IP Phone User Guide for Broadworks Please read this guide carefully before operating your set Retain this guide for future reference ...

Страница 2: ...eiver is connected If problems persist consult the dealer or an experienced radio TV technician for help Canadian Compliance statement This Class B digital apparatus complies with Canadian ICES 003 Cet appareil numérique de la classe B est conforme à la norme NMB 003 du Canada This device complies with Class B limits of Industry Canada Operation is subject to the following two conditions 1 This de...

Страница 3: ...foot traffic or heavy objects Also do not locate cables between the desktop and walls where they may be crushed damaging the insulation Check the cables regularly and if damage is noted disconnect your phone Contact your local representative for a replacement Should liquid spill on the phone disconnect the unit from power and the network Do not use during lightning storms Lightning presents a pote...

Страница 4: ...13 Muting a Call 8 3 14 Accessing Your Voice Mail 8 3 15 DSS BLF Coverage 8 3 16 Hotline Warm Line 9 4 Advanced Services and the IP8830 Phone LCD Menu 10 4 1 Using the Call Logs Menu 10 4 2 Using the Phone Book Menu 10 4 3 Private Hold 12 4 4 Barge in 12 5 Setting Your Preferences 13 5 1 LCD Contrast 13 5 2 Ring Setting 13 5 2 1 Setting the Ring Type 13 5 2 2 Setting Line Ring Type and Delay 14 5 ...

Страница 5: ...luetooth Headset 20 5 10 1 Pairing a Bluetooth headset 21 5 10 2 Connect or Disconnect a Paired Headset 21 5 10 3 Deleting a Headset from the Paired List 22 5 10 4 Bluetooth Module Information 22 5 11 Language Setting 23 Appendix A Dial Pad Character Set 24 Appendix B Time Zones 25 Appendix C IP8830 Icons 26 ...

Страница 6: ...aled feature codes Refer to your system administrator for further information The IP8830 Phone has fixed feature buttons soft feature keys flexible buttons that are configurable and dial pad buttons as shown in the figure below The twenty four 24 flexible buttons access lines and features based on the IP Phone configuration Flexible buttons assigned for line access called line buttons represent a ...

Страница 7: ...green Flexible buttons not assigned for line access may access features such as Speed dial Redial and others Refer to section 5 5 and your system administrator for further information The figure below shows other major components of IP8830 Phone These components include Handset Speaker and microphone Message Wait Indicator Message LED LCD 240 by 56 pixel displays 4 lines Flexible button labels The...

Страница 8: ...tely for connection to power The handset connects to the base with the supplied standard handset coiled cord Use the chart below to make connections to the IP Phone 1 LAN Connect the IP Phone LAN port to the LAN wall jack with the provided LAN cable 2 PC Connect the IP Phone PC port to your desktop PC with an RJ 45 terminated UTP 5 cable 3 Power If the LAN port supports PoE IEEE 802 3af compliant ...

Страница 9: ...for processing To send the digits immediately press the button to indicate dialing is complete and then the IP Phone sends the number to the call server To place a call o Lift the handset You may press the speakerphone button or line button to activate the speakerphone To use a headset press the headset button o Dial the destination number After a short delay the IP Phone sends the number or dial ...

Страница 10: ...ey The active call status changes to hold and you receive dial tone o Dial the number you wish to receive the transfer o Await answer and announce the transfer o Hang up the handset to complete the transfer To cancel a transfer for example the second party does not answer or is busy o Press the EndCall softkey 3 5 Using Blind Call Transfer You can transfer an active call to another extension witho...

Страница 11: ...e IP Phone has a 3 Party Conference feature that lets you converse with two other parties simultaneously To set up a conference o Place first call as normal o Press the Conferen softkey The call status changes to hold and you receive dial tone o Dial the number you want to join the conference o When the party answers press the Join softkey to establish the conference To end your conference and dis...

Страница 12: ...30 Phone incorporates a Phone Book with up to 100 records Refer to section 4 2 for information on use of the Phone Book Each record includes a name contact information and a Speed number 00 to 99 When you dial a Speed number the IP Phone initiates a call to the contact Speed number dialing must be enabled Refer to your system administrator for further information To place a call using a Speed numb...

Страница 13: ...S line type that addresses the special needs associated with an Attendant or Secretarial answering position The specific needs for these users are Direct Station Selection DSS one touch calling and transfers to extensions Busy Lamp Field BLF visual status indication of covered lines Coverage the ability to pick up calls ringing at those extensions The DSS line in the IP Phone uses the shared line ...

Страница 14: ... use remotely Fast blinking red Call appearance ringing for covered line Slow blinking red Remote call hold 3 16 Hotline Warm Line With Hotline Warm Line operation configured the IP Phone automatically calls the defined destination when you take the handset off hook or press the speaker button The call initiates immediately Hotline or after a delay of up to 10 seconds Warm Line The later permits y...

Страница 15: ...her information To access the Call Logs menu o While in an idle state press the Up navigation or Call Log flexible button The Call Log menu displays with several choices missed outgoing and incoming o Use the Previous Next softkeys to select the desired log and press the OK softkey or dial the digit in front of the desired selection o The log will display information on the calls along with the re...

Страница 16: ...he relationship between the dial pad digits and characters To edit a record o Access the Phone Book as described above o Use the Previous Next softkeys to display the desired record or dial the digit preceding the desired record o Press the right navigation button to display the Edit softkey o Select the Edit softkey o Edit the name contact information ring type and speed number for the record sel...

Страница 17: ...key o Enter the search criteria name or contact information Use the Mode softkey to enter characters Refer to Appendix A Dial Pad Character Set which shows the relationship between the dial pad digits and characters o Select the OK softkey to view the search results 4 3 Private Hold Your Call Server may provide private hold If available a call on a shared line can be placed on hold and others cann...

Страница 18: ...ress the OK softkey o Press the Down softkey to decrease the contrast or press the Up softkey to increase the contrast o Move to another parameter with the navigation buttons and continue the session or press the Setting button to exit the configuration session 5 2 Ring Setting Ring settings determine the ring type tone for the phone In addition the ring type for each line can be set with immediat...

Страница 19: ...the type include one of up to fourteen tones Ringer Off or Set to Default see section 5 2 1 Of the fourteen tones five are permanently stored in the memory of the phone and the remaining five must be downloaded before use In addition for each line the ring signal can be immediate or delayed The delay is set in 1 second increments from 0 no delay to 10 seconds To set the ring type for a line o Pres...

Страница 20: ... another parameter with the navigation buttons and continue the session or press the Setting button to exit the configuration session 5 3 Ringer Off The IP Phone can be programmed not to ring when an incoming call is received To set the Ringer Off parameter o Press the Setting button o Dial 3 or move the cursor to 3 Phone Settings using the Previous Next softkeys and press the OK softkey o Dial 3 ...

Страница 21: ...eadset Function Toggles the Headset on and off 6 Redial Function Dials the last number dialed by the user 7 Return Call Function Dials the number of the last answered call 8 Set Call Forwarding Sets the call forwarding configuration 9 Conference Function 1 Initiates a conference call 2 Joins calls in a conference 10 Transfer Function Initiates a call transfer 11 Hold Function Places an active call...

Страница 22: ...ires an SNTP server IP address or name To assign the SNTP server address o Press the Setting button o Dial 3 or move the cursor to 3 Phone Settings using the Previous Next softkeys and press the OK softkey o Dial 6 or move the cursor to 6 Time Configuration using the Previous Next softkeys and press the OK softkey o Dial 1 or move the cursor to 1 SNTP Server Address using the Previous Next softkey...

Страница 23: ...sor to 3 DST Auto Adjustment using the Previous Next softkeys and press the OK softkey o Press the Yes softkey to enable DST Auto Adjustment or press the No softkey to disable DST Auto Adjustment o Move to another parameter with the navigation buttons and continue the session or press the Setting button to exit the configuration session 5 6 4 Time Format The format of the LCD time display can be s...

Страница 24: ... with the navigation buttons and continue the session or press the Setting button to exit the configuration session 5 7 Lock Outgoing Call The IP Phone can be configured to allow outgoing calls only if a password is entered When enabled the LCD screen will display the password request and the lock icon as shown and the password must be entered prior to placing an outgoing call To activate this fea...

Страница 25: ...ble disable the Key Tone o Press the Settings button o Dial 3 or move the cursor to 3 Phone Settings using the Previous Next softkeys and press the OK softkey o Dial 10 or move the cursor to 10 Key Tone using the Previous Next softkeys and press the OK softkey o Press the Yes softkey to enable the Key Tone or press the No softkey to disable the Key Tone o Move to another parameter with the navigat...

Страница 26: ... headsets are already paired with the IP Phone press the right navigation button and select the Add softkey to add another headset o Select a Bluetooth headset from the list of headsets using the Next softkey and select the Pair softkey o When the Enter PIN Code message displays input the PIN associated with the headset and press OK softkey If a valid PIN is entered the headset is automatically ac...

Страница 27: ...dset must be paired with your IP8830 To remove a headset from the Paired list o Press the Settings button o Dial 3 or move the cursor to 3 Phone Settings using the Previous Next softkeys and press the OK softkey o Dial 11 or move the cursor to 11 Bluetooth using the Previous Next softkeys and press the OK softkey o Dial 1 or move the cursor to 1 Headset Management using the Previous Next softkeys ...

Страница 28: ...u number 12 is used when the IP Phone is equipped with a Bluetooth module When a Bluetooth module is not connected the Language menu number is 11 To select an available language o Press the Settings button o Dial 3 or move cursor to 3 Phone Settings using the Previous Next softkeys and press the OK softkey o Dial 12 or move cursor to 12 Language using the Previous Next softkeys and press the OK so...

Страница 29: ...he table below maps each dial pad digit to characters available Three modes are available dial pad digits upper case letters and lower case letters as shown in the table Dial Pad Mode Digit Upper Case A Lower Case a 1 2 A B C a b c 3 D E F d e f 4 G H I g h i 5 J K L j k l 6 M N O m n o 7 P Q R S p q r s 8 T U V t u v 9 W X Y Z w x y z 0 Space Space ...

Страница 30: ...T 03 30 Tehran Iran 44 GMT 04 00 Caracas Venezuela 13 GMT 04 00 Abu Dhabi UAE 45 GMT 04 00 La Paz Bolivia 14 GMT 04 00 Tbilisi Georgia 46 GMT 03 30 New Found land 15 GMT 04 30 Kabul Afghanistan 47 GMT 03 00 Brasilia Brazil 16 GMT 05 00 Islamabad Pakistan 64 GMT 03 00 Buenos Aires Argentina 17 GMT 05 30 New Delhi India 48 GMT 03 00 Georgetown Guyana 18 GMT 06 00 Dhaka Bangladesh 65 GMT 02 00 Inuuk ...

Страница 31: ...dule is installed with no paired headsets When blinking the IP8830 is searching or attempting to pair with a headset Bluetooth paired icon indicates one or more maximum 5 headsets are paired with the module but none are active When blinking the IP8830 is attempting to pair or connect a headset Bluetooth connected icon indicates a headset is connected to IP8830 When blinking rapidly the IP8830 is s...

Страница 32: ...LGN8820 1002SBUG 01 00 Dec 08 ...

Отзывы: