background image

Using the Lift Blocks

Planar UltraRes Series User Manual

21

b

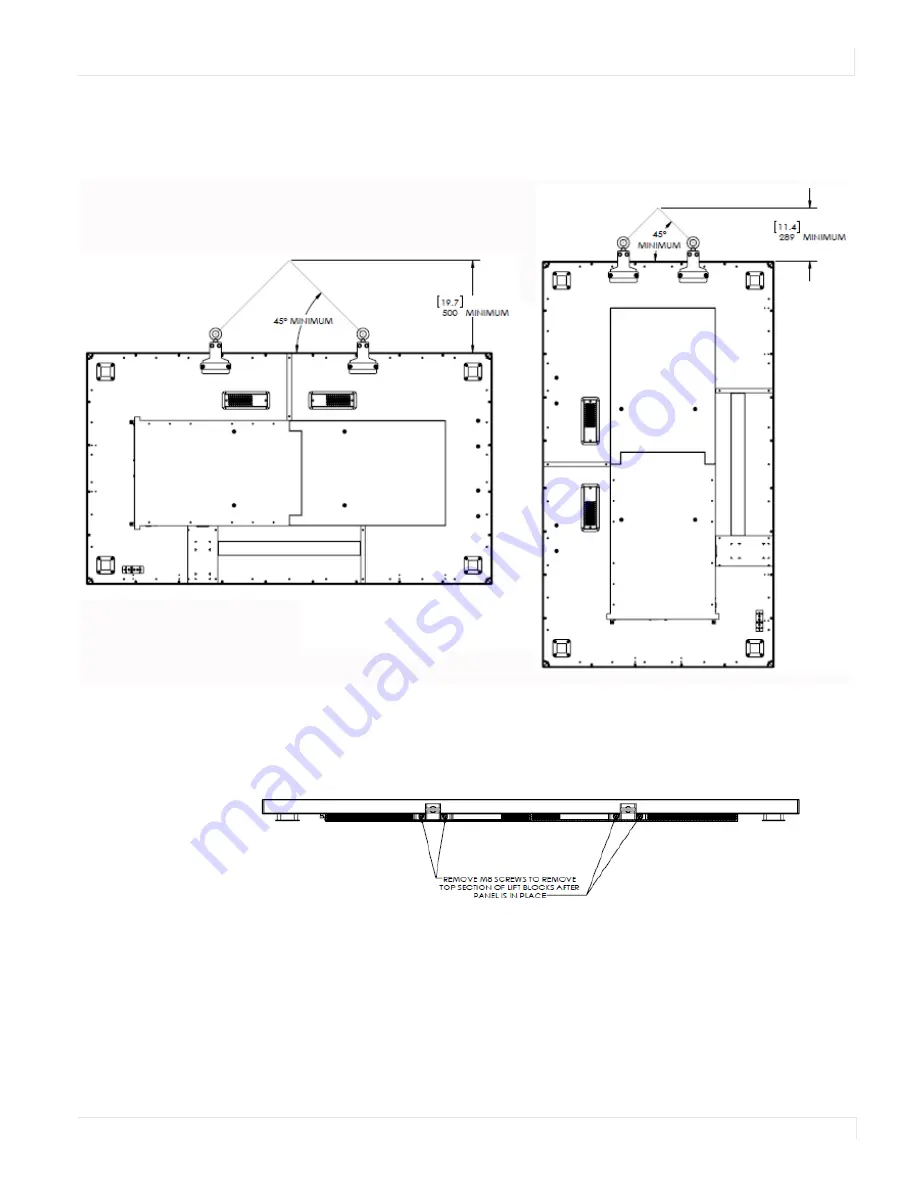
Single point attachment: The angle between the top of the panel and the 
support lines should not be less than 45 degrees.

3

Lift the panel into place.

4

Detach the upper half of the lift block from the lower half by removing the two 
vertical screws. This leaves the bottom half attached to the panel but hidden.

Singe Point Lift: Landscape

Singe Point Lift: Portrait

Содержание Tocuhboards Planar UltraRes Series

Страница 1: ...Planar UltraRes Series User Manual...

Страница 2: ...ors or omissions contained herein or for incidental or consequential damages in connection with the furnishing performance or use of this material Warranty and Service Plans Planar warranty and servic...

Страница 3: ...UltraRes Series Standard Inputs 10 Installing the Displays 11 Installing the Planar Profile Mounting System 12 Installing OPS Expansion Optional 25 Supported Graphics Cards 26 Operating the Display 2...

Страница 4: ...r Installation 62 Touchscreen PQLabs MultiTouch Platform Content 62 Uninstalling the MultiTouch Driver 63 External Control 64 Signal Compatibility 65 Color Subsampling Support 68 Specifications 69 Dim...

Страница 5: ...sign and configuration options required in high profile offices leading control rooms collaboration rooms and digital branding installations Features of the Planar UltraRes Series displays include Bes...

Страница 6: ...dealer for inspection WARNING Wall mounts must be secure If the display is hung on a wall the wall must be strong enough to hold it Simply mounting it to wallboard or wall paneling won t be adequate o...

Страница 7: ...let consult an electrician for the replacement of the obsolete outlet 9 Protect the power cord from being walked on or pinched particularly at plugs convenience receptacles and the point where they ex...

Страница 8: ...extended periods of time 12 hours or longer An electrical charge differential may build up between the electrodes of the liquid crystal which causes a negative color video image color inverted and bri...

Страница 9: ...ek verzamelpunt voor de recyclage van elektrische en elektronische apparatuur Door te garan deren dat u dit product op de correcte manier wegwerpt helpt u potenti le negatieve gevolgen voor het milie...

Страница 10: ...at up to 3000 meters Cooling Requirements For optimal performance active cooling by the installer should be planned for when the ambient temperature anywhere in the wall is predicted to be above the s...

Страница 11: ...g Failure to do so may result in electrical shock or damage Keep the following points in mind when cleaning the surface of the display When the surface of the display becomes dirty wipe the surface li...

Страница 12: ...box 1 LCD mounts optional If ordered this will be inside a separate box inside the LCD box Note If you do not use Planar s mounts you need to ensure the mounts that you purchase can adequately support...

Страница 13: ...B drive Contains the User Manual touch drivers and USB to serial driver 1 USB cable Connects to a PC for touch functionality touch models only and serial commands all models 1 Remote control Used to c...

Страница 14: ...HDCP 2 2 HDMI 2 HDMI 4K 60Hz HDCP 2 2 HDMI 3 HDMI 4K 30Hz HDMI 4 HDMI 4K 30Hz DP OUT DisplayPort Out DP IN DisplayPort In 4K 60 Hz OPS 4K 60Hz Note Only one HDCP 2 2 source can be displayed at a time...

Страница 15: ...isplay must be installed on a flat surface If you ordered the optional wall mounts use the supplied UltraRes mounting template for the center point of the display as well as for top and bottom bracket...

Страница 16: ...urchase the correct hardware needed to support the display mounted to that structure Caution If the unit being installed is fitted with a touch input device it is important that the touch frame is not...

Страница 17: ...o determine the center points of the wall mounts The V notches are labeled Short Center and Long Center Use the Short Center hole for a landscape display and the Long Center hole for a portrait displa...

Страница 18: ...b You may wish to screw the template in place to make the next steps easier Note If you are installing a landscape display and the template is too long you can break the template at the notch below th...

Страница 19: ...e up with the bottom hole you marked on the wall This time use the LONG CENTER for a landscape panel and the SHORT CENTER for a portrait panel Ensure that the template is flat against the wall and lev...

Страница 20: ...top wall mount with the screw hole drilled from the template Note This picture shows mounts for a landscape installation 11 Tighten the screw into the mount 12 Use a level to make sure the mount is l...

Страница 21: ...Res Series User Manual 17 14 Install the bottom mount brackets such that the holes marked earlier line up with the inner bottom hole on the bottom mount bracket Ensure the bottom mounts are level and...

Страница 22: ...ofile Mounting System 18 Planar UltraRes Series User Manual 15 Using three physically capable people carefully hang the back of the display onto the top wall mount bracket using the square brackets on...

Страница 23: ...of the display As an alternative you can use the optional lift blocks along with a lift assist mech anism to lift the panel into place For details refer to Using the Lift Blocks on page 20 16 On the...

Страница 24: ...el using the provided M8 x 35 pan head screws 2 Securely attach your lift mechanism to the eyehooks a Spreader bar attachment A spreader bar allows for a small lift profile and less stress on the pane...

Страница 25: ...of the panel and the support lines should not be less than 45 degrees 3 Lift the panel into place 4 Detach the upper half of the lift block from the lower half by removing the two vertical screws Thi...

Страница 26: ...nd Bracket The kickstand bracket is used for service mode without having to remove the display from the wall Use the following instructions to put the display in service mode 1 Loosen the captive lock...

Страница 27: ...er Manual 23 2 Pull the display out and then swing the kickstands down to hold it in place The kickstands will nest into the bottom mount brackets Make sure to use both kickstands as using only one ca...

Страница 28: ...e length performance may vary between different cables and sources The recommended maximum DisplayPort length is 3m for DisplayPort 1 2 and 5m for DisplayPort 1 1 HDMI cable length is recommended as f...

Страница 29: ...HDBaseT receivers etc To install an OPS device remove the protective cover on the display and slide the device firmly into position When installed the OPS device will be connected internally to the d...

Страница 30: ...program will have application specific 3D settings that must be set up See the specific program s user manual for instructions on application specific 3D setup Note Consult the specific graphics card...

Страница 31: ...isplay 3D content you can skip this section 1 Right click on the desktop and select Catalyst Control Center 2 Select AMD FirePro then select 3D Application Settings 3 Check the Enable Quad Buffer Ster...

Страница 32: ...Program Settings tab 4 In section 1 select the program for which its 3D capabilities will be used If the program is not listed click Add and search for the program s exe file 5 In section 2 use the f...

Страница 33: ...Keypad The OSD keypad is located on the rear of the display OSD Keypad Buttons Key Descriptions Power Power on Power off Menu Left Decrease value Menu Right Increase value Menu Up Increase volume Menu...

Страница 34: ...30 Planar UltraRes Series User Manual Remote Control Receiver The remote control receiver is located near the keypad on the rear of the display Use the IR extender cable for operating the remote from...

Страница 35: ...SD ROTATION Caution Improper ventilation may shorten the life of the display Using the Display in Flat or Tilted Orientation The display is not recommended for use in flat orientation for tabletop flo...

Страница 36: ...Using the Remote Control 32 Planar UltraRes Series User Manual Using the Remote Control Below is a picture of the remote control See the following page for button descriptions and Hex codes...

Страница 37: ...ult address is 1785 0x06F9 binary 00000110 11111001 16 data bits eight 8 bits for the command followed by the logical inverse of the command An end pulse a modulated pulse of 0 56 ms similar to the mo...

Страница 38: ...n 3 4 1785 15 0x06F90FF0 Number button 4 5 1785 16 0x06F910EF Number button 5 6 1785 17 0x06F911EE Number button 6 7 1785 20 0x06F914EB Number button 7 8 1785 25 0x06F919E6 Number button 8 9 1785 27 0...

Страница 39: ...ed by the remote and accepted by the display can be configured This is useful if there are multiple Planar displays and you would like each remote to work only with one of the displays It can also be...

Страница 40: ...switch is set to 3 Press the ON button on the remote or the power button on the keypad Turning the Display Off With the power on press the OFF button on the remote or the power button on the keypad t...

Страница 41: ...urrent zone you can navigate through the on screen menu see page 39 Alternatively you can use the remote or keypad as described next Remote Press the Zone 1 Zone 2 Zone 3 or Zone 4 buttons on the remo...

Страница 42: ...ENU The MAIN menu appears 2 Within the menu use and ENTER to navigate through the menus and adjust options 3 Press PREV on the remote control or MENU on the keypad to return to the previous menu To ex...

Страница 43: ...youts submenu refer to page 40 Note You can only use 4K 60Hz in Single mode Zone 1 Select the source displayed in Zone 1 Options HDMI 1 HDMI 2 HDMI 3 HDMI 4 DP OPS Default HDMI 1 Note If HDMI1 was sel...

Страница 44: ...1 HDMI 2 HDMI 3 HDMI 4 DP OPS Default HDMI 4 Note If HDMI1 was selected as another source OPS cannot be selected If OPS was selected as another source HDMI1 cannot be selected Auto Scan Sources Select...

Страница 45: ...s Series User Manual 41 PIP Select from four PiP Picture in Picture layouts The layout in orange will be the active layout displayed when the Multi Source View is set to PiP PIP Size Select the size o...

Страница 46: ...s menu are saved per input The zone s corresponding input source is shown in the title bar and the graphic beneath that shows which zone is being adjusted in the current Multi Source View mode and Adv...

Страница 47: ...5 Noise Reduction Turn on noise reduction processing Options Off Low Medium High Default Off Diagnostic Color Set the image to monochrome This setting is for use in adjustments to a test pattern and...

Страница 48: ...1 75 1 8 1 85 1 9 1 95 2 0 2 05 2 1 2 15 2 2 2 25 2 3 2 35 2 4 2 45 2 5 2 55 2 6 2 65 2 7 2 75 2 8 Default 2 2 Aspect Ratio Set how the source is treated when the aspect ratio of the input is differen...

Страница 49: ...n the title bar Options Zone 1 Zone 2 Zone 3 Zone 4 Default Zone 1 Note Changing the Audio Select setting via the ZONE 1 4 keys also changes the Current Zone setting Volume Set the volume of the audio...

Страница 50: ...Res Series User Manual Balance Set the audio balance Range 0 100 Default 50 Enable Internal Speakers Disable or enable the built in speakers Options On Off Default On Mute Mute or unmute the audio Opt...

Страница 51: ...ing settings You can save up to 10 presets using this menu more can be saved via the serial command interface If a preset is saved it will appear as Preset 1 Preset 2 and so on If it is not saved it w...

Страница 52: ...d Settings Menu Panel Brightness Submenu Intensity Set the intensity of the LCD backlight Range 0 100 Default 75 Local Dimming Turn on or off the local dimming function if supported by the display Opt...

Страница 53: ...er a reduced power mode if no signal is detected after the specified period of time When in this state the display will turn on when a signal is detected or when any key is pressed on the keypad or IR...

Страница 54: ...address You can use the number keys on the remote to enter this information Subnet Mask The current subnet mask You can use the number keys on the remote to enter this information Default Gateway The...

Страница 55: ...st keypress before the OSD menu automatically closes If set to Off the menu never automatically closes Options Off 10 Seconds 30 Seconds 60 Seconds 120 Seconds 240 Seconds Default 60 Seconds Allow Pop...

Страница 56: ...s Menu 52 Planar UltraRes Series User Manual Schedule Submenu Blank Screen Color Select the color to display when there is no signal in a zone Options Black White Gray Red Green Blue Cyan Magenta Yell...

Страница 57: ...time unless a DNS server is programmed This is done via the DNS Server setting in the Network menu or the serial command interface Set Event 1 Event 20 Event Enabled Turns on the event If disabled th...

Страница 58: ...ogram the EDID information for the selected connector based on the selections in the EDID submenu EDID Type Set the EDID type to determine the base EDID used for the current connector 4K60 selects an...

Страница 59: ...sh Rate Options Disabled Enabled Note This setting should only be enabled by advanced users Pixel Clock The value of the pixel clock in megahertz Range 0 600 00 in 0 01 increments Horizontal Blanking...

Страница 60: ...Height Select the width and height of the tiled wall Default Width 1 Height 1 Unit Column Unit Row Selects the location of the current display within the tiled wall Default Column 1 Row 1 Frame Compe...

Страница 61: ...play behave as indicated on page 31 When disabled the status LEDs are always turned off Options Disable Enable Default Enable MEMC Enable motion estimation motion compensation frame interpolation This...

Страница 62: ...he IR remote code set accepted by the display Options 00000 65535 Default 01785 Factory Reset Return the saved settings in a system to their factory defaults Firmware Update Update the firmware for th...

Страница 63: ...Menu Planar UltraRes Series User Manual 59 Information Menu System Information Submenu This menu displays version information for all programmable parts in the system It also contains the model and se...

Страница 64: ...enu 60 Planar UltraRes Series User Manual Image Information Submenu This menu displays image details for the current zone If more than one zone is available you can change zones by setting the Current...

Страница 65: ...ormation Menu Planar UltraRes Series User Manual 61 Error Log Submenu This menu displays a chronological list of system errors that have occurred For a list of possible errors see Error Codes on page...

Страница 66: ...nality is configurable via the Touch Control setting Touchscreen MultiTouch Driver Installation 1 With the PC on plug in the USB memory stick to the USB port on your PC 2 Locate and open the USB drive...

Страница 67: ...t settings Utility Diagnose Starts the MultiTouchDoctor program This can be used to troubleshoot issues with the touchscreen Options Default settings on options have the following programs enabled Tui...

Страница 68: ...lling the Planar UltraRes display externally Using a serial link to send ASCII commands and to receive responses to those commands The same set of commands can be sent over RS 232 USB TCP or UDP See t...

Страница 69: ...750 x x x VESA CVT 1024x768 60 48 363 65 000 x x x VESA DMT 1024x768 70 56 476 75 000 x x x VESA DMT 1024x768 75 03 60 023 78 750 x x x VESA DMT 1024x768 85 03 68 677 94 500 x x x VESA DMT 1152x864 7...

Страница 70: ...1 F VIC 16 with vertical parameters doubled 2560x1440 59 951 88 787 241 500 x x x VESA CVT R 2560x1600 59 972 98 713 268 500 x x x VESA CVT R 3840x2160 24 52 438 209 750 x x x VESA CVT R 3840x2160 30...

Страница 71: ...48 500 x x x SMPTE 274M CEA 861 F Format 31 1080p 60 67 500 148 500 x x x SMPTE 274M CEA 861 F Format 16 UHDTV 3840x2160 24 54 000 297 000 x x x CEA 861 F Format 93 HDMI 1 4b VIC 1 3840x2160 25 56 250...

Страница 72: ...User Manual Color Subsampling Support Video Timing Input RGB 4 4 4 Supported YUV 4 4 4 Supported YUV 4 2 2 Supported YUV 4 2 0 Supported 4K 50 60 Hz DP x x x 4K 50 60 Hz HDMI 1 2 OPS x x x x 4K 50 60...

Страница 73: ...o local dimming disabled 5000 1 1600 1 1400 1 1300 1 1300 1 Viewing Angle Typ 178 178 178 178 178 Response Time Typ 6ms 5ms 5ms 8ms 5ms Color Gamut 72 NTSC Display Color 1 07 billion 10 bit depth Conn...

Страница 74: ...lbs 11 2 kg Portrait 19 0 8 6 kg Fanless Yes Speakers 10W x 2 built in Usage Recommended Usage All day All day 24x7 24x7 All day Backlight D LED E LED E LED D LED D LED Backlight Life 35 000 hours mi...

Страница 75: ...reflective AR Glass Type 2mm Corning Gorilla Glass 3mm soda lime Touch ERO T models only Touch Technology IR Supporting OS Windows 7 8 10 Vista XP Mac OSX and Linux Item UR7551 UR7551 ERO UR7551 ERO T...

Страница 76: ...Dimensions 72 Planar UltraRes Series User Manual Dimensions UR7551...

Страница 77: ...UR7551 Touch Planar UltraRes Series User Manual 73 UR7551 Touch...

Страница 78: ...UR8451 74 Planar UltraRes Series User Manual UR8451...

Страница 79: ...UR8451 Touch Planar UltraRes Series User Manual 75 UR8451 Touch...

Страница 80: ...Planar UltraRes Series User Manual 76 UR9851...

Страница 81: ...UR9851 Touch Planar UltraRes Series User Manual 77 UR9851 Touch...

Страница 82: ...ent issues you may encounter during the installation process or after your display has been running for some time If you are not able to solve your issue in this section please contact Planar s Techni...

Страница 83: ...sted solution s If you still are not able to resolve your issue please contact Planar s Technical Support Department Symptom Can t Get PC to Output 4K 24 30 60 Hz Solution Make sure that your graphics...

Страница 84: ...cards Solution If using DisplayPort make sure the connector overmold isn t too large Symptom Can t Select OPS or HDMI 1 Solution The OPS and HDMI sources cannot be viewed at the same time If your Mult...

Страница 85: ...roperly Possible Cause The wired IR module may not be fully connected Solution Make sure the IR is fully connected by pressing hard to unsure it is inserted as far as possible Possible Cause The wired...

Страница 86: ...es Series User Manual Accessing Planar s Technical Support Website Visit http www planar com support for the following support documents and resources User Manual RS232 User Manual Touch screen driver...

Страница 87: ...source selecting 37 inputs and view menu 39 installation before you build 11 of display on a wall 12 of LCD 11 OPS expansion slot 25 safety precautions 3 introduction 1 IR codes using 33 IR commands f...

Страница 88: ...tion 2 precautions 2 precautions during use 4 selecting input source 37 service plans ii signal compatibility 65 specifications 69 subsampling color 68 supported timings 65 T temporary image retention...

Отзывы: