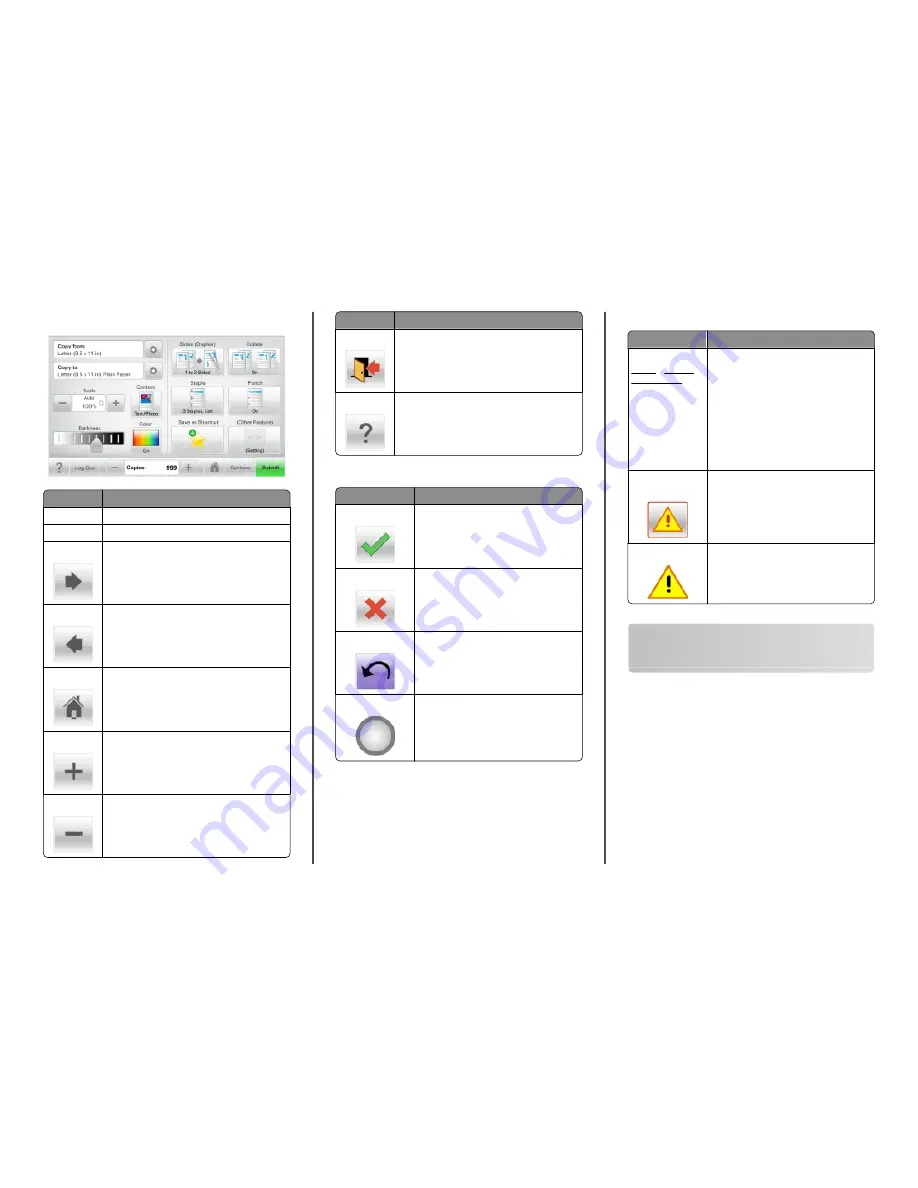
Lexmark XS795dte Скачать руководство пользователя страница 3

Sample touch screen

Touch

To

Submit

Submit changes made in the printer settings.

Sample Copy

Print a sample copy.

Right arrow

Scroll to the right.

Left arrow

Scroll to the left.

Home

Return to the home screen.

Right increase Select a higher value.

Left decrease Select a lower value.

Touch

To

Exit

Exit from the current screen.

Tips

Open a context-sensitive Help dialog on the touch 

screen.

Other touch-screen buttons

Touch

To

Accept

Save a setting.

Cancel

Cancel an action or a selection.

Exit a screen and lets you return to the 

previous screen without saving changes.

Reset

Reset values on the screen.

Radio button

Select or clear an item.

Features

Feature

Description

Menu trail line:
Menus > Settings > 

Copy Settings > 

Number of Copies

A menu trail line is located at the top of each 

menu screen. This feature shows the path 

taken to arrive at the current menu.
Touch any of the underlined words to return 

to that menu.
Number of Copies is not underlined since this 

is the current screen. If you touch an 

underlined word on the Number of Copies 

screen before the Number of Copies is set 

and saved, then the selection is not saved, 

and it does not become the default setting.

Attendance 

message alert

If an attendance message affects a function, 

then this icon appears and the red indicator 

light blinks.

Warning

If an error condition occurs, then this icon 

appears.

Setting up and using the home 

screen applications

Finding the IP address of the printer

Note: Make sure your printer is connected to a network or to a 

print server.
You can find the printer IP address:

From the top left corner of the printer home screen.

From the TCP/IP section in the Network/Ports menu.

By printing a network setup page or menu settings page, and 

then finding the TCP/IP section.

Note: An IP address appears as four sets of numbers separated 

by periods, such as 123.123.123.123.

Setting up and using the home screen applications

3

Содержание XS795dte

Страница 1: ...utton is blinking amber in pulsing pattern 4 Keypad Lets you enter numbers letters or symbols on the display 5 Submit Lets you submit changes made in the printer settings 6 Stop Cancel Stops all print...

Страница 2: ...or held or confidential print jobs Job names for held jobs excluding confidential print jobs Profile names Bookmark container or print job names USB container or print job names for supported file typ...

Страница 3: ...menu Touch any of the underlined words to return to that menu Number of Copies is not underlined since this is the current screen If you touch an underlined word on the Number of Copies screen before...

Страница 4: ...n that came with your operating system 1 Open a Web browser and then type the printer IP address in the address field Note View the printer IP address on the printer control panel home screen The IP a...

Страница 5: ...r click Applications Remote Operator Panel Launch VNC Applet Exporting and importing a configuration using the Embedded Web Server You can export configuration settings into a text file that can then...

Страница 6: ...re loading 3 Squeeze and then slide the length guide to the correct position for the paper size you are loading Note The length guide has a locking device To unlock push the button on top of the lengt...

Страница 7: ...of equipment instability load each paper drawer or tray separately Keep all other drawers or trays closed until needed 1 Pull the tray out 2 Adjust the width guide as necessary 3 Flex the sheets back...

Страница 8: ...ccepts paper or specialty media within the following dimensions Width 89 mm 3 5 in to 229 mm 9 02 in Length 127 mm 5 in to 1270 mm 50 in Note Maximum width and length can be applied only to short edge...

Страница 9: ...ys using other paper sizes can be linked manually using the Paper Size menu available from the Paper Size Type menu Note To link the multipurpose feeder Configure MP must be set to Cassette in the Pap...

Страница 10: ...File Print If necessary click the disclosure triangle to see more options 2 From the Print dialog and pop up menus adjust the settings as needed Note To print on a specific paper type adjust the pape...

Страница 11: ...From the printer control panel touch Cancel Job or press on the keypad 2 Touch the print job you want to cancel and then touch Delete Selected Jobs Note If you press on the keypad then touch Resume to...

Страница 12: ...the IP address in the TCP IP section 2 Click Settings 3 Under Default Settings click E mail FTP Settings 4 Click E mail Settings Setup E mail Server 5 Fill in the fields with the appropriate informat...

Страница 13: ...Cancel Job while Scanning appears When using the scanner glass touch Cancel Job while Scanning appears or while Scan the Next Page Finish the Job appears Faxing Sending a fax Sending a fax using the...

Страница 14: ...ument faceup short edge first into the ADF or facedown on the scanner glass Note Do not load postcards photos small items transparencies photo paper or thin media such as magazine clippings into the A...

Страница 15: ...aper guides 3 Insert the flash drive into the USB port on the front of the printer The USB Drive home screen appears 4 Select the destination folder and then touch Scan to USB drive 5 Adjust the scan...

Страница 16: ...he side door of the printer CAUTION HOT SURFACE The inside of the printer might be hot To reduce the risk of injury from a hot component allow the surface to cool before touching 2 Slide the latch to...

Страница 17: ...ides 4 From the printer control panel touch Continue jam cleared 280 289 paper jams 1 Remove all original documents from the ADF 2 Open the ADF cover 3 Grasp the jammed paper on each side and then gen...

Страница 18: ...fragments are removed 3 Close the finisher door 4 Slide the finisher back until it clicks in place 5 From the printer control panel touch Continue jam cleared 455 staple jam 1 Press the latch to open...

Страница 19: ...staple cartridge holder firmly back into the stapler unit until the staple cartridge holder clicks into place 7 Close the stapler door 8 From the printer control panel touch Continue jam cleared Clear...

Отзывы: