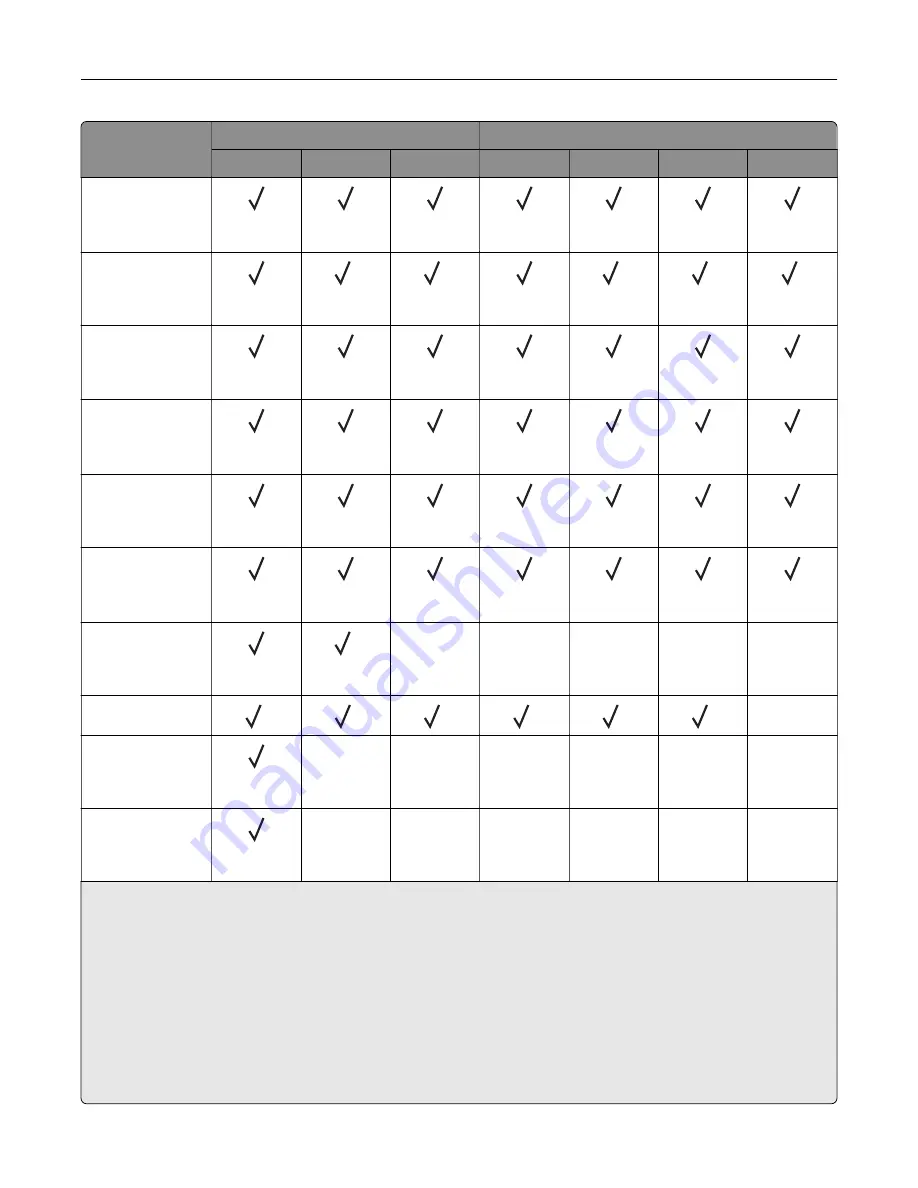
Paper size
Staple finisher
Staple, hole punch finisher
Stack
Offset
Staple
Stack
Offset
Staple
Hole punch
JIS B4
1
257 x 364 mm
(10.12 x 14.33 in.)
JIS B5
182 x 257 mm
(7.17 x 10.1 in.)
2
2
2
2
7
Ledger
1
279.4 x 4431.8 mm
(11 x 17 in.)
Legal
1
215.9 x 355.6 mm
(8.5 x 14 in.)
Letter
215.9 x 279.4 mm
(8.5 x 11 in.)
Oficio (Mexico)
1
215.9 x 340.4 mm
(8.5 x 13.4 in.)
Statement
139.7 x 215.9 mm
(5.5 x 8.5 in.)
2
X
X
X
X
X
Universal
3
4
5
8
9
9
X
7 3/4 Envelope
98.4 x 190.5 mm
(3.875 x 7.5 in.)
X
X
X
X
X
X
9 Envelope
98.4 x 225.4 mm
(3.875 x 8.9 in.)
X
X
X
X
X
X
1
Loads only in short
‑
edge orientation.
2
Loads only in long
‑
edge orientation.
3
Supports paper sizes ranging from 88.9 x 98.38 mm (3.5 x 3.87 in.) to 296.93 x 431.8 mm (11.69 x 17 in.).
4
Supports paper sizes ranging from 190 x 139.7 mm (7.48 x 5.5 in.) to 296.93 x 431.8 mm (11.69 x 17 in.).
5
Supports paper sizes ranging from 202.9 x 182.03 mm (7.99 x 7.17 in.) to 296.93 x 431.8 mm (11.69 x 17 in.).
6
Supports only up to 2
‑
hole punching.
7
Supports only up to 2
‑
hole punching when loaded in short
‑
edge orientation.
8
Supports paper sizes ranging from 88.9 x 98.38 mm (3.5 x 3.87 in.) to 320.04 x 1320.8 mm (12.6 x 52 in.).
9
Supports paper sizes ranging from 209.97 x 148 mm (8.27 x 5.83 in.) to 296.93 x 431.8 mm (11.69 x 17 in.).
Learn about the printer
24
Содержание XC9325
Страница 63: ...2 Adjust the guide at the back of the tray Do the same at the front of the tray Set up install and configure 63 ...
Страница 77: ...2 Unpack the envelope tray and then remove all the packing material Set up install and configure 77 ...
Страница 86: ...Set up install and configure 86 ...
Страница 87: ...6 Remove the standard tray Set up install and configure 87 ...
Страница 89: ...10 Connect the tray connector to the printer and then attach the cover Set up install and configure 89 ...
Страница 90: ...11 Secure the rear part of the optional tray to the printer Set up install and configure 90 ...
Страница 94: ...Set up install and configure 94 ...
Страница 95: ...6 Remove the standard tray Set up install and configure 95 ...
Страница 97: ...10 Connect the tray connector to the printer and then attach the cover Set up install and configure 97 ...
Страница 98: ...11 Secure the rear part of the optional tray to the printer Set up install and configure 98 ...
Страница 102: ...Set up install and configure 102 ...
Страница 103: ...6 Remove the standard tray Set up install and configure 103 ...
Страница 105: ...10 Connect the tray connector to the printer and then attach the cover Set up install and configure 105 ...
Страница 106: ...11 Secure the rear part of the optional tray to the printer Set up install and configure 106 ...
Страница 110: ...6 Install the optional tray Set up install and configure 110 ...
Страница 111: ...7 Connect the tray connector to the printer Set up install and configure 111 ...
Страница 115: ...4 Remove the hard disk cover 5 Remove the controller board shield Set up install and configure 115 ...
Страница 117: ...9 Attach the hard disk cover 10 Connect the fax connector cable to the controller board Set up install and configure 117 ...
Страница 121: ...4 Remove the hard disk cover 5 Remove the controller board shield Set up install and configure 121 ...
Страница 125: ...Installing the working shelf 1 Turn off the printer Set up install and configure 125 ...
Страница 130: ...4 Open the front door and then remove the blue knob Note Do not throw away the knob Set up install and configure 130 ...
Страница 134: ...Set up install and configure 134 ...
Страница 139: ...8 Open the front door and then remove the blue knob Note Do not throw away the knob Set up install and configure 139 ...
Страница 140: ...9 Remove the standard bin side cover Note Do not throw away the bin side cover Set up install and configure 140 ...
Страница 142: ...12 Close the front door 13 Attach the finisher to the printer Set up install and configure 142 ...
Страница 145: ...17 Connect the paper transport cable to the rear of the finisher Set up install and configure 145 ...
Страница 270: ...10 Insert the waste toner bottle until it clicks into place Maintain the printer 270 ...
Страница 274: ...7 Insert the new waste toner bottle until it clicks into place Maintain the printer 274 ...
Страница 278: ...Maintain the printer 278 ...
Страница 282: ...11 Insert the waste toner bottle until it clicks into place Maintain the printer 282 ...
Страница 283: ...12 Lock the waste toner bottle 13 Close the door Maintain the printer 283 ...
Страница 285: ...3 Insert the new tray insert Maintain the printer 285 ...
Страница 287: ...3 Unlock the used fuser Maintain the printer 287 ...
Страница 288: ...4 Remove the used fuser 5 Unpack the new fuser 6 Insert the new fuser Maintain the printer 288 ...
Страница 289: ...7 Lock the new fuser 8 Close the door 9 Turn on the printer Maintain the printer 289 ...
Страница 291: ...3 Remove the used transfer roller 4 Unpack the new transfer roller Maintain the printer 291 ...
Страница 293: ...Replacing the transfer module 1 Turn off the printer Maintain the printer 293 ...
Страница 296: ...5 Unlock and then pull out the used transfer module Maintain the printer 296 ...
Страница 299: ...10 Insert the waste toner bottle until it clicks into place Maintain the printer 299 ...
Страница 300: ...11 Lock the waste toner bottle 12 Turn on the printer Maintain the printer 300 ...
Страница 301: ...Replacing the tray roller kit 1 Turn off the printer Maintain the printer 301 ...
Страница 303: ...4 Unpack the new tray roller kit Maintain the printer 303 ...
Страница 305: ...Replacing the ADF roller kit 1 Turn off the printer 2 Open the ADF top cover Maintain the printer 305 ...
Страница 306: ...s 3 Remove the separator roller cover Maintain the printer 306 ...
Страница 311: ...4 Insert the new printhead wiper 5 Close the door Maintain the printer 311 ...
Страница 312: ...Replacing the 2000 sheet tray roller kit 1 Turn off the printer Maintain the printer 312 ...
Страница 313: ...2 Slide the tray to the left 3 Open door J and then open the roller kit cover Maintain the printer 313 ...
Страница 314: ...4 Locate and remove the used roller kit 5 Unpack the new roller kit Maintain the printer 314 ...
Страница 328: ... ADF glass Scanner glass 3 Close the scanner cover Maintain the printer 328 ...
Страница 329: ...Cleaning the tray roller kit 1 Turn off the printer Maintain the printer 329 ...
Страница 331: ...4 Apply water to a soft lint free cloth and then wipe the feed rollers Maintain the printer 331 ...
Страница 332: ...5 Insert the roller kit until it clicks into place 6 Insert the tray 7 Turn on the printer Maintain the printer 332 ...
Страница 333: ...Cleaning the ADF roller kit 1 Turn off the printer Maintain the printer 333 ...
Страница 334: ...2 Open the ADF top cover 3 Remove the separator roller cover Maintain the printer 334 ...
Страница 338: ...Cleaning the 2000 sheet tray roller kit 1 Turn off the printer Maintain the printer 338 ...
Страница 339: ...2 Slide the tray to the left 3 Open door J and then open the roller kit cover Maintain the printer 339 ...
Страница 379: ...Troubleshoot a problem 379 ...


