background image

4-68

  Service Manual

7541-03x

Paper feed unit removal

1.

Remove the HVPS. See 

“HVPS removal” on page 4-111

.

2.

Remove the complete duplex unit. See 

“Duplex removal” on page 4-63

.

3.

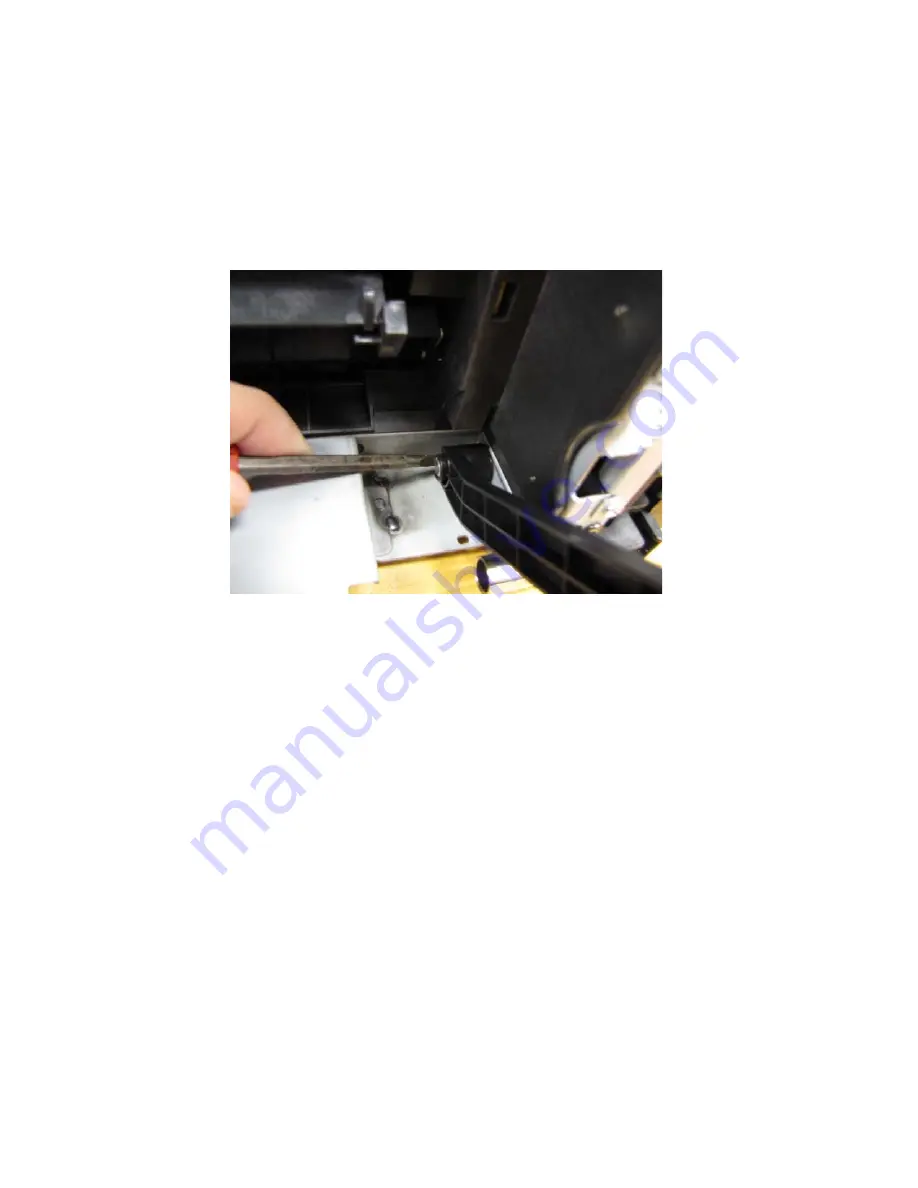
Using a flatblade screwdriver, gently push the tab securing the link arm to the link arm stay back, and 
remove the right link arm.

Note:  

Use care when pushing the tab back. It can easily break if pushed too far.

4.

Disconnect the registration clutch harness from connector CN20 on the printhead controller board.

5.

Disconnect the pick roll, separator roll, and feed roll clutch cables from connector CN8 on the MDCONT 
(engine) board.

6.

Disconnect the paperfeed unit sensors cable from CN12 on the engine board.

7.

Disconnect the paper feed unit motor harness from connect or CN16 on the MDCONT (Engine) board.

Содержание X925

Страница 1: ... contents Start diagnostics Safety and notices Trademarks Index Lexmark and Lexmark with diamond design are trademarks of Lexmark International Inc registered in the United States and or other countries Revision date August 25 2011 ...

Страница 2: ...ferences in this publication to products programs or services do not imply that the manufacturer intends to make these available in all countries in which it operates Any reference to a product program or service is not intended to state or imply that only that product program or service may be used Any functionally equivalent product program or service that does not infringe any existing intellec...

Страница 3: ...s 1 7 Media weights 1 8 Media guidelines 1 9 Paper 1 9 Paper characteristics 1 9 Unacceptable paper 1 10 Selecting paper 1 10 Scan fax and copy specifications 1 11 General specifications 1 11 Fax features 1 12 Scanner specifications 1 13 MFP scan speed 1 14 Tools required for service 1 15 Acronyms 1 16 Diagnostic information 2 1 Start 2 1 Flatbed ICC card NVRAM 2 2 Initial check 2 2 POR Power On R...

Страница 4: ...jam Scan sensor jam 2 30 283 05 Scan sensor jam 2 31 285 05 Scanner ADF eject jam 2 32 290 11 Scanner ADF cover open jam 2 33 291 06 Flatbed cover open 2 35 292 01 Scanner carriage locked 2 35 ADF paper jam service check 2 36 Error codes 2 38 149 01 Abnormal exit motor 2 38 941 05 Abnormal EEPROM 2 39 950 xx Service NCVRAM Mismatch 2 39 952 xx Service NV Failure 2 39 953 xx Service NVRAM Failure 2...

Страница 5: ...3 Failed indirect register test 2 57 841 04 Failed external DRAM test 2 57 841 05 Image pipe time out 2 57 841 06 Scanner did not initiate scan 2 58 842 00 No response 842 01 HW protocol 842 02 Logical protocol 2 58 843 00 Carriage Home 2 59 844 00 Lamp failure Front side 2 59 849 01 Device had modem installed but config ID indicates it should not 2 59 849 10 Device had HD installed but config ID ...

Страница 6: ...belt up down check 2 93 Unable to print from USB thumb drive service check 2 94 Waste toner bottle missing service check 2 94 Wrong paper size service check tray1 2 95 Wrong paper size service check tray2 2 95 Paper in ADF size service check 2 96 Diagnostic aids 3 1 Understanding the operator panel and menus 3 1 Operator panel need new art 3 1 Understanding the home screen 3 2 Using the touch scre...

Страница 7: ...omatically Display Error Screens 3 17 Exit Config Menu 3 17 Diagnostics mode 3 18 Entering Diagnostics mode 3 18 Diagnostic mode menus 3 18 SCANNER CALIBRATION 3 20 Adjust Calibration Values 3 20 Reset Calibration Values 3 20 PRINT TESTS 3 20 Print Tests input sources 3 20 Print Quality Pages 3 21 HARDWARE TESTS 3 21 Panel Test 3 21 Button Test 3 21 DRAM Test 3 21 Serial Wrap Test 3 22 USB HS Test...

Страница 8: ...tScript or PCL emulation What settings produce the best color 3 47 Why doesn t the printed color match the color I see on the computer screen 3 47 The printed page appears tinted Can I adjust the color 3 47 My color transparencies seem dark when they are projected Is there anything I can do to improve the color 3 48 What is manual color correction 3 48 How can I match a particular color such as a ...

Страница 9: ...al 4 56 Density sensor removal 4 57 Main switch 4 58 Scanner power supply removal 4 58 Right side removals 4 61 Fuser removal 4 61 Handle cover removal 4 62 Duplex removal 4 63 Paper feed unit removal 4 68 Transfer Roll CRU 4 72 Rear removals 4 73 RIP board removal 4 73 Crossbar removal not a FRU 4 74 Engine board and mount removal not a FRU 4 75 Drive unit cover not a FRU 4 77 Drive unit 4 79 Dri...

Страница 10: ...sor actuator 4 145 Paper path sensor 4 146 Scan sensor 4 146 Scan sensor actuator 4 148 Scan sensor cover not a fru 4 149 Duplex timing sensor 4 152 Duplex out scan out sensor 4 157 Duplex out sensor actuator 4 158 Flatbed cover closed sensor 4 159 Flatbed upper cover 4 161 Outer ADF top cover 4 163 Inner ADF top cover 4 164 ADF relay card cover 4 167 Left ADF cover 4 167 Right ADF cover 4 170 Dup...

Страница 11: ...05 Calibrating the scanner 4 205 Calibrating the scanner black levels 4 205 Adjusting ADF magnification 4 206 Adjusting scanner registration 4 206 Locations 5 1 Locations 5 1 Print engine cross section 5 1 Flatbed ADF sensors 5 3 ADF 5 3 Flatbed Sensors 5 3 Rip Board connectors 5 4 Scanner secondary power supply 5 25 Scanner ICC board connectors 5 26 ADF relay card connectors 5 31 UICC connectors ...

Страница 12: ...Assembly 15 Upper assembly 7 30 Assembly 16 Printhead controller board cables 7 32 Assembly 17 Paper trays 7 34 Assembly 18 Fuser 7 36 Assembly 19 550 sheet option feeder covers 7 38 Assembly 20 550 sheet option feeder base 7 40 Assembly 21 550 sheet option feeder paper feed 7 42 Assembly 22 550 sheet option feeder tray 7 44 Assembly 23 Maintenance kits power cords and options 7 46 Index I 1 Part ...

Страница 13: ...Notices and safety information xiii 7541 03x Notices and safety information This device is an LED based printer ...

Страница 14: ...xiv Service Manual 7541 03x ...

Страница 15: ...ignes d entretien et de réparation de ce produit s adressent uniquement à un personnel de maintenance qualifié Le démontage et l entretien de ce produit pouvant présenter certains risques électriques le personnel d entretien qualifié devra prendre toutes les précautions nécessaires ATTENTION Ce symbole indique la présence d une tension dangereuse dans la partie du produit sur laquelle vous travail...

Страница 16: ...re el mantenimiento de este producto está dirigida exclusivamente al personal cualificado de mantenimiento Existe mayor riesgo de descarga eléctrica y de daños personales durante el desmontaje y la reparación de la máquina El personal cualificado debe ser consciente de este peligro y tomar las precauciones necesarias PRECAUCIÓN este símbolo indica que el voltaje de la parte del equipo con la que e...

Страница 17: ...producte està orientada exclusivament a professionals i no està destinada a ningú que no ho sigui El risc de xoc elèctric i de danys personals pot augmentar durant el procés de desmuntatge i de servei d aquest producte El personal professional ha d estar ne assabentat i prendre les mesures convenients PRECAUCIÓ aquest símbol indica que el voltatge de la part de l equip amb la qual esteu treballant...

Страница 18: ...o identify the connector locations and test points on the printer 6 Preventive maintenance contains the lubrication specifications and recommendations to prevent problems 7 Parts catalog contains illustrations and part numbers for individual FRUs Appendix A contains service tips and information Appendix B contains representative print samples Conventions Note A note provides additional information...

Страница 19: ...s The printer also has flexible paper handling It supports a wide variety of paper sizes and has a standard multipurpose feeder that makes it easy to print on envelopes transparencies labels card stock and non standard size paper You can add optional inputs to the base printer which can increase the printer paper capacity to 2100 sheets Maintenance approach The diagnostic information in chapter tw...

Страница 20: ...orts up to three 550 sheet trays CAUTION TIPPING HAZARD Floor mounted configurations require additional furniture for stability You must use either a printer stand or printer base if you are using a high capacity input tray a duplex unit and an input option or more than one input option If you purchased a multifunction printer MFP that scans copies and faxes you may need additional furniture For m...

Страница 21: ...options are not available in every country or region Available internal options Memory cards Printer memory Flash memory Fonts Firmware cards Bar Code PrintCryptionTM Printer hard disk LexmarkTM Internal Solutions Ports ISP RS 232 C Serial ISP Parallel 1284 B ISP MarkNetTM N8250 802 11 b g n Wireless ISP MarkNet N8130 10 100 Fiber ISP MarkNet N8120 10 100 1000 Ethernet ISP Media handling options 5...

Страница 22: ...0 hertz Hz nominal 90 to 137 V ac extreme High voltage models 220 to 240 V ac at 50 to 60 hertz Hz nominal not available in all countries and regions Clearances Printing states Power Off 0W Sleep Mode 11W Hibernate Mode 3W Ready Mode 105W Continuous printing 620W 1 Right 385 mm 15 16 in 2 Front 609 6 mm 24 in 3 Left 100 mm 3 94 in 4 Rear 100 mm 3 94 in 5 Top 285 mm 11 22 in Allow additional cleara...

Страница 23: ... 2300 meters Atmospheric pressure 74 6 kPa Ambient operating environment Temperature 15 6 to 32 20 C 60 to 900 F Relative humidity 8 to 80 Storage and shipping packaged printer with or without print cartridge Temperature 40 to 110 F 40 to 43 3 C In some cases performance specifications such as paper OCF EP cartridge usage are measured at an ambient condition Status 1 meter average sound pressure d...

Страница 24: ... Label is selected print speed is 35ppm Note When using custom size media it is critical that the user define the actual width via the Paper Menu Universal Setup on the op panel for best reliability Processor 1 GHZ IBM Power PC processor Memory Standard memory 512 mb Optional memory 256 512 and 1024 MB 1 200 pin x 64 DDR 2 SO DIMMs 1 slot Optional flash 256 mb Paper specifications Paper sizes supp...

Страница 25: ...0 5 in Oficio 216 x340 mm 8 5 x 13 4 in Folio 216 x 330 mm 8 5 x 13 in Statement1 140 x 216 mm 5 5 x8 5 in Tabloid Universal Plain Paper 64 to 297mm x 148 to 432mm Banner 210 to 297mm x 433 to 12129mm 140 x 210 mm 5 5 x 8 3 in up to 216 x 356 mm 8 5 x 14 in 210 to 297mm x 148 to432 mm 7 3 4 Envelopes Monarch 3 98 x 191 mm 3 9 x 7 5 in 9 Envelope3 98 x 226 mm 3 9 x 8 9 in 10 Envelope3 105 x 241 mm ...

Страница 26: ... 128g m2 Short Grain 28lb to 34lb 105g m2 to 128g m2 Card Stock max Cover 50lb 42lb 135g m2 157g m2 Index 67lb 75lb 120g m2 157g m2 Tag 74lb 85lb 120g m2 157g m2 MFS MPF Duplexer All sizes supported by engine Xerographic and Bond Long Grain 16lb to 34lb 60g m2 to 128g m2 Short Grain 16lb to 34lb 60g m2 to 128g m2 Recycled Long Grain 20lb to 34lb 75g m2 to 128g m2 Short Grain 28lb to 34lb 105g m2 t...

Страница 27: ...ristics The following paper characteristics affect print quality and reliability Consider these characteristics when evaluating new paper stock For detailed information see the Card Stock Label Guide available on the Lexmark Web site at http support lexmark com Weight The printer can automatically feed paper weights from 60 to 220 g m2 16 to 58 lb bond grain long Paper lighter than 60 g m2 16 lb m...

Страница 28: ...s cotton possesses characteristics that can result in degraded paper handling Unacceptable paper The following papers are not recommended for use with the printer Chemically treated papers used to make copies without carbon paper also known as carbonless papers carbonless copy paper CCP or no carbon required NCR paper Preprinted papers with chemicals that may contaminate the printer Preprinted pap...

Страница 29: ... slots 1 Wireless option Yes ISP INA slots 1 DLE Firmware card font card and flash memory card slots 2 The following combinations are supported when you use more than one slot DLE and user flash DLE and font card Font and User flash Paper handling Paper input standard 250 and 150 sheet tray 50 MPF Optional paper handling Input 550 sheet tray up to 3 Optional paper handling Output None Duplex Yes F...

Страница 30: ...nd and Receive Delayed send Supported Block junk fax banned fax list Based on Caller ID or Remote Station ID Fax shortcuts Average shortcut includes 25 characters for name 10 characters for number and four characters for shortcut ID Shortcuts can contain one phone number or multiple numbers Each number is a location see the Preferences area for the maximum number of locations xxx Broadcast fax Max...

Страница 31: ... type Re circulating Dual Pass Automatic Document Feeder RADF Scanner ADF document input and output capacity 100 sheets 20 lb 75 g m2 bond Scanner media depth thickness Maximum 0 11mm Minimum 0 08 mm Scanner media weight Maximum 32 lb 120 g m2 Minimum 16 lb 60 g m2 Document size Maximum 11 8 x 25 in 299 72 x 635 mm Short Edge Feed SEF Minimum 4 x 5 04 in 101 6 x 128 02 mm SEF Document size sensing...

Страница 32: ...Manual 7541 03x MFP scan speed Note Scan performance is measured as 150 dpi 1 bit for mono and 150 depi 24 bit for color Media size Simplex Duplex Mono Color Mono Color Letter plain 32 32 13 13 A4 plain 33 33 14 14 ...

Страница 33: ... Phillips screwdriver magnetic 2 Phillips screwdriver magnetic short blade 7 32 inch 5 5 mm open end wrench 7 0 mm nut driver Needlenose pliers Diagonal side cutters Spring hook Feeler gauges Analog or digital multimeter Parallel wrap plug 1319128 Twinax serial debug cable 1381963 Coax serial debug cable 1381964 Flashlight optional ...

Страница 34: ...t dc Direct Current DIMM Dual Inline Memory Module DLE Downloadable emulator DRAM Dynamic random access memory DVM Digital multimeter ECC Error correcting code ECM Error correction mode EDO Enhanced Data Out EEPROM Electrical Erasable Programmable Read Only Memory ENA External Network Adapter EOL End of life EP Electrophotographic process EPROM Erasable programmable read only memory ESD Electrosta...

Страница 35: ...rrectable failure OCR Oil coating roll OEM Original Equipment Manufacturer OHP Overhead projector OPC Optical photo conductor OPT Optical Sensor PC Photoconductor PDF Portable Document Format PICS Problem isolation charts PIN Personal identification number PIXEL Picture element PJL Printer Job Language POR Power on reset POST Power on self test PPDS Personal Printer Data Stream ppm Pages per minut...

Страница 36: ...oll TPS Toner Patch Sensing TTM Tandem Tray Module TVOC Total Volatile Organic Compound UAT Universally Adjustable Tray UPR Used Parts Return USB Universal Serial Bus V Volts V ac Volts alternating current V dc Volts direct current VOM Volt Ohmmeter VTB Vacuum Transport Belt XPS XML Paper Specification Y Yellow ...

Страница 37: ... or symptom and take the indicated action Error code or symptom Location Print quality issues Go to Print quality issues on page 2 4 Scanner image issues Go to ADF scanner print quality on page 2 11 Paper jams 200 xx Go to Paper jams on page 2 17 Error codes Go to Error codes on page 2 38 Attendance messages Go to User attendance messages on page 2 66 Other symptoms Go to Other symptoms on page 2 ...

Страница 38: ...cold spaces near open flames and dusty areas Avoid sites exposed to direct sunlight Print paper checks Use the recommended paper for this printer Paper dampness Make a trial print with paper from a newly opened package and check the result To determine the corrective action necessary to repair a printer look for the following information Does the POR stop Check the POR Power On Reset sequence Do y...

Страница 39: ...or power on is halted Fuser thermistor checked if there is an error power on is halted 5 LED illuminates 6 RIP initialized ROM is checked if there is an error power on is halted Memory checked if there is an error power on is halted 7 Main tray lift motor moves paper up to position 8 Printer condition checked Check for jams if there is an error power on is halted Query the toner cartridge and imag...

Страница 40: ...module transfer belt and transfer roll for damage Replace if damaged 4 Inspect the imaging units and toner cartridges for damage Replace if damaged 5 If paper other than 20lb plain letter A4 paper is being used load 20lb plain letter A4 and print the Print Quality pages to see if the problem remains 6 Use Tray 1 to test print quality problems 7 Print the Print Quality Pages and then look for varia...

Страница 41: ...ribbon cable on both ends 4 Replace the LED printhead Did this fix the problem Problem resolved Go to step 5 5 Are the contacts on the HVPS clean Go to step Clean the contacts on the HVPS 6 Are the spring contacts on the sub frame damaged Replace the subframe Go to step 7 7 Replace the HVPS Did this fix the problem Problem resolved Contact your second level support Step Action and questions Yes No...

Страница 42: ...he imaging unit Replace the imaging unit Go to step 2 2 Is there dirt on the exposing surface of the LED printhead Go to step 3 Go to step 4 3 Clean the LED printhead Did this fix the issue Problem resolved Go to step 4 4 Replace the defective LED printhead Did this fix the issue Problem resolved Contact your second level support Step Action and questions Yes No 1 Check the condition of the paper ...

Страница 43: ...belt Clean the roll if needed Note Be careful when cleaning the dirt of the transfer roll Be careful to not deform the roll Replace the transfer roll if it is scratched 3 Imaging unit Check for scratches of unevenness on the photoconductor drum Replace the imaging unit if the drum is damaged Look for dirt on the rolls Replace the imaging unit if the rolls are dirty Step Action and questions Yes No...

Страница 44: ...solved Go to step 6 6 Check the transfer roll for dents Are there any dents in the transfer roll Replace the transfer roll Go to step 7 7 Remove the transfer belt and check the surface for waviness or other irregularities Are the surface irregularities Replace the transfer belt Contact your second level support Step Action and questions Yes No 1 Check the drum on the imaging unit for over exposure...

Страница 45: ...for dewing or moisture on the LED printheads Is there moisture on the printheads Let the printheads dry Move the printer to a less humid location if needed Go to step 3 3 Using the Administrative menu move the transfer belt to the up and down position Does the belt move Go to step 4 Replace the belt 4 Check the transfer roll for proper installation Is the transfer roll installed correctly Go to st...

Страница 46: ...egistration rolls for dirt or debris Is there dirt on the registration rolls Clean the registration rolls with a lint free cloth Step Action and questions Yes No 1 Check the fuser for proper installation Is the fuser properly installed Go to step 2 Reinstall the fuser 2 Check connection CN on the LVPS for proper connection Is the cable properly connected Go to step Go to step 3 Check CN for the co...

Страница 47: ... the media route for foreign objects such as staples clips and scraps in the media path Step Check Yes No 1 Check the large and small platen glass on the scanner unit assembly Is the large and small platen glass contaminated Clean both sides of the large and small platen glass Go to step 2 2 Check the three mirrors in the scanner unit assembly Are the three mirrors contaminated or show signs of du...

Страница 48: ... 4 Perform a print test using the scanner unit assembly Does the error continue Replace the scanner unit assembly Go to Flatbed assembly removal on page 4 116 Problem solved 5 Perform a print test using the ADF unit assembly Does the error continue Replace the ICC board Go to ICC board on page 4 123 Problem solved Step Check Yes No 1 Check the large platen glass on the scanner unit assembly Is the...

Страница 49: ...D assembly Does the error continue Replace the scanner CCD assembly Go to CCD chassis on page 4 124 Problem solved 5 Perform a print test using the flatbed scanner assembly Does the error continue Replace the ICC board Go to ICC board on page 4 123 Problem solved Step Check Yes No ...

Страница 50: ...3 Problem solved 3 Check for obstructions in the area of the media feed path in the ADF Is the media feed path free from any obstructions Go to step 4 Remove obstructions 4 Is the ADF left cover assembly properly and evenly closed Go to step 5 Open then properly close the ADF left cover assembly 5 Check the ADF pick roll assembly for damage and wear Is the ADF feed pick roll assembly free from dam...

Страница 51: ...4 Open then properly close the ADF left cover assembly 4 Check the ADF pick roll assembly for damage and wear Is the ADF feed pick roll assembly free from damage and wear Go to step 5 Replace the ADF feed pick roll assembly Go to ADF pick roll removal on page 4 114 5 Check the ADF separator roll Is the separator roll free from damage and wear Go to step 6 Replace the separator roll Go to ADF separ...

Страница 52: ...ables to the ICC board and CCD Did this fix the problem Problem resolved Go to step 5 4 Check the cables for continuity Is there continuity Go to step 6 Go to step 5 5 Replace the ribbon cables from the ICC board to the CCD Did this fix the problem Problem resolved Go to step 6 6 Replace the ICC Did this fix the problem Problem resolved Go to step 7 7 Replace the CCD Did this fix the problem Probl...

Страница 53: ...ADF Eject Jam 2 200 xx Paper jam in the transfer carry area 3 250 Paper jam in the MPF tray 4 201 xx Paper jam in the fuser entry area 230 Paper jam in the duplex 231 39 Paper jam in the duplex Check the duplex sensor area at the bottom of the duplex 5 24x Paper jam in the papertray x indicates which tray the jam is in 6 203 Paper jam at the paper exit area 7 292 01 Scanner Carriage Locked To reso...

Страница 54: ...he fuser the fuser nip release lever should be lowered After removing the jammed page return the lever to the proper position 3 Close the right side cover 4 Press Continue jam cleared 201 paper jam 1 Open the right side cover 2 Determine where the jam is located and remove it a If the paper is visible under the fuser grasp it on each side and pull it out b If the paper is not visible remove the fu...

Страница 55: ...d 203 paper jam 1 Grasp any jammed paper that is visible in the exit bin and gently pull it out Note Make sure all paper fragments are removed If the page is in the fuser the fuser nip release lever should be lowered After removing the jammed page return the lever to the proper position 2 Press Continue jam cleared ...

Страница 56: ... Manual 7541 03x 230 paper jam 1 Open the right cover 2 Lift the duplexing unit mechanism away from the cover 3 Remove any jammed paper 4 Lower the mechanism 5 Close the right cover 6 Press Continue jam cleared 1 2 ...

Страница 57: ...tion 2 21 7541 03x 231 39 paper jam 1 Open the right cover 2 Lift the duplexing unit mechanism away from the cover 3 Remove any jammed paper 4 Lower the mechanism 5 Close the right cover 6 Press Continue jam cleared 1 2 ...

Страница 58: ...over and pull any jammed pages out 2 Open Tray 1 ad pull the jammed pages up and out 3 Close Tray 1 4 Press Continue jam cleared Jam in the optional trays 1 Open the side affected tray s access door and remove the jammed pages Note Make sure all paper fragments are removed 1 2 ...

Страница 59: ...2 Open the affected tray and remove the jammed pages 3 Close the tray 4 Press Continue jam cleared 250 paper jam 1 Remove the jammed pages from the multipurpose feeder 2 Load paper into the multipurpose feeder 3 Press Continue jam cleared ...

Страница 60: ... curling could be due to humidity conditions 2 Paper feed unit rollers Roller clutch Are the rollers dirty or worn Replace as needed If there is a failure to pick and the feed rollers are clean check the roller clutch on the paperfeed unit This check can be performed by turning the paper feed roll in both directions If the shaft can be turned in both directions replace the roller clutch 3 Paper fe...

Страница 61: ...tration sensor If this doesn t fix the problem replace the engine board FRU Action 1 Transfer belt unit Rear paper guide Discharge brush Fuser Remove any buildup of toner Replace any damaged or worn parts Check the paper exit flag on the fuser for damage Replace the fuser if necessary 2 Fuser entry sensor Check the fuser entry sensor to ensure it is in it s position and not dislodged Check the cab...

Страница 62: ...e sure the clutch turns freely with no binding and it is properly installed Check for wear or damage to the associated gears Replace as necessary 4 Feed roller solenoid assembly Paper re feed solenoid assembly Check for proper operation of the solenoid and linkage Replace as necessary 5 Paper tray Check to see if the paper edge guides have shifted If so re time by removing the screw and gear from ...

Страница 63: ...2 Paper out sensor Paper feed unit Paper level sensor Turn the printer on and open the right cover and duplex Bypass the right cover door open interlock switch With the paper tray empty and the paper out sensor blocked pull out and replace the cassette If the tray rises and stays in place check for a dirty paper out sensor and inspect the paper empty sensor actuator on the paper feed unit If the p...

Страница 64: ...tration clutch and the problem remains replace the printer controller board FRU Action 1 MPF tray paper guides Check the guides to ensure they are not binding Also check the guides to ensure they are correctly adjusted for the paper in the tray 2 MPF roll cover Make sure the MPF roll cover is properly installed and not obstructing the paperpath Check for broken tabs and replace the cover if any ta...

Страница 65: ...odged Go to step 7 Go to step 8 7 Properly install the sensor Did this fix the problem Problem resolved Go to step 8 8 Check the sensor ADF paper present for proper operation 1 Enter the Diagnostics Menu 2 Touch SCANNER TESTS 3 Touch Sensor Tests 4 Observe the line sensor ADF paper present Does the display on the operator panel change every time the sensing area of the above sensor is interrupted ...

Страница 66: ...sts 4 Observe the line sensor ADF Skew and Scan sensor Does the display on the operator panel change every time the sensing area of the above sensor is interrupted or blocked Go to step 6 Go to step 9 6 Check the connections along the cable from the sensor to J1 on the ADF relay card Are all the connections properly connected Go to step 8 Go to step 7 7 Properly connect the connectors Did this fix...

Страница 67: ...d to the ADF relay card Go to step 7 Go to step 6 6 Reconnect the cable to the ADF relay card Did this fix the issue Problem resolved Go to step 7 7 Check pin 1 4 7 10 for 5V and pin 3 6 9 12 for GND on connector J1 on the ADF relay card Are they present Go to step 8 Go to step 9 8 Replace the inner cover sensor assembly Did this fix the issue Problem resolved Go to step 9 9 Check the ADF motor as...

Страница 68: ...CANNER TESTS 3 Touch Sensor Tests 4 Observe the line sensor ADF exit sensor Does the display on the operator panel change every time the sensing area of the above sensor is interrupted or blocked Go to step 10 Go to step 9 9 Check J4 on the ADF relay card for proper connectivity Is the sensor cable properly connected to the ADF relay card Go to step11 Go to step 10 10 Reconnect the cable to the AD...

Страница 69: ... 3 Touch Sensor Tests 4 Observe the line sensor Cover open Does the display on the operator panel change every time the sensing area of the above sensor is interrupted or blocked Go to step 10 Go to step 9 9 Check the sensor connection for proper connection to CN1 on the ADF relay and the paper present sensor Is the cable properly connected Go to step 11 Go to step 10 10 Connect the cables Did thi...

Страница 70: ...2 34 Service Manual 7541 03x 18 Replace the ICC board Did this fix the issue Problem resolved Replace the RIP board See RIP board removal on page 4 73 Step Action and questions Yes No ...

Страница 71: ... 3 3 Check all the connections from the FB cover open sensor to J1 on the ICC board Are they properly connected Go to step 5 Go to step 4 4 Properly connect the connections Did this fix the problem Problem resolved Go to step 5 5 Replace the sensor Did this fix the problem Problem solved Go to step 6 6 Check the cable connections from the ICC board to the RIP Are the cables properly connected Go t...

Страница 72: ... paper present Are the sensors working properly Go to step 6 Go to step 9 6 Check the leading edge of the paper to ensure the paper is not curled or bent in a way that would keep it from contacting the paper present sensor actuator Is the paper damaged Bad media Replace the media Go to step 7 7 Check for dirt in the ADF scan sensor paper in sensor and paper pass sensor See Flatbed ADF sensors on p...

Страница 73: ...Diagnostic information 2 37 7541 03x 16 Replace the ICC board Did this fix the issue Problem resolved Replace the RIP board See RIP board removal on page 4 73 Step Questions actions Yes No ...

Страница 74: ...1error on page 2 52 146 03 Tray 3 error See 146 03 Tray 3 error on page 2 52 146 04 Tray 4 error See 146 04 Tray 4 error on page 2 53 146 05 Tray 5 error See 146 05 Tray 5 error on page 2 54 121 04 Abnormal belt thermistor See 121 04 Belt thermistor error on page 2 47 113 01 HDCONT M HEAD error See 113 01 Magenta printhead error on page 2 45 112 01 HDCONT C HEAD error See 112 01 Cyan printhead err...

Страница 75: ...0 00 950 29 EPROM mismatch failure on page 2 64 952 xx Service NV Failure Perform a POR to clear the error 953 xx Service NVRAM Failure Replace the RIP board For the 958 error replace the UICC card if replacing the RIP board does not fix the problem 954 xx Service NVRAM Failure 955 00 Service Code CRC loc 956 xx Service System Board 957 xx Service System Board 958 xx Service NAND Failure 959 xx Se...

Страница 76: ...est See 841 04 Failed external DRAM test on page 2 57 841 05 Image pipe timeout See 841 05 Image pipe time out on page 2 57 841 06 Scanner did not initiate scan See 841 06 Scanner did not initiate scan on page 2 58 842 00 No response See 842 00 No response 842 01 HW protocol 842 02 Logical protocol on page 2 58 842 01 HW Protocol See 842 00 No response 842 01 HW protocol 842 02 Logical protocol on...

Страница 77: ...t Receive Threshold 7XX Error occurred when sending a frame Check line quality Adjust Transmit Level Select a lower Max Speed value under Fax Send settings 800 Received EOT unexpectedly from the modem in V34 mode If error persists disable V34 modulation scheme 802 Too many timeouts occurred during ECM reception If error persists disable ECM mode 803 Fax cancelled by user No action needed 804 Unexp...

Страница 78: ...Adjust to a lower modulation scheme 813 Timeout occurred after waiting too long to receive a good frame Adjust Receive Threshold 814 Tried too many times at selected speed using V34 modulation scheme Adjust Transmit Level Adjust to a lower modulation scheme 815 Fax transmission was interrupted due to power failure Troubleshoot MFP if error persists See No dial tone on page 2 83 818 Fax transmissio...

Страница 79: ... training successfully in V27 terminal modulation scheme Select a lower Max Speed under Fax Send settings Adjust the Transmit Level Check line quality 888 Failure to transmit training successfully at 2400 bps in V27 terminal modulation scheme Adjust Transmit Level Check line quality 889 Failed to connect at the minimum speed supported by the MFP Adjust Transmit Level Incompatible connection 88A Fa...

Страница 80: ...ce No action needed A01 Received request for unsupported image width from remote fax device No action needed A02 Received request for unsupported image resolution from remote fax device No action needed A03 Received request for unsupported compression type from remote fax device No action needed A04 Received request for unsupported image length from remote fax device No action needed F00 Unknown e...

Страница 81: ...e the ribbon cable Does this fix the problem Problem fixed Go to step 3 3 Replace the cyan LED printhead Does this fix the problem Problem fixed Replace the printhead controller board Step Action and questions Yes No 1 Is the ribbon cable connecting CN3 on the printhead controller board to the black LED head securely connected Go to step 2 Properly connect the ribbon cable 2 Replace the ribbon cab...

Страница 82: ... the fuser cable 4 Replace the printhead controller board Does this fix the problem Problem solved Go to step 5 5 Replace the fuser Does this fix the problem Problem solved Contact second level support Step Action and questions Yes No 1 Is the fuser properly installed Make sure that it is properly seated Go to step 2 Reinstall the fuser 2 Is the fuser cable properly connected to CN19 on the printh...

Страница 83: ...ce the printhead controller board Does this fix the problem Problem solved Go to step 5 5 Replace the fuser Does this fix the problem Problem solved Contact second level support Step Action and questions Yes No 1 Is the fuser properly installed Make sure that it is properly seated Go to step 2 Reinstall the fuser 2 Is the fuser cable properly connected to CN19 on the printhead controller board Go ...

Страница 84: ...pply removal on page 4 51 Does this fix the problem Problem solved Replace the fuser power cable Step Action and questions Yes No 1 POR the printer a couple times Does the printer turn off a few seconds after the POR Note When restarting the machine you should see the power switch physically move to the off position when the machine turns off Go to step 2 Problem resolved 2 Replace the printhead c...

Страница 85: ...o step 4 4 Replace the printhead controller board Does this resolve the issue Problem solved Go to step 5 5 Replace the HVPS Does this resolve the issue Problem solved Contact your second level support Step Action and questions Yes No 1 Is the density sensor cleaner stuck in place Go to step 2 Release the cleaner Replace if damaged 2 Is the cable connecting the density sensor to CN14 on the printh...

Страница 86: ...nsor Go to step 6 Properly connect the cable to CN8 on the printhead controller board and Theta sensor 6 Is the sensor misaligned the sponge blocking the sensor and the cover opening and closing smoothly Properly align the sensor and reposition the sponge on the theta sensor cover Make sure the cover opens and closes smoothly Go to step 7 7 Replace the theta sensor Problem solved Go to step 8 8 Re...

Страница 87: ...supply item Did this fix the problem Problem solved Replace the drive motor for the affected color Step Action and questions Yes No 1 Is the fuser paper exit motor cable properly connected to the motor and CN16 on the engine board Go to step 2 Connect the cables at both ends 2 Check the cable for continuity Is there continuity Go to step 3 Replace the fuser paper exit motor cable 3 Replace the pap...

Страница 88: ...on paper tray to the option connector on the back of the printer Is the cable properly connected on both ends Go to step 3 Go to step 2 2 Connect the cable properly at both ends Does this fix the problem Problem resolved Go to step 3 3 Check the option cable s connection to CN 13 on the printhead controller board Is it properly connected Go to step 4 Go to step 5 4 Check the option cable in the pr...

Страница 89: ... Is it properly connected Go to step 3 Go to step 2 2 Reconnect the cable to CN 121 Did this fix the problem Problem resolved Go to step 3 3 Check CN 120 on the second expansion paper feeder s expansion feeder controller board for proper connectivity Is it properly connected Go to step 5 Go to step 4 4 Reconnect the cable to CN 120 Did this fix the problem Problem resolved Go to step 5 5 Check CN ...

Страница 90: ...hird expansion paper feeder s expansion feeder controller board for proper connectivity Is it properly connected Go to step 7 Go to step 6 6 Reconnect the cable to CN 103 Did this fix the problem Problem resolved Go to step 7 7 Replace the paper full sensor Does this fix the problem Problem resolved Go to step 8 8 Replace the expansion paper feeder controller board Does this fix the problem Proble...

Страница 91: ... Replace the engine power supply cable Does this remedy the situation Problem solved Replace the engine controller board Step Questions actions Yes No 1 Is there anything obstructing the fan s movement Clear the obstruction Go to step 2 2 Check connector CN22 on the engine controller board Is it properly connected Go to step 3 Reconnect the connector 3 Replace the main fan Does this remedy the sit...

Страница 92: ...actions Yes No 1 POR the device a few times Did the error re occur Go to step 3 Go to step 2 2 POR into the diagnostic menu Run the ASIC test in the Scanner Test menu Did the ASIC pass Problem resolved Go to step 3 3 Replace the RIP Did this fix the issue Problem resolved Contact second level support Step Questions actions Yes No 1 POR the device a few times Did the error re occur Go to step 2 Pro...

Страница 93: ...he RIP board Did this fix the issue Problem resolved Contact second level support Step Questions actions Yes No 1 POR the device a few times Did the error re occur Go to step 2 Problem resolved 2 Replace the RIP Did this fix the issue Problem resolved Contact second level support Step Questions actions Yes No 1 POR the device a few times Did the error re occur Go to step 2 Problem resolved 2 Repla...

Страница 94: ...IP board Did this fix the issue Problem resolved Contact second level support Step Questions actions Yes No 1 POR the device Did the error re occur Go to step 2 Problem resolved 2 Check all the connections from the ICC card to the ADF relay card and RIP board to ICC card Also check the CCD cables for proper connectivity Are the cables properly connected Go to step 3 Go to step 4 3 Properly connect...

Страница 95: ...Replace the flatbed unit Did this fix the issue Problem resolved Go to step 9 7 Replace the ICC card Did this fix the issue Problem resolved Go to step 8 8 Replace the CCD Did this fix the issue Problem resolved Go to step 9 9 Replace the RIP board Did this fix the issue Problem resolved Contact your second level support Step Questions actions Yes No 1 Check the FFC ribbon cable connecting the RIP...

Страница 96: ... connected Go to step 5 Go to step 4 4 Properly connect the cables to the RIP board Restart the device into diagnostic mode Does the 900 xx error reoccur during startup Go to step 5 Go to step 6 5 Replace the RIP board and restart the device Does this fix the problem Note If an error different from the original 900 xx is displayed consult the service check for that error Problem resolved Go to ste...

Страница 97: ...art the device Does the 900 xx error reoccur Go to step 18 Go to step 20 18 Upgrade the firmware Contact your next level of support for the correct firmware level to use Restart the printer to operating mode Send the printer a print job Does the 900 xx error reoccur Go to step 19 Problem resolved 19 Replace the modem Restart the device Does the 900 xx error reoccur Go to step 31 Problem resolved 2...

Страница 98: ...Go to step 31 Go to step 26 31 Contact your next level of support You will need the following information for them Exact 900 xx error digits and complete error message Printed menu settings page Printed network settings page Device error log A sample print file if error appears to be isolated to a single file File Application used if error is related to specific print file Device Operating System ...

Страница 99: ...s fix the issue Problem resolved Go to step 8 8 Replace the printhead controller board Did this fix the issue Problem resolved Contact your second level of support Step Action and questions Yes No 1 POR the printer Does the problem go away Problem resolved Go to step 2 2 Replace the printhead controller Does this fix the problem Problem resolved Go to step 3 3 Replace the RIP board Did this fix th...

Страница 100: ...n replaced recently Replace the RIP board with a new and not previously installed system board See RIP board removal on page 4 73 Go to step 3 3 Turn the printer power off for ten or more seconds Then turn the printer back on POR the printer Is the error gone and can the printer print Problem solved Go to step 4 4 Clear the NVRAM of the printer 1 Turn the printer power off 2 With the printer off p...

Страница 101: ... re occur Go to step 2 Problem resolved 2 Put the machine into recovery mode and update the firmware You will need to contact your second level support for the correct firmware level to use Did updating the firmware fix the issue Problem resolved Go to step 3 3 Replace the RIP board Did this fix the problem Problem resolved Call your second level support ...

Страница 102: ...ws a user to override the source for the remainder of a job The page will be printed as it is formatted on the paper installed in the tray This may cause clipping No further Change prompts will be posted for the remainder of the current job If the src is MP Feeder Manual Paper or Manual Envelope the string Manual Feeder will be used instead of the src string from the Default Source list If the src...

Страница 103: ... job can be cancelled Wait for supplies If job parking is enabled and the job meets all the requirements for allowing the job to be parted the printer adds this message Load source size Load paper in the indicated source and of the indicated size and select Continue Additional messages may include More information the printer will present instructions Cancel Job the printer job can be cancelled Wa...

Страница 104: ...o continue Remove Paper All bins Remove the paper from all output bins Restore Held Jobs Go Stop If the printer detects Print and Hold or parked jobs stored on the hard disk during Power On Self Test POST Choices are Restore Print jobs are restored and Restoring Held Jobs x y where x is the number of the job restored and y is the total number of jobs to restore You can quit restoring and the remai...

Страница 105: ...blem still exists replace the printhead controller board See Printhead controller board removal on page 4 37 32 Unsupported Cartridge Check to see if the toner cartridge is a supported cartridge Note Once the cartridge shipped with the printer is exhausted it must be replaced by a supply cartridge refer to the User s Guide for part numbers If the specified toner cartridge is a supported cartridge ...

Страница 106: ...urrent jobs Select Continue to clear the message If this does not fix the problem replace the RIP board See RIP board removal on page 4 73 37 Insufficient memory Some Held Jobs Will Not Be Restored The printer was unable to restore some or all of the confidential or held jobs on the hard disk Select Continue to clear the message If this message occurs again replace the hard drive If this does not ...

Страница 107: ... not print correctly POR the printer If this does not fix the problem replace the PCI card 54 Std Network Software Error Select Continue to clear the message and continue printing The job may not print correctly Program new firmware for the network interface POR the printer If this does not fix the problem replace the PCI card 54 Network x Software Error 55 Unsupported Option in Slot x 1 Turn the ...

Страница 108: ...page 4 73 58 Too Many Trays Attached 1 Turn off and unplug the printer 2 Remove options until the supported number of options for that model Models C925 supports three additional trays 3 Plug in the printer and turn it on 61 Defective Disk Select Continue to clear the message and continue printing Install a different hard disk before performing any operations that require a hard disk If this does ...

Страница 109: ...he fuser is installed Check the cable connectors for damage at the system board and at the LVPS 82 Replace Waste Toner Replace the waste toner box using the instruction sheet that comes with the replacement waste toner box Ensure that there is no interference between the waste toner box and the printer If the problem persists replace the engine board See Engine board MDCONT on page 4 92 If the pro...

Страница 110: ...olor Cartridge Low Show Me View Supplies and Tell Me More displays additional information Replace the specified toner cartridge Select Continue to clear the message and continue printing Check CN17 and 18 on the printhead controller board for proper connectivity If the problem persists replace the printhead controller board See Printhead controller board removal on page 4 37 88 xx color Cartridge ...

Страница 111: ... jammed in the fuser Open the fuser rollers by operating the fuser pressure relief lever If you cannot remove the jam replace the fuser The jam access panel can also be opened After letting the fuser cool unscrew the two thumbscrew and open the access panel You cannot clear the paper jam message To clear the paper jam messages you must remove all paper from the printer paper path Check both inside...

Страница 112: ...mbly Transfer belt toner waste bottle Transfer belt separation fingers Fuser separation pawl Paper will not feed from MPF Be sure you have paper in the MPF Check the paper size and type Does it match the paper setting on the printer Be sure the MPF paper present sensor connector CN16 is connected to the CK1 daughter board If the paper still does not feed go to Paper path service checks on page 2 2...

Страница 113: ...e resolved Go to step 6 6 Remove the ADF rear cover and inspect the ADF cover closed sensor for dirt and debris Is there dirt and debris present Go to step 7 Go to step 8 7 Remove the ADF rear cover and clean the dirt and debris from the sensor Does this fix the issue Issue resolved Go to step 8 8 Inspect the connections on the ADF relay card in the ADF Are all the connections properly connected G...

Страница 114: ... functioning phone jack Did this fix the problem Problem resolved Go to step 5 5 Is the phone line being used by the MFP an analog line Go to step 8 Go to step 6 6 Is the line being used a VOIP line Go to step 7 Go to step 8 7 Have the system administrator verify that the VOIP server is configured to receive faxes Is the server properly configured Go to step 8 Stop here The issue is VOIP related T...

Страница 115: ...enter the SE menu enter Modem settings and select Transmit Level Test by adjusting the transmitted signal strength by decreasing increasing the Transmit Level setting in steps of 1db For example if default value is 11 db changing it to 12db will decrease the signal strength by 1db and changing it to 10db will increase the signal strength by 1db Recommended adjustment range is 5 db in 1db steps fro...

Страница 116: ... Go to step 7 7 In diags config menu verify that the Enable Fax Receive setting is on Is the setting set to on Go to step 9 Go to step 8 8 Set Enable Fax Receive to On Did this fix the problem Problem resolved Go to step 9 9 Is Distinctive Ring enabled Go to step 11 Go to step 10 10 Turn on Distinctive ring Did this fix the problem Problem resolved Go to step 11 11 Is the phone line analog Go to s...

Страница 117: ...Threshold Test by adjusting the received signal level by decreasing increasing the Receive Threshold setting in steps of 2db For example if default value is 43 db changing it to 45db will decrease the received signal level by 2db and changing it to 41db will increase the received signal level by 2db Recommended adjustment range is between 33db and 48db in 2db steps Did this fix the problem Problem...

Страница 118: ...the requested information This is where you will type in the information you retrieved in step 3 Second level support can assist you if you have questions about the information requested on the page Note The fields requesting the code levels model number type of problem are auto filled If the information is not in the fields it can be retrieved from the SE menu The SE menu can be accessed by press...

Страница 119: ...to the modem card and wall jack Did this fix the problem Problem resolved Go to step 3 3 Test the phone line s ability to send and receive calls Did the phone line work properly Go to step 5 Go to step 4 4 Use the MFP on a properly functioning phone jack Did this fix the problem Problem resolved Go to step 5 5 Is the modem card cable properly connected to the system board at J8 and the modem card ...

Страница 120: ...ved Go to step 3 3 Check the printer s online status under Printers and Faxes on the host computer Delete all print jobs in the print queue Is the printer online and in a Ready state Go to step 5 Go to step 4 4 Change the printer status to online Did this fix the issue Problem resolved Go to step 5 5 Does the IP address displayed on the network settings page match the IP address in the port of the...

Страница 121: ...to the printer Did this fix the problem Problem resolved Go to step 17 17 Are the other devices on the wireless network communicating properly Go to step 18 Contact the network administrator 18 Verify that the ISP wireless card cable and any other ISP cables are properly seated in their connectors Are the cables connected correctly Go to step 20 Go to step 19 19 Properly reseat the ISP cables Did ...

Страница 122: ...laced at the same time Card Remove all the option cards from the device Install each card individually Restart the MFP after each card is installed Remove the card and repeat the previous step with a different card till all cards are checked When a faulty card is found replace the card If the error persists after replacing the option card replace the RIP board See RIP board removal on page 4 73 If...

Страница 123: ... the machine into diagnostics mode and perform the button test Do any of the buttons fail the test Go to step 6 Problem solved 6 Replace the RIP board POR the machine into diagnostics mode and perform the button test Do any of the buttons fail the test Contact your second level support Problem solved Step Action and questions Yes No 1 Check the cable connection between the RIP and the UICC and che...

Страница 124: ...any damaged or broken parts that would prevent it from being installed properly or move around in the printer Are there loose or damaged parts on the tray Go to step 2 Go to step 3 2 Try a different tray Did this fix the issue Problem resolved Go to step 3 3 Check the sensor cables for proper connection to the sensors and engine controller board Are they properly connected Go to step 5 Go to step ...

Страница 125: ... to step 8 Go to step 7 6 Install the paper feed maintenance kit Did this fix the issue Problem solved Contact your second level support Step Action and questions Yes No 1 Are the imaging units properly seated Go to step 3 Go to step 2 2 Reseat the imaging units and properly close the photodeveloper lock Did this fix the issue Problem solved Go to step 3 3 Check the contacts on the rear of the pho...

Страница 126: ...f the problem continues replace the RIP board DRAM options This service check is the same as the flash memory option service check with the following exception Run the DRAM Test on page 3 21 from the menu if the DRAM Memory card assembly is correctly installed and not broken or damaged If the test fails replace the DRAM card assembly If the problem continues replace the RIP board Step Action and q...

Страница 127: ...ding on the disk size This test leaves the hard disk unformatted The servicer or user must reformat the disk using the Format Disk Menu operation This is a destructive type of test All the data on the disk is destroyed and should not be performed on a known good disk Network card option The network is installed on the system board on network model printers See Networking service check on page 2 84...

Страница 128: ...03 on the LVPS are connected properly Go to step 7 Properly connect the cables 7 Replace the switch Did this fix the problem Problem solved Go to step 8 8 Are the fuses blown on either supply Go to step 9 Go to step 10 9 Replace the power supply with the blown fuse Did this fix the problem Problem solved Go to step 10 10 Check CN03 on the scanner power supply for the following voltages and grounds...

Страница 129: ...nuity Is there continuity Go to step 6 Go to step 7 6 Replace the defective cable Did this fix the problem Problem solved Go to step 7 7 Replace the printhead Did this fix the problem Problem solved Go to step 8 8 Replace the printhead controller board Did this fix the problem Problem solved Contact you second level support Step Action and questions Yes No 1 Is the transfer belt position sensor ac...

Страница 130: ...door Pull the toner bottle out and push it back in to position Close the photoconductor locking unit door Did this fix the problem Problem solved Tell the customer that this issue can occur Instruct them to perform the procedure performed in step 1 Go to step 2 2 Clean the waste toner bottle sensor of any debris or toner Did this fix the issue Problem solved Go to step 3 3 Check the cable connecti...

Страница 131: ...place the sensor Did this fix the issue Problem resolved Go to step 8 8 Replace the engine board Did this fix the issue Problem resolved Contact your second level support Step Action and questions Yes No 1 Remove the tray and move the paper size guides to different positions Are the size pins moving when the length guide is moved Go to step 3 Go to step 2 2 Try a different paper standard tray Did ...

Страница 132: ...DF paper length sensors for dirt or debris Are the sensors clear Go to step 4 Go to step 3 3 Clear the sensors of dirt and debris Did this fix the problem Problem resolved Go to step 4 4 Check the sensors for proper connection to J3 on the ADF relay card Are they properly connected Go to step 6 Go to step 5 5 Reconnect the cables Did this fix the problem Problem resolved Go to step 6 6 Check pin 4...

Страница 133: ...essing data or printing Solid green The printer is on but idle Solid red Operator intervention is required 3 Sleep Enables Sleep Mode or Hibernate Mode The following actions wake the printer from Sleep Mode Touching the screen or any hard buttons Opening an input tray cover or door Sending a print job from a computer Performing a Power on Reset POR 4 Keypad Lets you enter numbers letters or symbol...

Страница 134: ...ning or error message whenever the printer requires intervention to continue processing Touch this to access the messages screen for more information on the message and how to clear it Tips Opens context sensitive Help information on the touch screen Note All menus have a Tips button USB Displays files on a flash drive Bookmarks Allows you to create organize and save a set of bookmarks URLs into a...

Страница 135: ...ncel Jobs not pictured Opens the Cancel Jobs screen The following items are available under the Print Fax and Network headings Print job Copy job Fax profile FTP E mail send Each heading shows up to three jobs per screen If more than three jobs exist in a column then an arrow appears enabling you to scroll through the jobs Select a job to cancel it Button Function Submit Saves settings changes Sam...

Страница 136: ...the current screen to the home screen Tips Opens context sensitive Help on the touch screen Icon Function Accept Confirms selections and moves to the next screen Stop Cancel Cancels an action or selection Cancels out of a screen and return the previous screen Return Navigates back to the previous screen Unselected radio button Indicates that an item is not selected Button Function ...

Страница 137: ...o button Indicates a selection Index Displays information about the key functions of the printer including instructions on how to operate it Search Lets you search for files and menus Warning Indicates a warning or error condition Icon Function ...

Страница 138: ...ngs Setup Menu Finishing Menu Quality Menu Job Accounting Menu Utilities Menu XPS Menu PDF Menu Postscript Menu PCL Emul Menu HTML Menu Network Ports Active NIC Standard Network Standard USB Parallel x Serial x SMTP Setup Security Miscellaneous Security Settings Confidential Print Disk Wiping Security Audit Log Set Date and Time Reports Menu Settings Page Device Statistics Network Setup Page Netwo...

Страница 139: ...uently required by a user Generally the options made available in this menu group are used to configure a printer for operation See Configuration Menu on page 3 9 for more information Network SE menu While in Network Ports Menu press and hold 9 7 and 6 SE menu At the printer perform the following steps 1 In the Admin menu navigate to Network Ports Standard Network Std Network Setup menu 2 Press an...

Страница 140: ...inter 2 Press and hold 2 7 and 8 3 Turn on the printer 4 Release the buttons when the splash screen appears This mode will allow the printer to boot from a secondary set of instructions to allow a code flash to the printer Code can be flashed from a PC via USB ...

Страница 141: ...e Counter on page 3 10 Reset Transfer Belt Counter See Reset Transfer Belt Counter on page 3 11 USB Scan To Local See USB Scan to Local on page 3 11 Black Only Mode See Reset Maintenance Counter on page 3 10 Print Quality Pages See Print Quality Pages on page 3 11 Fuser Speed See Fuser Speed on page 3 11 Reports See Reports on page 3 11 Color Trapping See Color Trapping on page 3 11 Tray Insert Me...

Страница 142: ...r Manual Registration See Scanner Manual Registration on page 3 15 Disable Scanner See Disable Scanner on page 3 15 Paper Prompts See Paper Prompts on page 3 15 Envelope Prompts See Envelope Prompts on page 3 15 Action for Prompts See Action for Prompts on page 3 15 Jobs On Disk See Jobs On Disk on page 3 15 Disk Encryption See Disk Encryption on page 3 16 Erase all information on Disks See Erase ...

Страница 143: ...ntify print quality problems The Test Pages must be printed on A4 Legal or Letter paper Fuser Speed Use this setting if the device is encountering a shock line issue After adjusting the setting the device will print the Print Quality Pages It is recommended that this menu setting is used under the guidance of your second level of support Reports From this menu you can print the Menu Settings Page ...

Страница 144: ...available Download Emuls Warning This setting should not be changed without specific instructions from the next level of support This setting temporarily disables downloaded emulators for troubleshooting purposes All downloaded emulators are re enabled automatically after two PORs Demo Mode This printer supports a demo mode that is usually used in retail environments to illustrate the features of ...

Страница 145: ...st When this setting is set to On a user can initiate scanner related jobs and enter values for a limited number of settings related to those jobs using the keypad Touch Back to exit without changing the setting Format Fax Storage This setting enables you to format the non volatile storage used for storing faxes Note If an advanced password has been established you must enter this password in orde...

Страница 146: ...le A is shown here 3 In the Color Alignment sub menu Select A 4 Look at item A on the sheets 5 Look for the numerical value where the color lie is aligned with the two black lines on each end Note In the example above 10 would be the value to enter 6 Using the arrows on the touch screen scroll to the value that matches the correct value on the printout 7 Touch the check mark 8 Repeat steps 3 throu...

Страница 147: ...ize Envelope Prompts Env Prompts controls which tray a change prompt is directed to when the envelopes are sensed to be the wrong size Action for Prompts This setting enables users to have the printer resolve media change prompt situations automatically Such prompts occur when the selected media for the job is not available when the job prints This setting applies only to jobs that cannot be parke...

Страница 148: ...s and jobs from a disk Font Sharpening Font Sharpening allows the user to adjust the value of the high frequency screens used for font data For example if the value is 24 all fonts 24 points and less use the high frequency screens The default value is 24 This feature works only in PostScript emulation Require Standby If set to Off this setting disables Standby Mode in the General Settings menu UI ...

Страница 149: ...n the Home screen for a length of time equal to the Screen Timeout setting in the Timeouts section of the General Settings Menu Any IR that does appear on the panel will give the user the option of returning to the Home screen without clearing it From the Home screen the user can initiate any other workflow or feature as usual Once the device returns to the Home screen though any existing IR again...

Страница 150: ...hold 3 and 6 3 Turn on the printer 4 Hold the buttons until the splash screen appears Diagnostic mode menus SCANNER CALIBRATION See SCANNER CALIBRATION on page 3 20 Copy Quick Test Adjust Calibration Values Reset Calibration Values PRINT TESTS See PRINT TESTS on page 3 20 Tray 1 Tray 2 if installed Tray 3 if installed Tray 4 if installed Tray 5 if installed Multi Purpose Feeder Print Quality Pages...

Страница 151: ...ee Defaults on page 3 24 Prt Color Pg Count See PAGE COUNTS on page 3 25 Prt Mono Pg Count Perm Page Count Serial Number See Serial Number on page 3 25 Model Name See Model Name on page 3 25 Configuration ID See Configuration ID on page 3 25 Par 1 Strobe Adj if installed See REPORTS EVENT LOG Display Log See Display Log on page 3 26 Print Log See Print Log on page 3 27 Clear Log See Clear Log on p...

Страница 152: ...n the selected input source If a source is selected that contains paper then a page similar to the Quick Test Page is printed and does not contain the Print Registration diamonds If a source is selected which contains envelopes then an Envelope Print Test pattern is printed This pattern contains only text which consists of continuous prints of each character in the selected symbol set If Continuou...

Страница 153: ...E TESTS Button Test With no buttons pressed an image the operator panel buttons is displayed Press each operator panel button one at a time and the button in the illustration turns blue 2 Press Stop X or touch Back to exit the test DRAM Test This test checks the validity of DRAM both standard and optional The test repeatedly writes patterns of data to DRAM to verify that each bit in memory can be ...

Страница 154: ...finishes the screen updates with the result P and F represent the same numbers for DRAM If the test passes the Pass Count increases by 1 However if the test fails one of the following failure messages appears for approximately three seconds and the Fail Count increases by 1 Receive Status Interrupt Error Status Error Receive Data Interrupt Error Transmit Data Interrupt Error Transmit Empty Error T...

Страница 155: ...Passed appears if the test passes Quick Disk Test Test Failed appears if the test fails 2 Press Stop X or touch Back to return to the Device Tests menu Disk Test Clean Warning This test destroys all data on the disk and should not be attempted on a good disk This test may run approximately 1 hours depending on the disk size 1 From the Diagnostics menu navigate to DEVICE TESTS Disk Test Clean A Con...

Страница 156: ... Tray Tests menu To run the Input TrayTest 1 From the Diagnostics menu touch INPUT TRAY TESTS 2 Select the input source 3 Select either Single or Continuous Note If Single is selected no buttons are active while the input device is feeding If Continuous is selected Stop X can be pressed to cancel the test 4 At the end of the test the printer returns to the INPUT TRAY TESTS menu PRINTER SETUP Defau...

Страница 157: ... and A through F Note When the printer detects a Configuration ID that is not defined or invalid the following occurs The default standard model Configuration ID is used instead Configuration ID is the only function available in DIAGNOSTICS Unless the menu is in DIAGNOSTICS Check Config ID appears To set the configuration ID 1 From the Diagnostics menu navigate to Printer Setup Configuration ID 2 ...

Страница 158: ...e sample time by 50 ns per increment Touch Back to return to the Diagnostics menu REPORTS From this menu you can print the Menu Settings Page or the Event Log EVENT LOG Display Log Display Log shows the message that appeared on the operator panel for each event in the log starting with the most recent Use the touch screen arrows to scroll through the log entries To see more in depth information ab...

Страница 159: ... software errors Code versions of all packages when error occurred Panel message when error occurred except for 900 service RIP software errors Debug information and secondary error codes depending on the error The Clear Log operation clears out the errors that print in this report The errors listed in the Display Log operation do not necessarily match in number nor in order with the errors from t...

Страница 160: ...h of the flatbed Press Stop X to end the test Sensor Test This test checks each scanner related sensor and returns Closed or Open for each Sensor ADF Paper Present 0 means paper is not present in the ADF Sensor FB Cover Open 0 means the flatbed cover is down Sensor Home Sensor 1 means the CCD is in the home position Sensor Skew Sensor 0 means the actuator is in the up position Sensor ADF Cover ope...

Страница 161: ...er to the ITU and second transfer to the media 5 Fuse the toner to the media 6 Clean erase the photoconductor and the ITU In summary the printer s controller board receives print data and the command to print The controller board then initiates the print process The controller board is the command center for the EP process and coordinates the various motors and signals The high voltage power suppl...

Страница 162: ...e LED Service tips If the surface of the charge roller is damaged such as a nick or pit it will cause the charge to be uneven on the photoconductor This will cause a repeating mark on the printed page Check the service manual for the repeating marks table If the charge roller is severely damaged the surface of the photoconductor will not be charged properly and heavy amounts of toner will be depos...

Страница 163: ...e Service tips Never touch the surface of the photoconductor with your bare hand The oil from your skin may cause a charge differential on the surface and toner will not stick properly The result would be repeating blotches of voids light print on a page Then the photoconductor will have to be replaced The surface of the photoconductor is coated with an organic substance that makes it sensitive to...

Страница 164: ...o using glue to write on a can and then rolling it over glitter The glitter sticks to the glue but won t stick to the rest of the can Service tips Never touch the surface of the developer roller with your bare hand The oil from your skin may cause a charge differential on the surface and toner will not stick properly The result would be repeating blotches of voids light print on a page Then the af...

Страница 165: ...nd the transfer belt Service tips Never touch the surface of the transfer belt with your bare hand The oil from your skin will cause a charge differential on the surface and toner will not stick properly The result would be repeating blotches of voids light print on a page Then the transfer belt will have to be replaced Don t use solvents or other cleaners to clean the transfer belt surface No mat...

Страница 166: ...e media and the entire image is transferred from the transfer belt to the media Service tips If the transfer roller has nicks pits or flat spots on it the surface doesn t come into contact with the media and transfer unit properly This will cause voids or light spots on the page or repeating voids light areas because the toner can t be fully transferred due to the charge difference in the areas of...

Страница 167: ...ge or cause paper jams Toner that rubs off a printed page can be a sign of a malfunctioning fuser or an improper media setting Always check the paper type setting before replacing the fuser A common mistake is to print on heavier media such as cardstock with the paper type set to plain paper When removing paper jams from the fuser be sure to use the fuser release tabs to relieve the pressure on th...

Страница 168: ...oner image on the transfer belt has been transferred to the page the transfer belt rotates around and is cleaned by the cleaning blade This occurs for every page that is printed After the toner is moved to the cleaning blade the toner is moved from the cleaning blade to the waste toner area using an auger system Cleaning blade Waste toner box Fuser Transfer belt Second transfer roller Transfer bel...

Страница 169: ...om the photoconductors a cleaning blade scrapes the remaining toner from the surface of each photoconductor This is the clean erase process Now the photoconductor surface is prepared to begin the EP cycle once again This cleaning erasing cycle happens after each plane of color is transferred to the transfer belt Cleaning blade ...

Страница 170: ...ay 2 Tray 1 uses a spring loaded plate to engage the media in the tray with the pickup roller Tray 2 uses a tray lift motor to lift the paper to the paper feed mechanism Tray 1 holds approximately 150 sheets of 20lb paper and Tray 2 holds about 250 sheets of 20lb paper Tray 1 does not have automatic size sensing therefore the correct paper size must be set on the paper size wheel located on the fr...

Страница 171: ...ensitive so positioning the Tray Guides 1 or 2 notches out of position could result in an incorrect paper size reading If any Paper Jams 34 Short paper messages or other paper feed problems occur check the paper size in the tray against the size the printer thinks is loaded You can view the paper size in the Paper Menu Multipurpose feeder The MFP holds about 50 sheets of 20lb paper and does not ha...

Страница 172: ...otates backwards to prevent multiple sheets of paper from feeding The paper moves to the feed roll and is fed into the paper path Paper Pick roll Separator roll torque limiter Paper feed motor Paper feed clutch Std Registration roller IN Feed roll Transport Clutch Regisration roll OUT A B a b c Normal feed Multi feed Friction A B Feed roll Pick roll Separator roll Torque limiter Friction a b c ...

Страница 173: ...ray one by one Once the duplex exit MPF detection lever senses the leading edge of the media at the duplex exit roller it engages the duplex re feed clutch to transport the sheet of paper into the paper path Duplex transport upper roller Duplex exit roller Duplex exit MPF sensor actuator Timing belt MPF feed clutch Duplex clutch Paper feed roller Paper MPF tray Lower duplex transport roll Delivery...

Страница 174: ... Entry Detection Sensor and enters the Fuser Here heat and pressure are applied to the page to bond the image permanently to the media The toner is impregnated with wax so it releases from the fuser rolls without the need of a wiper or oil coating roller The Fuser Rollers continue to feed the paper upward to the Fuser Exit Sensor and Fuser Exit Rolls Paper exit If the sheet is single sided the pap...

Страница 175: ...rinter Once the paper reaches the bottom the Duplex Exit MPF detection lever senses the leading edge of the media at the Duplex Exit Roller and it engages the Duplex re feed clutch to transport the sheet of paper into the EP paper path Note Once the media reaches the Duplex Exit MPF detection lever it shares the same paper path as the MPF Transfer roll Paper Paper Paper MPF Registration roller Dup...

Страница 176: ...h sensor 4 ADF cover open ADF paper path sensor 5 Pick roll ADF pick roll CRU 6 Pick roll position sensor Photo interrupt ADF paper path sensor 7 Feed roll ADF pick roll CRU 8 Separator roll ADF Separator roll CRU 9 Paper gap sensor photo interrupt ADF paper path sensor 10 Paper in sensor Photo reflect Scan sensor 11 Scan roller ADF main feed unit 12 Scan sensor Photo interrupt Scan sensor 13 Take...

Страница 177: ... pick the pick roll is in the up position If the sensor determines that the roll is in the up position the pick roll is moved to the down position to initiate the pick 4 With the pick roll in the proper position the signal to pick is generated from the ADF relay card The top sheet in the paper is pulled in to the ADF towards the feed roll To prevent double feeds a separator roll is present to prov...

Страница 178: ... the scan job is simplex the duplex gate is positioned to direct the media to the exit roller and the media exits the ADF to the output bin 12 The reversed exit roll pulls the paper back into the ADF The transport roll then moves the media to the paper in sensor When the paper in sensor is actuated the exit roll stops Also the paper in sensor indicates that this is the second side of the media to ...

Страница 179: ... tables For example it is possible to apply one type of color conversion table to text while applying a different color conversion table to photographic images Should I use PostScript or PCL emulation What settings produce the best color The PostScript driver is strongly recommended for best color quality The default settings in the PostScript driver provide the preferred color quality for the maj...

Страница 180: ...ded Web Server Selecting any sample set generates a multiple page printout consisting of hundreds of colored boxes Either a CMYK or RGB combination is located on each box depending on the table selected The observed color of each box is obtained by passing the CMYK or RGB combination labelled on the box through the selected color conversion table To print Color samples from the printer 1 press Men...

Страница 181: ... value entered in the RGB or CMYK Increment box To access a detailed Color Samples set from the Embedded Web Server 1 Open a Web browser 2 In the address bar type the network printer IP address 3 Click Configuration 4 Click Color Samples 5 Click Detailed Options to narrow the set to one color range 6 When the Detailed Options page appears select a color conversion table 7 Enter the RGB or CMYK col...

Страница 182: ...3 50 Service Manual 7541 03x ...

Страница 183: ...ectricity in your body to the machine Hold the ESD sensitive part by its edge connector shroud cover do not touch its pins If you are removing a pluggable module use the correct tool Do not place the ESD sensitive part on the machine cover or on a metal table if you need to put down the ESD sensitive part for any reason first put it into its special bag Machine covers and metal tables are electric...

Страница 184: ...e place the old RIP card back in the machine and start it up After the machine startup shut down the machine and install the new RIP card After installing the new RIP card restart the machine and let it go through the startup cycle After this procedure is completed successfully there is no need to adjust any settings If the above procedure fails you must contact the technical support center for fu...

Страница 185: ...ed Solutions page select the apps to be exported by clicking the selection box next to the app 7 Choose Export If the Web page cannot be accessed or an error persists despite trying to boot in Invalid Engine code mode then there is no way to backup the eSF apps The technician needs to make the customer aware that the applications and their setting could not be saved Note There is a size limit on t...

Страница 186: ...ex unit and paperfeed unit sub component removals have their own sections They are Duplex unit component removals on page 4 172 Paperfeed unit component removals on page 4 177 Note Some removal procedures require removing cable ties You must replace cable ties during reassembly to avoid pinching wires obstructing the paper path or restricting mechanical movement CAUTION Remove the power cord from ...

Страница 187: ...Repair information 4 5 7541 03x Cover Removals RIP cover 1 Remove the two screws securing the RIP cover to the RIP cage 2 Remove the RIP cover ...

Страница 188: ...03x Scanner power supply access cover 1 Press the access cover inward at the arrow and pull back removing the cover Cord cover 1 Remove the screw A securing the right side of the cord cover to the rear cover and scanner frame ...

Страница 189: ...curing the left side of the cord cover to the rear cover and scanner frame 3 Tilt the cord cover back and lift it up and away from the rear of the scanner Rear cover 1 Remove the cord cover See Cord cover on page 4 6 2 Remove the screw A above the rear fan ...

Страница 190: ...4 8 Service Manual 7541 03x 3 Remove the two screws B in the lower left corner 4 Remove the screw C in the lower left corner ...

Страница 191: ...Repair information 4 9 7541 03x 5 Remove the screw D in the upper right corner 6 Remove the screw E in the top middle of the cover ...

Страница 192: ...e frame 9 Remove the option connector cover 10 Use the flatblade screwdriver to pry the rear cover away from the side cover at the main fan 11 Use a small flatblade screwdriver to release the tabs G that fasten the option connector cable to the rear cover 12 Pull the rear cover away from the device Note If there are ISP cards installed remove the thumbscrews from the RIP cage G ...

Страница 193: ...Repair information 4 11 7541 03x Front op panel cover 1 Remove the one screw A on the front right side 2 Remove the two screws B on the on the inner left side of the cover ...

Страница 194: ...4 12 Service Manual 7541 03x 3 Remove the two screws C on the under side of the cover 4 Pull the cover back 5 Disconnect the USB cable D from the cover ...

Страница 195: ...4 13 7541 03x Op panel top cover 1 Remove the card reader cover See Front op panel cover on page 4 11 2 Remove the two screws A on the front of the cover 3 Remove the screw B in the upper left corner of the panel assembly ...

Страница 196: ...he panel assembly 5 Release the tabs on the inside of the cover and gently lift the top cover assembly away from the bottom cover 6 Disconnect the speaker cable D from the UICC 7 Disconnect the grey and blue USB cables E from the UICC 8 Disconnect the RIP UICC cable F from the UICC ...

Страница 197: ...ion 4 15 7541 03x Op panel bottom cover 1 Remove the op panel top cover 2 Remove the three screws A that secure the op panel bottom cover to the flatbed assembly 3 Lift the cover up and away from the flatbed assembly ...

Страница 198: ...ervice Manual 7541 03x Upper right cover 1 Remove the op panel bottom cover See Op panel bottom cover on page 4 15 2 Remove the screw A at the rear of the cover 3 Remove the screw B at the front of the cover ...

Страница 199: ... 4 17 7541 03x 4 Lift the cover up so it clears the tabs C and pull it away from the printer Output bin print engine top cover 1 Open the front cover 2 Remove the two screws A securing the top cover to the printer frame ...

Страница 200: ...rew B on the left side above the scanner power supply door 4 Use a flatbed screwdriver to release the tabs C on the top cover from the printer frame 5 Lift and remove the top cover Back cave cover 1 Remove the inner right cover 2 Remove the top cover ...

Страница 201: ...move the two screws A on the left side of the back cave cover 4 Remove the cover Inner right cover 1 Remove the upper right cover 2 Remove the lower op panel cover 3 Remove the front screw A that secures the inner right cover to the frame ...

Страница 202: ... 20 Service Manual 7541 03x 4 Remove the screw B that secures the front of the inner right cover to the back cave cover 5 Remove the two screws C that fasten the rear cave cover to the inner right cover ...

Страница 203: ...Repair information 4 21 7541 03x 6 Use a screw driver to release the four tabs D that secure the inner right cover to the back cave cover 7 Pull the inner right cover forward and out of the device ...

Страница 204: ...e the rear cover See Rear cover on page 4 7 2 Remove the top cover See Output bin print engine top cover on page 4 17 3 Remove the rear screw A securing the left cover to the printer frame 4 Remove the screw B securing the left cover to the left EMI shield ...

Страница 205: ...Repair information 4 23 7541 03x 5 Remove the two screws C securing the left cover to the frame 6 Remove the screw D securing the left cover to the printer frame D ...

Страница 206: ...4 24 Service Manual 7541 03x 7 Slide the left cover back to release the tabs from the printer frame 8 Pull the left cover away from the frame ...

Страница 207: ...on 4 25 7541 03x Speaker removal 1 Remove the front operator panel cover 2 Remove the top operator panel cover 3 Remove the four screws A that secure the speaker cover to the op panel bottom cover 4 Remove the speaker ...

Страница 208: ... Output bin full sensor actuator removal 1 Remove the op panel paper exit guide See Op panel paper exit guide removal on page 4 32 2 Remove the screw A from the op panel paper exit guide 3 Remove the screw B from the op panel paper exit guide ...

Страница 209: ...Repair information 4 27 7541 03x 4 Remove the screw C from the op panel paper exit guide 5 Remove the top cover of the guide ...

Страница 210: ...4 28 Service Manual 7541 03x 6 Use a flatblade screwdriver to release the actuator from the exit guide 7 Remove the actuator ...

Страница 211: ...on page 4 106 4 Remove the toner cartridges and imaging units 5 Disconnect the affected LED s ribbon cable from the printhead controller board 6 Guide the printhead ribbon cable through the top of the print engine 7 Remove the head holder screw A securing the LED holder to the top frame Note You will need to remove the top EMI shield to access the screw if you are removing the magenta or yellow LE...

Страница 212: ...sembly towards the front of the print engine Note Use two hands when removing the unit This is to prevent the LED assembly from dropping down and damaging the LED unit in the assembly Note Perform a color alignment after installing the new printhead See Color Alignment on page 3 14 ...

Страница 213: ...9 2 Using a screw driver pull the plastic casing A on the rear of the holder away from the tab on the printhead releasing it from the printhead holder 3 Repeat the previous step for the front of the printhead assembly 4 Remove the printhead from the LED assembly 5 Carefully remove the ribbon cable B from the printhead ...

Страница 214: ...ice Manual 7541 03x Op panel paper exit guide removal 1 Remove the paper output bin See Output bin print engine top cover on page 4 17 2 Remove the two screws A on the front 3 Remove the two screws B in the rear ...

Страница 215: ...ver 2 Remove the op panel paper exit guide See Op panel paper exit guide removal on page 4 32 3 Disconnect the paper exit bin full sensor cable from CN7 on the printhead controller board 4 Thread the cable A through the fuser fan duct 5 Remove the screw B securing the paper exit guide to the sub drive unit ...

Страница 216: ...4 34 Service Manual 7541 03x 6 Remove the screw C securing the paper exit guide to the rear of the printer frame 7 Pull the fuser duct back to provide some clearance for the paper exit unit ...

Страница 217: ... 4 35 7541 03x 8 Lift the unit up and remove it from the printer Note When reinstalling the unit line up the slots D on the paper exit unit with the tabs E on the sub drive unit before pushing the unit down in place D EE ...

Страница 218: ... exit guide See Paper exit guide removal on page 4 33 2 Release the tabs A securing the black exit guide 3 Open the guide exposing the bin full sensor 4 Release the tabs B securing the bin full sensor to the paper exit guide 5 Disconnect the blue cable from the sensor A B ...

Страница 219: ...er board Engine board Replace only one component at a time Replace the required component and perform a POR before replacing a second component listed above If this procedure is not followed the printer will be rendered inoperable Never replace both of the components listed above without a POR after installing each one or the printer will be rendered inoperable Warning 1 Remove the rear cover See ...

Страница 220: ...r support 5 Remove the screw B securing the cable box to the top shield 6 Remove the screws securing the top shield 7 Disconnect all the cables from printhead controller board Warning Be careful to avoid damaging the ribbon cables when removing them from the printhead controller board A B ...

Страница 221: ...ller board to the frame Top EMI sheild removal 1 Remove the output bin cover See Output bin print engine top cover on page 4 17 2 Remove the two front screws A that secure the top EMI shield to the printer frame 3 Remove the screws B that secure the top sheild to the rear EMI sheild C A A B ...

Страница 222: ...4 40 Service Manual 7541 03x Front removals Transfer belt CRU 1 Open the front cover 2 Open the right cover 3 Lower the transfer belt door ...

Страница 223: ...the two green handles appear on the top of the unit 5 Use the two handles to pull the unit all the way out Transfer belt position sensor removal 1 Remove the transfer belt 2 Remove the sensor cable from the belt position sensor 3 Press the tabs the fasten the belt position sensor to the printer frame ...

Страница 224: ...ensor removal This is the paper size sensor for the top MPF tray 1 Remove the standard paper tray 2 Remove the MPF paper tray 3 Remove the 15 screws A securing the sensor support frame to the print engine frame 4 Remove the paper size sensors ...

Страница 225: ...air information 4 43 7541 03x Photoconductor lock removal 1 Remove the standard paper tray 2 Remove the two screws A that secure the front metal cover to the printer frame 3 Remove the photoconductor lock ...

Страница 226: ...t side of the printer frame 3 Twist the stopper downward to release the two pawls B 4 Insert a flat blade screwdriver at point C 5 Pull the stopper forward to disengage the stopper from the printer frame 6 Disengage the pawls D by tuning them in the direction indicated by the arrow 7 Push the stopper up at point C to disengage the stopper from the frame ...

Страница 227: ...Left side removals Left EMI shield removal not a FRU 1 Remove the top cover See Output bin print engine top cover on page 4 17 2 Remove the left cover See Left cover removal on page 4 22 3 Remove the screw A 4 Remove the three screws B ...

Страница 228: ...4 46 Service Manual 7541 03x 5 Remove the two screws C 6 Remove the two screws D ...

Страница 229: ...Repair information 4 47 7541 03x 7 Remove the one screw E 8 Remove the four screws F on top ...

Страница 230: ...4 48 Service Manual 7541 03x 9 Remove the two screws G on top 10 Remove the two screws H ...

Страница 231: ...Repair information 4 49 7541 03x 11 Remove one screw I 12 Remove the screw J ...

Страница 232: ...4 50 Service Manual 7541 03x 13 Carefully insert the screwdriver through the main fan and remove the one screw K 14 Remove the Left EMI shield ...

Страница 233: ...ted to the power supply 3 Remove the three screws A securing the top of power supply to the power supply cage CAUTION SHOCK HAZARD Remove power from the printer before continuing or use caution if the product must be energized during this procedure The heat sink transformer core presents risk of electric shock Test before touching ...

Страница 234: ...4 52 Service Manual 7541 03x 4 Remove the three screws B securing the bottom of power supply to the power supply cage ...

Страница 235: ...ar fan on page 4 102 3 Disconnect the engine board fan cable from the engine board 4 Disconnect the main fan cable from CN22 on the engine board 5 Remove the screw A fastening the main fan stay to the left EMI shield 6 Remove the screw B fastening the main fan stay to the rear of the printer frame ...

Страница 236: ...4 54 Service Manual 7541 03x 7 Thread the fan cable through the cable stay 8 Lift the fan up and pull the main fan stay away from the printer ...

Страница 237: ...with label pointed outwards 1 Remove the left side EMI shield 2 Remove the fan s wiring harness from the connector A on the shield Note The harness must be routed in this matter when the fan is reinstalled 3 Turn the shield over and remove the four screws B securing the fan to the shield ...

Страница 238: ...y See Scanner power supply removal on page 4 58 3 Remove the 7 screws A securing the power box shield to the printer frame 4 Disconnect the theta sensor harness from the theta sensor 5 Remove the one screw B securing the theta sensor mounting plate to the printer frame 6 Remove the two screws C securing the theta sensor to the mounting plate B C D ...

Страница 239: ...al on page 4 51 2 Remove the scanner power supply See Scanner power supply removal on page 4 58 3 Remove the 7 screws securing the power box shield to the printer frame 4 Disconnect the density sensor harness from the density sensor 5 Remove the two screws D fastening the density sensor to the frame B C D ...

Страница 240: ...witch 1 Remove the main power switch cable 2 Disconnect both harnesses A from the power switch Scanner power supply removal 1 Remove the left cover 2 Remove the left EMI shield 3 Disconnect the three cables from the scanner power supply ...

Страница 241: ...Repair information 4 59 7541 03x 4 Remove the four screws A from the top of the scanner power supply 5 Remove the screw B from the lower right corner of the scanner power supply ...

Страница 242: ...4 60 Service Manual 7541 03x 6 Remove the screw C from the lower left corner of the scanner power supply ...

Страница 243: ...Repair information 4 61 7541 03x Right side removals Fuser removal 1 Open the right side door 2 Grab the handles on the fuser and gently pull the fuser out of the print engine ...

Страница 244: ...4 62 Service Manual 7541 03x Handle cover removal 1 Remove the two screws A securing the handle covers to the printer frame 2 Remove the handle cover ...

Страница 245: ...gh voltage power supply See HVPS removal on page 4 111 2 Remove the handle covers See Handle cover removal on page 4 62 3 Open the right cover and remove the transfer roll Warning Avoid damaging the transfer roll 4 While holding the right cover lift the duplex unit ...

Страница 246: ...4 64 Service Manual 7541 03x 5 Disconnect the two springs from the right cover 6 Disconnect the left and right link arms from the duplex pin covers on the right cover ...

Страница 247: ...Repair information 4 65 7541 03x 7 Disconnect the duplex clutch and sensor cables from the connectors B on the engine controller board 8 Disconnect the duplex ground wire from the frame ...

Страница 248: ...4 66 Service Manual 7541 03x 9 Route the duplex cables through the frame 10 Slide the duplex to the right freeing it from the left hinge ...

Страница 249: ...om the printer while carefully routing the cables through the right hinge on the printer 12 Remove the screws securing the duplex unit to the right cover Note See Duplex unit component removals on page 4 172 for instructions to remove the duplex sub components ...

Страница 250: ...he right link arm Note Use care when pushing the tab back It can easily break if pushed too far 4 Disconnect the registration clutch harness from connector CN20 on the printhead controller board 5 Disconnect the pick roll separator roll and feed roll clutch cables from connector CN8 on the MDCONT engine board 6 Disconnect the paperfeed unit sensors cable from CN12 on the engine board 7 Disconnect ...

Страница 251: ...Repair information 4 69 7541 03x 8 Remove the four screws A fastening the paperfeed mount plate to the right scanner stay ...

Страница 252: ...4 70 Service Manual 7541 03x 9 Remove the two screws B securing the right side of the paper feed unit to the printer frame ...

Страница 253: ...ion 4 71 7541 03x 10 Remove the two screws C securing the upper left side of the paper feed unit to the printer frame 11 Remove the two screws D securing the lower left side of the paper feed unit to the printer frame ...

Страница 254: ...te When routing the cables through the frame be sure to make a note of where they go through the frame Note See Paperfeed unit component removals on page 4 177 for instructions to remove the paperfeed unit sub components Transfer Roll CRU 1 Open the right side cover duplex unit 2 Turn the transfer roll fasteners to the unlocked position ...

Страница 255: ... will be rendered inoperable Warning Never install and remove components listed above as a method of troubleshooting components Once a component has been installed in a printer it cannot be used in another printer It must be returned to the manufacturer CAUTION POTENTIAL INJURY There is danger of explosion if a lithium battery is incorrectly replaced Replace it only with the same or an equivalent ...

Страница 256: ...3x 6 Remove the fourteen screws B securing the RIP board to the RIP cage Crossbar removal not a FRU 1 Remove the RIP cage 2 Remove the five screws A securing the cross bar to the rear EMI shield and the vertical scanner supports ...

Страница 257: ...unit See HVPS removal on page 4 111 2 Remove the rear fan See Rear fan on page 4 102 3 Disconnect the engine board fan cable from the engine board 4 Disconnect all the cables from the engine board 5 Remove the screw A from the upper right corner 6 Remove the screw B from the lower right corner ...

Страница 258: ...4 76 Service Manual 7541 03x 7 Remove the screw C from the upper left corner 8 Remove the screw D from the lower left corner 9 Pull the board and frame away from the printer frame ...

Страница 259: ...er not a FRU 1 Remove the HVPS unit See HVPS removal on page 4 111 2 Disconnect the drive unit motor cables from CN 17 18 19 and 20 on the engine board 3 Remove the screw A from the upper right corner 4 Remove the screw B from the lower right corner ...

Страница 260: ...41 03x 5 Remove the screw C from the upper left corner 6 Remove the screw D from the lower left corner 7 Slide the drive unit cover away from the drive unit being careful to avoid damaging the contact springs on the sub unit ...

Страница 261: ...FRU on page 4 77 2 Remove the engine board and engine board mounting bracket See Engine board and mount removal not a FRU on page 4 75 3 Disconnect the drive motor wiring harnesses from the engine board 4 Remove the three screws A in the upper left corner 5 Remove the screw B between the two leftward motors A ...

Страница 262: ...4 80 Service Manual 7541 03x 6 Remove the screw C between the two rightward motors 7 Remove the screw D securing the fan cage to the scanner support D ...

Страница 263: ...Repair information 4 81 7541 03x 8 Push the fan cage back 9 Remove the two screws E in the upper right corner E ...

Страница 264: ...4 82 Service Manual 7541 03x 10 Remove the screw F in the lower right corner 11 Remove the two screws G in the center bottom of the drive unit F G ...

Страница 265: ...K Note All four motors use this procedure 1 Remove the drive unit 2 Place the drive unit with the motors down on a table 3 Remove the two screws A securing the motor to the drive unit Note Note When replace the drive motor be careful to not damage the gears in the drive unit with the metal gear on the motor H ...

Страница 266: ...fan on page 4 102 7 Disconnect the engine board fan cable from the engine board 8 Remove the op panel paper exit guide See Op panel paper exit guide removal on page 4 32 9 Remove the paper exit guide See Paper exit guide removal on page 4 33 10 Remove the fuser fan from the fuser duct This part does not need to be removed from the machine 11 Remove the black fuser duct This is not a FRU Note You w...

Страница 267: ...Repair information 4 85 7541 03x 13 Disconnect the cables A from the blade connectors on the interlock switch 14 Disconnect the fuser paper exit motor cable B ...

Страница 268: ...4 86 Service Manual 7541 03x 15 Using a long shaft screwdriver remove the two black plastite screws C securing the sub drive cover to the sub drive unit 16 Remove the black plastic sub drive cover ...

Страница 269: ...Repair information 4 87 7541 03x 17 Remove the screw D at the bottom of the sub drive unit 18 Remove the screw E at the middle of the sub drive unit above the fuser paper exit motor ...

Страница 270: ... the screw F at the top of the sub drive unit Note If you are replacing the unit place the ground wire on the new unit 20 Pull the portion of the unit with the motor and sensors out of the machine 21 Disconnect the fuser entry sensor cable ...

Страница 271: ...move the gear train portion of the sub drive unit out of the printer Door interlock switch removal 1 Remove the sub drive unit See Sub drive unit removal on page 4 84 2 Remove the two screws A securing the door interlock switch to the sub drive unit ...

Страница 272: ...uplex solenoid removal 1 Remove the sub drive unit See Sub drive unit removal on page 4 84 2 Remove the left screw A securing the solenoid to the sub drive unit 3 Remove the right screw B securing the solenoid to the sub drive unit ...

Страница 273: ...epair information 4 91 7541 03x Fuser entry sensor removal 1 Remove the sub drive unit See Sub drive unit removal on page 4 84 2 Depress the tabs A fastening the fuser entry sensor to the sub drive unit ...

Страница 274: ...securing the board to the bracket Fuser Fan 1 Remove the rear EMI shield See Rear EMI shield Not a FRU on page 4 106 2 Remove the fuser duct 3 Remove the HVPS See HVPS removal on page 4 111 4 Remove the rear fan See Rear fan on page 4 102 5 Disconnect the fuser fan cable from CN21 the engine controller board 6 Remove the fuser fan Note Make sure the rating label is facing outward when reinstalling...

Страница 275: ...EMI shield Not a FRU on page 4 106 2 Disconnect the cable from the connector A exit drive unit motor 3 Remove the two screws B that secure the exit drive unit motor to the fuser motor damper Note The ground wire C is connected with one of the screws Be sure to replace the ground wire when replacing the motor ...

Страница 276: ...rom CN U14 on the RIP board 2 Loosen the two screws B that secure the modem to the RIP cage 3 Pull the modem up and inward to remove it from the cage Papertray lift motor removal 1 Remove the HVU See HVPS removal on page 4 111 2 Remove the rear fan See Rear fan on page 4 102 B ...

Страница 277: ... the paper tray lift motor to the frame RIP cage removal Note The RIP board does not need to be removed to perform this procedure 1 Remove the rear cover See Rear cover on page 4 7 2 Disconnect all the cables from the RIP board 3 Remove the screw A securing the bottom of the RIP cage to the rear EMI shield and crossbar ...

Страница 278: ...4 96 Service Manual 7541 03x 4 Remove the two screws B securing the upper left corner of the RIP cage to the EMI shield 5 Remove the six screws C on the inside of the RIP cage ...

Страница 279: ...ve unit See Drive unit on page 4 79 2 Remove the printhead controller board Printhead controller board removal on page 4 37 3 Remove the three screws A securing the board stay to the printer frame 4 Remove the five screws B securing the head pin plate to the printer frame ...

Страница 280: ...4 98 Service Manual 7541 03x 5 Remove the ten screws C securing the top support rail not a FRU to the top frame 6 Remove the four printhead assemblies See LED assembly removal on page 4 29 ...

Страница 281: ...Repair information 4 99 7541 03x 7 Remove the twelve screws D securing the top frame to the printer 8 Remove the four screws E securing the plastic body back to the left and right printer frames ...

Страница 282: ...3x 9 Remove the screws F securing the toner sensors to the top frame Transfer belt motor removal 1 Remove the HVPS 2 Disconnect the motor harness A from the transfer belt 3 Remove the two screws B securing the motor to the frame ...

Страница 283: ...ure and humidity sensor removal 1 Remove the rear cover The sensor will be located to the right side of the right rear scanner support 2 Disconnect the sensor cable A from the sensor 3 Remove the screw B securing the sensor to the printer frame ...

Страница 284: ... 7541 03x Rear fan 1 Remove the high volt power supply See HVPS removal on page 4 111 2 Remove the three screws A securing the fan mounting duct to the printer 3 Route the high volt power supply cable the fan mounting duct ...

Страница 285: ...Repair information 4 103 7541 03x 4 Disconnect the fan cable B from the MDCONT engine board ...

Страница 286: ... 104 Service Manual 7541 03x Sub frame unit 1 Remove the drive unit 2 Disconnect the belt up down sensor harness A if it is connected 3 Remove the four screws B securing the sub unit to the head in plate ...

Страница 287: ...r information 4 105 7541 03x Paper size switch removal 1 Remove the HVPS See HVPS removal on page 4 111 2 Disconnect the three cables 3 Remove the two screws A securing the sensor mount to the printer frame ...

Страница 288: ...r EMI shield Not a FRU 1 Remove the rear cover See Rear cover on page 4 7 2 Remove the RIP cage See RIP cage removal on page 4 95 3 Remove the cross bar See Crossbar removal not a FRU on page 4 74 4 Remove the two silver screws A securing the top rear of the EMI shield to the frame ...

Страница 289: ...Repair information 4 107 7541 03x 5 Remove the four screws B on the upper right side of the shield 6 Remove the two screws C on the lower right side of the shield ...

Страница 290: ...4 108 Service Manual 7541 03x 7 Remove the screw D in the lower left corner of the shield 8 Remove the two screws E in the upper left corner ...

Страница 291: ...Repair information 4 109 7541 03x 9 Remove the upper screw F securing the emi shield to the cage 10 Remove the lower screw G securing the emi shield to the cage ...

Страница 292: ... cables out of the guides Paper feed motor removal 1 Remove the paper feed unit See Power supply fan removal on page 4 55 2 Disconnect the cable A from the paper feed motor 3 Remove the two screws B securing the paper feed motor to the paper feed unit ...

Страница 293: ... Remove the top cover See Output bin print engine top cover on page 4 17 3 Remove rear EMI shield See Rear EMI shield Not a FRU on page 4 106 4 Remove three screws A attaching the HVU to the frame Note The upper left screw is different than the other two 5 Pinch the nylon retainer B to free the board ...

Страница 294: ... 1 Remove the HVPS See HVPS removal on page 4 111 2 Remove the rear fan See Rear fan on page 4 102 3 Depress the tabs A securing the waste toner sensor to the frame and push the sensor in After the sensor is detached pull it out of the frame 4 Disconnect the waste toner sensor cable B from the sensor ...

Страница 295: ...information see Adjustments on page 4 205 ADF assembly removal 1 Remove the cord cover See Cord cover on page 4 6 2 Remove the rear cover 3 Remove the two thumbscrews A that secure the ADF cable to the flatbed assembly 4 Remove the thumbscrews securing the ADF and flatbed hinges to the flatbed 5 Tilt the ADF assembly up and lift it away from the flatbed assembly Note After installing the new ADF a...

Страница 296: ...4 114 Service Manual 7541 03x ADF pick roll removal 1 Open the ADF top cover 2 Pull the tab 1 down 2 3 Remove the ADF pick roll ...

Страница 297: ...4 115 7541 03x ADF separator roll removal 1 Open the ADF top cover 2 Pull the separator roll lock 1 up 3 Pull the separator roll shaft holder 2 up 4 Pull the lock 3 off the shaft 5 Take the separator roll 4 off the shaft ...

Страница 298: ...r cover on page 4 7 5 Disconnect the flatbed cables A from the RIP 6 Using a short handle screw driver remove the two screws B on the left underside of the flatbed platform 7 Using a short handle screw driver remove the two screws C on the right underside of the flatbed platform 8 Remove the flatbed from the scanner platform 9 Remove the flatbed front cover See Flatbed front cover on page 4 117 No...

Страница 299: ...Repair information 4 117 7541 03x Flatbed front cover 1 Remove the flatbed assembly from the flatbed platform 2 Turn the flatbed over on a non marring surface 3 Remove the screw A 4 Remove the screw B ...

Страница 300: ...4 118 Service Manual 7541 03x 5 Remove the screw C 6 Remove the screw D ...

Страница 301: ...Repair information 4 119 7541 03x 7 Remove the screw E ...

Страница 302: ...he haptics cable A from the UICC 3 Remove the UICC cable B from the UICC 4 Disconnect the ribbon cable C from the UICC 5 Remove the four screws D securing the UICC to the upper operator panel assembly Note When reattaching the UICC cable to the display and the UICC card ensure that the end of the cable with the black tape to the display ...

Страница 303: ...removal on page 4 120 3 Disconnect the UICC cable A from the touchscreen from the touchscreen 4 Remove the seven screws B securing the touchscreen to the upper operator panel assembly Note When reattaching the UICC cable to the display and the UICC card ensure that the end of the cable with the black tape is connected to the display ...

Страница 304: ...d 1 Remove the ADF relay board cover See ADF relay card cover on page 4 167 2 Disconnect the ADF cable ground A from the relay board 3 Disconnect all the cables from the relay board 4 Remove the other screw securing the board to the ADF assembly ...

Страница 305: ...gine 3 Place the scanner glass side down on a non marring surface 4 Remove the 5 screws securing the shield to the flatbed assembly 5 Remove the shield from the flatbed assembly 6 Remove the two screws that secure the ADF cable connector to the bottom shield 7 Disconnect all the cables from the ICC board 8 Remove the five screws A securing the board to the flatbed assembly ...

Страница 306: ... Service Manual 7541 03x CCD chassis 1 Remove the flatbed upper cover 2 Remove the screw A securing the CCD guide rod to the flatbed frame 3 Remove the screw B securing the CCD guide rod to the flatbed frame ...

Страница 307: ...Repair information 4 125 7541 03x 4 Slide the guide rod towards the CCD chassis and remove the chassis from the rod 5 Disconnect the ribbon cables C from the CCD chassis ...

Страница 308: ...ter installing the new CCD perform the scanner calibration procedures See Adjustments on page 4 205 CCD belt 1 Remove the flatbed upper cover 2 Disconnect the belt from the clip on the right side 3 Disconnect the belt from the spring on the left side of the flatbed 4 Remove the belt from the CCD chassis ...

Страница 309: ...n a non marring surface and remove the bottom shield 3 Disconnect the affected sensor s cable from the ICC board 4 Turn the flatbed rightside up 5 Remove the flatbed upper cover 6 Remove the screw A securing the affected sensor to the flatbed assembly 7 Lift the sensor and thread the sensor cable through the bottom of the flatbed assembly ...

Страница 310: ...ble 1 Remove the cord cover See Cord cover on page 4 6 2 Remove the left ADF cover 3 Remove the ADF relay card cover 4 Disconnect the ground cable from the ADF relay board A 5 Disconnect the ground cable from the ADF main feeder chassis B ...

Страница 311: ...Repair information 4 129 7541 03x 6 Disconnect the ADF cable C from the ADF relay board ADF motor frame 1 Remove the left ADF cover 2 Disconnect the motor cables from the ADF relay card ...

Страница 312: ...4 130 Service Manual 7541 03x 3 Remove the two screws A securing the motor frame to the ADF main feeder unit ...

Страница 313: ...Repair information 4 131 7541 03x 4 Remove the motor frame from the ADF unit Note When replacing the frame make sure the ADF drive clutch stop B is properly aligned with the clutch ...

Страница 314: ...e the ADF main feeder 2 Remove the four screws A securing the solenoids to the ADF main feeder ADF drive clutch 1 Remove the ADF main feeder unit 2 Remove the clip A securing the ADF drive clutch to the shaft 3 Slide the ADF drive clutch off the shaft ...

Страница 315: ...Repair information 4 133 7541 03x ADF input tray 1 Remove the screw A under the front side of the ADF input tray 2 Remove the screw B under the rear side of the ADF input tray 3 Open the ADF top cover ...

Страница 316: ...isconnect the tray paper present sensor cable ADF main feeder 1 Remove the left ADF cover 2 Remove the right ADF cover 3 Disconnect the cables from the ADF relay card 4 Disconnect the ground wire A from the ADF main feeder 5 Remove the ADF motor frame assembly A ...

Страница 317: ...mation 4 135 7541 03x 6 Remove the three screws B securing the right side of the ADF main feeder to the top flatbed cover 7 Remove the screw C securing the right side of the ADF main feeder to the top flatbed cover ...

Страница 318: ...ADF main feeder to the top flatbed cover 9 Remove the main feeder from the flatbed cover 10 Remove the solenoids 11 Remove the ADF clutch 12 Remove the Inner ADF top cover 13 Remove the ADF paper guide Note After reinstalling the new component perform the scanner calibrations See Adjustments on page 4 205 ...

Страница 319: ... 4 134 2 Remove the clip A securing the ADF clutch to the transport roll shaft 3 Slide the clutch off the shaft ADF hinge 1 Remove the ADF unit from the scanner assembly 2 Place the ADF unit upside down on a non marring surface 3 Remove the four screws A the secure the hinge to bottom of the flatbed cover ...

Страница 320: ... 2 Place the ADF unit upside down on a non marring surface 3 Remove the four screws A the secure the hinge to bottom of the flatbed cover Tray paper size sensors 1 Remove the ADF input tray from the ADF unit 2 Remove the three screws A fastening the tray bottom to the ADF input tray top ...

Страница 321: ...Repair information 4 139 7541 03x 3 Release the tab B securing the tray top to the tray bottom 4 Release the tab C securing the tray top to the tray bottom ...

Страница 322: ...Manual 7541 03x 5 Release the tab D securing the tray top to the tray bottom 6 Release the tab E securing the tray top to the tray bottom 7 Pull the tabs F back to release the width sensor cable from the tray bottom ...

Страница 323: ...Repair information 4 141 7541 03x 8 Remove the two screws G securing the paper width actuator to the rack gear 9 Remove the size sensors from the ADF input top ...

Страница 324: ... the ADF paper tray ADF cover open ADF pick sensor Note The ADF cover open and ADF pick sensor are one assembly 1 Remove the flatbed upper cover 2 Disconnect the sensor cable A from the connector on the sensor 3 Remove the screw B securing the sensor cable to the ADF inner cover B ...

Страница 325: ...ecuring the sensor to the inner cover 5 Remove the screw D securing the ADF pick sensor to the inner cover ADF cover open sensor actuator 1 Remove the screw securing the cover open sensor to the ADF inner cover 2 Remove the ADF cover open sensor actuator C D ...

Страница 326: ...ly 1 Remove the ADF outer cover 2 Disconnect the sensor assembly A cable from the main cover sensor cable 3 Remove the screw B holding the cable to the ADF inner cover 4 Remove the screw C securing the ADF paper in sensor to the ADF inner cover 5 Remove the screw D securing the paper present sensor to the ADF inner cover B C D ...

Страница 327: ... the screw securing the ADF paper present sensor to the ADF inner cover 2 Turn the actuator up and carefully remove the actuator from the inner ADF to cover Paper in sensor actuator 1 Remove the ADF paper in sensor 2 Carefully remove the actuator from the inner ADF to cover ...

Страница 328: ...an sensor FRU assembly is made of the scan sensor and an optical paper path jam sensor 1 Remove the ADF main feed unit 2 Remove the scan sensor cover 3 Remove the screw A securing the scan sensor to the scan sensor cover 4 Remove the two screws B securing the paperpath sensor to the ADF main feed unit ...

Страница 329: ...Repair information 4 147 7541 03x 5 Pull the scan sensor cable through the clip on the ADF main feed unit 6 Pull the sensor cable through the side of the ADF main feed unit ...

Страница 330: ...4 148 Service Manual 7541 03x Scan sensor actuator 1 Remove the scan sensor 2 Use a flatbed screwdriver to free the actuator from the scan sensor cover 3 Remove the actuator ...

Страница 331: ...tion 4 149 7541 03x Scan sensor cover not a fru 1 Remove the ADF main feed unit 2 Use a flatblade screwdriver to remove the guide on the bottom of the ADF main feed unit 3 Pull the guide out of the ADF main feed unit ...

Страница 332: ...4 150 Service Manual 7541 03x 4 Remove the screw A securing the scan sensor cover to the ADF main feed unit 5 Remove the screw B securing the scan sensor cover to the ADF main feed unit ...

Страница 333: ...Repair information 4 151 7541 03x 6 Remove the screw C securing the scan sensor cover to the ADF main feed unit 7 Remove the screw D securing the scan sensor cover to the ADF main feed unit ...

Страница 334: ...ual 7541 03x 8 Remove the screw E securing the scan sensor cover to the ADF main feed unit 9 Remove the scan sensor cover Duplex timing sensor 1 Remove the ADF main feed unit 2 Remove the fastener A 3 Remove the gear B ...

Страница 335: ...Repair information 4 153 7541 03x 4 Turn the bushing C to release it from the ADF main feed unit 5 Remove the screw D securing the paper guide to the ADF main feed unit ...

Страница 336: ...4 154 Service Manual 7541 03x 6 Turn the bushing E to release it from the ADF main feed unit 7 Remove the screw F securing the paper guide to the ADF main feed unit ...

Страница 337: ...Repair information 4 155 7541 03x 8 Lift the paper guide up and feed the duplex pass timing sensor cable through the ADF main feeder frame 9 Release the cable from the clip G on the paper guide ...

Страница 338: ...4 156 Service Manual 7541 03x 10 Carefully pull the sensor PCBA away from the retainer H on the paper guide 11 Carefully lift the sensor up and away from the paper guide ...

Страница 339: ...157 7541 03x Duplex out scan out sensor 1 Remove the ADF main feed unit 2 Remove the screw a securing the duplex out sensor to the ADF main feed unit 3 Route the cable out of the main feed unit removing the clips if needed ...

Страница 340: ...rvice Manual 7541 03x Duplex out sensor actuator 1 Remove the duplex out sensor 2 Remove the two screws A that fasten the sensor mount to the ADF main feed unit 3 Lift the actuator out of the ADF main feed unit ...

Страница 341: ...3x Flatbed cover closed sensor 1 Remove the flatbed upper cover See Flatbed upper cover on page 4 161 2 Remove the two screws a securing the sensor mounting bracket to the flatbed chassis 3 Remove the sensor cable from the connector ...

Страница 342: ...4 160 Service Manual 7541 03x 4 Pull the two tabs B back to release the sensor from the mounting bracket ...

Страница 343: ...er 1 Remove the flatbed assembly See Flatbed assembly removal on page 4 116 2 Remove the flatbed front cover See Flatbed front cover on page 4 117 3 Remove the two screws A on the front of the flatbed unit 4 Remove the screw B on the front of the cover ...

Страница 344: ...4 162 Service Manual 7541 03x 5 Remove the two screws C on the top rear of the cover 6 Remove the two screws D on the top rear of the cover 7 Lift the cover off of the flatbed chassis ...

Страница 345: ...4 163 7541 03x Outer ADF top cover 1 Open the ADF top cover 2 Remove the left cover screw A that secures the outer cover to the inner cover 3 Remove the middle cover screw B that secures the outer cover to the inner cover ...

Страница 346: ...41 03x 4 Remove the right cover screw C that secures the outer cover to the inner cover Inner ADF top cover 1 Remove ADF outer top cover 2 Remove the ADF main feeder 3 Remove the screw A securing the hinge to the main feeder ...

Страница 347: ...Repair information 4 165 7541 03x 4 Remove the hinge 5 Pull the inner top cover away from the ADF main feeder ...

Страница 348: ...3x 6 Carefully feed the sensor assembly cable through the ADF main feeder 7 Carefully feed the sensor assembly cable through the ADF paper guide assembly 8 Remove sensors and hinges from the inner cover to place on the new cover ...

Страница 349: ...Repair information 4 167 7541 03x ADF relay card cover 1 Remove the two screws A securing the relay cover to the ADF assembly Left ADF cover 1 Remove the two screws A on top of the left ADF cover ...

Страница 350: ...4 168 Service Manual 7541 03x 2 Remove the screw B in the rear of the left ADF cover 3 Lift the ADF top cover and remove the screw C ...

Страница 351: ...Repair information 4 169 7541 03x 4 Lift the cover up and slide the tab on the cover out of the ADF assembly ...

Страница 352: ...4 170 Service Manual 7541 03x Right ADF cover 1 Remove the screw A securing the cover to the flatbed cover 2 Lift the ADF top cover and remove the screw B securing the cover to the flatbed cover ...

Страница 353: ...Repair information 4 171 7541 03x 3 Lift the rear of the right ADF cover up and pull the cover away from the flatbed cover ...

Страница 354: ...tch removal 1 Remove the duplex unit See Duplex removal on page 4 63 2 Remove the two screws A securing the duplex cover to the duplex unit 3 Disconnect the duplex clutch harness from the duplex clutch 4 Remove the e clip B that fastens duplex clutch to the carrying shaft ...

Страница 355: ...e Duplex clutch removal on page 4 172 2 Remove the timing belts Duplex exit MPF sensor removal 1 Remove the duplex unit See Duplex removal on page 4 63 2 Remove the duplex exit MPF sensor actuator 3 Disconnect the sensor harness 4 Pinch the tabs C that secure the sensor to the duplex unit C ...

Страница 356: ...duplex unit See Duplex removal on page 4 63 2 Remove the two screws A securing the MPF clutch cover to the duplex unit 3 Remove the e clip B securing the clutch to the MPF shaft 4 Remove the MPF shaft C 5 Remove the MPF paper empty lever D 6 Remove the MPF clutch ...

Страница 357: ...on 4 175 7541 03x MPF tray assembly removal 1 Open the MPF tray 2 Slide the MPF arm up to the opening on the tray A 3 Pull the arm out of the tray 4 Repeat steps 1 and 2 for the other arm 5 Remove the MPF roller cover ...

Страница 358: ...4 176 Service Manual 7541 03x 6 Lift and pull the tray away from the printer ...

Страница 359: ... Separating the MPF tray and main tray paperfeed units 1 Remove the paperfeed unit from the printer See Power supply fan removal on page 4 55 2 Remove the clutches on the paperfeed unit See Paperfeed unit clutch removal on page 4 179 3 Remove the two screws A securing the paperfeed motor to the paperfeed motor frame 4 Remove the seven screws B securing the paperfeed motor frame to the paper feed u...

Страница 360: ...178 Service Manual 7541 03x 6 Remove the twelve screws C securing the paperfeed connect frame to the paperfeed units 7 Remove the eight screws D securing the paperfeed connect frame to the paperfeed units ...

Страница 361: ... A from the clutch 3 Remove the e clip B securing the clutch to the shaft Note When reinstalling the clutch make sure the clutch stopper on the paperfeed unit is lined up with the stop on the clutch Registration sensor MPF tray removal 1 Open the right cover door 2 Pull the cassette guide down 3 Pinch the tabs A that secure the sensor to the cassette guide releasing the sensor 4 Disconnect the sen...

Страница 362: ...oor 2 Pull the cassette guide down 3 Place a flatbed screwdriver under the right side of the actuator using it as a lever to pull the actuator shaft out of the cassette guide Static discharge brush removal 1 Remove the paperfeed unit See Power supply fan removal on page 4 55 2 Remove the six screws A that secure the discharge brush plate to the paperfeed unit ...

Страница 363: ... 1 Remove the paperfeed unit See Power supply fan removal on page 4 55 2 Remove the clutches on the paperfeed unit See Paperfeed unit clutch removal on page 4 179 3 Separate the two paperfeed units See Separating the MPF tray and main tray paperfeed units on page 4 177 4 Remove the registration gears A 5 Remove the e clips B 6 Remove the registration bushings C 7 Remove the registration springs D ...

Страница 364: ... on page 4 55 2 Depress the tab A and remove the PE sensor actuator 3 Pull back the tab on the pick roll B and remove the pick roll Paperfeed roll removal 1 Remove the paperfeed unit See Paper feed unit removal on page 4 68 2 Remove the pick roll See Pick roll removal on page 4 182 3 Remove the nylon retainer clip C 4 Remove the feed roll ...

Страница 365: ...arator roll removal 1 Lower the duplex unit to the down position 2 Remove the outer cassette guide A 3 Remove the inner cassette guide B 4 Remove the plastic e clip C that secures the separator roll to the shaft 5 Remove the separator roll ...

Страница 366: ... tray paperfeed units on page 4 177 for instructions 1 Remove the static discharge brush plate top feeder only 2 Remove the static discharge brush top feeder only 3 Remove the registration roll gears A 4 Remove the e clips B securing the registration rolls to the paperfeed unit 5 Remove the bushings C holding the registration roll to the paperfeed unit 6 Remove the registration springs D 7 Slide t...

Страница 367: ...Repair information 4 185 7541 03x MPF roll removal 1 Remove the MPF arms A from the MPF tray and right cover 2 Lower the MPF tray 3 Remove the MPF roller cover 4 Slide the MPF coupling to the left ...

Страница 368: ...4 186 Service Manual 7541 03x 5 Take the MPF shaft out 6 Remove the MPF roll ...

Страница 369: ...removal 1 Remove MPF tray See MPF tray assembly removal on page 4 175 2 Gently pull the right side of the pad holder cover and disconnect it from the mount A 3 Gently pull the left side of the pad holder cover and disconnect it from the mount B ...

Страница 370: ...4 188 Service Manual 7541 03x 4 Remove the right screw C securing the outer pad holder to the MPF unit 5 Remove the left screw D securing the outer pad holder to the MPF unit ...

Страница 371: ...Repair information 4 189 7541 03x 6 Pull the outer pad holder away from the machine 7 Carefully lift and remove the pad from the pad holder Note Reuse the spring that was between the pad and pad holder ...

Страница 372: ...need to remove the drive gear spring and washer on the paper exit roll and place it on the new paper exit roll 1 Remove the paper exit unit See Paper exit guide removal on page 4 33 2 Remove the e clip A that fastens the exit unit roll to the paper exit unit 3 Remove the bushing B ...

Страница 373: ...Repair information 4 191 7541 03x 4 Remove the e clip C securing the drive gear to the shaft 5 Remove the drive gear D from the shaft ...

Страница 374: ...4 192 Service Manual 7541 03x 6 Remove the spring washer e clip and bushing E from the shaft 7 Release the tabs F that secure the black guide to the exit unit ...

Страница 375: ...Repair information 4 193 7541 03x 8 Open the paper exit unit exposing the rollers 9 Pull back the tab G to release the roller ...

Страница 376: ... Manual 7541 03x 10 Remove the screw H that fastens the roller holder to the paper exit unit frame 11 Pull the roller holder back and away from the paper exit unit 12 Repeat steps 9 thru 11 for the remaining rollers ...

Страница 377: ...Repair information 4 195 7541 03x 13 Move the paper exit guide roll to the left lift it out of the frame and pull it to the lift releasing it from the paper exit unit ...

Страница 378: ...the option paper feed unit 2 Remove the clip A securing the paper feed roll to the shaft 3 Slide the paper feed roll B off the shaft to remove it Pick roll removal 1 Remove the paper tray from the option paper feed unit 2 Pull back the tab A on the pick roll 3 Slide the pick roll B off of the shaft to remove it ...

Страница 379: ...e separator roll to the shaft 3 Slide the separator roll B off the shaft to remove it Paper size switches removal 1 Remove the paper tray from the option paper feed unit 2 Disconnect the cables A from the sensors 3 Remove the two screws B securing the sensor mounting bracket to the option tray rear frame 4 Remove the switches C from the bracket ...

Страница 380: ...r of the tray 5 Remove the sensor from the option paperfeed drawer Transport sensor removal 1 Take the main printer unit off of the option paper feed unit 2 Remove the screw A securing the transport sensor bracket to the option feeder 3 Disconnect the harness from the transport sensor 4 Remove the transport sensor from the mounting bracket by pressing the tabs B on the sensor together and pulling ...

Страница 381: ...pressing the tabs A on the sensor together and pulling it away from the frame 3 Disconnect the sensor from the harness Paper full sensor removal 1 Take the main printer unit off of the option paper feed unit 2 Remove the paper empty sensor from the frame by pressing the tabs A on the sensor together and pulling it away from the frame 3 Disconnect the sensor from the harness ...

Страница 382: ...bles from the option controller board 3 Remove the four screws A securing the controller board to the rear frame Stepper motor removal 1 Remove the rear cover 2 Remove the stepper motor cable from the controller board 3 Remove the three screws A securing the bracket to the rear frame 4 Remove the gear and belt ...

Страница 383: ...move the two screws B securing the stepper motor to the bracket Tray lift motor removal 1 Remove the rear cover 2 Disconnect the tray lift cable from the tray lift motor 3 Remove the three screws A securing the tray lift motor to the frame ...

Страница 384: ...or inter lock switch removal 1 Remove the rear cover 2 Disconnect the interlock cable from the interlock switch 3 Remove the one screw A securing the bracket to the frame 4 Remove the one screw B securing the interlock switch to the bracket ...

Страница 385: ...screw B securing the right rear cover 3 Remove the screw C securing the right rear switch cover 4 Remove the two screws D securing the vertical transport guide rail 5 Remove the vertical transport cover 6 Remove the two screws E securing the right middle cover 7 Remove the screw F securing the vertical transport guide plate F ...

Страница 386: ...4 204 Service Manual 7541 03x 8 Remove the two screws G securing the rear cover to the option feeder 9 Remove the left and right drum stays H 10 Remove the clutch ...

Страница 387: ... navigate to SCANNER CALIBRATION Copy Quick Test c Compare the copy to the original test page and then navigate to Adjust Calibration Values ADF Front Black d Adjust the values and then touch Submit to save your changes Increasing the value makes the black level darker e To check the changes reload the original test page and then repeat the Copy Quick Test Repeat the steps as needed until you are ...

Страница 388: ... 6 turn on the printer and release the buttons when the splash screen appears 2 Navigate to Scanner Manual Registration Print Quick Test 3 Adjust the flatbed a Place the printed test page facedown on the flatbed scanner glass and select Copy Quick Test b Compare the copy to the original test page c Select Flatbed and adjust the left and top margins as needed d Touch Submit to save your changes e T...

Страница 389: ...1 7541 03x 5 Locations Locations Print engine cross section Callout no Part name 1 Charge roll 2 LED head 3 Developer roll 4 Primary transfer roll 5 Drum cleaning blade 6 Photoconductor 7 Doctor blade 8 Supply roll ...

Страница 390: ... tray 23 Feed roll Std tray 24 Separator roll Std tray 25 Registration roll IN MP feeder 26 Registration roll OUT MP feeder 27 Registration roll IN Std tray 28 Registration roll OUT Std tray 29 Duplex input roll 30 Duplex transport roll 31 Duplex bottom transport roll 32 Duplex exit roll 33 Paper exit roll 34 Registration sensor actuator 35 Fuser input sensor actuator 36 Duplex exit sensor actuato...

Страница 391: ...sor 3 ADF paper present photo interrupt ADF paper path sensor 4 ADF cover open ADF paper path sensor 5 Pick roll ADF pick roll CRU 6 Pick roll position sensor Photo interrupt ADF paper path sensor 7 Feed roll ADF pick roll CRU 8 Separator roll ADF Separator roll CRU 9 Paper gap sensor photo interrupt ADF paper path sensor 10 Paper in sensor Photo reflect Scan sensor 11 Scan roller ADF main feed un...

Страница 392: ...5 4 Service Manual 7541 03x Rip Board connectors ...

Страница 393: ...V_SCANNER 8 FB_PWRSVR_R 9 FBR_AFE_SH_R 10 FBR_AFE_SEN_R 11 FBR_AFE_SCK_R 12 FBR_AFE_SDIO_R 13 GND 14 FBR_AFE_NRST_R 15 GND 16 FB_LVDS_RXIN0 17 FB_LVDS_RXIN0 18 GND 19 FB_LVDS_RXIN1 20 FB_LVDS_RXIN1 21 GND 22 FB_LVDS_RXIN2 23 FB_LVDS_RXIN2 24 GND 25 FB_LVDS_RXCLK 26 FB_LVDS_RXCLK 27 GND 28 FB_LVDS_MCLK 29 FB_LVDS_MCLK 30 GND ...

Страница 394: ...7 BOOT_SEL_CN 8 5V SCANNER 9 5V SCANNER 10 GND 11 MDC_TXD_CN 12 MDC_RXD_CN 13 GND 14 ADF_PAPER_PRES_R 15 FB_COVER_CLOSING_R 16 GND 17 FB_NHOME_R 18 ADF_INTERVAL_R 19 GND 20 MDC_RST_NR 21 3 3V 22 GND 23 NC_MDC_23 24 IC2_CLK 25 IC2_DATA 26 GND RIP board Connector Pin no Signal ...

Страница 395: ..._R 8 GND 9 MOD_IRQ_R 10 5V 11 POR_CUHD 12 3 3V 13 3 3V 14 NC_MOD_P6 J9 1 UI_RESET_NR 2 GND 3 TX1 4 TX1 5 TX2 6 TX2 7 CLXTX 8 CLXTX 9 GND 10 5V 11 UI_RXD 12 UI_RXD 13 TX0 14 TX0 15 GND 16 5V 17 5V 18 5V 19 WAKE 20 GND 21 GND 22 AMBER_LED 23 5V_CONT 24 PWR_BUTTON RIP board Connector Pin no Signal ...

Страница 396: ...nual 7541 03x J11 Printhead controller board 1 GND 2 VSYN_Y 3 VSYN_M 4 VSYN_C 5 VSYN_K 6 HSYN_Y 7 HSYN_M 8 HSYN_C 9 HSYN_K 10 GND 11 LEVELY O0 12 LEVELY O1 13 LEVELY E0 14 LEVELY E1 RIP board Connector Pin no Signal ...

Страница 397: ...2 LEVELC E1 23 LEVELK O0 24 LEVELK O1 25 LEVELK E0 26 LEVELK E1 27 FEED2 28 SBSY 29 GND RESRT 30 STATUS 31 FDRDY 32 CPRDY 33 STCLK 34 START 35 CBSY 36 PPRDY 37 STCLK 38 READY 39 COMMAND 40 GND J12 Printhead controller board 1 VCLK_M 2 GND 3 VCLK_Y 4 GND 5 VCLK_C 6 GND 7 VCLK_L 8 GND RIP board Connector Pin no Signal ...

Страница 398: ...5 10 Service Manual 7541 03x Printhead controller connectors ...

Страница 399: ...tor Connects to Pin no Signal CN1 Yellow printhead 1 HD5V 2 GND 3 HD5V 4 GND 5 HD5V 6 GND 7 HD5V 8 GND 9 HD5V 10 GND 11 HD3V 12 SO Y 13 SCK Y 14 STROBE Y 15 DATA_Y0 16 DATA_Y1 171 DATA_Y2 18 DATA_Y3 19 HSYNC Y 20 LOAD_Y 21 GND 22 CLOCK N Y 23 CLOCK P Y 24 GND ...

Страница 400: ...1 HD5V 2 GND 3 HD5V 4 GND 5 HD5V 6 GND 7 HD5V 8 GND 9 HD5V 10 GND 11 HD3V 12 SO C 13 SCK C 14 STROBE C 15 DATA_C0 16 DATA_C1 171 DATA_C2 18 DATA_C3 19 HSYNC C 20 LOAD_C 21 GND 22 CLOCK N C 23 CLOCK P C 24 GND Printhead controller board Connector Connects to Pin no Signal ...

Страница 401: ... HD5V 2 GND 3 HD5V 4 GND 5 HD5V 6 GND 7 HD5V 8 GND 9 HD5V 10 GND 11 HD3V 12 SO M 13 SCK M 14 STROBE M 15 DATA_M0 16 DATA_M1 171 DATA_M2 18 DATA_M3 19 HSYNC M 20 LOAD_M 21 GND 22 CLOCK N M 23 CLOCK P M 24 GND Printhead controller board Connector Connects to Pin no Signal ...

Страница 402: ... 14 STROBE K 15 DATA_K0 16 DATA_K1 171 DATA_K2 18 DATA_K3 19 HSYNC K 20 LOAD_K 21 GND 22 CLOCK N K 23 CLOCK P K 24 GND CN5 Engine board 1 MBUSY_IN 2 SUBRXD 3 SUBTXD 4 MOTOR_CLK1 5 MOTOR_CLK2 6 MOTOR_CLK3 7 MOTOR_CLK4 8 GND 9 HTNB1 10 PEPCNG 11 GND 12 THETALED 13 PRG_SW 14 LDPRG Printhead controller board Connector Connects to Pin no Signal ...

Страница 403: ...ND 5 STACK_SW 6 5V CN8 Theta sensor 1 A 2 THETA 3 GND CN9 N C CN 10 CN11 HVPS 1 VCC24VFAN 2 GND 3 HV24V_2 4 HINB 5 DACLK 6 DASO 7 DARIN 8 DA_LAT CN12 N C CN13 OPTION 1 ADR0 2 ADR1 3 OPTION_RST 4 OPTION_RXD 5 OPTION_TXD 6 OPT_24V 7 OPT_24V 8 GND 9 GND 10 OPT_5V 11 GND Printhead controller board Connector Connects to Pin no Signal ...

Страница 404: ... CN16 LVPS 1 24V_GND 2 HV25V 3 SLEEP1 4 SLEEP2 5 HT1 6 HT2 7 HT3 8 ZEROCRS CN17 Toner sensor K 1 TNSETK 2 k k 3 GND 4 TSZANK 5 5V Toner sensor C 6 TNSETC 7 k k 8 GND 9 TSZANC 10 5V CN18 Toner sensor Y 1 TNSETY 2 k k 3 GND 4 TSZANY 5 5V Toner sensor M 6 TNSETM 7 k k 8 GND 9 TSZANM 10 5V Printhead controller board Connector Connects to Pin no Signal ...

Страница 405: ...rd 1 VCLK Y 2 GND 3 VCLK M 4 GND 5 VCLK C 6 GND 7 VCLK K 8 GND CN22 RIP board 1 GND 2 VSYN Y 3 VSYN C 4 VSYN M 5 VSYN K 6 HSYN Y 7 HSYN C 8 HSYN M 9 HSYN K 10 GND 11 LEVELY O0 Printhead controller board Connector Connects to Pin no Signal ...

Страница 406: ...EVELM O1 17 LEVELM E0 18 LEVELM E1 19 LEVELC O0 20 LEVELC O1 21 LEVELC E0 22 LEVELC E1 23 LEVELK O0 24 LEVELK O1 25 LEVELK E0 26 LEVELK E1 27 GND 28 FEED2 29 SBSY 30 FPF 31 STATUS 32 FDRDY 33 CPRDY 34 START 35 CBSY 36 PPRDY 37 STCLK 38 READY 39 COMMAND 40 GND Printhead controller board Connector Connects to Pin no Signal ...

Страница 407: ...Locations 5 19 7541 03x Engine board connectors ...

Страница 408: ...B1 7 GND 8 MOTOR CLK4 9 MOTOR CLK3 10 MOTOR CLK2 11 MOTOR CLK1 12 TXD 13 RXD 14 MBUSY_IN CN3 N C CN4 Temp humidity sensor 1 Temp S 2 GND 3 Humid S 4 5V CN5 Paper size sensor Std Cassette 1 CPSIZE2 2 PCZCNG C 3 CPSIZE1 4 PCZCNG C 5 CPSIZE0 6 PCZCNG C CN6 Paper tray lift motor 1 PN2 2 PN1 CN7 Paper size sensor MPF Cassette 1 MPSIZE2 2 MPSIZE1 3 PCZCNG M 4 MPSIZE0 ...

Страница 409: ...T U D 6 LD CN10 Duplex solenoid DUPSOL GND CN12 Full sensor 1 GND 2 PFLIFTSW 3 LD PE Sensor STD tray 4 GND 5 PP EMP 6 LD PE Sensor MPF tray 7 GND 8 MPF DET 9 LD Reg sensor 10 GND 11 PRGSW 12 PRGSW5V CN13 Duplex clutch 1 DUPOUTCL 2 3 GND CN14 Exit sensor 1 GND 2 DUP INSW 3 5V CN15 Belt motor 1 1A BELT 2 1B BELT 3 2A BELT 4 2B BELT Engine board Connector Connects to Pin no Signal ...

Страница 410: ...SYMOY A 4 DSYMOY B CN18 Motor M Motor 1 DSMMOY A 2 DSMMOY B 3 DSMMOY A 4 DSMMOY B CN19 Motor C Motor 1 DSCMOY A 2 DSCMOY B 3 DSCMOY A 4 DSCMOY B CN20 Motor K Motor 1 DSKMOY A 2 DSKMOY B 3 DSKMOY A 4 DSKMOY B CN21 Fuser fan 1 FFAN 2 FFALM 3 GND CN22 Main fan 1 CFAN 2 CFALM 3 GND CN23 Main switch 1 24V PR 2 24V PR CN24 LVPS 1 5V IN 2 5V GND 3 24V PR 4 24V GND 5 24 V Engine board Connector Connects t...

Страница 411: ...ower supply fan 1 PSFAN 2 PSFALM 3 GND CN26 Rear fan 1 REAFAN 2 REAFALM 3 GND CN27 Remote switch 1 GND 2 P OFF CN28 MPF clutch 1 TMPCL 2 GND CN29 t MPF paper out 1 GND 2 TMFDET 3 LD1 Engine board Connector Connects to Pin no Signal ...

Страница 412: ...5 24 Service Manual 7541 03x LVPS Connectors LVPS board Connector Connects to Pin no Signal CN01 Scanner power supply 1 AC L 2 3 AC N CN02 Fuser sensor 1 COM 2 HT3 3 HT2 4 HT1 ...

Страница 413: ...CXerox P 2 Heater3N 3 Heater2N 4 Heater1N 5 Sleep2 6 Sleep1 7 HT24 8 GND Engine board 9 FAN GND 10 FAN ARM 11 FAN CN06 Power supply fan 1 FAN 2 FAN ARM 3 FAN GND Connector Connects to Pin no Signal CN01 Power switch 1 110V or 220V in 3 GND CN02 LVPS 1 COM 3 110V or 220V out CN03 RIP board 1 5V 2 5V 3 24V 4 24V 5 GND 6 GND 7 GND 8 GND LVPS board Connector Connects to Pin no Signal ...

Страница 414: ...2 DGND 3 5V J2 FB paper size sensor 2 1 GND 2 5V 3 FBPS2 3 4 FBPS2 2 5 FBPS2 1 J3 1 GND 2 24V_RIP 3 24V_RIP 4 24V_RIP 5 GND 6 TOP_FB 7 BOOT SEL 8 5V 9 5V 10 GND 11 MDC RXD 12 13 GND 14 ADF_PAPER_INMDC_TXD 15 F_COVER_OPEN 16 GND 17 HMSEN 18 PAPER_GAP 19 GND 20 RESET_N 21 3 3V 22 GND 23 HW RESERVE 24 IC2_CLK 25 IC2 DATA 26 GND ...

Страница 415: ...5 1 5V 2 24VM_ADF 3 24VM_ADF 4 GND 5 GND 6 IO_BUS0 7 IO_BUS2 8 IO_BUS4 9 IO_BUS6 10 ADF_PICKUP_STEP 11 FB_ADF_STEP 12 DGND 13 I_ADF_PLUG 14 DGND 15 24VM_ADF 16 DGND 17 NC 18 IO_BUS1 19 NC 20 IO_BUS3 21 NC 22 IO_BUS5 23 ADF_PAPER_IN 24 NC 25 PAPER _GAP 26 3 3V ICC board Connector Pin no Signal ...

Страница 416: ... 3 GND 4 GND 5 FB_DIR 6 HM_SEN 7 GND 8 FBM_EN 9 FB_RS 10 GND 11 FB_MS2 12 FB_MS1 13 GND 14 TQ2 15 TQ1 16 24VM_CCD 17 FB_ADF_STEP 18 24VM_CCD J7 1 JTD1 2 GND 3 JTD 0 4 GND 5 JTCK 6 GND 7 RTCK 8 JTMS 9 3 3V 10 JIRST_N 11 3 3V 12 GND ICC board Connector Pin no Signal ...

Страница 417: ...GND 8 98714_OUT2_M 9 98714_OUT2_P 10 GND 11 98714_OUT1_M 12 98714_OUT1_P 13 GND 14 98714_OUT0_M 15 98714_OUT0_P 16 GND 17 AFE_RESET 18 GND 19 98714_SDATA 20 98714_SCLK 21 98714_SEN_N 22 98714_SH_R 23 PWR_SVR 24 5V_CCD_IN 25 5V_CCD_IN 26 GND 27 24V_IN 28 24V_IN 29 LAMP_ON 30 GND ICC board Connector Pin no Signal ...

Страница 418: ..._N 11 98714_SCLK 12 98714_SDATA 13 GND 14 AFE_RESET 15 GND 16 98714_OUT0_P 17 98714_OUT0_M 18 GND 19 98714_OUT1_P 20 98714_OUT1_M 21 GND 22 98714_OUT2_P 23 98714_OUT2_M 24 GND 25 98714_CLK_P 26 98714_CLK_M 27 GND 28 INCLK_P 29 INCLK M 30 GND J10 FB paper size sensor 3 1 GND 2 5V 3 FBPS3 3 4 FBPS3 2 5 FBPS3 1 ICC board Connector Pin no Signal ...

Страница 419: ...ensors 1 5V 2 COVER OPEN 3 GND 4 5V 5 PICKUP ROLLER 6 GND 7 5V 8 GAP 9 GND 10 5V 11 PAPER DET 12 GND J2 ADF scan motor 1 OUT2B 1 2 OUT1A 1 3 OUT2A 1 4 OUT1B 1 J6 ADF pick motor 1 OUT2B 2 2 OUT1A 2 3 OUT2A 2 4 OUT1B 2 J3 ADF paper width and length sensors 1 B5SEN 2 A4SEN 3 B4SEN 4 5V 5 GND 6 A3SEN 7 L1SEN ...

Страница 420: ...DF paper out sensor 1 5V 2 Paper out 3 GND J5 Duplex paper pass 1 5V 2 2 PASS SEN 3 GND J7 Scan sensor paper in 1 5V 2 PAPER SCAN 3 GND 4 5VD 5 PAPER IN 6 GND J8 Solenoids 1 24V 2 GND 3 24V 4 GND ADF relay card Connector Pin no Signal ...

Страница 421: ...4 24VM MOTOR ON 5 GND 6 24VM MOTOR ON 7 NC 8 GND 9 NC 10 GND 11 FB ADF STEP 12 NC 13 ADF PICKUP STEP 14 PAPER DET 15 FB IO BUS 3 16 NC 17 FB IO BUS 1 18 FB IO BUS 2 19 FB IO BUS 0 20 FB IO BUS 4 21 FB IO BUS 5 22 FB IO BUS 6 23 GND 24 PAPER GAP 25 5VD 26 GND J10 ADF clutch 1 24V 2 GND ADF relay card Connector Pin no Signal ...

Страница 422: ...tors J1 N C J3 Touchscreen display 4 pin ribbon cable J5 N C J8 N C J10 Pop panel connector to RIP J12 Touchscreen display J20 N C J21 Speaker J22 USB card reader J23 Haptics motor J24 USB connection to RIP board J25 USB thumbdrive connector ...

Страница 423: ... feeder layout STM L C M 1 0 1 0 Door interlock Transport Motor Paper tray lift motor Upper UL1 Interface Lower UL2 Interface Paper volume Paper full Transport Paper empty Transport Clutch Paper size detection Paper size detection Paper size detection JCN ...

Страница 424: ...5 36 Service Manual 7541 03x Option board layout ASSY NO CN120 CN101 CN107 CN301 CN103 CN108 CN105 CN106 CN121 IC103 IC100 CN102 0 CN104 IC Socket ...

Страница 425: ... 5V 11 11 11 CGND 9 9 1 ADR0 6 6 2 ADR1 5 5 3 RST 10 10 4 TXD 7 7 5 RXD 8 8 6 VAA 24V 1 1 7 VAA 24V 2 2 8 AGND 3 3 9 AGND 4 4 10 VCC 5V 11 11 11 CGND 9 9 12 N C 1 ADR0 ADR0 1 2 ADR1 ADR1 2 3 RST RST 3 4 TXD TXD 4 5 RXD RXD 5 6 VAA SW VAA 24V 6 7 VAA SW VAA 24V 7 8 AGND AGND 8 9 AGND AGND 9 10 VCC 5V VCC 5V 10 11 CGND CGND 11 12 OPEN_DET_H VAA SW 1 13 CENTA_DET_L CGND 2 14 VAA SW N C 㩎㩨㨻㐿ᬌ 㧕 3 N C ...

Страница 426: ...5 38 Service Manual 7541 03x ...

Страница 427: ...arts are replaced or as needed not on a scheduled basis Use of lubricants other than those specified can cause premature failure Some unauthorized lubricants may chemically attack polycarbonate parts Use IBM no 10 oil P N 1280443 Approved equivalents Mobil DTE27 Shell Tellus 100 Fuchs Renolin MR30 IBM no 23 grease Approved equivalent Shell Darina 1 and grease P N 99A0394 to lubricate appropriate a...

Страница 428: ...6 2 Service Manual 7541 03x ...

Страница 429: ...Refers to the number of units in a particular option It does not include the rest of the base machine Units FRU Refers to the number of units packaged together and identified by the part number NS Not shown in the Asm Index column indicates that the part is procurable but is not pictured in the illustration PP Parts Packet in the parts description column indicates the part is contained in a parts ...

Страница 430: ...7 2 Service Manual 7541 03x Assembly 1 Covers ...

Страница 431: ...124 1 1 Access cover 16 40X6369 1 1 Option cable 17 40X6125 1 1 Option cover 18 40X6298 1 1 Back cover 19 40X6297 1 1 Cable cover 20 40X6296 Printer top cover 21 40X6743 1 1 Op panel paper exit guide 22 40X6417 1 1 Output bin full lever 23 40X6273 1 1 B S link arm spring 24 40X6269 1 1 B S link arm 25 40X6270 1 1 Safety switch spring 26 40X6267 1 1 Release link 27 40X6271 1 1 Release spring 28 40X...

Страница 432: ...7 4 Service Manual 7541 03x Assembly 2 Flatbed and ADF ...

Страница 433: ...Parts catalog 7 5 7541 03x Assembly 2 Flatbed and ADF Asm index Part number Units mach Units FRU Description 2 1 40X6545 1 1 ADF unit whole unit 2 40X6980 1 1 Flatbed whole unit ...

Страница 434: ...7 6 Service Manual 7541 03x Assembly 3 Flatbed ...

Страница 435: ...anel top 8 40X6959 1 1 Op panel access cover 9 40X6958 1 1 Op panel bottom 10 40X6307 1 1 10 2 inch touchscreen display w haptics 11 40X6978 1 1 Flatbed front cover 12 40X6443 1 1 Model name cover 13 40X6326 1 1 CCD belt 14 40X6548 3 1 Optical paper size sensors 15 40X6325 1 1 Flatbed cover open sensor NS 40X6977 1 1 Op panel light pipe NS 40X6757 4 1 Scanner rubber pad NS 40X6758 4 1 Scanner stop...

Страница 436: ...7 8 Service Manual 7541 03x Assembly 4 ADF 1 ...

Страница 437: ... 1 Upper flatbed top cover 6 40X6344 1 1 Right ADF cover 7 40X6334 1 1 Flatbed hinge 8 40X6347 1 1 Lower flatbed top cover 9 40X6432 1 1 Flatbed cushion 10 40X6333 1 1 ADF hinge 11 40X6329 1 1 ADF relay card 12 40X6433 1 1 ADF cable 13 40X6342 1 1 ADF relay card cover 14 40X6343 1 1 Left ADF cover 15 40X6542 1 1 Release arm 16 40X6544 1 1 Idle clutch roller 17 40X6543 1 1 Idle pulley roller NS 40X...

Страница 438: ...7 10 Service Manual 7541 03x Assembly 5 ADF 2 ...

Страница 439: ...76 1 1 Duplex timing sensor 12 40X6532 1 1 Gear w spring holder 13 40X6538 1 1 Spur G28T gear 14 40X6537 1 1 Spur G63 27T gear 15 40X6536 1 1 Spur G36T gear 16 40X6974 1 1 Duplex out sensor actuator 17 40X6975 1 1 Duplex out sensor 18 40X6534 1 1 Scan sensor w paper in sensor 19 40X6535 1 1 Scan sensor actuator 20 40X6348 1 1 ADF main feeder 21 40X6335 1 1 ADF drive clutch 22 40X6434 1 1 ADF solen...

Страница 440: ...7 12 Service Manual 7541 03x Assembly 6 Duplex components 1 ...

Страница 441: ...48 1 1 Duplex ground plate 12 40X6260 1 1 Duplex static brush 13 40X6159 1 1 F2 S Transfer spring 14 40X6143 1 Transfer roll bushing 15 40X6151 2 1 Roller guide spring 16 40X6258 1 1 Roller guide 17 40X6012 1 1 Transfer roll 18 40X1104 8 1 Photo sensor 19 40X6158 1 1 Duplex clutch cable 20 40X6150 1 1 2 S Transfer spring 21 40X6149 1 1 Transfer contact plate 22 40X6259 1 1 Duplex ground cable 23 4...

Страница 442: ...7 14 Service Manual 7541 03x Assembly 7 Duplex components 2 ...

Страница 443: ...0X6141 1 1 Sub tray 8 40X6136 1 1 A S pushing spring 9 40X6137 4 1 Duplex cover roller 10 40X6135 1 1 B S pushing spring 11 40X6134 1 1 Right cover 12 40X6133 1 1 Safety spring 13 40X6127 1 1 Safety switch rod 14 40X6128 2 1 Door lever lock 15 40X6131 1 1 Lever open spring 16 40X6130 1 1 Lever shaft 17 40X6129 1 1 Door lever 18 40X6132 1 1 Lever guide 19 40X6983 2 1 Duplex cover pin 20 40X6981 2 1...

Страница 444: ...7 16 Service Manual 7541 03x Assembly 8 Paper exit ...

Страница 445: ... 7541 03x Assembly 8 Paper exit Asm index Part number Units mach Units FRU Description 1 40X6579 1 1 Paper exit roller 2 40X1104 8 1 Photo sensor exit sensor 3 40X6168 1 1 Exit sensor cable 4 40X6745 1 1 Paper exit guide ...

Страница 446: ...7 18 Service Manual 7541 03x Assembly 9 Base 1 ...

Страница 447: ...s mach Units FRU Description 1 40X6173 1 1 Main unit drive 2 40X6261 1 1 Photo interrupter cable 3 40X1104 8 1 Photo sensor 4 40X6160 1 1 Sub frame 5 40X6162 1 1 Belt motor 6 40X6262 1 1 Belt motor cable 7 40X6161 4 1 Drive unit motor NS 40X7052 1 1 Base 1 screw parts pack ...

Страница 448: ...7 20 Service Manual 7541 03x Assembly 10 Base 2 ...

Страница 449: ...enoid bracket 5 40X6165 1 1 Exit drive unit solenoid 6 40X6368 Engine power supply Door interlock cable 7 40X6166 1 1 Door open switch 8 40X1104 8 1 Photo sensor 9 40X6278 1 1 Fuser exit sensor cable 10 40X6367 1 1 Engine paperfeed cable Paper exit unit 11 40X6164 1 1 Exit drive unit motor 12 40X6209 1 1 Tray lift motor cable 13 40X6172 1 1 Paper tray lift motor NS 40X7442 1 1 Base 2 screw parts p...

Страница 450: ...7 22 Service Manual 7541 03x Assembly 11 Base 3 ...

Страница 451: ...Parts catalog 7 23 7541 03x Assembly 11 Base 3 Asm index Part number Units mach Units FRU Description 1 40X6174 2 1 Handle cover 2 40X6175 4 1 Bottom foot NS 40X6421 2 1 Rubber grip pad ...

Страница 452: ...7 24 Service Manual 7541 03x Assembly 12 Paper feed ...

Страница 453: ...ion gear 10 40X6183 1 1 Lower registration spring 11 40X6184 1 1 Upper registration spring 12 40X6179 2 1 Feed roll 13 40X6177 2 1 Feed roll gear 14 40X6178 2 1 Pickup gear 15 40X6180 2 1 Pick roll 16 40X6186 2 1 Separator roll 17 40X6187 2 1 Torque limiter 18 40X6181 2 1 Pickup lever A 19 40X6190 1 1 Registration sensor cable 20 40X6422 1 1 Upper registration spring 21 40X6423 1 1 Lower registrat...

Страница 454: ...7 26 Service Manual 7541 03x Assembly 13 Electrical 1 ...

Страница 455: ...51 1 1 220V Scanner power supply 14 40X6749 1 1 Main power cable 15 40X6263 1 1 Sensor A S cleaner 16 40X6266 1 1 Sensor cover 17 40X6265 1 1 Sensor cover spring 18 40X6199 1 1 Density sensor 19 40X6201 1 1 Density sensor cable 20 40X6202 1 1 Humidity sensor 21 40X6203 1 1 Humidity sensor cable 22 40X6428 3 1 Paper size sensors 23 40X6206 1 1 Main fan 24 40X6205 1 1 Power supply fan 25 40X6425 2 1...

Страница 456: ...7 28 Service Manual 7541 03x Assembly 14 Electrical 2 ...

Страница 457: ...0X6416 1 1 MPF Engine board cable 11 40X6190 1 1 Registration sensor cable 12 40X6748 1 1 RIP Harness cable 13 40X6261 1 1 Photo interrupter cable Belt up down 14 40X6194 1 1 Paperfeed clutch cable 15 40X6165 1 1 Exit solenoid cable w solenoid 16 40X6209 1 1 Tray lift motor cable 17 40X6171 1 1 Fuser fan cable fan included 18 40X6367 1 1 Engine paperfeed cable 19 40X6161 1 1 Drive unit motor w mot...

Страница 458: ...7 30 Service Manual 7541 03x Assembly 15 Upper assembly ...

Страница 459: ... FRU Description 1 40X6429 4 1 LED printhead assembly 2 40X6216 4 1 LED FFC ribbon cable 3 40X6218 4 1 LED printhead 4 40X6756 1 1 Printhead controller board 5 40X6215 8 1 Contact spring 6 40X6214 2 1 Toner sensor NS 40X6369 1 1 PRCONT option cable NS 40X7449 1 1 Upper assembly screw parts pack ...

Страница 460: ...7 32 Service Manual 7541 03x Assembly 16 Printhead controller board cables ...

Страница 461: ...r cable 110V 2 40X6440 1 1 Fuser power cable 220V 3 40X6168 1 1 Paper exit sensor cable 4 40X6278 1 1 Fuser exit sensor cable 5 40X6756 1 1 Printhead controller board 6 40X6201 1 1 Density sensor cable 7 40X6198 1 1 Theta sensor cable 8 40X6210 1 1 Power supply fan cable 9 40X6370 1 1 RIP print controller cable 10 40X6369 1 1 Printhead controller option cable 11 40X6748 1 1 RIP harness cable ...

Страница 462: ...7 34 Service Manual 7541 03x Assembly 17 Paper trays ...

Страница 463: ...y 17 Paper trays Asm index Part number Units mach Units FRU Description 1 40X6223 1 1 Multipurpose tray 2 40X6219 1 1 Main paper tray NS 40X6220 1 1 Tray rack gear NS 40X6221 1 1 Tray pinion gear NS 40X7451 1 1 Cassette screw parts pack ...

Страница 464: ...7 36 Service Manual 7541 03x Assembly 18 Fuser ...

Страница 465: ...Parts catalog 7 37 7541 03x Assembly 18 Fuser Asm index Part number Units mach Units FRU Description 1 40X6013 1 1 110V Fuser 1 40X6093 1 1 220V Fuser ...

Страница 466: ...7 38 Service Manual 7541 03x Assembly 19 550 sheet option feeder covers ...

Страница 467: ...ight front option cover 4 40X6252 1 1 Right rear option cover 5 40X6254 1 1 Right switch cover 6 40X6224 1 1 Stand base foot 7 40X6250 1 1 Left option cover 8 40X6248 1 1 Rear option cover 9 40X6249 1 1 Rear connector cover 10 40X6255 1 1 Upper front option cover 11 40X6253 1 1 Right middle option cover NS 40X1173 1 1 Photo interrupter Horizontal sensor NS 40X7452 1 1 550 sheet paperfeed screw par...

Страница 468: ...7 40 Service Manual 7541 03x Assembly 20 550 sheet option feeder base ...

Страница 469: ...2 Interface cable 3 40X6430 3 1 Option switch sensor 4 40X6358 1 1 Rising unit hub 5 40X6359 1 1 Rising unit spring 6 40X6360 1 1 Timing belt 7 40X6231 1 1 Option interface board 8 40X6232 1 1 Main interface cable 9 40X6233 1 1 Stepper motor cable 10 40X6230 1 1 Option stepper motor 11 40X6229 1 1 Opt tray paper lift motor NS 40X7452 1 1 550 sheet paperfeed screw parts pack ...

Страница 470: ...7 42 Service Manual 7541 03x Assembly 21 550 sheet option feeder paper feed ...

Страница 471: ...X1173 1 1 Horizontal sensor paperfeed 5 40X1106 1 1 Retainer clip 6 40X1078 1 1 Option tray feed roll 7 40X1077 1 1 Option tray pick roll 8 40X1079 1 1 Option tray separator roll 9 40X1080 1 1 Torque limiter clutch 10 40X6235 1 1 Timing belt S 11 40X6237 1 1 Timing belt L 12 40X6234 1 1 Opt tray door closed sensor 13 40X6232 1 1 Main interface cable 14 40X6236 1 1 Option paperfeed clutch NS 40X745...

Страница 472: ...7 44 Service Manual 7541 03x Assembly 22 550 sheet option feeder tray ...

Страница 473: ...Parts catalog 7 45 7541 03x Assembly 22 550 sheet option feeder tray Asm index Part number Units mach Units FRU Description 1 40X6246 1 1 Option paper tray ...

Страница 474: ...40X5969 1 Korean font card NS 40X5970 1 Simplified Chinese font card NS 40X5971 1 Traditional Chinese font card NS 40X5972 1 Japanese font card NS 40X6924 1 Forms and barcode card NS 40X6925 1 IPDS SCS card NS 40X6928 1 Prescribe card NS 40X0271 1 UK straight power cord NS 40X0301 1 Australia 8ft straight power cord NS 40X3609 1 Japan power cord NS 40X1792 1 Korea power cord NS 40X0303 1 PRC power...

Страница 475: ... Min Copy Memory 3 13 NumPad Job Assist 3 13 Configuration menu USB Scan to Local 3 11 configuration menu 3 9 accessing 3 7 Auto Align Adj 3 13 Black Only Mode 3 11 Color Alignment 3 14 Color Trapping 3 11 Demo Mode 3 12 Disk Encryption 3 16 Download Emuls 3 12 Energy Conserve 3 13 entering 3 9 Envelope Prompts 3 15 Exit Config Menu 3 17 Factory Defaults 3 12 Font Sharpening 3 16 Jobs On Disk 3 15...

Страница 476: ...roll removal 4 190 exiting configuration menu 3 17 F Factory Defaults 3 12 false door open service check 2 86 Fax dials a number but no connection is made 2 83 Fax reception fails 2 80 Fax Storage Location 3 13 Faxes fail to transmit 2 78 Feed Test SCANNER 3 28 flash options service check 2 90 Flash Test 3 24 flatbed lock 2 35 Font Sharpening 3 16 Format Fax Storage 3 13 Fuser entry sensor removal...

Страница 477: ...2 25 Paper in ADF size service check 2 96 Paper is being picked up and carried to the registration roller Paper jams 200 250 24x 2 24 paper jam 200 2 18 201 2 18 203 2 19 230 2 20 231 39 2 21 24x 2 22 250 2 23 Clearing and troubleshooting paper jams 2 18 Paper level sensor removal 4 198 Paper path service checks 2 24 Paper Prompts 3 15 paper size sensor removal 4 42 Paper size switch removal 4 105...

Страница 478: ...l 4 181 Transfer belt motor removal 4 100 transfer belt position sensor removal 4 41 Transport sensor removal 4 198 Tray lift motor removal 4 201 Upper and lower registration springs removal 4 181 Waste toner sensor removal 4 112 removals Back cave cover 4 18 Cord cover 4 6 Crossbar removal not a FRU 4 74 Drive unit 4 79 Drive unit motor C M Y K 4 83 Front op panel cover 4 11 Fuser removal 4 61 In...

Страница 479: ...ervice check 2 96 Paper is being picked up and carried to the registration roller Paper jams 200 250 24x 2 24 paper path 2 24 Paper has entered the duplex unit Paper jam 230 231 9 2 26 Paper has entered the fuser and exited the printer Paper jam 203 2 25 Paper has exited the registration roller and entered the fuser Paper jam 201 2 25 Paper has stopped at the registration roller or has not reached...

Страница 480: ...rge brush removal 4 180 Stepper motor removal 4 200 Sub drive unit removal 4 84 Sub frame unit removal 4 104 T Temperature and humidity sensor removal 4 101 Theory of operation Color theory 3 47 Printer engine 3 29 Scanner 3 44 Theta sensor removal 4 56 Toner sensor removal 4 97 tools required 1 15 Torque limiter removal 4 181 Transfer belt CRU removal 4 40 Transfer belt motor removal 4 100 transf...

Страница 481: ...sor cable 7 33 40X6201 Density sensor cable 7 27 40X6202 Humidity sensor 7 27 40X6203 Humidity sensor cable 7 27 40X6204 110 V Low voltage power supply 7 27 40X6205 Power supply fan 7 27 40X6206 Main fan 7 27 40X6208 High volt power supply cable 7 27 40X6209 Tray lift motor cable 7 21 40X6210 Power supply cable 7 33 40X6210 Power supply fan cable 7 27 40X6211 Fuser power cable 110V 7 33 40X6211 LV...

Страница 482: ...ly 7 11 40X6328 ADF separator roll 7 11 40X6329 ADF relay card 7 9 40X6330 ADF motor frame w motors 7 11 40X6331 Outer ADF top cover 7 11 40X6332 Inner ADF top cover 7 11 40X6333 ADF hinge 7 9 40X6334 Flatbed hinge 7 9 40X6335 ADF drive clutch 7 11 40X6336 Roller bearing 7 11 40X6338 ADF input tray 7 9 40X6340 Top cover release handle 7 11 40X6341 Top cover release hook 7 11 40X6342 ADF relay card...

Страница 483: ...6748 RIP harness cable 7 33 40X6748 RIP harness cable 7 27 40X6749 Main power cable 7 29 40X6749 Main power cable 7 27 40X6750 110V Scanner power supply 7 27 40X6751 220V Scanner power supply 7 27 40X6752 RIP power supply cable 7 27 40X6753 MPSP cable scanner low volt power supply 7 27 40X6755 MFP cave light assembly 7 3 40X6757 Scanner rubber pad 7 7 40X6758 Scanner stopper screw 7 7 40X6759 Scan...

Страница 484: ... Cassette screw parts pack 40X7451 7 35 Chile Uraguay powercord 40X0273 7 46 Complete duplex 40X6126 7 3 Contact spring 40X6215 7 31 Cover 1 screw parts pack 40X6499 7 3 7 13 7 15 Cover closed actuator cable 40X7455 7 29 D Discharge brush plate 40X6277 7 13 Door lever 40X6129 7 15 Door lever lock 40X6128 7 15 Door open switch 40X6166 7 21 Drive gear 40X6146 7 13 Drive unit motor 40X6161 7 19 drive...

Страница 485: ...X5969 7 46 L LED FFC cable 40X6216 7 31 LED printhead 40X6218 7 31 LED printhead assembly 40X6429 7 31 Left cover 40X6122 7 3 Left hinge 40X6283 7 3 Lever guide 40X6132 7 15 Lever open spring 40X6131 7 15 Lever shaft 40X6130 7 15 Lower registration spring 40X6183 7 25 Lower registration spring 40X6423 7 25 M Main Standard paper tray 40X6219 7 35 Main drive unit 40X6173 7 19 main fan 40X6206 7 29 M...

Страница 486: ... paper size switch cable 40X6120 7 29 Paper tray lift motor 40X6172 7 21 Paper tray size switch cable 40X7456 7 29 Paperfeed clutch 40X6191 7 25 Paperfeed clutch cable 40X6194 7 25 Paperfeed maintenance kit 40X6372 7 25 Paperfeed screw parts pack 40X7447 7 25 Paperfeed unit 40X6176 7 25 Paperfeed unit motor 40X6192 7 25 Parallel 1284 B serial adapter 40X4823 7 46 Photo interrupter cable 40X6261 7 ...

Страница 487: ...7 41 Sub drive unit 40X6163 7 21 Sub frame 40X6160 7 19 Sub tray 40X6141 7 15 Switzerland powercord 40X1772 7 46 T Taiwan powercord 40X1791 7 46 Timing belt 40X6235 7 43 Timing belt 40X6360 7 41 Timing belt L 40X6237 7 43 Toner sensorl 40X6214 7 31 Torque limiter 40X6187 7 25 Torque limiter clutch 40X1080 7 43 Traditional Chinese font card 40X5971 7 46 Transfer belt door DS lock 40X6169 7 3 Transf...

Страница 488: ...I 14 Service Manual 7541 03x ...

Отзывы: