background image

Loading standard trays and optional trays

45

Printing

3

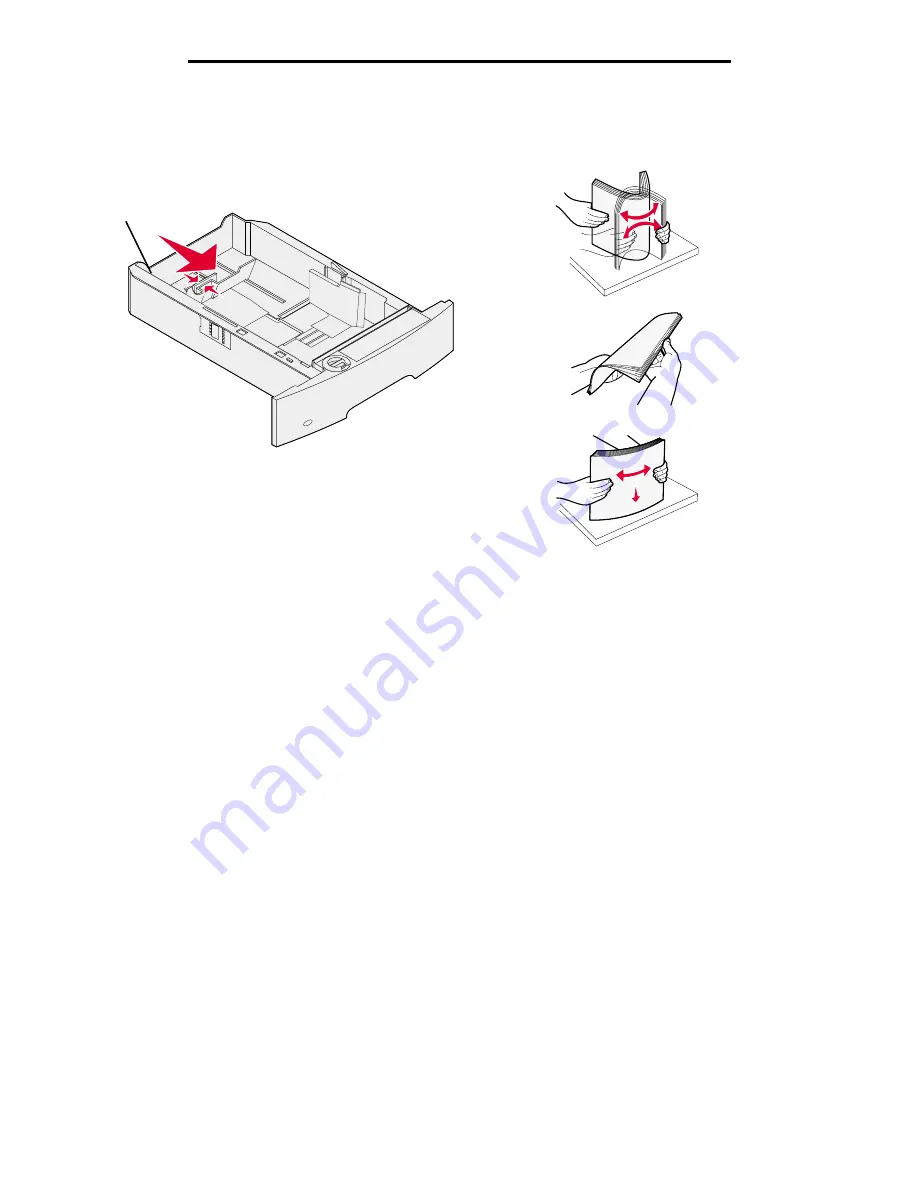
Squeeze the rear guide tab, and slide the guide to the correct position for the size media you are loading.

4

Flex the sheets back and forth to loosen them, then fan them. Do not fold or crease the print media. Straighten the 
edges on a level surface.

Size indicators

Содержание Optra T642n

Страница 1: ...rch 2005 Lexmark and Lexmark with diamond design are trademarks of Lexmark International Inc registered in the United States and or other countries 2005 Lexmark International Inc All rights reserved 740 West New Circle Road Lexington Kentucky 40550 ...

Страница 2: ...s or services do not imply the manufacturer intends to make these available in all countries in which it operates Any reference to a product program or service is not intended to state or imply that only that product program or service may be used Any functionally equivalent product program or service that does not infringe any existing intellectual property right may be used instead Evaluation an...

Страница 3: ...s 25 Installing input options 25 Installing a duplex unit 27 Installing memory or option cards 28 Accessing the printer system board 28 Installing or removing a memory card 30 Installing or removing a flash memory or firmware card 32 Installing an option card 34 Replacing the shield 35 Chapter 5 Printing 36 Sending a job to print 36 Printing from a USB flash memory device 36 Canceling a print job ...

Страница 4: ...ring jams 80 Identifying jams 80 Access doors and trays 81 Understanding jam messages 82 Clearing printer jams 82 Clearing staple jams 93 Chapter 9 Administrative support 96 Adjusting operator panel brightness and contrast 96 Disabling operator panel menus 96 Enabling operator panel menus 97 Restoring factory default settings 97 Adjusting Power Saver 98 Disabling Power Saver 98 Encrypting the disk...

Страница 5: ...ntions 116 Static sensitivity notice 116 Electronic emission notices 116 Noise emission levels 118 ENERGY STAR 119 Waste from Electrical and Electronic Equipment WEEE directive 120 Laser advisory label 120 Laser notice 120 Statement of limited warranty 120 Index 123 ...

Страница 6: ...tions that came with the option Models The printer is available in three base models The following table indicates some of the differences between the models CAUTION Do not set up this product or make any electrical or cabling connections such as the power cord or telephone during a lightning storm T640 T642 T644 Input capacity 250 sheets 500 sheets 500 sheets Output capacity 250 sheets 500 sheets...

Страница 7: ...heet drawer a duplex unit and an input option or more than one input option If you purchased a multifunction printer MFP that scans copies and faxes you may need additional furniture See www lexmark com multifunctionprinters for more information Standard output bin Operator panel Tray 1 integrated tray or standard tray Tray 5 2000 sheet drawer 5 bin Mailbox Output expander Envelope feeder Duplex u...

Страница 8: ...ght Paper Loading Custom Types Universal Setup Bin Setup Reports Menu Settings Page Device Statistics Network Setup Page Network x Setup Page Profiles List NetWare Setup Page Print Fonts Print Directory Settings Setup Menu Finishing Menu Quality Menu Utilities Menu PDF Menu PostScript Menu PCL Emul Menu HTML Menu Image Menu Security Max Invalid PIN Job Expiration Network Ports IPv6 TCP IP Standard...

Страница 9: ... printer must be in the Ready state to access the menu index A message indicating the menus are unavailable will appear if the printer is not ready Stop Stops the mechanical operation of the printer After pressing Stop the message Stopping appears When the printer has stopped the status line in the operator panel will show Stopped and a list of options appears Indicator light A two tone LED is use...

Страница 10: ...ad consists of numbers a pound sign and a backspace button The 5 button has a raised bump for non visual orientation The numbers are used to enter numeric values for items like quantities or PINs The backspace is used to delete the number to the left of the cursor Pressing the backspace multiple times will delete additional entries Note The pound sign is not used The display panel shows messages a...

Страница 11: ...he system driver A separate printer object will be created and appear in the Printers folder Use the drivers CD that shipped with the printer to install the custom printer driver and obtain enhanced printer features and functionality Drivers are also available in downloadable software packages on the Lexmark Web site at www lexmark com Using Windows Server 2003 Windows 2000 Windows XP Windows 98 S...

Страница 12: ...allel cable The Plug and Play screen will not appear for Windows NT Using Windows 95 and Windows 98 first edition 1 Turn on the computer 2 Insert the drivers CD If the CD launches automatically click Exit to return to the Add Printer Wizard 3 Click Start Æ Settings Æ Printers and double click Add Printer Note USB support is not available for Windows 95 and Windows 98 first edition operating system...

Страница 13: ...ears and then press x is the number of the serial port 7 Press until Parameter appears where Parameter is the parameter required for a change and then press 8 Press until Setting appears where Setting is the setting required for a change and then press Note the following restrictions Maximum baud rate supported is 115 200 Data Bits must be set to 7 or 8 Parity must be set to Even Odd or None Stop ...

Страница 14: ...nstallation Setting parameters in the communications COM port After the printer driver is installed set the serial parameters in the communications port assigned to the printer driver The serial parameters in the communications port must exactly match the serial parameters set in the printer 1 Click Start Æ Settings Æ Control Panel and double click System 2 On the Device Manager tab click to expan...

Страница 15: ...A printer PPD is also available in a downloadable software package on the Lexmark Web site at www lexmark com 4 Do one of the following If the USB attached printer appears in the Printer List quit Print Center or Printer Setup Utility A queue has been created for the printer If the USB attached printer does not appear in the Printer List make sure the USB cable is properly connected and the printe...

Страница 16: ... sure the printer PPD matches the printer 8 Click Create and click Save 9 Specify a printer name and click Save The printer is now saved as a desktop printer UNIX Linux Local printing is supported on many UNIX and Linux platforms such as Sun Solaris and Red Hat The Sun Solaris and Linux packages are available on the drivers CD and on the Lexmark Web site at www lexmark com The UNIX Linux User s Gu...

Страница 17: ...work Assigning a printer IP address If the network is using DHCP an IP address is automatically assigned connecting the network cable to the printer 1 Look for the address under the TCP IP heading on the network setup page printed in Printing a network setup page 2 Go to Verifying the IP settings and begin with step 2 If the network is not using DHCP then manually assign an IP address to the print...

Страница 18: ...ch network computer Windows In Windows environments network printers can be configured for direct printing or shared printing Both network printing methods require the installation of a printer driver and the creation of a network printer port Supported printer drivers Windows system printer driver Lexmark custom printer driver Updated system and custom drivers are available on the Lexmark Web sit...

Страница 19: ...he printer such as Monochrome1 lab4 After the port is created this name appears in the list of available ports d Enter the IP address in the text box Note If the IP address is unknown print a network setup page and look under the TCP IP heading For help see Printing a network setup page and Verifying the IP settings 8 Print a test page to verify printer installation Printing configuration Operatin...

Страница 20: ...Connect the USB cable and turn on the printer The Plug and Play screen appears and a printer object is created in the Printers folder of the computer The printer is shared in step 2 Share the printer on the network Note USB support is not available for Windows NT operating systems Use a parallel cable instead The Plug and Play screen will not appear for Windows NT h Print a test page to verify pri...

Страница 21: ...the printer driver is fully installed on each client computer Network clients retain control of driver modifications The client computer handles the print job processing 1 Click Start Æ Settings Æ Printers 2 Click Add Printer to launch the Add Printer wizard 3 Click Next 4 Click Network Printer and click Next 5 Enter the printer name or URL if on the Internet or an intranet and click Next If the p...

Страница 22: ...vides detailed information about the capabilities of a printer to the Macintosh computer c Click Continue on the Welcome screen and again after viewing the Readme file d Click Continue after viewing the license agreement and click Agree to accept the terms of the agreement e Select a Destination and click Continue f On the Easy Install screen click Install g Enter the password and click OK All the...

Страница 23: ...up menu 5 Enter the IP address or the printer DNS name in the Printer Address box 6 Choose Lexmark from the Printer Model pop up menu 7 Select the new printer from the list and click Add 8 Verify printer installation a Open Finder click Applications and click Text Edit b Choose Print from the File menu c Choose Summary from the Copies Pages pop up menu d Do one of the following If the PPD file dis...

Страница 24: ...file portion of the menu is correct for the printer printer setup is complete If the PPD file displayed in the PostScript Printer Description PPD file portion of the menu is not correct for the printer repeat Step 1 Install a custom PPD file UNIX Linux The printer supports many UNIX and Linux platforms such as Sun Solaris and Red Hat Visit the Lexmark Web site at www lexmark com for a complete lis...

Страница 25: ...nal furniture More information is available on our Lexmark Web site at www lexmark com multifunctionprinters Install the printer and any options you have purchased in the following order CAUTION If you are installing options after setting up the printer turn the printer off and unplug the power cord before continuing Printer stand or printer base 2000 sheet drawer 250 sheet or 500 sheet drawer Dup...

Страница 26: ... tray from the support unit Remove all packing material and tape from both the support unit and the tray 2 Place the support unit on top of any previously installed drawers or the table or printer cabinet where you plan to use the printer The tab round peg and square holes on top of any drawer help you position the support unit so the edges are aligned properly Make sure the support unit is secure...

Страница 27: ...ndard tray and the 500 sheet duplex unit only works with printers that have a 500 sheet standard tray Make sure you have the appropriate duplex unit for the tray size installed in the printer 1 Place the duplex unit on top of any installed drawers or the table or printer cabinet where you plan to use the printer The tab round peg and square holes on top of any drawer help you position the duplex u...

Страница 28: ...options Memory cards Printer memory Flash memory Firmware cards Bar Code IPDS and SCS TNe PrintCryption Other options Printer hard disk RS 232 serial interface card Parallel 1284 C interface card MarkNet N8000 series internal print servers also called internal network adapters or INAs Accessing the printer system board You must access the printer system board to install printer memory flash memory...

Страница 29: ...printer system board 29 Installing and removing options 3 Press both side door latches and open the side door 4 Loosen but do not remove the six screws on the shield 5 Slide the shield to the right and then remove it ...

Страница 30: ...rds are easily damaged by static electricity Touch something metal such as the printer frame before you touch a memory card 2 Push open the latches on both ends of the memory card connector 3 Unpack the memory card Avoid touching the connection points along the edge of the card Save the packaging 4 Align the notches on the bottom of the card with the notches on the connector 5 Push the memory card...

Страница 31: ...h something metal such as the printer frame before you touch a memory card 2 Push the latches away from the card on both ends of the memory card connector The memory card moves out of the connector as the latches open 3 Pull the memory card out of the connector Avoid touching the connection points along the edge of the card 4 Place the card into the original packaging If you do not have the origin...

Страница 32: ...alled you may need to remove the option card before installing the flash memory or firmware card 2 Unpack the flash memory or firmware card 3 Holding the flash memory or firmware card by the locking clips align the plastic pins on the card with the holes on the system board 4 Push the flash memory or firmware card firmly into place and release the locking clips The entire length of the connector o...

Страница 33: ...ore removing the flash memory or firmware card 2 Squeeze the flash memory or firmware card locking clips 3 Pull the card out Avoid touching the metal pins on the bottom of the card 4 Place the flash memory or firmware card in its original packaging If you do not have the original packaging wrap the flash memory or firmware card in paper and store it in a box 5 If you removed an option card to acce...

Страница 34: ...you touch an option card 1 Locate the card connectors on the system board 2 Remove the screw and the cover plate and save them If you are installing a tall card install it in connector 1 If you are installing two short cards on a model with multiple connectors use connector 1 first and then use connector 2 3 Unpack the card Save the packaging materials 4 Align the connection points on the card wit...

Страница 35: ...options on the printer system board follow these steps to reattach the shield and close the doors 1 Align the keyholes on the shield with the screws on the frame 2 Slide the shield down onto the screws 3 Tighten the screws 4 Close the side door 5 Close the top front cover 6 Close the multipurpose feeder ...

Страница 36: ...d Lexmark driver support are available from the Lexmark Web site To print a job from a typical Windows application 1 Open the file you want to print 2 From the File menu select Print 3 Select the correct printer in the dialog Modify the printer settings as appropriate such as the pages you want to print or the number of copies 4 Click Properties or Setup to adjust printer settings that were not av...

Страница 37: ... Select Continue and your job prints after the other jobs finish 3 Press until the appears next to the document you want to print and then press A screen asking the number of copies to be printed will appear 4 To print only one copy press or manually input the number of copies with the number pad then press Note Do not remove the USB flash memory device from the USB Direct interface until the docu...

Страница 38: ...job is sent to easily cancel the job press The Stopped screen appears Press until Cancel a job appears and then press Canceling a job from a computer running Windows Canceling a job from the taskbar When you send a job to print a small printer icon appears in the right corner of the taskbar 1 Double click the printer icon A list of print jobs appears in the printer window 2 Select the job you want...

Страница 39: ...you are printing to 3 In the printer window select the print job you want to cancel 4 Press Delete Printing the menu settings page You can print a menu settings page to review the default printer settings and to verify the printer options are installed correctly 1 Make sure the printer is on 2 Press on the operator panel 3 Press until the appears next to Reports and then press 4 Press until the ap...

Страница 40: ...nter memory go to the printer and use the printer operator panel to specify what you want to do with your print job All confidential and held jobs have a user name associated with them To access confidential or held jobs you must first select the type of job confidential or held and then select your user name from the user name list Once you select your user name you can print all your confidentia...

Страница 41: ...ter steps At the printer 1 Press until the appears next to Held jobs and then press 2 Press until the appears next to your user name and then press 3 Press until the appears next to Confidential jobs and then press 4 Enter your PIN For more information see Entering a personal identification number PIN 5 Press until the appears next to the job you want to print and then press Note After your job pr...

Страница 42: ...ess additional held jobs Windows 1 From a word processor spreadsheet browser or other application select File Æ Print 2 Click Properties If there is no Properties button click Setup and then click Properties 3 Depending on the operating system you may have to click the Other Options tab and then click Print and Hold Note If you have difficulty finding Print and Hold Æ Held Jobs click Help and see ...

Страница 43: ...rom a word processor spreadsheet browser or other application select File Æ Print b Click Properties or Options Printer or Setup depending on the application to view the printer driver settings c Click the Paper tab A paper tray list will appear d Select the tray containing the specialty media Note If you have difficulty click Help and then follow the driver instructions e Select the media type tr...

Страница 44: ...et standard tray depending on the model you purchased You may have also purchased one or more 250 sheet or 500 sheet optional trays or a 2000 sheet drawer The steps for loading a 250 sheet tray or 500 sheet tray are the same Note The steps for loading a 2000 sheet drawer are different than the steps for loading a 250 sheet tray or 500 sheet tray To load print media Note Do not remove a tray when a...

Страница 45: ...ueeze the rear guide tab and slide the guide to the correct position for the size media you are loading 4 Flex the sheets back and forth to loosen them then fan them Do not fold or crease the print media Straighten the edges on a level surface Size indicators ...

Страница 46: ...erently in the trays depending on the options you have installed Print side face down for simplex single sided printing Print side face up for duplex printing Note Do not fill paper above the load line Overfilling the tray may cause jams With an optional finisher Without an optional finisher Simplex Duplex Simplex Duplex ...

Страница 47: ...of the media you are loading is the same size of the media previously loaded do not change the Paper Size setting To change the Paper Size and Paper Type setting 1 Make sure the printer is on 2 Press on the operator panel 3 Press until the appears next to Paper Menu and then press 4 Press until the appears next to Paper Size Type and then press 5 Press until the appears next to the input source yo...

Страница 48: ...opes 75 transparencies The multipurpose feeder accepts print media within the following dimensions Width 69 85 mm 2 75 in to 215 9 mm 8 5 in Length 127 mm 5 in to 355 6 mm 14 in The icons on the multipurpose feeder show you how to load the multipurpose feeder with paper how to turn an envelope for printing and how to load letterhead paper for simplex and duplex printing A finisher affects how lett...

Страница 49: ...t Note Do not place objects on the multipurpose feeder Also avoid pressing down or applying excessive force on it 3 Slide the width guide to the far right 4 Flex the sheets or envelopes back and forth to loosen them then fan them Do not fold or crease the print media Straighten the edges on a level surface Note Hold transparencies by the edges and avoid touching the print side Fan the stack of tra...

Страница 50: ...ncies with the left edge of the stack against the stack height label and with the recommended print side face up Load envelopes flap side down with the stamp area and flap on the left The end of the envelope with the stamp area enters the multipurpose feeder first Never use envelopes with stamps clasps snaps windows coated linings or self stick adhesives These envelopes may severely damage the pri...

Страница 51: ...eprinted paper Follow the illustrations for loading the paper according to your options Do not fill paper above the load line Overfilling the tray may cause jams Without a finisher attached Simplex single sided Duplex With a finisher attached Duplex Simplex single sided ...

Страница 52: ...t to Paper Menu and then press c Press until the appears next to Paper Size Type and then press d Press until the appears next to MP Feeder Size Type and then press e Press until the appears next to the media size you loaded and then press f Press until the appears next to MP Feeder Size Type and then press g Press until the appears next to the media type you loaded and then press The printer retu...

Страница 53: ...print media when a job is printing or when the operator panel indicator light is blinking Doing so may cause a jam Note Before loading print media in the drawer you should know the recommended print side of the paper you are using This information is usually on the paper package To load the 2000 sheet drawer 1 Open the loading door If the elevator tray is not already in the lowered position push t...

Страница 54: ...ia to the back of the drawer Note For duplex printing letterhead or other preprinted paper must be loaded differently Carefully align each stack as you load it to ensure a smooth edge where the stacks meet Do not load print media above the load line Note When loading more than one ream of paper we recommend you remove the top and bottom sheet 4 Close the loading door Simplex single sided Duplex ...

Страница 55: ...lopes Extended to the middle position for medium length envelopes Fully open extended to its full length for long envelopes Warning Do not place objects on the envelope feeder Avoid pressing down on it or applying excessive force 2 Lift the envelope weight back toward the printer It stays in place 3 Slide the width guide to the far right 4 Flex a stack of envelopes back and forth and then straight...

Страница 56: ...ng Never use envelopes with stamps clasps snaps windows coated linings or self stick adhesives These envelopes may severely damage the printer Note When you load envelopes do not exceed the maximum stack height Use the stack height label as a guide for the correct stack height when loading Do not try to load more envelopes indicated by the stack height label overloading can cause jams 6 Slide the ...

Страница 57: ...pe of print media loaded in tray 2 and tray 4 the printer selects print media from tray 2 until it becomes empty and then the printer automatically feeds print media from the next linked tray tray 4 By linking all trays standard and optional you effectively create a single source with a capacity of up to 4 100 sheets Make sure you load the same size and type of print media in each tray in order to...

Страница 58: ...s How many can be installed on the printer Bin is allowed to connect with Illustration of output bin Print media Printer Models Standard bin 250 sheets 75 g m2 of plain paper 150 transparencies 100 labels 25 envelopes 75 g m2 T640 N A one is standard on the printer and located on top of the printer Any of the options in combinations as follows in this column Standard bin 500 sheets 75 g m2 of plai...

Страница 59: ...ress until the appears next to Paper Menu and then press 3 Press until the appears next to Bin Setup and then press 4 Press until the appears next to Configure Bins and then press 5 Press until the appears next to Link and then press The printer returns to Ready Output expander 650 sheets 75 g m2 of plain paper 50 envelopes 75 g m2 T640 T642 T644 3 1 5 bin mailbox 1 high capacity output stacker or...

Страница 60: ...Stock Label Guide available on our Lexmark Web site at www lexmark com We recommend that you try a limited sample of any paper or specialty media you are considering using with the printer before purchasing large quantities Supported print media The following tables provide information on standard and optional sources for both input and output trays and bins Note If you use a print media size not ...

Страница 61: ...4 mm 8 5 x 11 in Legal 215 9 x 355 6 mm 8 5 x 14 in Executive 184 2 x 266 7 mm 7 25 x 10 5 in Folio1 216 x 330 mm 8 5 x 13 in Statement1 139 7 x 215 9 mm 5 5 x 8 5 in Universal2 139 7 x 210 mm to 215 9 x 355 6 mm 5 5 x 8 27 in to 8 5 x 14 in 69 85 x 127 mm to 215 9 x 355 6 mm 2 75 x 5 in to 8 5 x 14 in 69 85 x 127 mm to 229 x 355 6 mm 2 75 x 5 in to 9 01 x 14 in 148 x 182 mm to 215 9 x 355 6 mm 5 ...

Страница 62: ... media sizes continued Legend indicates support T640 250 sheet tray T642 T644 500 sheet tray 250 sheet drawer option 500 sheet drawer option Multipurpose feeder 2000 sheet drawer option Envelope feeder option Duplex unit option Standard output bin Output expander option 5 bin mailbox option High capacity output stacker option Print media size Dimensions 1 This size does not appear in the Paper Siz...

Страница 63: ...tput expander 5 bin mailbox High capacity output stacker Finisher Standard Offset Stapled Paper Card stock Transparencies Vinyl labels Paper labels Polyester label Dual web and integrated labels Printing label applications on the printer requires a special label fuser cleaner The label fuser cleaner is included with a special label cartridge for label applications See Ordering supplies for more in...

Страница 64: ...39 lb bond Labels maximum4 Paper 180 g m2 48 lb bond 163 g m2 43 lb bond Note Not supported in the multipurpose feeder n a Dual web paper 180 g m2 48 lb bond 163 g m2 43 lb bond Note Not supported in the multipurpose feeder Polyester 220 g m2 59 lb bond 220 g m2 59 lb bond Note Not supported in the multipurpose feeder Vinyl5 300 g m2 92 lb liner 260 g m2 78 lb liner Note Not supported in the multi...

Страница 65: ... Bristol Not recommended 163 g m2 90 lb 163 g m2 90 lb Tag 163 g m2 100 lb 163 g m2 100 lb Cover 176 g m2 65 lb 176 g m2 65 lb Card stock maximum grain short Index Bristol 199 g m2 110 lb 199 g m2 110 lb Tag 203 g m2 125 lb 203 g m2 125 lb Cover 216 g m2 80 lb 216 g m2 80 lb Transparencies Laser printer 138 to 146 g m2 37 to 39 lb bond 138 to 146 g m2 37 to 39 lb bond Print media weights continued...

Страница 66: ...on bond 60 to 105 g m2 16 to 28 lb bond 60 to 105 g m2 16 to 28 lb bond Not recommended Media sizes supported in the finisher Dimensions Finisher output support Size Standard1 Offset Stapled A4 210 x 297 mm 8 27 x 11 7 in A5 148 x 210 mm 5 83 x 8 27 in JIS B5 182 x 257 mm 7 17 x 10 1 in Letter 215 9 x 279 4 mm 8 5 x 11 in Legal 215 9 x 355 6 mm 8 5 x 14 in Executive 184 2 x 266 7 mm 7 25 x 10 5 in...

Страница 67: ...siness paper 60 to 176 g m2 16 to 47 lb bond 60 to 90 g m2 16 to 24 lb bond 60 to 90 g m2 16 to 24 lb bond Card stock maximum grain long Index Bristol 163 g m2 90 lb bond Not recommended Not recommended Tag 163 g m2 100 lb bond Cover Not recommended Card stock maximum grain short Index Bristol 199 g m2 110 lb bond Not recommended Not recommended Tag 203 g m2 125 lb bond Cover 216 g m2 80 lb bond P...

Страница 68: ...grain long 75 to 135 g m2 20 to 36 lb bond Labels upper limit Paper 180 g m2 48 lb bond Not recommended Not recommended Dual web paper 180 g m2 48 lb bond Polyester 220 g m2 59 lb bond Vinyl 300 g m2 92 lb bond Envelopes Sulfite wood free or up to 100 cotton bond 60 to 105 g m2 16 to 28 lb bond Not recommended Not recommended Media weights supported in the finisher continued Print media Type Finis...

Страница 69: ...cally feed paper weights from 60 to 176 g m2 16 to 47 lb bond grain long in the integrated and optional 500 sheet trays and paper weights from 60 to 135 g m2 16 to 36 lb bond grain long in the multipurpose feeder and optional 250 sheet trays Paper lighter than 60 g m2 16 lb might not be stiff enough to feed properly causing jams For best performance use 75 g m2 20 lb bond grain long paper When usi...

Страница 70: ...rdous emissions For detailed information see the Card Stock Label Guide which is available on the Lexmark Web site at www lexmark com Transparencies can be fed automatically from the multipurpose feeder and all standard and optional trays except the 2000 sheet drawer See Identifying and linking output bins for information about transparency compatibility with optional output bins Be careful when y...

Страница 71: ...ing reliability 1 Print five sheets of paper 2 Wait approximately five seconds 3 Print five more sheets of paper When printing on labels Set the Paper Size Type menu item to Labels in the Paper menu You can set the Paper Size Type from the printer operator panel the printer driver the Local Printer Setup Utility or from MarkVision Feed vinyl labels from the standard 250 or 500 sheet trays or the o...

Страница 72: ...tor panel from the printer driver in the Local Printer Setup Utility or from MarkVision Be aware that preprinting perforation and creasing can significantly affect the print quality and cause print media handling or jamming problems Avoid using card stock that may release hazardous emissions when heated Do not use preprinted card stock manufactured with chemicals that may contaminate the printer P...

Страница 73: ...ack line on the labels in the sources Do not load wrinkled creased damp or curled print media Flex fan and straighten print media before you load it If jams do occur with print media try feeding one sheet at a time through the multipurpose feeder Do not use print media that you have cut or trimmed yourself Do not mix print media sizes weights or types in the same print media source Make sure the r...

Страница 74: ...this key operator In the U S contact Lexmark at 1 800 539 6275 for information about Lexmark Authorized Supplies Dealers in your area In other countries or regions visit the Lexmark Web site at www lexmark com or contact the place where you bought the printer Storing supplies Choose a cool clean storage area for the printer supplies Store supplies right side up in their original packaging until yo...

Страница 75: ...eased on a sheet of print media The values range from 1 lightest setting to 10 darkest setting Note When toner is low firmly shake the cartridge to redistribute any remaining toner See Ordering a print cartridge for more information Print media Multipage Print in the Settings Æ Finishing Menu Causes the printer to print two or more page images on one side of a sheet Values for Multipage Print are ...

Страница 76: ...are Part number Description Average cartridge yield1 T640 T642 T644 For the Americas2 64015SA Return Program Print Cartridge 6 000 standard pages X X X 64015HA High Yield Return Program Print Cartridge 21 000 standard pages X X X 64415XA Extra High Yield Return Program Print Cartridge 32 000 standard pages X 64004HA High Yield Return Program Print Cartridge for Label Applications 21 000 standard p...

Страница 77: ...urn Program Print Cartridge for Label Applications 21 000 standard pages X X X Other available print cartridges 64036SE Print Cartridge 6 000 standard pages X X X 64036HE High Yield Print Cartridge 21 000 standard pages X X X 64436XE Extra High Yield Print Cartridge 32 000 standard pages X For the Asia Pacific Region4 64017SR Return Program Print Cartridge 6 000 standard pages X X X 64017HR High Y...

Страница 78: ...d be used for label applications to optimize feeding reliability To order this item visit our Web site at www lexmark com or contact your Lexmark representative Label fuser cleaners are not recommended for duplex printing Ordering staple cartridges Staple cartridges hold 3 000 staples Use part number 11K3188 to order a pack of three staple cartridges For information on clearing a staple jam see Wh...

Страница 79: ...he office The printer can be safely moved from one location within an office to another following these precautions The printer must remain in an upright position Any cart used to move the printer should have a surface able to support the full footprint of the printer Severe jarring movements may cause damage to the printer and must be avoided Preparing the printer for shipment To transport the pr...

Страница 80: ...opy of the page that jammed if Jam Recovery is set to On or Auto however the Auto setting does not guarantee the page will print Identifying jams If the printer jams the appropriate jam message will be displayed on the printer operator panel If you select Show areas on the operator panel you can view one or more images to help you clear the jam See the diagram on page 81 for an overview of the pap...

Страница 81: ... mailbox you are using The numbers in following illustration indicate the numbers that can appear on the operator panel and designate the general area of a paper jam 24x Paper Jam 201 Paper Jam 200 Paper Jam 260 Paper Jam 23x Paper Jam 250 Paper Jam 27x Paper Jam 28x Paper Jam 202 Paper Jam 23x Paper Jam Doors and trays 200 Paper Jam 201 Paper Jam 250 Paper Jam 260 Paper Jam 24x Paper Jam 23x Pape...

Страница 82: ...h To go to a specific jam see Understanding jam messages Message What to do 200 and 201 Paper Jam Remove Cartridge Open the top front cover remove the print cartridge and remove the jam 202 Paper Jam Open Rear Door Open the rear door on the printer and remove the jam 23x Paper Jam Check Duplex Remove the duplex tray from the duplex unit raise duplex deflector and remove the jam Open rear duplex do...

Страница 83: ...e feeder feeds envelopes from the bottom of the stack the bottom envelope will be the one that is jammed 1 Lift the envelope weight 2 Remove all envelopes If the jammed envelope has entered the printer and cannot be pulled out remove the envelope feeder a Lift the envelope feeder up out of the printer and then set it aside b Remove the envelope from the printer Note If you cannot remove the envelo...

Страница 84: ...Clearing printer jams 84 Clearing jams 3 Flex and stack the envelopes 4 Load the envelope feeder 5 Adjust the guide 6 Lower the envelope weight 7 Press 1 2 1 2 ...

Страница 85: ...x and 24x jams Paper jams in these areas can occur on the incline surface of a tray or across more than one tray To clear these areas 1 Open the printer paper tray and remove any jammed media 2 Open the duplex tray To remove the media pull up ...

Страница 86: ...ed media Pull the print media either up or down If it does not pull easily one way try the other way 4 If you have an optional 2000 sheet feeder open the front door press the elevator button to lower the tray remove the jam and make sure the stack of print media is neat and aligned 5 Press Elevator button ...

Страница 87: ... printer to cool before touching any internal components 3 Lift and pull the print cartridge out of the printer Warning Do not touch the photoconductor drum on the underside of the cartridge Use the cartridge handle whenever you are holding the cartridge 4 Place the print cartridge aside Note Do not leave the cartridge exposed to light for extended periods Note The print media may be covered with ...

Страница 88: ...emove the paper This could cause personal injury or damage to the printer Warning If the print media does not move immediately when you pull stop pulling You need to access the print media from the printer rear door 6 Align and reinstall the toner cartridge 7 Close the top front cover 8 Close the multipurpose feeder 9 Press ...

Страница 89: ... Otherwise continue with step 2 2 Open the printer rear door CAUTION The inside of the printer may be hot Allow the printer to cool before touching any internal components CAUTION Do not use any pointed objects to remove the paper This could cause personal injury or damage to the printer 3 Remove the jammed media 4 Close the rear door 5 Press ...

Страница 90: ...Clearing printer jams 90 Clearing jams 23x Paper Jam Open Duplex Rear Door 1 Open the duplex rear door 2 Remove the jammed media Depending on the media location pull the media either up or down ...

Страница 91: ...x Paper Jam Check Bin x If you have a finisher see 28x Paper Jam Check Finisher 27x Paper Jam Check Bin x To clear a jam in the output expander high capacity output stacker or the 5 bin mailbox 1 If the paper is exiting into the bin or finisher pull the media straight out and press Otherwise continue with step 2 2 Push the output bin rear door latches in toward the center The rear doors will open ...

Страница 92: ...ear doors and make sure all doors are secure 5 Press 28x Paper Jam Check Finisher To clear a jam in the finisher 1 Push the finisher rear door latches in toward the center The rear door will open and drop down 2 Remove the jammed media 3 Close the rear door and make sure the door is secure ...

Страница 93: ... stack of print media 6 Close the finisher output bin cover 7 Press Clearing staple jams A 28x Stapler Jam message indicates staples are jammed in the stapler This requires removing the staple cartridge holder from the printer 1 Lift the front edge of the finisher output bin cover until it locks into position 2 Remove the print media ...

Страница 94: ...he stapler 5 Use the metal tab to lift the staple guard and then pull out the sheet of staples Discard the entire sheet 6 Remove any loose staples from the staple guard 7 Look through the clear covering on the bottom of the cartridge holder to make sure no staples are jammed in the entry throat 8 Press down on the staple guard until it snaps securely into place ...

Страница 95: ...earing staple jams 95 Clearing jams 9 Push the cartridge holder firmly into the stapler until the cartridge holder clicks into place 10 Close the stapler access door 11 Close the finisher output bin cover ...

Страница 96: ...default and the printer returns to Ready Disabling operator panel menus Since many people could be using the printer an administrator may choose to lock the operator panel menus to keep others from changing menu settings from the operator panel To disable the operator panel menus so that changes cannot be made to the printer default settings 1 Turn the printer off Note Disabling the operator panel...

Страница 97: ...mitting Selection appears When the Submitting Selection message disappears an asterisk appears next to the setting to identify it as the current user default setting These settings are active until new ones are stored or the factory defaults are restored To restore the original printer factory default settings Warning All downloaded resources fonts macros and symbol sets in printer memory RAM will...

Страница 98: ...mark com Disabling Power Saver Disabling Power Saver is two step process First you must turn the variable on then select the variable To disable Power Saver 1 Turn the printer off 2 Press and hold and while turning the printer on 3 Release the buttons when you see a clock CONFIG MENU appears on the first line of the display 4 Press until the appears next to Energy Conserve and then press 5 Press u...

Страница 99: ... 3 Release the buttons when you see a clock CONFIG MENU appears on the first line of the display 4 Press until the appears next to Disk Encryption and then press 5 Press until the appears next to Disable and then press 6 Contents will be lost Continue appears Press until the appears next to Yes 7 Press The Encrypting Disk progress bar appears 8 When disk encryption has finished click the back arro...

Страница 100: ...s of the printer you want to configure using the format http ip_address 2 Click Configuration 3 Under Other Settings click Network Ports 4 Click SNMP SNMPv3 authentication and encryption has three levels of support No authentication and no encryption Authentication with no encryption Authentication and encryption Note Only the selected level and later may be used to communicate Supporting IPSec In...

Страница 101: ... Authenticating 802 1x port authentication allows the printer to join networks that require authentication before allowing access 802 1x port authentication can be used with the WPA Wi Fi Protected Access feature of an optional internal wireless print server to provide WPA Enterprise security support Support for 802 1x requires the establishment of credentials for the printer The printer must be k...

Страница 102: ...r panel You can assign a PIN through the Web page of the device Note This setting is only available when a hard disk is installed Note Back channel data will be processed while the printer is locked Reports such as user or event logs can be retrieved from a locked printer To set Printing Lockout 1 Open your Web browser In the address line enter the IP address of the printer you want to configure u...

Страница 103: ...print cartridge Online technical support Technical support is available on our Lexmark Web site at www lexmark com Checking an unresponsive printer If the printer is not responding first make sure The power cord is plugged into the printer and a properly grounded electrical outlet The electrical outlet is not turned off by any switch or breaker The printer is not plugged into any surge protectors ...

Страница 104: ... KnowledgeBase to search for Direct USB printing Jobs do not print The printer is not ready to receive data Make sure Ready or Power Saver appears on the display before sending a job to print Press to return the printer to the Ready state The specified output bin is full Remove the stack of paper from the output bin and then press The specified tray is empty Load paper in the tray You are using th...

Страница 105: ...recommend Lexmark part number 1329605 10 ft or 1427498 20 ft for the standard parallel port The printer is in Hex Trace mode If Ready Hex appears on the display you must exit Hex Trace mode before you can print your job Turn the printer off and back on to exit Hex Trace mode Tray linking does not work Tray linking is not configured properly Make sure both the size and type of media are the same in...

Страница 106: ...urely installed Envelope feeder Make sure the connection between the envelope feeder and the printer is secure Make sure the Paper Size setting is correct in both the Paper Menu and in the software application Make sure the envelopes are loaded correctly See Loading the envelope feeder for more details Finisher Make sure the connection between the finisher and the printer is secure If the finisher...

Страница 107: ...wer problems Output expander Make sure the connection between each output expander or the connection between the output expander and the printer is secure If the output expander is listed on the menu settings page but print media jams when it exits the printer and enters the output expander it may not be properly installed Reinstall each output expander Printer memory Make sure printer memory is s...

Страница 108: ...stack to ensure the print media has been loaded properly Be sure to remove the top and bottom sheets of each ream of paper that is loaded A jam occurs Rubber feed rollers do not turn to advance print media Check the following The power cord is plugged firmly into the back of the 2000 sheet drawer The power cord is plugged into an outlet The outlet has power Consistent misfeeds or jams in the drawe...

Страница 109: ...he paper has absorbed moisture due to high humidity Load paper from a fresh package Store paper in its original wrapper until you load it See Storing print media for more information The pick rolls may be worn Replace the pick rolls See Ordering pick rollers for more information The Paper Jam message remains after you remove the jammed paper You have not pressed Go or have not cleared the entire p...

Страница 110: ... menu Change the Contrast setting in the Quality menu If you are printing on an uneven print surface change the Paper Weight and Paper Texture settings in the Paper menu Verify the correct print media is being used Toner smears or print comes off the page If you are printing on an uneven print surface change the Paper Weight and Paper Texture settings in the Paper menu Verify the print media is wi...

Страница 111: ...shake the print cartridge side to side and front to back several times to redistribute the toner Reinstall the cartridge and then press Repeat this procedure multiple times until the print remains faded When the print remains faded replace the print cartridge If you are using preprinted forms make sure the ink can withstand temperatures of 230 C 446 F Printing is too dark Change the Toner Darkness...

Страница 112: ...nd prints The Toner Darkness setting may be too dark Change the Toner Darkness setting in the quality menu Adjust the Brightness setting darker Adjust the Contrast setting lighter See the tables on page 113 for more settings information The print cartridge may be defective Replace the print cartridge Some of the print is cut off on the sides top or bottom of the media Move the guides in the tray t...

Страница 113: ...setting Select a lower number to lighten the printed output or save toner Brightness Adjusts the gray value of printed objects 6 6 0 is the default setting Contrast Adjusts the contrast of printed objects 0 5 0 is the default setting Values marked by an asterisk are the factory default settings Driver option Purpose Values Enhance Fine Lines A selection to enable a print mode preferable for certai...

Страница 114: ...Notices Trademarks Licensing notice Conventions Electronic emission notices Noise emission levels ENERGY STAR Waste from Electrical and Electronic Equipment WEEE directive Laser notice Statement of limited warranty ...

Страница 115: ...ATES GOVERNMENT RIGHTS This software and any accompanying documentation provided under this agreement are commercial computer software and documentation developed exclusively at private expense Licensing notice The printer resident software contains software developed and copyrighted by Lexmark In addition the printer resident software may contain Lexmark modified software licensed under the provi...

Страница 116: ...y energy and if not installed and used in accordance with the instructions may cause harmful interference to radio communications However there is no guarantee that interference will not occur in a particular installation If this equipment does cause harmful interference to radio or television reception which can be determined by turning the equipment off and on the user is encouraged to try to co...

Страница 117: ...ction requirements of EC Council directives 89 336 EEC and 73 23 EEC on the approximation and harmonization of the laws of the Member States relating to electromagnetic compatibility and safety of electrical equipment designed for use within certain voltage limits A declaration of conformity with the requirements of the directives has been signed by the Director of Manufacturing and Technical Supp...

Страница 118: ...ct connections to the public telecommunications systems in the United Kingdom Noise emission levels Hinweis zum GS Zeichen Die folgenden Messungen wurden gemäß ISO 7779 durchgeführt und gemäß ISO 9296 gemeldet Modell T640 T642 T644 Gerätetyp 061 000 4061 200 4061 400 4061 010 4061 210 and 4061 410 Postanschrift Lexmark Deutschland GmbH Postfach 1560 63115 Dietzenbach Adresse Lexmark Deutschland Gm...

Страница 119: ...This feature will cut the energy used by up to 50 percent Lexmark is proud to be a participant in this program As an ENERGY STAR Partner Lexmark International Inc has determined that this product meets the ENERGY STAR guidelines for energy efficiency Model T640 T642 T644 Machine types 061 000 4061 200 4061 400 4061 010 4061 210 and 4061 410 Mailing address Lexmark Deutschland GmbH Postfach 1560 63...

Страница 120: ...DHHS 21 CFR Subchapter J for Class I 1 laser products and elsewhere is certified as a Class I laser product conforming to the requirements of IEC 60825 1 Class I laser products are not considered to be hazardous The printer contains internally a Class IIIb 3b laser that is nominally a 5 milliwatt gallium arsenide laser operating in the wavelength region of 770 795 nanometers The laser system and p...

Страница 121: ...pair not included in warranty service damaged beyond repair or if the product is not free of all legal obligations restrictions liens and encumbrances Before you present this product for warranty service remove all print cartridges programs data and removable storage media unless directed otherwise by Lexmark For further explanation of your warranty alternatives and the nearest Lexmark authorized ...

Страница 122: ...OR ANY LOST PROFITS LOST SAVINGS INCIDENTAL DAMAGE OR OTHER ECONOMIC OR CONSEQUENTIAL DAMAGES This is true even if you advise Lexmark or a Remarketer of the possibility of such damages Lexmark is not liable for any claim by you based on a third party claim This limitation of remedies also applies to claims against any Suppliers and Remarketers of Lexmark Lexmark s and its Suppliers and Remarketers...

Страница 123: ...onfigured models 7 contrast LCD 96 D disabling operator panel menus 96 Duplex unit 7 E edition notice 2 electrical emission statement 116 Embedded Web Server setting security 99 using secured 100 emission statement 116 enabling operator panel menus 97 Envelope feeder 7 envelopes guidelines 70 loading envelope feeder 55 F FCC statement 116 G guidelines print media 69 H held jobs confidential jobs 4...

Страница 124: ...78 PIN entering at the printer 41 entering from the driver 40 for confidential jobs 40 Power Saver adjusting 98 print cartridge ordering 76 print media guidelines 69 paper 69 transparencies guidelines 70 Print media guidelines 69 print media jams avoiding 73 print media specifications characteristics 69 sizes 61 types 63 weight 64 Printing 36 problems incorrect characters print 105 job didn t prin...

Страница 125: ...tandard tray 7 staple and offset unit replacing staples 78 staple cartridge replacing 78 StapleSmart replacing staples 78 stapling maximum number 106 Stop button 9 supplies label fuser cleaner 78 maintenance kit 77 print cartridge 76 recycling 78 T toner cartridge recycling 78 transfer roller 78 transparencies loading input tray 44 tray linking 57 U UNIX 16 24 USB Direct interface 36 USB flash mem...

Отзывы: