4026-0XX
Repair Information 4-11
Operator Panel Removal
1. Unplug the power cord from the machine.
2. Remove the toner cartridge and P.C. drum.
3. Disconnect the operator panel cable from the controller board.
4. Loosen the front operator panel mounting screw from the board
cage.
5. Remove the rear operator panel mounting screw from the board
cage.
6. Remove the operator panel.
Paper Entry Sensor Removal
1. Remove the paper feed input tray assembly.
2. Remove the paper lift plate assembly.
3. Remove the manual feed guide plate.
4. Remove the engine board.
5. Remove the controller board.
6. Remove the paper feed frame assembly.
7. Disconnect the paper entry sensor cable.
8. Use a screwdriver to release the paper entry sensor latches.
9. Remove the paper entry sensor.
Paper Entry Sensor Flag Removal
1. Remove the paper feed input tray assembly.
2. Remove the paper lift plate assembly.
3. Remove the manual feed guide plate.
4. Remove the engine board.
5. Remove the controller board.
6. Remove the paper feed frame assembly.
7. Use a screwdriver to gently apply outward pressure on the flag
pivots to release the flag from the mounting.
8. Remove the paper entry sensor flag.
Содержание Optra E
Страница 8: ...viii Service Manual 4026 0XX ...
Страница 15: ...Notices and Safety Information xv 4026 0XX Japanese Laser Notice Chinese Laser Notice ...
Страница 72: ...4026 0XX 3 5 ...
Страница 74: ...4026 0XX 3 7 ...
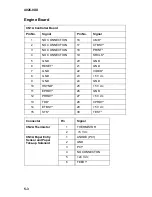
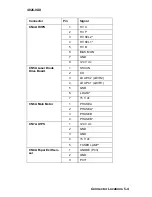
Страница 101: ...4026 0XX Connector Locations 5 6 ...
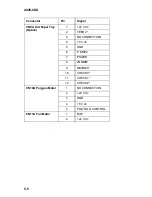
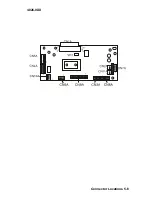
Страница 105: ...4026 0XX Connector Locations 5 10 ...
Страница 108: ...4026 0XX 6 2 Assembly 1 Covers ...
Страница 110: ...4026 0XX 6 4 Assembly 1 Covers continued ...
Страница 112: ...4026 0XX 6 6 Assembly 2 Frame ...
Страница 114: ...4026 0XX 6 8 Assembly 2 Frame continued ...
Страница 116: ...4026 0XX 6 10 Assembly 2 Frame continued ...
Страница 118: ...4026 0XX 6 12 Assembly 3 Printhead ...
Страница 120: ...4026 0XX 6 14 Assembly 4 Paper Feed Input Tray ...
Страница 122: ...4026 0XX 6 16 Assembly 5 Paper Feed Frame ...
Страница 124: ...4026 0XX 6 18 Assembly 6 Fuser ...
Страница 126: ...4026 0XX 6 20 Assembly 6 Fuser continued ...
Страница 128: ...4026 0XX 6 22 Assembly 7 Electronics ...
Страница 130: ...4026 0XX 6 24 Assembly 7 Electronics continued ...
Страница 132: ...4026 0XX 6 26 Assembly 8 Transfer Assembly ...
Страница 134: ...4026 0XX 6 28 Assembly 9 Option Second Paper Drawer ...
Страница 136: ...4026 0XX 6 30 Assembly 9 Option Second Paper Drawer continued ...
Страница 138: ...4026 0XX 6 32 Assembly 9 Option Second Paper Drawer continued ...

