background image

Quick Reference

Learning about the scanner

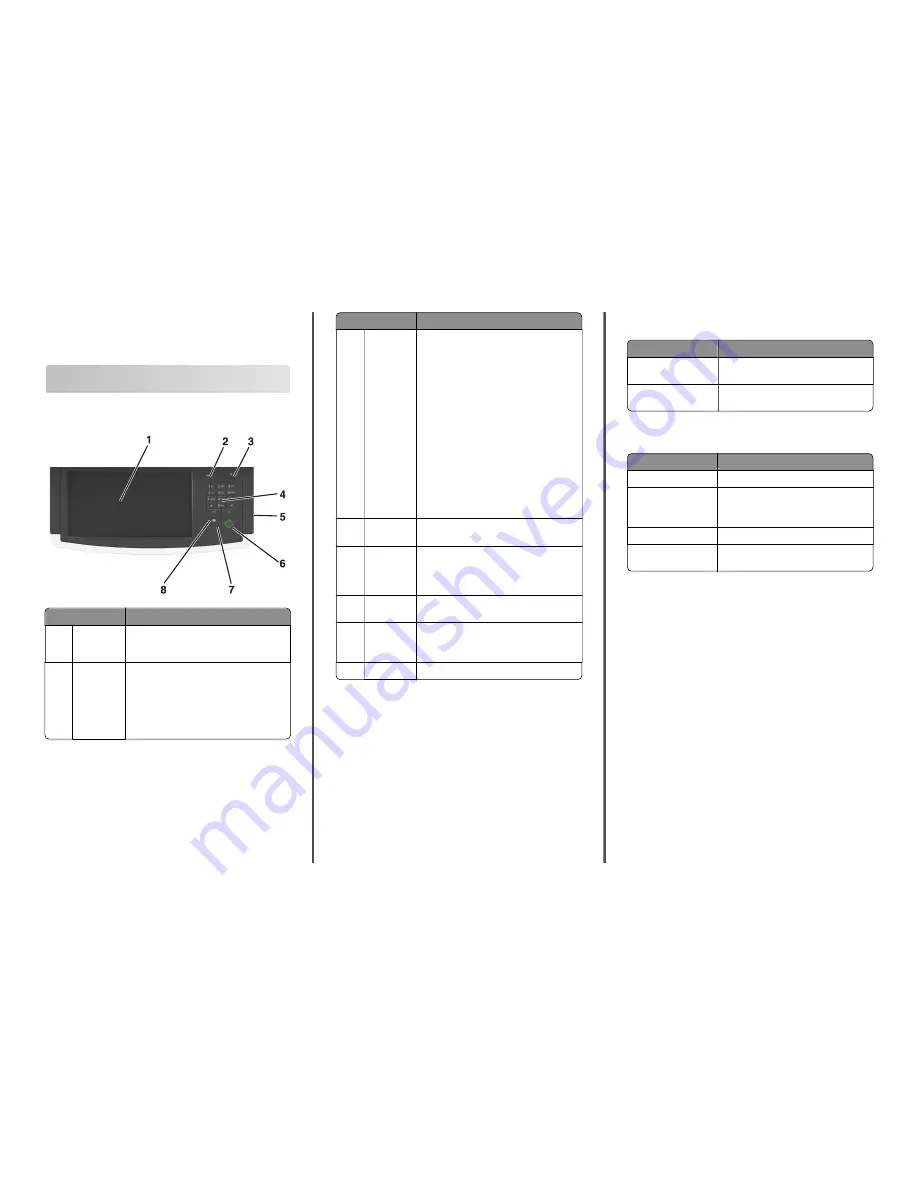
Understanding the scanner control panel

Item

Description

1

Display

Lets you view scanning, copying, faxing, and
printing options as well as status and error
messages

2

Indicator
light

Off

—The power is off.

Blinking green

—The scanner is warming up,

processing data, or printing.

Solid green

—The scanner is on, but idle.

Blinking red

—Operator intervention is

needed.

Item

Description

3

Sleep

Enables Sleep mode

The following are the statuses of the indicator
light and the Sleep button:

Entering or waking from Sleep mode—The
indicator light is illuminated solid green,
Sleep button is unilluminated.

Operating in Sleep mode—The indicator
light is illuminated solid green, Sleep button
is illuminated solid amber.

The following actions wake the printer from
Sleep mode:

Touching the screen or pressing any button

Opening an input tray, cover, or door

Sending a print job from the computer

Performing a power

on

reset with the main

power switch

4

Keypad

Lets you enter numbers, letters, or symbols on
the display

5

USB port

Lets you insert a USB flash drive to send data or
to save scanned images.

For instructions on how to use the USB port, see
“Printing from a flash drive” on page 18.

6

Submit

Lets you submit changes made in the scanner
settings

7

Stop/Cancel

Stops all scanner activity

Note: 

A list of options is displayed once

Stopped

 appears on the display.

8

Home

Lets you navigate back to the home screen

Understanding the colors of the Sleep
button and indicator lights

The colors of the Sleep button and the indicator lights on the scanner
control panel signify a scanner and a printer status.

Sleep button light colors and their corresponding scanner and
printer status

Sleep button light

Scanner and printer status

Off

The scanner and the printer are off, idle or in
Ready state.

Solid amber

The scanner and the printer are in Sleep
mode.

Indicator light colors and their corresponding scanner and
printer status

Indicator light

Scanner and printer status

Off

The scanner and the printer are off.

Blinking green

The scanner and the printer are warming up
or processing data.

The printer is printing.

Solid green

The scanner and the printer are on, but idle.

Blinking red

The scanner and the printer require user
intervention.

Understanding the scanner home screen

When the scanner is turned on, the display shows a basic screen,
referred to as the home screen. Touch the home screen buttons and
icons to initiate an action such as copying, faxing, or scanning; to open
the menu screen; or to respond to messages.

Note: 

Your home screen may vary depending on your home screen

customization settings, administrative setup, and active embedded
solutions.


1

Содержание MX6500E

Страница 1: ... changes made in the scanner settings 7 Stop Cancel Stops all scanner activity Note A list of options is displayed once Stopped appears on the display 8 Home Lets you navigate back to the home screen Understanding the colors of the Sleep button and indicator lights The colors of the Sleep button and the indicator lights on the scanner control panel signify a scanner and a printer status Sleep butt...

Страница 2: ...eld jobs excluding confidential print jobs Profile names Bookmark container or print job names USB container or print job names for supported file types Features Feature Description Menu path Example Menus Settings Copy Settings Number of Copies A menu path is located at the top of each menu screen This feature shows the path taken to arrive at the current menu Touch any of the underlined words to...

Страница 3: ... of the computer Note Make sure that you know how your printer and computer are connected to the network Ethernet or wireless The computer IP address is required when setting up home screen applications such as Forms and Favorites Multi Send Scan to Network For Windows users 1 Open the command window In Windows 8 From the Search charm type run and then navigate to Apps list Run type cmd OK In Wind...

Страница 4: ... Scan to FTP Scan documents directly to a File Transfer Protocol FTP server For more information see Scanning to an FTP address on page 21 Scan to Network Scan a document and then send it to a network shared folder For more information see Setting up Scan to Network on page 5 Scan to Sharepoint Securely scan documents to sites housed on SharePoint servers For more information see Setting up Scan t...

Страница 5: ...ress field Note View the scanner IP address on the scanner home screen The IP address appears as four sets of numbers separated by periods such as 123 123 123 123 2 Click Settings Apps Apps Management Multi Send 3 From the Profiles section click Add and then customize the settings Notes See the mouse over help beside each field for a description of the setting If you select FTP or Share Folder as ...

Страница 6: ...al Type the Windows domain for the destination if the destination resides within a different Windows domain than the printer Username Type the default user name to connect to the destination Password Type the default password to connect to the destination Authentication Type Select how users are authenticated when connecting to the destination Append Timestamp Select the check box to add a time st...

Страница 7: ...ick Apply 3 To export or import a configuration for multiple applications do the following a Click Settings Import Export b Do either of the following To export a configuration file click Export Embedded Solutions Settings File and then follow the instructions on the computer screen to save the configuration file To import a configuration file do the following 1 Click Import Embedded Solutions Set...

Страница 8: ...e paper size indicators at the bottom of the tray to help position the guides 3 Unlock the length guide then squeeze and then slide the guide to the correct position for the size of the paper being loaded 3 1 2 Notes Lock the length guide for all paper sizes Use the paper size indicators at the bottom of the tray to help position the guides 8 ...

Страница 9: ...s installed or not Without an optional staple finisher With an optional staple finisher ABC One sided printing One sided printing ABC Two sided printing A B C Two sided printing If you are loading prepunched paper for use with the staple finisher thenmakesuretheholesonthelongedgeofthepaper are on the right side of the tray One sided printing Two sided printing A B C Note If the holes on the long e...

Страница 10: ...s the maximum paper fill indicator Warning Potential Damage Overfilling the tray can cause paper jams Whenusingcardstock labels orothertypesofspecialtymedia make sure the paper is below the dashed line which is the alternate paper fill indicator 6 For custom or Universal size paper adjust the paper guides to lightly touch the sides of the stack and then lock the length guide 10 ...

Страница 11: ... tray CAUTION POTENTIAL INJURY To reduce the risk of equipment instability load each tray separately Keep all other trays closed until needed 1 Pull out the tray 2 Adjust the width and length guides Loading A5 size paper a Pull up and slide the width guide to the position for A5 LGL OFC FOLIO LTR A4 A5 1 LGL OFC FOLIO LTR A 4 A 5 2 LGL OFC FOL IO LTR A4 A5 b Squeeze and slide the length guide to t...

Страница 12: ... folio size paper a Pull up and slide the width guide to the correct position for the size of the paper being loaded LGL OFC FOLIO LTR A4 A5 1 LGL OFC FOLIO LTR A 4 A 5 2 LGL OFC FOL IO LTR A4 A5 b If the A5 length guide is still attached to the length guide then remove it from its place If the A5 length guide is not attached then proceed to step d c Put the A5 length guide in its holder 2 1 12 ...

Страница 13: ... the paper is loaded properly There are different ways for loading letterhead depending on whether an optional staple finisher is installed or not Withoutanoptionalstaplefinisher With an optional staple finisher ABC One sided printing A B C One sided printing ABC Two sided printing A B C Two sided printing Make sure the paper is below the maximum paper fill indicator Warning Potential Damage Overf...

Страница 14: ...urpose feeder door Note Do not load or close the multipurpose feeder while a job is printing B5 EXE C A4 A5 L TR 2 Pull the multipurpose feeder extender B5 EXE C A4 A5 L TR Note Guide the extender gently so that the multipurpose feeder is fully extended and open 3 Slidethewidthguidetothecorrectpositionforthesizeofthepaper being loaded B 5 E X E C A 4 A 5 L T R Note Use the paper size indicators on...

Страница 15: ...until it comes to a stop Load only one size and type of paper or specialty media at a time Make sure the paper fits loosely in the multipurpose feeder lies flat and is not bent or wrinkled There are different ways of loading letterhead depending on whether an optional staple finisher is installed or not Without an optional staple finisher With an optional staple finisher A B C One sided printing A...

Страница 16: ...osition Note Use the size indicators on the bottom of the tray to help position the guides 2 Load the business cards facedown short edge first into the ADF Note Make sure the last edge of the business card is aligned with the A8 mark on the ADF guide Linking and unlinking trays When the paper size and paper type for any trays are the same the printer will link those trays When one linked tray beco...

Страница 17: ...creen The IP address appears as four sets of numbers separated by periods such as 123 123 123 123 If you are using a proxy server then temporarily disable it to load the Web page correctly 2 Click Settings Paper Menu Custom Names 3 Type a name for the paper type and then click Submit 4 Select a custom type and then verify that the correct paper type is associated with the custom name Note Plain Pa...

Страница 18: ... of data can occur 2 From the scanner control panel touch the document you want to print 3 Touch the arrows to get a preview of the document 4 Use or to specify the number of copies to print and then touch Print Notes Do not remove the flash drive from the scanner USB port until the document has finished printing If you leave the flash drive in the scanner after leaving the initial USB menu screen...

Страница 19: ... have more pages to scan then place the next document on the scanner glass and then touch Scan the Next Page 4 Touch Finish the Job to return to the home screen Canceling a copy job Canceling a copy job while the original document is in the ADF When the ADF begins processing a document touch Cancel Job on the scanner control panel Canceling a copy job while copying pages using the scanner glass Fr...

Страница 20: ... or make any electrical or cabling connections such as the fax feature power cord or telephone during a lightning storm Sending a fax using the touch screen 1 LoadanoriginaldocumentfacedownintotheADForonthescanner glass Note Do not load postcards photos small items transparencies photo paper or thin media such as magazine clippings into the ADF Place these items on the scanner glass 2 If you are l...

Страница 21: ...up Note A password may be required If you do not have an ID and password then get one from your system support person 3 Type a unique name for the shortcut and then enter the fax number To create a multiple number shortcut enter the fax numbers for the group Note Separate each fax number in the group with a semicolon 4 Assign a shortcut number If you enter a number that is already in use then you ...

Страница 22: ...e this shortcut number when you are ready to scan your documents 7 Review the instructions on the Scan Profile screen a Load an original document facedown long edge first into the ADF tray or facedown on the scanner glass Notes Do not load postcards photos small items transparencies photo paper or thin media such as magazine clippings into the ADF tray Place these items on the scanner glass The AD...

Страница 23: ...f paper Do not remove a tray while the printer is printing Do not load a tray while the printer is printing Load it before printing or wait for a prompt to load it Do not load too much paper Make sure the stack height is below the maximum paper fill indicator Do not slide the paper into the tray Load paper as shown in the illustration Make sure the guides in the tray or the multipurpose feeder are...

Страница 24: ... jam Notes When Jam Assist is set to On the printer flushes blank pages or pages with partial prints to the standard bin after a jammed page has been cleared Check your printed output for blank pages When Jam Recovery is set to On or Auto the printer reprints jammed pages However the Auto setting reprints jammed pages if adequate printer memory is available 2 3 4 5 6 7 8 9 11 1 10 Jam location Pri...

Страница 25: ...x page jam remove paper open finisher rear door Leave paper in bin 451 Open the rear door of the staple finisher and then remove the jammed paper Jam location Printer message What to do 12 Automatic document feeder ADF x page jam open automatic feeder top cover 28y xx Remove all paper from the ADF tray and then remove the jammed paper x page jam lift front cover to remove cartridge 200 201 CAUTION...

Страница 26: ...printer Make sure the cartridge is fully pushed in 9 Close the multipurpose feeder door and the front cover 10 From the scanner control panel touch Done to clear the message and continue printing x page jam open upper rear door 202 CAUTION HOT SURFACE The inside of the printer might be hot To reduce the risk of injury from a hot component allow the surface to cool before touching 1 Pull down the r...

Страница 27: ...ut Note Make sure all paper fragments are removed 3 Close the rear door 4 Open the rear door of the duplex area and then push the back of the standard tray 5 Press down the rear duplex flap then firmly grasp the jammed paper and then gently pull out the paper Note Make sure all paper fragments are removed 1 2 6 Insert the standard tray 7 From the scanner control panel touch Done to clear the messa...

Страница 28: ...asp the jammed paper and then gently pull the paper to the right and out of the printer Note Make sure all paper fragments are removed 2 1 3 Insert the tray 4 From the scanner control panel touch Done to clear the message and continue printing x page jam open tray x 24x 1 Check which tray is indicated on the printer display and then pull the tray 2 Firmly grasp the jammed paper on each side and th...

Страница 29: ...then gently pull it out Note Make sure all paper fragments are removed 2 Flex the sheets back and forth to loosen them and then fan them Do not fold or crease the paper Straighten the edges on a level surface 3 Reload paper into the multipurpose feeder 4 Slide the paper guide until it rests lightly against the edge of the paper 5 From the scanner control panel touch Done to clear the message and c...

Страница 30: ...and then gently pull it out Notes Make sure all paper fragments are removed When using A4 folio or legal size paper make sure to adjust the bin extender so that the paper enters the bin properly 5 From the scanner control panel touch Done to clear the message and continue printing x page jam remove paper open finisher rear door Leave paper in bin 451 1 Open the staple finisher rear door 2 Firmly g...

Страница 31: ...rom the stapler bin firmly grasp the jammed paper on each side and then gently pull it out Note Make sure all paper fragments are removed 2 Open the stapler door 3 Pull down the latch of the staple cartridge holder and then pull out the holder from the printer 4 Use the metal tab to lift the staple guard and then remove any loose staples 5 Press down the staple guard until it clicks into place 31 ...

Страница 32: ...ck into the stapler unit until the cartridge holder clicks into place 8 Close the stapler door 9 From the scanner control panel touch Done to clear the message and continue printing x page jam remove paper open expander rear door Leave paper in bin 43y xx 1 Open the output expander rear door 2 Firmly grasp the jammed paper on each side and then gently pull it out Note Make sure all paper fragments...

Страница 33: ...message is cleared when the pages are removed from the ADF tray 2 Open the ADF cover 3 Firmly grasp the jammed paper on each side and then gently pull it out Note Make sure all paper fragments are removed 4 Close the ADF cover 5 Straighten the edges of the original documents then load the documents into the ADF and then adjust the paper guides 6 From the scanner control panel touch Done to clear t...

Отзывы: