8
9
Getting Started
Remote Control Guide
Remote Control Guide
Activating and Operating
BATTERY PLACEMENT
1. Remove the back cover, to expose the battery
compartment.
2. Use two new AAA Alkaline batteries (provided).
Slide a battery into each compartment being
sure to align correct positive and negative ends
and press into place.
3. Replace the back cover.
TOOLS NEEDED TO MOUNT REMOTE HOLDER
— Power drill
—
3
⁄
32
” drill bit
— Phillips screwdriver
— Pencil
— Drywall anchors, if mounted into drywall (not provided).
MOUNTING INSTRUCTIONS
1. Choose a location to mount the remote holder.
2. Orient the remote holder on the wall. Mark
screw holes.
3. If you are mounting the remote holder onto wood,
use a
3
⁄
32
” drill bit to drill the screw holes.
4. Attach the remote holder to the wall using the
screws provided.
5. Gently push the remote into the remote holder
until it is snug.
NOTE
: If you are mounting the Remote Holder onto
drywall, use drywall anchors.
JOIN A BLIND TO A GROUP
NOTE:
The LEVOLOR
®
remote will not operate a blind until
the blind has been added to a GROUP.
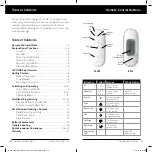
1. Press and hold STOP until the WHITE programming
light starts flashing, then release. This puts the remote
in program mode.
2. Press the desired GROUP number (1, 2, 3, 4, 5 or 6) on
the remote. The BLUE GROUP indicator light above
the GROUP button will flash to show it is selected.
3. With one hand press and continue to hold the
manual control button located on the headrail.
4. While continuing to hold down the manual control
button, use your other hand to press and hold
OPEN on the remote until the blind moves slightly to
indicate it has been joined to the GROUP.
5. Release both buttons.
6. To exit program mode press and hold
STOP until
the lights stop flashing.
SET A FAVORITE POSITION
Each blind has one FAVORITE position. Default setting is slats
tilted up at a 45 degree angle. Setting a new FAVORITE position
overwrites any previous setting.
1. Using the manual control button headrail physically
tilt slats open or closed to the preferred FAVORITES
position.
2. Press and hold STOP until the WHITE programming
light starts flashing, then release. This puts the remote
in program mode.
3. With one hand press and continue to hold the
manual control button.
4. While continuing to hold down the manual control
button, use your other hand to press and hold
♥
FAVORITE on the remote until the slats move slightly
to indicate it has set this position as your FAVORITE.
5. Release both buttons.
6. To exit program mode press and hold
STOP until
the lights stop flashing.
NOTE:
It is recommended that only similar window
coverings be included in a GROUP because of differences
in product features and operation.
Curved edge
should be on top
18-0007-025_Woods_Remote_Control_Guide_v9wu.indd 8-9
3/6/19 10:51 AM


