LevelOne NetCon FBR-1415TX Скачать руководство пользователя страница 12


12 

3.2 Install the Software into Your Computers 


Skip this section if you do not want to use the print server function of this product. 

Notice

:

  If  you  are  using  Windows  2000/XP,  please  refer  to 

Chapter  5  Printer

  -  5.3  Configuring  on 

Windows  2000  and  XP  Platforms.  It  is  not  necessary  to  setup  any  program  and  the  print-server  can 

work.                                                                       


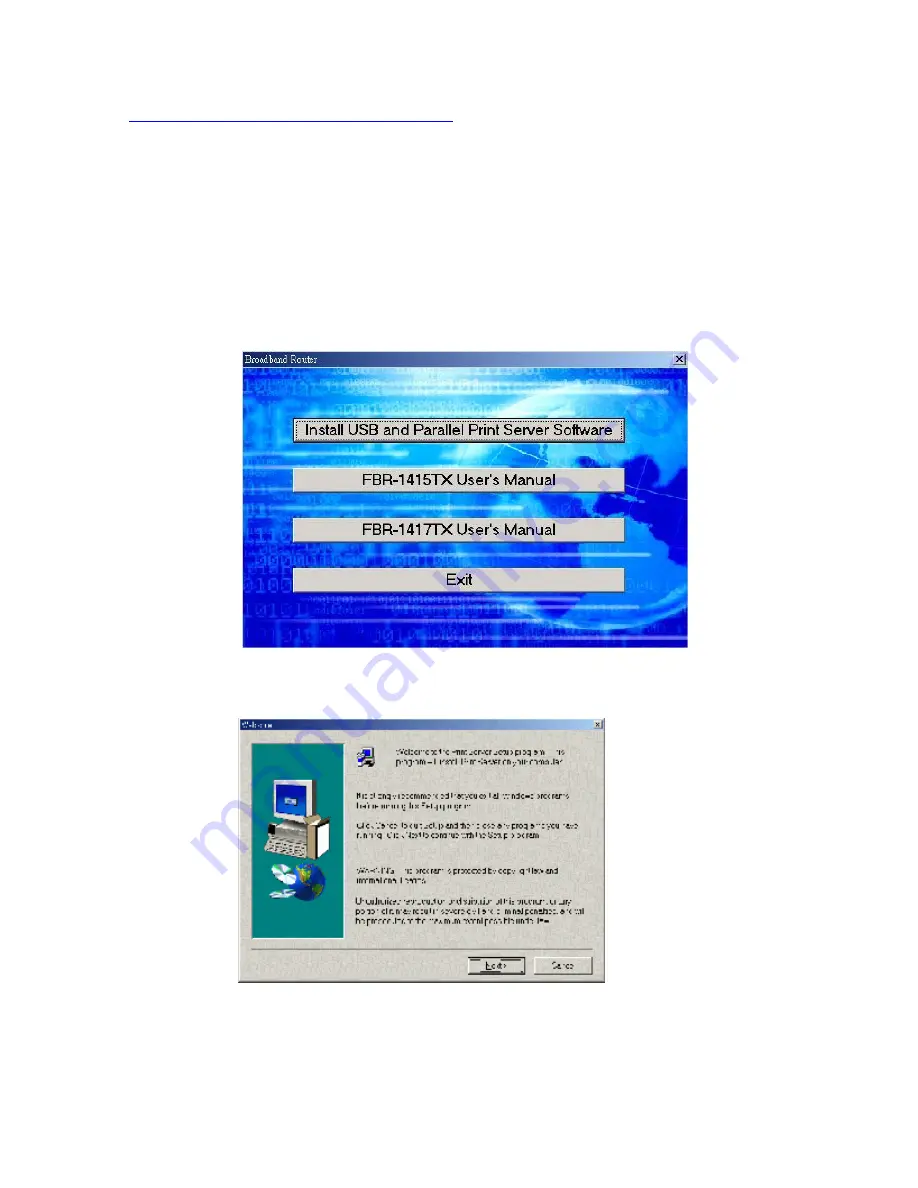
Step 1: Insert the installation CD-ROM into the CD-ROM drive. The following window 

will be shown automatically. If it isn

t, please run 

install.exe

 on the CD-ROM.                                                                                                                           


Step  2:  Click  on  the 

INSTALL  USB  and  Parallel  Print  Server  Software 

  button.  Wait  until  the 

following 

Welcome

 dialog to appear, and click on the 

Next

 button. 


Step 3: Select the destination folder and click on the 

Next

 button. Then, the setup program will begin 

to  install  the  programs  into  the  destination  folder  .Step  4:  When  the  following  window  is 

displayed, click on the 

Finish

 button. 

Содержание NetCon FBR-1415TX

Страница 1: ...1 LevelOne FBR 1415TX Broadband Router w 1USB 1 Parallel Printer Server User s Manual...

Страница 2: ...und to comply with the limits for a Class B digital device pursuant to Part 15 of the FCC Rules These limits are designed to provide reasonable protection against radio interference in a commercial en...

Страница 3: ...ROADBAND ROUTER 14 4 1 START UP AND LOG IN 15 4 2 STATUS 16 4 3 WIZARD 17 4 4 BASIC SETTING 19 4 4 1 Primary Setup WAN Type Virtual Computers 19 4 5 FORWARDING RULES 25 4 5 1 Virtual Server 26 4 5 2 S...

Страница 4: ...IGURING ON WINDOWS NT PLATFORMS 64 5 3 CONFIGURING ON WINDOWS 2000 AND XPPLATFORMS 65 5 4 CONFIGURING ON UNIX LIKE BASED PLATFORMS 70 5 5 CONFIGURING ON APPLE PC 75 APPENDIX A TCP IP CONFIGURATION FOR...

Страница 5: ...t Switch Equipped with a 4 port auto sensing Ethernet switch l Printer sharing Embedded a print server to allow all of the networked computers to share one printer Built in USB and parallel host to co...

Страница 6: ...users under this device from accessing specific URLs l URL Blocking Supported URL Blocking can block hundreds of websites connection by simply a keyword l VPN Pass through The router supports vpn pas...

Страница 7: ...an control some functions like virtual server and packet filters when to access or block Other functions l UPNP Universal Plug and Play Supported FBR 1415TX also supports this function The application...

Страница 8: ...On The WAN port is linked WAN WAN port activity Green Blinking The WAN port is sending or receiving data Reset reset To reset system settings to factory defaults On An active station is connected to...

Страница 9: ...t Description 5VDC Power inlet DC 5V 2A WAN The port where you will connect your cable or DSL modem or Ethernet router Port 1 4 The ports where you will connect networked computers and other devices U...

Страница 10: ...igure 2 3 Setup of LAN and WAN connections for this product 3 Setup WAN connection Prepare an Ethernet cable for connecting this product to your cable xDSL modem or Ethernet backbone Figure 2 3 illust...

Страница 11: ...tically that is via DHCP server of this product After installing the TCP IP communication protocol you can use the ping command to check if your computer has successfully connected to this product The...

Страница 12: ...1 Insert the installation CD ROM into the CD ROM drive The following window will be shown automatically If it isn t please run install exe on the CD ROM Step 2 Click on the INSTALL USB and Parallel P...

Страница 13: ...r and then click the OK button to reboot your computer Step 4 After rebooting your computer the software installation procedure is finished Now you can configure the FBR 1415TX refer to Chapter 4 and...

Страница 14: ...B B Br r ro o oa a ad d db b ba a an n nd d d R R Ro o ou u ut t te e er r r This product provides Web based configuration scheme that is configuring by your Web browser such as Netscape Communicator...

Страница 15: ...on is established you will see the web user interface of this product There are two appearances of web user interface for general users and for system administrator To log in as an administrator enter...

Страница 16: ...t s working status A WAN Port Status If the WAN port is assigned a dynamic IP there may appear a Renew or Release button on the Sidenote column You can click this button to renew or release IP manuall...

Страница 17: ...17 4 3 Wizard Setup Wizard will guide you through a basic configuration procedure step by step Press Next...

Страница 18: ...18 Setup Wizard Select WAN Type For detail settings please refer to 4 4 1 primary setup...

Страница 19: ...19 4 4 Basic Setting 4 4 1 Primary Setup WAN Type Virtual Computers Press Change...

Страница 20: ...ptions A Static IP Address ISP assigns you a static IP address B Dynamic IP Address Obtain an IP address from ISP automatically C Dynamic IP Address with Road Runner Session Management e g Telstra Big...

Страница 21: ...Time the amount of time of inactivity before disconnecting your PPPoE session Set it to zero or enable Auto reconnect to disable this feature 4 4 1 5 PPTP 1 My IP Address and My Subnet Mask the privat...

Страница 22: ...re If Auto reconnect is enabled this product will automatically connect to ISP after system is restarted or connection is dropped 4 4 1 7 Virtual Computers Virtual Computer enables you to use the orig...

Страница 23: ...onment include host IP Subnet Mask Gateway and DNS configurations It is not easy to manually configure all the computers and devices in your network Fortunately DHCP Server provides a rather simple ap...

Страница 24: ...er will automatically allocate an unused IP address from the IP address pool to the requesting computer You must specify the starting and ending address of the IP address pool 4 Domain Name Optional t...

Страница 25: ...25 4 5 Forwarding Rules...

Страница 26: ...ll requests to this port will be redirected to the computer specified by the Server IP Virtual Server can work with Scheduling Rules and give user more flexibility on Access control For Detail please...

Страница 27: ...of Special Applications fails to make an application work try setting your computer as the DMZ host instead 1 Trigger the outbound port number issued by the application 2 Incoming Ports when the trig...

Страница 28: ...o be exposed to unrestricted 2 way communication for Internet games Video conferencing Internet telephony and other special applications NOTE This feature should be used only when needed Non standard...

Страница 29: ...29 4 6 Security Settings...

Страница 30: ...Servers or DMZ host only You can select one of the two filtering policies 1 Allow all to pass except those match the specified rules 2 Deny all to pass except those match the specified rules You can s...

Страница 31: ...rk with Scheduling Rules and give user more flexibility on Access control For Detail please refer to Scheduling Rule Each rule can be enabled or disabled individually Inbound Filter To enable Inbound...

Страница 32: ...2 192 168 9 1 192 168 9 14 They can do everything except read net news port 119 and transfer files via FTP port 21 Others are all allowed After Inbound Packet Filter setting is configured click the s...

Страница 33: ...Packet Filter field Example 1 192 168 123 100 192 168 123 149 They are allowed to send mail port 25 receive mail port 110 and browse Internet port 80 port 53 DNS is necessary to resolve the domain na...

Страница 34: ...168 123 100 192 168 123 119 They can do everything except read net news port 119 and transfer files via FTP port 21 Others are allowed After Outbound Packet Filter setting is configured click the save...

Страница 35: ...on when someone accesses the specific URLs Privilege IPAddresses Range Setting a group of hosts and privilege these hosts to access network without restriction Domain Suffix A suffix of URL to be rest...

Страница 36: ...ction will be record in log file 2 URL include girl com will not be blocked but the action will be record in log file 3 URL include erotica com will be blocked but the action will not be record in log...

Страница 37: ...o input a keyword only In other words Domain filter can block specific website while URL Blocking can block hundreds of websites by simply a keyword URL Blocking Enable Checked if you want to enable U...

Страница 38: ...n will be record in log file 2 URL include erotica will be blocked but the action will be record in log file 3 URL include girl will not be blocked but the action will be record in log file 4 URL incl...

Страница 39: ...ction control to enable the controlling of which wired can connect to this device If a client is denied to connect to this device it means the client can t access to the Internet either Choose allow o...

Страница 40: ...ice In this page we provide the following Combobox and button to help you to input the MAC address You can select a specific client in the DHCP clients Combobox and then click on the Copy to button to...

Страница 41: ...tion to specified a group of trusted IP addresses For example 10 1 2 0 24 NOTE When Remote Administration is enabled the web server port will be shifted to 88 You can change web server port to other p...

Страница 42: ...S attack comes from the Internet Currently the router can detect the following DoS attack SYN Attack WinNuke Port Scan Ping of Death Land Attack etc VPN PPTP IPSec Pass Through Please enable this feat...

Страница 43: ...43 4 7 Advanced Settings...

Страница 44: ...time server to consult UTC time Time Zone Select a time zone where this device locates Set Date and Time manually Selected if you want to Set Date and Time manually Daylight Saving Select and configu...

Страница 45: ...to Check Enable to enable this function E mail Alert Enable Check if you want to enable Email alert send syslog via email SMTP Server IP Port Input the SMTP server IP and port which are concated with...

Страница 46: ...46 E mail Subject The subject of email alert This setting is optional...

Страница 47: ...your host to your current IP address which changes each time you connect your Internet service provider Before you enable Dynamic DNS you need to register an account on one of these Dynamic DNS serve...

Страница 48: ...48 Username E mail Password Key You will get this information when you register an account on a Dynamic DNS server Example After Dynamic DNS setting is configured click the save button...

Страница 49: ...values and monitoring network events Enable SNMP You must check either Local or Remote or both to enable SNMP function If Local is checked this device will response request from LAN If Remote is chec...

Страница 50: ...ch s get community is set as public 2 This device will response to SNMP client which s set community is set as private 3 This device will response request from both LAN and WAN 4 This device will send...

Страница 51: ...used to setup the functions of static and dynamic routing RIP Routing Information Protocol RIP will exchange information about destinations for computing routes throughout the network Please select R...

Страница 52: ...123 103 1 So if for example the client3 wanted to send an IP data gram to 192 168 0 2 it would use the above table to determine that it had to go via 192 168 123 103 a gateway And if it sends Packets...

Страница 53: ...53 4 7 6 Schedule Rule You can set the schedule time to decide which service will be turned on or off Select the enable item Press Add New Rule...

Страница 54: ...54 You can write a rule name and set which day and what time to schedule from Start Time to End Time The following example configure ftp time as everyday 14 10 to 16 20 After configure Rule 1...

Страница 55: ...the schedule rule and the rule of the rules behind the deleted one will decrease one automatically Schedule Rule can be apply to Virtual server and Packet Filter for example Exanple1 Virtual Server Ap...

Страница 56: ...56...

Страница 57: ...57 4 8 Toolbox 4 8 1 System Log You can View system log by clicking the View Log button...

Страница 58: ...58 4 8 2 Firmware Upgrade You can upgrade firmware by clicking Firmware Upgrade button...

Страница 59: ...bin file Once you want to restore these settings please click Firmware Upgrade button and use the bin file you saved 4 8 4 Reset to default You can also reset this product to factory default by click...

Страница 60: ...re the target device must be Wake on LAN enabled and you have to know the MAC address of this device say 00 11 22 33 44 55 Clicking Wake up button will make the router to send the wake up frame to the...

Страница 61: ...nter port please skip this chapter 5 1 Configuring on Windows 95 98 Platforms After you finished the software installation procedure described in Chapter 3 your computer has possessed the network prin...

Страница 62: ...62 1 Find out the corresponding icon of your server printer for example the HP LaserJet 6L Click the mouse s right button on that icon and then select the Properties item...

Страница 63: ...d Port item Be sure that the Printer Driver item is configured to the correct driver of your server printer 4 Click on the button of OK Type in the IP address of this product and then click the OK but...

Страница 64: ...edure for a Windows NT platform is similar to that of Windows 95 98 except the screen of printer Properties Compared to the procedure in last section the selection of Details is equivalent to the sele...

Страница 65: ...and XP Platforms Windows 2000 and XP have built in LPR client users could utilize this feature to Print You have to install your Printer Driver on LPT1 or other ports before you preceed the following...

Страница 66: ...66 2 Select Ports page Click Add Port 3 Select Standard TCP IP Port and then click New Port...

Страница 67: ...67 4 Click Next and then provide the following information Type address of server providing LPD that is our NAT device 192 168 123 254 5 Select Custom then click Settings...

Страница 68: ...68 6 Select LPR type lp lowercase letter in Queue Name And enable LPR Byte Counting Enabled...

Страница 69: ...69 7 Apply your settings...

Страница 70: ...inter name is lp Noticed If the router has USB and Parallel port at the same time Please be careful to setup 1 Use Parallel to print Queue Name lp 2 Use USB to print Queue Name lpUSB0 In X Windows for...

Страница 71: ...71 1 Enter the Pinter Name Comments then forward 4 Select LPD protocol and then forward...

Страница 72: ...72 5 Enter Router LAN IP Address and the queue name lp Then forward...

Страница 73: ...73 6 Select the Printer Brand and Model Name Then Forward 7 Click Apply to finish setup 8 At last you must click Apply on the toolbox to make the change take effective...

Страница 74: ...tool in X windows PS The spool name is lp all lowercase letter Below is my setting etc printcap lp sd var spool lpd lp mx 0 sh rm 192 168 123 254 rp lp key point if var spool lpd lp filter Then add th...

Страница 75: ...go to Printer center Printer list and add printer 2 Choose IP print and setup printer ip address router Lan ip address 3 Disable Default Queue of Server And fill in lp in Queue name item 4 Printer Mo...

Страница 76: ...76 Noticed If the router has USB and Parallel port at the same time Please be careful to setup 1 Use Parallel to print Queue Name lp 2 Use USB to print Queue Name lpUSB0...

Страница 77: ...u have been successfully installed one network card on your personal computer If not please refer to your network card manual Moreover the Section B 2 tells you how to set TCP IP values for working wi...

Страница 78: ...list And choose TCP IP in the Network Protocols Click OK button to return to Network window 6 The TCP IP protocol shall be listed in the Network window Click OK to complete the install procedure and...

Страница 79: ...Settings then click Control Panel 2 Double click Network icon Select the TCP IP line that has been associated to your network card in the Configuration tab of the Network window 3 Click Properties bu...

Страница 80: ...80 a Select Obtain an IP address automatically in the IP Address tab b Don t input any value in the Gateway tab...

Страница 81: ...B Configure IP manually a Select Specify an IP address in the IP Address tab The default IP address of this product is 192 168 123 254 So please use 192 168 123 xxx xxx is between 1 and 253 for IP Ad...

Страница 82: ...address of this product default IP is 192 168 123 254 in the New gateway field and click Add button c In the DNS Configuration tab add the DNS values which are provided by the ISP into DNS Server Sear...

Страница 83: ...the router and press the RESET button in And then power on the router and hold the RESET button down until the STATUS and or M2 LED or Status LED start flashing then move away the hand If LED flashes...

Отзывы: