12 / 27
2.2.2 3-in-1 VGA Cable Installation
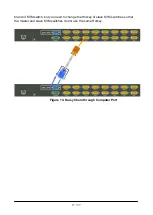
Each computer port connector is HDDB15 type. The 3-in-1 VGA cable has a HDDB15
male connector at one end. Plug it into computer port on the rear of KVM switch. The other
end of input cable has three connectors: a HDDB15 male type for computer video, a
purple mini din 6-pin PS/2 connector for keyboard and a green mini din 6-pin PS/2
connector for mouse. Plug these three connectors into the respective ports of computer.
Repeat the same procedure for all other computers.
(a) PS/2 computer --- Plug in PS/2 mouse connector to computer mouse port, the PS/2
keyboard connector to computer keyboard port. Do not hot plug PS/2 port. If you must
do that make sure PS/2 mouse first then the PS/2 keyboard.
Figure 9. 3-in-1 VGA cable
(b) USB computer --- connect PS/2-USB changer to PS/2 keyboard connector, then plug
the changer into available USB port. This single USB port can communicate both keyboard
and mouse signals. It works as a standard HID (Human Interface Device), no extra driver
needed.
Figure 10. 3-in-1 VGA Cable and PS/2 to USB Changer
Note:
It is recommended to power off all the computers and server before the
installation. If we can not turn off the computer, for PS/2 computer, please
plug in T-dongle connectors in the following order: firstly PS/2 mouse
connector, secondly PS/2 keyboard connector, thirdly the VGA connector to
the computer.
PS/2-USB Changer
Содержание KVM-8908
Страница 1: ...KVM 8908 KVM 8916 19 Widescreen LCD Rack Console with 8 16 Port KVM Switch User Manual...
Страница 10: ...10 27 2 Slide the unit into the rack and secure it to the rack Figure 7 Rack Mount Installation 2...
Страница 23: ...23 27 5 4 CAT5 5E 6 Straight Through UTP STP Cable Figure 18 CAT5 5E 6 Straight Through Cable Connector 8P8C...


