V
W
U
S
R
T
U
L
S
[DETAIL 6]
[DETAIL 7]
[DETAIL 8]
STEP 5
Install eight Rubber Straps [
S
], one onto each Cradle [
R
] and one onto each Wheel Stop [
V
] with the HammerHead end of the Rubber
Straps Facing away from the Cradle [
R
].
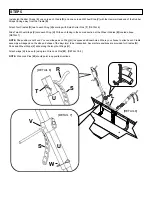
Attach four Cradles [
R
] two to each Wing [
U
] securing with Small Cotter Pins [
T
]. [DETAIL 6]
Slide Two Wheel Stops [
V
] onto each Wing [
U
]. With each facing in the same direction at the Wheel Cradles [
R
] located above.
[DETAIL 7]
NOTE:
Pad position is not fixed. You can slide pads on Wing [
U
] to expose additional holes. Where you choose to attach each Cradle
assembly will depend on the size and shape of the bicycle(s) to be transported. Several hole positions are provided for Cradles [
R
].
Pads and Wheel Stops [
V
] slide along the length of Wings [
U
].
Attach wings [
U
] to base [
L
] using two Wire Lock Pins [
W
]. [DETAIL 7 & 8]
NOTE:
Wire Lock Pins [
W
] should point in opposite directions.


