background image

Lenovo Portable Computer User Guide

46

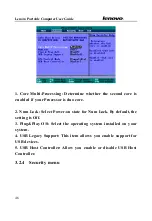
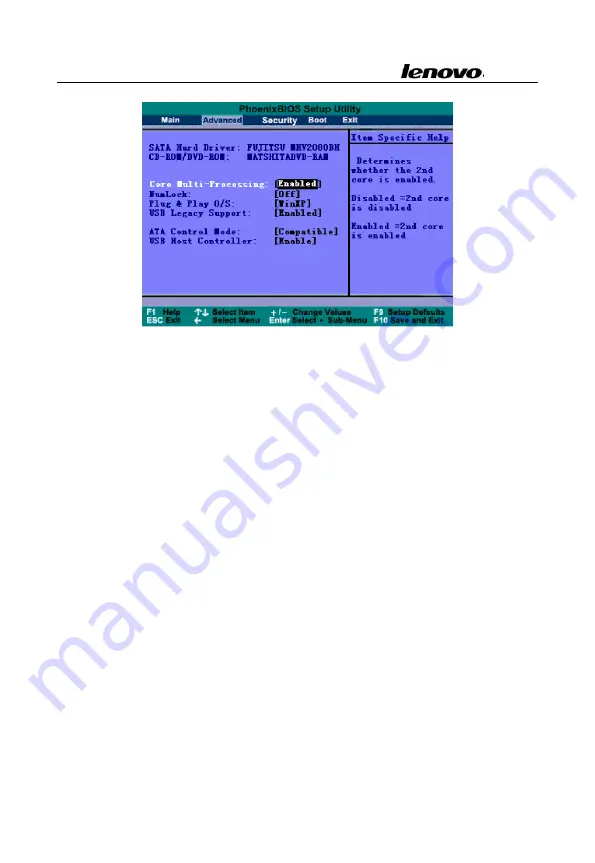
1. Core Multi-Processing: Determine whether the second core is
enabled if your Processor is duo core.

2. Num Lock: Select Power-on state for Num Lock. By default, the
setting is Off.
3. Plug&Play O/S: Select the operating system installed on your
system.
4. USB Legacy Support: This item allows you enable support for
USB devices.
5. USB Host Controller: Allow you enable or disable USB Host
Controller.

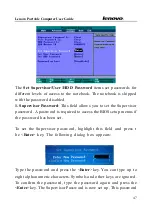
3.2.4   Security menu

Содержание Y300

Страница 1: ... or call our agent for help Pay your attention to the caution and safety messages in this guide and the safety messages in the preface Note 1 Do not plug in and or remove any computer component while using the computer except USB PCMCIA and or CD ROM devices which support PnP Plug and play Technology 2 The computer has adopted many new hardware components The user must install the drivers by follo...

Страница 2: ...e in work or entertainment time LENOVO 3000 Y300 series has two select models as follows l Intel 945GM Express Chipset with integrated graphics card l Intel 945PM Express Chipset with NVIDIA Geforce Go 7300 discrete graphics card 1 2 Finding where everything is located 1 2 1 Front view with the display open ...

Страница 3: ... quality CMOS camera has been integrated for picture taking and video communication etc To use the integrated camera double click the Scanners and Camera wizard on the desktop and follow the instructions on the screen 2 TFT Color LCD The computer adopts 13W Thin Film Transistor TFT full color display which supports the highest as 1280 horizontal x 768 vertical pixels 32 bit color 3 Stereo speakers...

Страница 4: ...lick to move up cursor Long press to fast move Double click to move rightside cursor Click to move up cursor Long press to fast move Double click to move leftside cursor Click to enter into menu and then click to OK Long press to quickly return to primal menu in the main window long press to exit Shuttle Center media software Double click to return to primal menu from secondary menu in main window...

Страница 5: ...fingertip across the Touchpad to move the pointer There are two buttons which perform like mouse buttons After the driver install Touchpad can be set to perform more functions For more details refer to Using Touchpad 7 Launch key Power button Press this button to turn on or off the computer Under Operating System use this button to enter quit standby or hibernation status Hint If the system cannot...

Страница 6: ...you can quickly lunch the EnergyCut program under the working OS such as WinXP or other more advanced OS Camera key Press Camera key to run the EasyCapture application Within the EasyCapture application press Camera key to take a photo Wireless launch key Enable or disable the wireless LAN 8 Status indicator 1 The system status indicators show the status of the computer as follows 1 Caps Lock indi...

Страница 7: ...puter is in STR Suspend to Ram 2 Battery indicator Blue The battery is fully charged Orange The battery is being charged Blinking orange The battery is low 3 Wireless LAN Bluetooth indicator Blue The wireless LAN feature is on Blinking Orange The bluetooth is on Blue Blinking Orange Bluetooth and Wireless are both enabled 10 Keyboard Standard 86 key keyboard Embedded numeric keypad and function ke...

Страница 8: ...al media card slot 4 in 1 3 Slot in optical driver 4 Optical driver button 1 Infrared port Use this port to send and receive infrared IR signals to and from other IR compatible devices This port supports a transfer rate of up to 4 Mbps per second 2 Multiple digital media card slot 4 in 1 ...

Страница 9: ...e you can play CD VCD and DVD on your computer If your computer has a CD RW DVD ROM as known as COMBO or a Super Multi you can burn the digital data to CD or DVD For more details refer to Using optical driver Note Optical media drive might vary with computer model When optical media drive is operating the CD DVD is circumvolving at very high speed in the drive Sometimes it makes a little bit noise...

Страница 10: ...Lenovo Portable Computer User Guide 10 1 2 3 Left view 1 VGA port 2 USB ports 3 Air Vent 4 IEEE1394 port 5 PC card slot 6 HDD Compartment ...

Страница 11: ... USB device supports PnP Plug and Play technology which means you can install and remove the USB device when your computer is on 3 Air vent The internal fan and louvers enable air to circulate in the computer and cool the central processor Be careful not to block the vent Note When the computer s temperature is high the computer will run the cooling fan automatically The cooling fan makes a little...

Страница 12: ...t The slot supports Type II PC card 6 HDD compartment The HDD compartment contains the hard disk 1 2 4 Right view 1 Security keyhole 2 USB ports 3 Microphone jack 4 Earphone jack 5 Connecter cover 6 RJ45 LAN connector 7 RJ11 Modem connector 8 Power jack ...

Страница 13: ...s to your computer such as mouse full size keyboard and memory key etc The USB ports comply with USB2 0 standards which enable data transfer speeds 40 times faster than the USB 1 1 standards The ports also support USB 1 1 Hint The USB device supports PnP Plug and Play technology which means you can install and remove the USB device when your computer is on 3 Microphone jack Enable connection of a ...

Страница 14: ...r voltage than the LAN cable It can damage your computer 7 RJ11 Modem connector In areas where an internal Modem is installed as standard device there is a Modem jack that lets you use a modular cable to connect the Modem directly to a telephone line Caution Be careful not to connect the digital circuitry cable to the Modem jack Its electric current might damage the Modem 8 Power jack The AC adapt...

Страница 15: ... to 240 volts and to a frequency of either 50 or 60 hertz enabling you to use the computer in almost any region The power connector jack and power cord jack might vary in different countries Make sure that the AC adaptor is correctly connected to the AC power Wrong connection might damage your computer and result in fire accident 1 2 5 Bottom view ...

Страница 16: ... and insert the battery pack horizontally into the mainframe until you hear the little click sound Slide the Battery Pack Lock to the Lock position and the Battery Release Latch will restore again Releasing battery pack Shut down the computer close the display panel and turn over the computer Slide the battery pack lock to the Unlock position Slide the battery release latch to free the battery pac...

Страница 17: ...r 4 FAN CPU wireless LAN card memory cover This cover protects the CPU memory and its thermal modules wireless LAN card is also installed here Caution Do not change the CPU by yourself If you need to change the CPU bring it to one of our agents The professional technician who has been qualified by Lenovo will help you Note Do not insert the different model of memory module It can reduce the comput...

Страница 18: ...antee all memory modules are compatible with the computer 1 3 Turn on off the power 1 3 1 Open close the LCD display panel Hold and lift up the display panel slowly with your both hands to the best view angle for you Press the Power Button to turn on the computer Then the Power Indicator glows blue When you are closing the display panel hold the middle top side and lay down the panel slowly with y...

Страница 19: ...he computer 1 Place the computer on a flat and clean surface 2 Connect the power cord to the AC adaptor 3 Connect the AC adaptor s DC output plug to the computer s DC IN socket 4 Plug the power cord into a live AC power that supports the voltage from 100 to 240volts and the frequency of either 50 or 60 hertz 5 Open the display panel and press the power button to turn on the computer 1 3 3 Turn off...

Страница 20: ...ight contain a little power when you use for the first time Operate the computer on the battery power until the battery is fully discharged Then follow the following steps to activate the battery Step 1 Uninterruptedly charge the battery for a long time Step 2 Operate the computer on the battery power until the battery is fully discharged Step 3 Do the step 1 and step 2 for another two times The c...

Страница 21: ...g battery When your computer does not connect to an external AC power the battery will automatically supply the power for your computer The operating time of the 945PM model which uses a dedicated video card is a little shorter than the 945GM model which uses integrated video card The actual operating time varies with different factors such as LCD brightness system EnergyCut property application c...

Страница 22: ...lashes Hint If you will not use the computer in a long time remove the battery pack and store it separately Note Charge and discharge the battery at least once three month to avoid the battery malfunctions by over discharge 1 4 3 Battery initialization After a long time using the battery s operating time is much shorter than the first use The reason is the lithium ion battery memory effect Do the ...

Страница 23: ... possible as you can to decrease the using times of battery pack and extend the battery operating life 1 4 4 Checking the battery status When you are using the battery power you can get the battery status and the remaining power of the battery through the following ways Double click the battery icon at the right bottom of Windows taskbar By default the battery icon only shows when the computer is ...

Страница 24: ... at the right bottom of Windows taskbar and a prompt window pops up to suggest you to connect to the AC power to avoid data loss Hint If the battery icon does not appear at the right bottom of Windows taskbar adjust the Windows setting to display it by following the following steps Click Start à Control Panel à Performance and Maintenance à Power Option à Advanced select Always show icon on the ta...

Страница 25: ... regulations Contact local manage institutions for disposal details 1 5 Using the LCD display This computer s display is 13 1 TFT WXGA LCD which supports 1280 768 32bit Use Fn and Fn to adjust LCD brightness LCD can switch the mode 15 9 and 4 3 with the function key Fn F11 that is you can switch 1280 768 and 1024 768 Note 1 LCD is made of glass and easy to break So use both hands to hold the left ...

Страница 26: ...ight damage the LCD display 4 Do not put object on the LCD back cover press or hit it 1 6 Using keyboard The computer has an 86 key Windows Keyboard or multi language keyboard 1 6 1 Using numeric keypad The numeric keypad is the keys of blue numbers and symbols at the right side of the keyboard Press Fn PrtScrn NumLk to enable the numeric keypad function When the function is active the Num Lock in...

Страница 27: ...o access some functions quickly Shortcut Function Fn ESC Camera on off Fn END Touchpad on off Fn F1 Let the computer into Standby Mode Fn F2 Turn on off LCD backlight Fn F3 Change display mode between LCD and external display Fn F4 Wireless LAN on off Fn F5 Bluetooth on off Fn F6 Play pause Fn F7 Stop Fn F8 Next Fn F9 Previous Fn F10 Enable disable Mute function Fn F11 4 3 and 15 9 switch ...

Страница 28: ...Key to access some window applications or utilities Shortcut Function E Open Windows Explore R Open Rundialog box F Open Search Results dialog box Ctrl F Open Search Results Computers dialog box when computer connects to network Pause Break Open System properties dialog box If you want to change the keyboard setting Click Start à Control Panel à Printers and Other Hardware à Keyboard and change th...

Страница 29: ...ve the on screen pointer on material that you want to move Tap the Touchpad twice but leave your finger on the pad after the second tap Now you are in Drag and Drop mode as press and hold the left mouse button Move your finger away from the Touch pad to stop drag and drop 3 Scroll Button It helps you to view websites and documents more conveniently You can change the Touchpad setting through Start...

Страница 30: ... 1 Tray in driver To load the disc into optical media drive follow the following steps Press the drive eject button on the drive door and wait a while for the drawer to come out Pull out it gently until it is fully opened Lay the CD DVD into the drawer label side up Press at the center of CD DVD gently until you feel it click into place and CD DVD can rotate well Push the drawer and close it gentl...

Страница 31: ... 8cm disk whenever Note Do not move the computer when the optical drive is working The optical drive indicator at the upside of the keyboard shows the optical drive working status There is another optical drive indicator beside the drive eject button It also shows the optical drive working status ...

Страница 32: ...ce and lower EnergyCut This computer has built in EnergyCut It can force the computer to operate in standby hibernation mode under pre defined conditions Using the EnergyCut properly can extend the battery operating time This computer supports ACPI Advanced Configuration and Power Interface EnergyCut standard ACPI also needs the Operating System which supports ACPI such as Microsoft Windows ME Mic...

Страница 33: ...nce à Power Options 2 1 4 Standby mode Standby mode suspends the system to RAM STR In this mode the computer turns off the monitor and hard disk to reduce the power consumption while it has been idle for a certain time Press the power button to restore the previous working environment Note If the AC adaptor and battery pack are both unplugged from the computer while it is in standby mode all data ...

Страница 34: ... After the computer enter hibernation mode press the power button to wake up the computer and restore the previous state If you enable hibernation facility when the computer battery is extremely low the computer will enter the hibernation mode automatically by default You can set up the way of entering hibernation mode for your computer close the lid of notebook computer press the power button or ...

Страница 35: ...ptor to the computer If you cannot connect the adaptor to the computer turn off the computer or let the computer enter hibernation mode Hint We strongly recommend you to complete the setting as follows Click Start à Control Panel à Performance and Maintenance à Power Options à Hibernation choose Enable Hibernation and click Applyto enable hibernation facility Click Start à Control Panel à Performa...

Страница 36: ... controlled by software You can adjust the speaker volume as desired when listening to music or watching movies Click Start à All Programs à Accessories à Entertainment à Volume Control In the Volume Control window click and drag the bar in the Volume Control column and slide it up or down to increase or decrease the volume Note Because there are several noise sources such as the fan hard disk and...

Страница 37: ...s the settings will automatically adjust to the closest possible setting 2 4 Connecting IEEE1394 device IEEE 1394 is a new data transmission standard supported by Windows systems It can transmit data and digital videos stably and rapidly Through the IEEE 1394 port the computer can connect external hard disks digital cameras and video cameras 2 5 Connecting to external display device Plug the power...

Страница 38: ...most PC Cards and automatically loads the appropriate device driver If the configuration program tells you to load the manufacturer s drivers use the floppy disk or CD that comes with the PC Card Note Some PC cards do not support PnP Plug and Play facility refer to the user s guide before using them Removing PC cards Warning Before removing a PC Card stop it running from the configuration utility ...

Страница 39: ...ck Pro SD Secure Digital and MMC cards Chapter 3 System configuration 3 1 Install drivers We provide a driver CD with all drivers that you need in the box You can install drivers from the CD Follow the following steps to install drivers on your computer We assume that the CD Rom is E Disk Note Adhere to the following sequence Otherwise It can ...

Страница 40: ...to complete the installation 3 1 2 Install graphic card driver Insert the driver CD Select Startà RunàBrowse to open the correct path For integrated graphics E WinXP VGA Intel Setup exe For discrete graphics E WinXP VGA Nvidia Setup exe In the installation screen follow the instruction to start files copying process At the end of installation select Yes I want to restart my computer now and click ...

Страница 41: ...e files copying process and complete the installation Then System Settings Change will ask Do you want to restart your computer now Click Yes to restart your computer Installation is finished when you see SUCCESS in device driver installation wizard interface 3 1 5 Install EnergyCut Insert the driver CD Run E WinXP EnergyCut Setup exe In the installation screen follow the instruction to start the ...

Страница 42: ... Run E WinXP touchpad Setup exe In the installation screen follow the instruction to start the files copying process At the end of installation select Yes I want to restart my computer now and click Finish to restart your computer The system will restart to complete the installation 3 1 9 Install card reader drive Insert the driver CD Run E WinXP CardReader Setup exe In the installation screen fol...

Страница 43: ... the files copying process At the end of installing select Yes I want to restart my computer now and click Finish to restart your computer The system will restart to complete the installation 3 1 12 Install Bluetooth driver Insert the driver CD Enable Bluetooth device by pressing Fn F5 before installing the driver Run E WinXP Bluetooth Setup exe In the installation screen follow the instruction to...

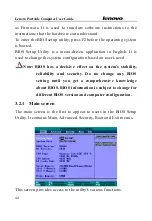
Страница 44: ...the system configuration based on user s need Note BIOS has a decisive effect on the system s stability reliability and security Do no change any BIOS setting until you get a comprehensive knowledge about BIOS BIOS information is subject to change for different BIOS version and computer configuration 3 2 1 Main screen The main screen is the first to appear to users in the BIOS Setup Utility It con...

Страница 45: ...Exit the current menu enter the Exit menu Scroll through the items on a menu or scroll through menus Change Values Enter Press to enter menus and submenus F9 Setup Defaults setting F10 Save current setting and Exit 3 2 2 Main menu Time and Date You can set your System Time and System Date through the Number key 3 2 3 Advanced menu ...

Страница 46: ...sor is duo core 2 Num Lock Select Power on state for Num Lock By default the setting is Off 3 Plug Play O S Select the operating system installed on your system 4 USB Legacy Support This item allows you enable support for USB devices 5 USB Host Controller Allow you enable or disable USB Host Controller 3 2 4 Security menu ...
Страница 47: ...isor password A password is required to access the BIOS setup menus if the password has been set To set the Supervisor password highlight this field and press t he Enter key The following dialog box appears Type the password and press the Enter key You can type up to eight alphanumeric characters Symbols and other keys are ignored To confirm the password type the password again and press the Enter...

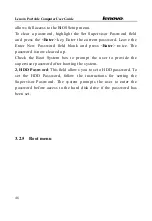
Страница 48: ...nk and press Enter twice The password is now cleared up Check the Boot System box to prompt the user to provide the supervisor password after booting the system 2 HDD Password This field allows you to set a HDD password To set the HDD Password follow the instructions for setting the Supervisor Password The system prompts the user to enter the password before access to the hard disk drive if the pa...

Страница 49: ...how the Boot Menu 3 Boot Time Diagnostic Screen Choose the logo screen or the diagnostic screen during boot 4 Preboot Execution Environment Choose it if Boot from network server 5 Boot Device Priority The BIOS loads the operating system from the disk drives in the sequence selected When you highlight this item and press Enter you can see the following menu ...

Страница 50: ...Lenovo Portable Computer User Guide 50 Press the Up and Down arrow keys to select which component is used for the boot device then use F5 and F6 to confirm the boot order of the device 3 2 6 Exit menu ...

Страница 51: ...the BIOS setting to factory default setting Discard Changes Discard all the changes which you have made Save Changes Save all the changes which you have made 3 3 Hardware configuration and component standard CPU l Intel CPU l µFCPGA encapsulation Chipset l North Bridge Intel 945 GM PM l South Bridge Intel ICH7 M l VGA nVIDIA only for 945PM System RAM l Support DDRII533 667RAM l Up to 4G Hard Disk ...

Страница 52: ...5 l One DC IN Jack l One VGA Port l One Headphone Jack l One Microphone in Jack l 3 USB 2 0 Ports l One IEEE 1394 4pin Port l One infrared port l One 4 in 1 Card Reader Memory Stick Memory Stick Pro MMC Secure Digital Communication Device l Built in 10M 100M Ethernet Card l Built in 56Kbps Modem Weight l Weight with battery pack 2 2Kg the weight might vary due to l vendor components manufacturing ...

Страница 53: ...Lenovo Portable Computer User Guide 53 l Battery Li ion l Adaptor 3 Pin ...

Страница 54: ...p your critical data on the notebook computer to ensure the data safety and security 4 1 1 Take care of using the computer Do not disassemble the computer Contact your provider immediately when you encounter problems Do not place any heavy objects on the LCD cover The LCD is easy to scratch Do not wipe the LCD with paper or touch it with fingers or pens We recommend you to select Turn Off the Disp...

Страница 55: ... the computer at least 13cm away from electric appliances which have strong magnetic radiations such as TV set refrigerator motor or large speakers Do not move the computer from a cold environment to a warm place suddenly When the temperature difference is over 10 condensation phenomenon will happens inside the computer and damage storage media Do not place the computer on an unbalanced surface 4 ...

Страница 56: ... 4 1 5 For outdoor use Backup you critical data before you take your computer outdoors Ensure that the battery is full Be sure to turn off the power and close the LCD well Do not leave anything between closed LCD and keyboard When you leave the computer in your car place it on the back seat to avoid being insolated Carry the AC adapter and power cord with the computer Do not place the computer in ...

Страница 57: ...shooting 4 2 1 The computer does nothing when you turn it on Do as follows l See if the AC adapter and its power cord are well connected to the computer and power outlet l Check the battery s power status some battery has a power self checking button See if the battery interface is defiled or if the power cord plug is defiled l Use the battery and AC power to power the computer respectively Turn t...

Страница 58: ... and save it Restart the computer 4 2 3 The computer halts or reports error when you install software or applications from CD or other storage media l Check the surface of the CD or other storage media Try the CD or other storage media in other notebook computers l Read the user s guide of the software you want to install and see whether it is compatible with the operating system on you computer l...

Страница 59: ... port configuration meets the requirements of the printer You can check this in BIOS and in the operating system l See if your printer can print normally when it is connected with other notebook computers l See if a printer of other model can print normally when it is connected with your notebook computer If the methods above do not work contact Lenovo licensed service agencies 4 2 5 A peripheral ...

Страница 60: ... contact Lenovo licensed service agencies 4 2 6 You can not dial up with the computer l See if the telephone cable is well connected to the Modem port on the computer l See if you have hung up your telephone and extensions l If you are using ISDN see if the ISDN devices are working well l See if your telephone cable is working well and can dial an outside number l If you are using an extension lin...

Страница 61: ... user s guide of the software and make sure other peripheral devices called during the operation of these programs can operate normally l Shut down other operating software so as to remove conflicts among software l If the software can t operate normally uninstall it Restart the computer and install it once more 4 2 8 Battery service time is too short l See if it s charged fully l See if the batte...

Страница 62: ...d Do not disassemble your computer do not maintain repair or restructure the computer by yourself or by agencies that are not licensed by Lenovo Contact Lenovo licensed service agencies for maintenance and repair services You can get free or charging services on the basis of Lennon s service policies You also can contact service support systems of Lenovo to get more service information 4 3 1 Warra...

Страница 63: ...heir telephone numbers is available at www lenovo com support phone For more details refer to Safety and warranty guide Note The contact information is subject to change If there is any change we ll not give any additional notification Conform to the latest telephone numbers web site address or addresses released by Lenovo Group Keep the guide well for future use ...

Отзывы: