2. Remove the computer cover. See “Removing the computer cover” on page 106.
3. Remove the front bezel. See “Removing and reinstalling the front bezel” on page 107.
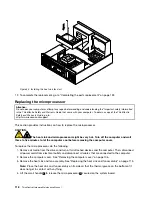
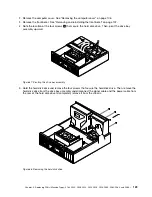
4. Note the location of the four screws
1
that secure the hard disk drive. Then, pivot the drive bay
assembly upward.
Figure 67. Pivoting the drive bay assembly
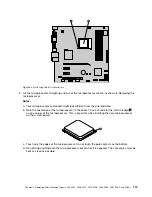
5. Hold the hard disk drive and remove the four screws that secure the hard disk drive. Then, remove the
hard disk drive from the drive bay assembly and disconnect the signal cable and the power cable from
the rear of the hard disk drive to completely remove it from the chassis.
Figure 68. Removing the hard disk drive
Chapter 9
.
Replacing FRUs (Machine Types: 4163, 5042, 5046, 5052, 5054, 5056, 5058, 5060, 5062, 5064, and 5066.)
129
Содержание ThinkCentre M75e
Страница 2: ......
Страница 15: ...Chapter 2 Safety information 9 ...
Страница 16: ... 18 kg 37 lbs 32 kg 70 5 lbs 55 kg 121 2 lbs 10 ThinkCentre Hardware Maintenance Manual ...
Страница 20: ...14 ThinkCentre Hardware Maintenance Manual ...
Страница 21: ...1 2 Chapter 2 Safety information 15 ...
Страница 22: ...1 2 16 ThinkCentre Hardware Maintenance Manual ...
Страница 28: ...22 ThinkCentre Hardware Maintenance Manual ...
Страница 29: ...1 2 Chapter 2 Safety information 23 ...
Страница 33: ...Chapter 2 Safety information 27 ...
Страница 34: ...1 2 28 ThinkCentre Hardware Maintenance Manual ...
Страница 38: ...32 ThinkCentre Hardware Maintenance Manual ...
Страница 42: ...36 ThinkCentre Hardware Maintenance Manual ...
Страница 76: ...70 ThinkCentre Hardware Maintenance Manual ...
Страница 106: ...100 ThinkCentre Hardware Maintenance Manual ...
Страница 140: ...134 ThinkCentre Hardware Maintenance Manual ...
Страница 308: ...Windows Vista Home Basic FRU CRU MT 5063 302 ThinkCentre Hardware Maintenance Manual ...
Страница 312: ...306 ThinkCentre Hardware Maintenance Manual ...
Страница 317: ......
Страница 318: ...Part Number 0A22749 Printed in USA 1P P N 0A22749 0A22749 ...


