Replacing the storage drive
Attention:
Do not open your computer or attempt any repair before reading and understanding the “Read
this first: Important safety information” on page iii.
For M700z
To replace the storage drive, do the following:
1. Remove any media from the drives and turn off all connected devices and the computer. Then,
disconnect all power cords from electrical outlets and disconnect all cables that are connected to the
computer.
2. Place a soft, clean towel or cloth on the desk or surface. Hold the sides of your computer and gently lay
it down so that the screen is against the surface and the cover is facing up.
3. Remove the computer stand. See “Replacing the computer stand” on page 60.
4. Remove the computer cover. See “Removing the computer cover” on page 65.
5. Remove the system-board shield. See “Replacing the system-board shield” on page 66.
6. Remove the VESA mount bracket. See “Replacing the VESA mount bracket” on page 68.
7. Locate the storage drive. See “Computer components” on page 7.
8. Disconnect the cable from the storage drive.
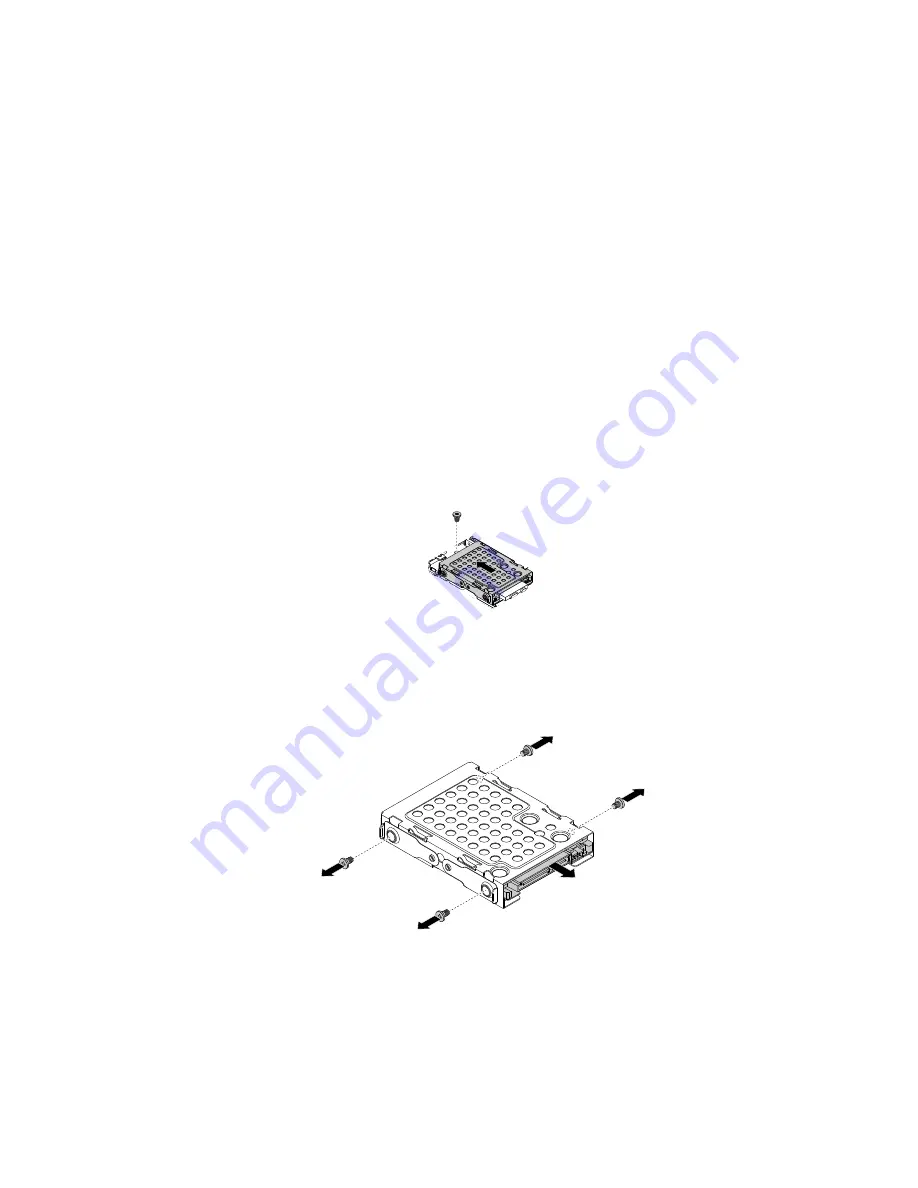
9. Remove the screw, and then slide the storage drive bracket out of the chassis as shown.
Figure 34. Removing the storage drive bracket
10. Remove the four screws that secure the storage drive to the bracket, and then slide the storage drive
out of the bracket. Do not touch the circuit board on the bottom of the hard disk drive.
Figure 35. Removing the storage drive
11. Position the new storage drive in the storage drive bracket so that the four screw holes in the hard disk
drive align with the corresponding holes in the bracket. Then, install the four screws to secure the
hard disk drive to the bracket.
12. Slide the storage drive bracket with the new hard disk drive on the chassis so that the screw hole
in the bracket aligns with the corresponding hole in the chassis. Then, install the screw to secure
the bracket to the chassis.
Chapter 7
.
Installing or replacing hardware
69
Содержание ThinkCentre M700z
Страница 1: ...ThinkCentre M700z and M800z User Guide Machine Types 10ET 10EU 10EV 10EW 10EY and 10F1 ...
Страница 10: ...viii ThinkCentre M700z and M800z User Guide ...
Страница 44: ...34 ThinkCentre M700z and M800z User Guide ...
Страница 46: ...Figure 16 Kensington style cable lock for M700z 36 ThinkCentre M700z and M800z User Guide ...
Страница 50: ...40 ThinkCentre M700z and M800z User Guide ...
Страница 94: ...84 ThinkCentre M700z and M800z User Guide ...
Страница 98: ...88 ThinkCentre M700z and M800z User Guide ...
Страница 106: ...96 ThinkCentre M700z and M800z User Guide ...
Страница 109: ...Appendix D China Energy Label Copyright Lenovo 2015 99 ...
Страница 110: ...100 ThinkCentre M700z and M800z User Guide ...
Страница 112: ...102 ThinkCentre M700z and M800z User Guide ...
Страница 115: ......
Страница 116: ......


